
InspectAPedia® FREE Encyclopedia of Building & Environmental Construction, Diagnosis, Maintenance & Repair |
Question? Just ask us! InspectAPedia
|
 How to Prepare a Wood Surface for Exterior Paints or Stains
- POST a QUESTION or COMMENT about surface preparation to assure a durable paint job
Preparing a wood surface for successful painting:
This article provides details about wood surface preparationbefore paint or stain application in order to assure a successful job.
A successful paint or stain job means that the result looks good and is durable.
InspectAPedia tolerates no conflicts of interest. We have no relationship with advertisers, products, or services discussed at this website.
How To Prepare a Wood Surface Before Painting or Staining
 This article series discusses best practices construction details for building exteriors, including water and air barriers, building flashing products & installation, wood siding material choices & installation, vinyl siding, stucco exteriors, building trim, exterior caulks and sealants, exterior building adhesives, and choices and application of exterior finishes on buildings: paints, stains.
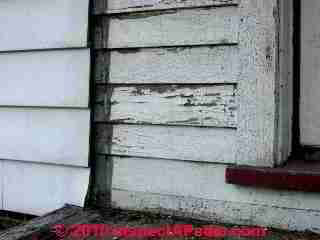
Photo: complete loss of adhesion of large areas of new paint under investigation by the editor [DF] - even the best-quality paint will fail to adhere to a poorly-prepared surface.
[Click to enlarge any image]
This article series includes excerpts or adaptations from Best Practices Guide to Residential Construction (Steve Bliss, J Wiley & Sons) , by Steven Bliss, courtesy of Wiley & Sons.
Failure to properly prepare a surface to receive new paint is the most frequent cause of paint job failures.
We discuss this problem at PAINTING MISTAKES. Also take a look at our field investigation of an expensive paint job that failed for just this reason,
at PAINT FAILURE CASE PHOTOS, SITE. Rather than clean and strip thick, old alligatored (and lead-containing) paint from an older building surface, the low-budget painter simply skim-coated the entire building with a crack filler and then painted over that.
The paint job failed so fast that paint was falling off of the building walls even before all of the walls had been painted.
How long a finish will last depends on many variables, including the quality of the finish, type and texture of wood, application conditions, and exposure. South- and west-facing walls get the most sun and are, therefore, often the first to need recoating. Whether painting, staining, or finishing in any manner, the FPL makes the following recommendations:
Make Sure of Proper Wood Moisture Content Before Painting
Never paint wood with a moisture content over 20%. Ideally, the wood should be painted at its average moisture content for that climate - about 12% for most of the United States, 9% for dry southwestern states (see Table 1-2).
At MOISTURE IMPACT on PAINT we provide additional details.

[Click to enlarge any image]
New Wood Surface Preparation For Painting
A rough-sawn wood surface will hold paint and stain much longer than a smooth, planed surface, which is why many contractors prefer to install siding rough side out. Also most lumber and siding today is flat-grained, which holds paint less well than vertical (or edge) grained.
The combination of flat grain and planing can create a burnished surface called “mill glaze,” which can cause problems with paint adhesion. To avoid problems, it is best to lightly sand with 50 to 80 grit sandpaper before painting smooth siding. The optimal approach is to first wet the lumber to raise its grain and then let it dry for two days before sanding.
Allowing Wood Siding to Weather Before Finishing
Some painters recommend letting smooth siding weather for a few weeks to open up the grain. However, research at FPL has shown that after two weeks of exposure, the wood surface begins to degrade and to loosen the wood fibers on the surface, which weakens the paint adhesion.
The FPL therefore strongly recommends painting within two weeks of installation, whether the rough or smooth side is facing out. If you need to paint wood that is badly weathered, the wood should be sanded, power rinsed, and allowed to dry before priming. Once the primer is dry, the top coat should be applied as soon as possible.
Wood Species and Wood Grain Affect Paint Success
In general, less dense woods hold paint better than more dense woods (see Table 1-12).
Also, within a single species, vertical-grain (also called edge-grain) wood holds paint much better than the more common flat-sawn lumber, primarily because flat sawn wood shrinks and swells more from changes in relative humidity.

Also vertical-grain wood has narrower bands of latewood, the denser and harder portion of each annual ring in a tree. When paint, particularly oil-based, becomes brittle with age, it tends to peel from the latewood.
Dense woods with wide, flat grain will present the greatest problems in holding paint. This is true for most hardwoods as well as dense softwoods with wide, flat grain, such as southern yellow pine and Douglas fir, especially if planed smooth.
Clean the Wood Surface Before Application of Paints / Stains
The best paint in the world can fail within the first year if applied over a wet, dirty, or degraded substrate. So the first priority is to make sure that the material being painted is sufficiently dry and clean.
Temperature and Time of Day Impact on Paint Job Success
Oil-based paints should be applied when it is over 40°F; for latex coatings the temperature should be at least 50°F during application and for 24 hours after. Also it is best not to apply paint too early or too late in the day.
If the dew has not evaporated in the morning, both oil and latex may have adhesion problems. If applied within two hours of sunset and a heavy dew forms before the paint dries, latex paints may streak and oil-based paints may not cure properly.
Use of Sealers on New Wood Before Painting or Staining - Water Repellent Preservatives (WRPs)
For the best protection of the underlying wood and the longest lasting finishes, bare wood should be sealed with a water-repellent preservative (WRP) before priming and painting or staining. WRPs contain a small amount of wax or other water repellent and a mildewcide, fungicide, or both, usually in a solvent base.
The preservatives help prevent mildew and decay in above-ground applications but are not meant for ground contact. Some WRPs contain UV blockers as well, which slow down the degradation of the outer wood fibers.
While sometimes formulated as a finish treatment for siding, some WRPs can be used as a pretreatment for painting and are recommended for that use by the USDA Forest Products Laboratory (FPL) and Western Wood Products Association (WWPA). Research shows that WRPs resist water entry better than acrylic primers.
On bevel siding, they also reduce warping, splitting, and mildew growth. They can also improve paint performance on hard-to-paint woods, such as southern yellow pine and Douglas fir.
In new construction, the FPL recommends that siding and trim be coated on all sides with a paintable WRP such as DAPWoodlife® or Cuprinol’s Clear Wood Preservative, preferably by dipping or with a brush, roller, or pad.
If the siding or trim is already installed, they suggest treating all places vulnerable to water entry, including door bottoms, window sills, lap and butt joints, edges and ends of trim, and any end grain on panel products such as plywood sidings.
If used as a pretreatment for paint, apply to bare, dry wood when it is above 50°F, and use only a single coat or excess wax buildup on the surface could affect the paint adhesion.
Allow two days of warm weather to dry, or up to a week if the material was dipped. If painted before the solvent has evaporated and the wax absorbed, the paint can be discolored and not bond well.
Importance of Priming New Wood Before Painting or Staining
All paints and most solid stains require priming on new wood. Primers are formulated with a higher ratio of binder to pigment than paints. [This means that there is more binder and less pigment in a primer than in a finish-coat of paint - Ed.] The primer forms a durable film that bonds well to the surface and blocks water.
However, without much pigment, it offers limited UV protection.
For woods with water-soluble extractives, such as cedar and redwood, use an oil-based primer or a stain blocking acrylic primer formulated to seal in the extractives. Also use a stain-blocking primer on any knots. Otherwise the extractives can bleed through the finish and stain the siding. For wood species relatively free of extractives, use a 100% acrylic latex primer. If sprayed or rolled on, back brushing is recommended for a good bond.
Many manufacturers now sell siding and trim preprimed. In addition to the convenience for the contractor, the factory-applied coating is applied uniformly without the risk of bad weather or other job-site variables. The only concern is the thickness of the primer. While most major manufacturers of preprimed siding do a good job, some third-party pre finishers may ship material with too thin a coating. In general, the primer should be 1.5 to 2 mils thick—thick enough that it hides the wood grain.
Use a Paint or Stain Primer Compatible with the Paint or Stain Top Coat
Watch out: as we discuss
at PAINT / STAIN SELECTION & PROCEDURES,
be sure that the primer you select for your paint job is compatible with the type of coating you intend to use for the top-coat. Read the manufacturer's label-instructions and check with your paint supplier. Painting some top coats atop the wrong primer is a guarantee of a failed paint job that shows up as wrinkling, cracking, or loss of adhesion of the building coating.
For example, if a solvent in the top coat is incompatible with the primer coat, it may cause the primer to dissolve, lose adhesion, or wrinkle. And if the chemistry of a primer is not compatible with a top coat, the top coat may simply fail to properly adhere to the primer.
We like alkyd paints because of their compatability: alkyd-based paints can generally be applied over either older oil-based painted surfaces or over latex based paints, reducing the need to strip otherwise sound paints from an older building surface.
If you don't know the chemistry of the paint on a building exterior, using an alkyd primer will help assure a good bond to the old surface, even if your final top coat is going to be latex.
Finally, don't use an indoor-rated paint on a building exterior. Interior paints not intended for outdoor use may lack adequate UV protection, weather resistance, or a binder and adhesion necessary for success on an outdoor surface exposed to the weather. - Ed.
Role of Back Priming Wood Building Siding or Trim
Most paint failures are related to moisture moving through the wood either from wind-driven rain that reaches the back of the siding or moisture escaping from the house. In some cases exposed end grain picks up moisture and causes localized peeling.
Use of a water repellent preservative or primer on the back of the siding and on all edges and cut ends, in addition to the visible face, will minimize these problems. Sealing the wood properly also helps prevent moisture from being driven through the siding by solar radiation.
When to Apply Paint Top Coats on Building Exteriors
For paints and solid stains, apply the top coat as soon as the primer is dry but not more than two weeks later. For best performance, apply two top coats. Latex paints can typically be recoated within a few hours.
Oil must cure for one or two days between coats. Apply paint at the coverage recommended on the can. Too thin a coat will wear quickly and too thick a coat may crack.
While brushing provides the best adhesion, a properly done spray job can yield good results. When spraying or rolling, the best results are achieved by back-brushing the paint to help work it evenly into the wood, particularly on rough-sawn surfaces.
Tips for Painting or Staining Pressure-Treated Wood: CCA, AZCA, ACQ Treatments
Wood that is pressure-treated with waterborne preservatives, such as chromated copper arsenate (CCA), ammoniacal copper zinc arsenate (AZCA), and ammoniacal copper quaternary (ACQ), present special problems for painted finishes.
First, pressure-treated lumber is often shipped to lumberyards with very high moisture contents. If painted while wet, the moisture may get trapped by the paint film and cause peeling. Also the species most commonly pressure treated— flat-sawn southern yellow pine in the eastern United States and Douglas fir and Ponderosa pine in the West—do not hold paint well to begin with.
Whether or not you intend to paint the wood, pressure treated exterior trim should be sealed with a water repellent preservative as soon as the surface is sufficiently dry. This will protect cut ends and help keep the wood from checking, cupping, and warping as the wood dries out. If this is the only treatment, it will need recoating every one to two years.
Factory-sealed treated lumber is now available that only requires treatment of cut ends when installed.
The most common treatment for pressure-treated wood is an oil-based, semitransparent stain. Since this type of finish is relatively permeable to moisture, for best results apply it over a sealer or over factory-sealed lumber. While the sealer can be applied to wood that is still wet inside, it is best to air dry the wood before staining.
This will take from a few days to a few weeks, depending on conditions, with two weeks on average. Two coats of an oil based, semitransparent stain over a sealer should last several years. The second coat should be applied before the first coat dries completely, or the second coat cannot penetrate the wood.
If a painted finish is desired, you will need to seal the wood first and allow it to dry for two to three weeks before applying a compatible primer and two coats of 100% acrylic top coat.
The longer the wood dries, however, the greater the risk that UV radiation will damage the wood surface, interfering with the paint’s adhesion. To avoid these problems and the long delays, consider using kiln dried treated lumber that can be finished immediately.
8-Step Preparation of Old Painted Surfaces to Receive New Paint
- Avoid painting mistakes: Do not fail to read the catalog of ways to foul up a paint job listed
at PAINTING MISTAKES.
- Clean the building surface. If you use power-washing, don't spray water up under clapboards or siding where you'll soak the building wall cavity, and be sure that all surface areas are dry before going to the next step.
- Remove loose paint. Watch out: if the age of the building means it has paint applied before 1978 there is almost certainly lead paint present, and you'll need to take proper precautions.
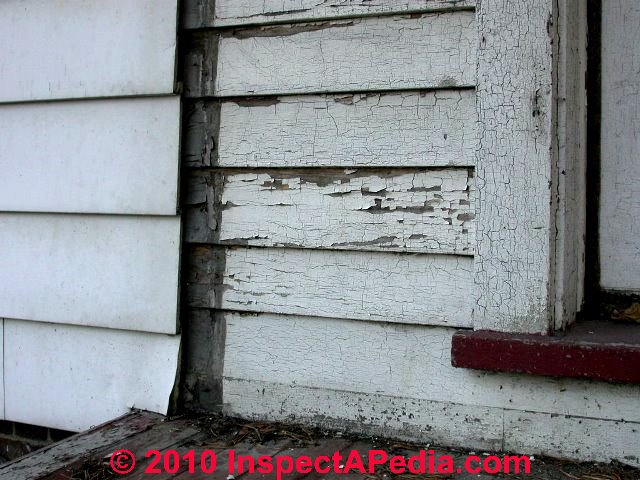
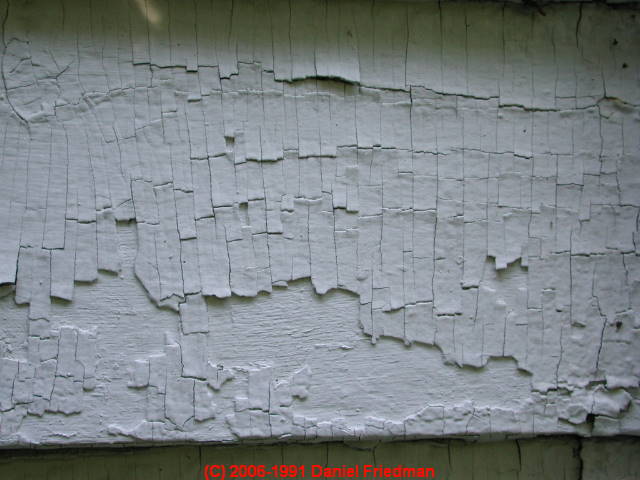
- Remove alligatored paint (such as in our photo at left).
- Remove cracked paint. It has lost its elasticity and will quickly crack the new painted surface.
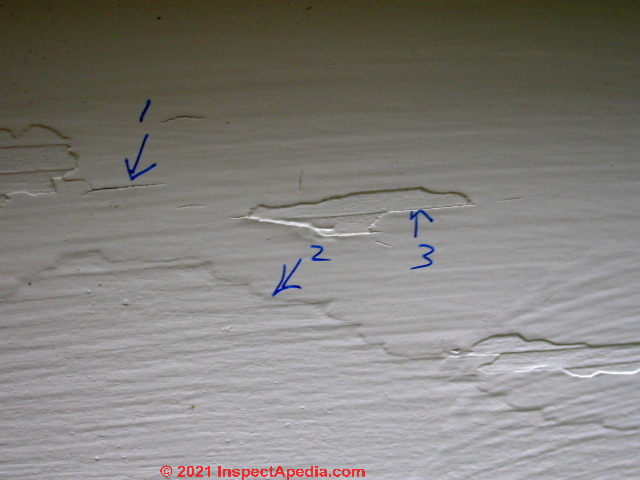
Photo above: during a consult concerning paint failure on a building we pionted out the effects of failure to adequately feather edges of areas where old paint remains.
- Feather edges of old paint: Where loose paint has been removed, sand or use a sharp scraper to feather the edges of remaining old paint that is sound and is being left in place.
- Use a primer: on new wood use a suitable primer including, where the wood contains heartwood or knots or other water-soluble extractives, using a primer labeled by its manufacturer as "extractive bleeding blocker".
Give strong consideration to using a primer to improve adhesion between the old painted surface (and any bare wood) and the final top coat. - Apply the finish coats of paint: by actually reading and following the manufacturers instructions.
For wonderfully-detailed painting advice see
Chapter 16, Finishing Wood, in WOOD HANDBOOK [PDF] U.S. Forest Products Laboratory, (2010) retrieved 2021/06/19 original source: https://www.fpl.fs.fed.us/documnts/fplgtr/fpl_gtr190.pdf
At PAINT FAILURE, DIAGNOSIS, CURE, PREVENTION you'll find a description of exterior conditions that can ruin a new paint job like painting over a damp surface, or in hot sun.
- - Adapted with permission from Best Practices Guide to Residential Construction (Steve Bliss, J Wiley & Sons) , content expanded from US FPL Wood Handbook & by InspectApedia.com editor.
Reader Comments, Questions & Answers About The Article Above
Below you will find questions and answers previously posted on this page at its page bottom reader comment box.
Reader Q&A - also see RECOMMENDED ARTICLES & FAQs
On 2020-08-06 by (mod) - prime all sides of wood
Great question,
in my opinion priming all of the sides of the wood will reduce moisture uptake and make the door more stable
On 2020-08-06 by Les Tomlinson
Should I prime T and G pine wood before assembly into a door ?
Then paint after assembly
On 2020-07-08 by ASH Green
ASH Green said:
One of the best articles that I’ve read in a very long time! I Took notes and surely gonna implement and test bunch of stuff you talked about.
You’re a beast! Cheers,
On 2018-05-20 - by (mod) -
As you may know weathering to a gray color is considered normal. If you don't like the very two parents that I agree that you may want to apply a great preservative stain. With that product you shouldn't need a primer. Use a pigmented penetrating stain. Keep in mind that even applying the stay in the colors are not going to be uniform on your house. I would also be careful about power washing as you can raise Grain, Drive water into the wall and damage of siding.
On 2018-05-19 by CATHY
I have a spruce board and batton house that I built in 2014. It has never been treated and parts are turning grey. I think best bet is to use solid stain to cover up the discoloration, but what should I use before I stain ..Wrp ? If so what is a good brand. I live in northern maine close to canadian boarder.
Tks !
On 2017-09-08 by Tina
Previously. I primed all sides of some pine new siding. It is holding up very well. We are now installing new pine siding. I have decided to paint all sides unless I just don't know if maybe it is not the best way to go. Thank you
On 2017-08-05 by Susan
I had to replace some 2X4's on my deck. Used new lumber. Sealed the old and new with clear wood preservative, zinc naphthenate. Now want to paint (or stain) the entire deck surface. What type of product should I use?
Question: plans for using an alkyd paint on an outdoor deck
(July 11, 2015) old school said:
I am going to re-paint a outdoor deck. In the N.W. Half the deck is exposed to sun, rain, snow and serious dew. After reading the information here, I am going with a alkyd paint. Unless someone suggest otherwise. The current coating has good adhesion and no cracking. But it is weather damaged from rain and sun.
Reply:
Old
Just watch for creating slippery surfaces.
Question: how to dry out a board at wall bottom to prep for painting - need a quick fix
3 Novemb er 2015 Ssusan said:
I have garage trim board that has wicked up moisture about 4 to 5 inches up off the driveway. Have sanded, primed and painted in the past (the bad spot) and it continues to (after a while) bubble the paint and then the paint peals off. I am not ready to replace the board as it involves removing garage door trim, etc. Need a quick fix on how or what to use to dry out that portion of the wood before I prime and paint again. Thanks.
Reply:
When weather permits, perhaps a box fan blowing along the board. But frankly if the board is at ground or in ground contact it's not going to be durable and there's a risk of hidden insect attack and rot.
...
Continue reading at PAINT / STAIN SELECTION & PROCEDURES or select a topic from the closely-related articles below, or see the complete ARTICLE INDEX.
Or see these
Recommended Articles
- ARTWORK MOLD CONTAMINATION - mold on paintings or other works of art
- HARDBOARD MASONITE™ & OTHER BRANDS - includes HARDBOARD & MASONITE USED in WORKS OF ART
- LEAD POISONING HAZARDS GUIDE
- PAINT & STAIN LIFE CHART that gives typical life expectancies of building exterior coatings on different types of wood surfaces.
- PAINT & STAIN SELECTION & PROCEDURES
- PAINT FAILURE, DIAGNOSIS, CURE, PREVENTION - home
- PAINT FAILURE DICTIONARY - illustrated list of all types of paint failures
- PAINT FAILURE INDICATORS
- PAINTING MISTAKES
- PAINT SURFACE PREPARATION
- SIDING, WOOD CLEANERS, STAINS, PAINTS - how to remove stains on siding & how to choose the proper paint or stain coating - formulas for bleach solution used to clean wood siding or trim stain
Suggested citation for this web page
PAINT SURFACE PREPARATION found at InspectApedia.com - online encyclopedia of building & environmental inspection, testing, diagnosis, repair, & problem prevention advice.
Or see this
INDEX to RELATED ARTICLES: ARTICLE INDEX to PAINTS & STAINS & FAILURES
Or use the SEARCH BOX found below to Ask a Question or Search InspectApedia
Ask a Question or Search InspectApedia
Try the search box just below, or if you prefer, post a question or comment in the Comments box below and we will respond promptly.
Search the InspectApedia website
Note: appearance of your Comment below may be delayed: if your comment contains an image, photograph, web link, or text that looks to the software as if it might be a web link, your posting will appear after it has been approved by a moderator. Apologies for the delay.
Only one image can be added per comment but you can post as many comments, and therefore images, as you like.
You will not receive a notification when a response to your question has been posted.
Please bookmark this page to make it easy for you to check back for our response.
Our Comment Box is provided by Countable Web Productions countable.ca
Citations & References
In addition to any citations in the article above, a full list is available on request.
- Steve Bliss's Building Advisor at buildingadvisor.com helps homeowners & contractors plan & complete successful building & remodeling projects: buying land, site work, building design, cost estimating, materials & components, & project management through complete construction. Email: info@buildingadvisor.com
Steven Bliss served as editorial director and co-publisher of The Journal of Light Construction for 16 years and previously as building technology editor for Progressive Builder and Solar Age magazines. He worked in the building trades as a carpenter and design/build contractor for more than ten years and holds a masters degree from the Harvard Graduate School of Education. Excerpts from his recent book, Best Practices Guide to Residential Construction, Wiley (November 18, 2005) ISBN-10: 0471648361, ISBN-13: 978-0471648369, appear throughout this website, with permission and courtesy of Wiley & Sons. Best Practices Guide is available from the publisher, J. Wiley & Sons, and also at Amazon.com - Best Practices Guide to Residential Construction, by Steven Bliss. John Wiley & Sons, 2006. ISBN-10: 0471648361, ISBN-13: 978-0471648369, Hardcover: 320 pages, available from Amazon.com and also Wiley.com. See our book review of this publication.
- Benjamin Moore Paints, SURFACE PREPARATION [PDF] (2017). Coronado grand®
Acrylic latex paint & primer
Eggshell finish 702, retrieved 2021/06/19 original source: https://media.benjaminmoore.com/
Excerpt: Surface Preparation Surfaces to be painted must be clean, dry, and free of dirt, dust, grease, oil, soap, wax, scaling paint, water soluble materials and mildew. Remove any peeling or scaling paint, and sand these areas to feather edges smooth with adjacent surfaces. Glossy areas should be dulled. Drywall surfaces must be free of sanding dust.
Spot prime before and after filling nail holes, cracks, and other surface imperfections. New plaster or masonry surfaces must be allowed to cure (30 days) before applying base coat. Cured plaster should be hard, have a slight sheen and maximum pH of 10; soft, porous or powdery plaster indicates improper cure.
Primers: New surfaces should be primed where indicated. Previously painted surfaces should be spot primed as necessary. There are a number of specialty primers available in our family of brands that can be used on difficult substrates such as bleeding woods, hard glossy surfaces, or other substrates where paint adhesion or stain blocking is a problem. ... WARNING! If you scrape, sand or remove old paint, you may release lead dust. - Mark Cramer Inspection Services Mark Cramer, Tampa Florida, Mr. Cramer is a past president of ASHI, the American Society of Home Inspectors and is a Florida home inspector and home inspection educator. Mr. Cramer serves on the ASHI Home Inspection Standards. Contact Mark Cramer at: 727-595-4211 mark@BestTampaInspector.com
- John Cranor [Website: /www.house-whisperer.com ] is an ASHI member and a home inspector (The House Whisperer) is located in Glen Allen, VA 23060. He is also a contributor to InspectApedia.com in several technical areas such as plumbing and appliances (dryer vents). Contact Mr. Cranor at 804-873-8534 or by Email: johncranor@verizon.net
- APA - The Engineered Wood Association [Website: www.pacificwoodlaminates.com ], 7011 So. 19th St., PO Box 11700, Tacoma WA 98411-0700, Tel: 253-565-7265. APA provides an HDO/MDO Plywood Product Guide that offers details about these products., provides an HDO/MDO Plywood Product Guide that offers details about these products. Product support help desk: 253-620-7400. Email the APA at help@apawood.org. Web search 09/13/2010, original source: http://www.pacificwoodlaminates.com/img/PDFs/PlywoodGuide.pdf
- Our recommended books about building & mechanical systems design, inspection, problem diagnosis, and repair, and about indoor environment and IAQ testing, diagnosis, and cleanup are at the InspectAPedia Bookstore. Also see our Book Reviews - InspectAPedia.
- In addition to citations & references found in this article, see the research citations given at the end of the related articles found at our suggested
CONTINUE READING or RECOMMENDED ARTICLES.
- Carson, Dunlop & Associates Ltd., 120 Carlton Street Suite 407, Toronto ON M5A 4K2. Tel: (416) 964-9415 1-800-268-7070 Email: info@carsondunlop.com. Alan Carson is a past president of ASHI, the American Society of Home Inspectors.
Thanks to Alan Carson and Bob Dunlop, for permission for InspectAPedia to use text excerpts from The HOME REFERENCE BOOK - the Encyclopedia of Homes and to use illustrations from The ILLUSTRATED HOME .
Carson Dunlop Associates provides extensive home inspection education and report writing material. In gratitude we provide links to tsome Carson Dunlop Associates products and services.
 | HOME | ABOUT | ASK a QUESTION | CONTACT | CONTENT USE POLICY | DESCRIPTION | POLICIES | PRIVACY | |
| © 2024 - 1985 Publisher InspectApedia.com - Daniel Friedman | |||||||||