
InspectAPedia® FREE Encyclopedia of Building & Environmental Construction, Diagnosis, Maintenance & Repair |
Question? Just ask us! InspectAPedia
|
 Layout Using Batter Boards & String
How to Lay Out a Deck, Foundation or Other Structure
- POST a QUESTION or COMMENT about construction project layout, location, squaring & leveling
What are batter boards and how are they used to lay out a structure?
Here we describe the rough and then precise layout of any structure on the ground using simple stakes, boards, string, a level and a measuring tape.
This article series describes construction methods for getting your structure properly placed, plumb, level, and square.
InspectAPedia tolerates no conflicts of interest. We have no relationship with advertisers, products, or services discussed at this website.
How to Lay Out a Structure Using Batter Boards.
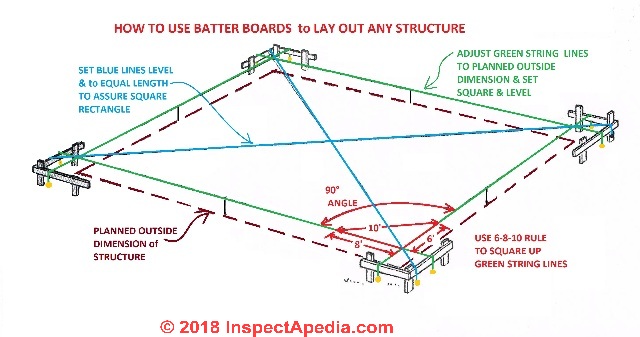 Our sketch summarizes the procedure for using batter boards and string to lay out any structure on the ground and to get the structure square, level, and exactly where you want it.
Here we'll give details of how to use this easy method to lay out a foundation, footing, deck, or just about any structure properly located, level, and square on the site.
[Click to enlarge any image]
Watch out: building a structure that's out of square is more than an aesthetic problem or an eyesore.
If by accident your structure is out of square or level (or both) then cutting and filling in the studs (if it's a wall), floor joists, ceiling joists, or rafters if it's a roof is going to be hell as every cut will have to be different, the plywood (sold in 4x8 ft. squares) you might use for sheathing isn't going to fit without trimming, and installing siding or roofing is also going to get really ugly.
Here we will describe the steps in laying out a simple building, deck, or foundation layout.
The procedure uses little more than stakes, boards, string, a carpenter's level, and a measuring tape, and ok, and maybe a mallet or sledge or hammer to drive stakes and to tap in a couple of nails.
Question: how do I build and use batter boards and strings to do a layout?
2018/07/14 George said:
I could use some drawings of the batter boards and strings layout for my deck project.
Reply: How to assemble and use batter boards.
George,
Excellent suggestion. We've published so many articles on the details of deck building that I've neglected a string and batter-board layout description.
We have placed this material on layout of any structure in between our article on doing a deck drawing - DECK PLAN & SKETCH - and DECK LAYOUT the article on attaching the ledger board - the home base from which most decks sprout.
Watch out: This batter-board and string procedure assumes that you have already done the following:
- Reviewed property zoning and setback restrictions to be sure that your structure is within lot lines and meets required set-backs.
- Obtained the necessary building permits and approvals to proceed.
- Set the general location for your deck - or see DECK LOCATION
- Made a rough and then as needed, a more-refined drawing of the end-product: deck, building, or whatever it is you're going to build - or see DECK PLAN & SKETCH - and DECK LAYOUT
Step 1: Rough Deck Layout
 Now we're ready to place the deck on the ground.
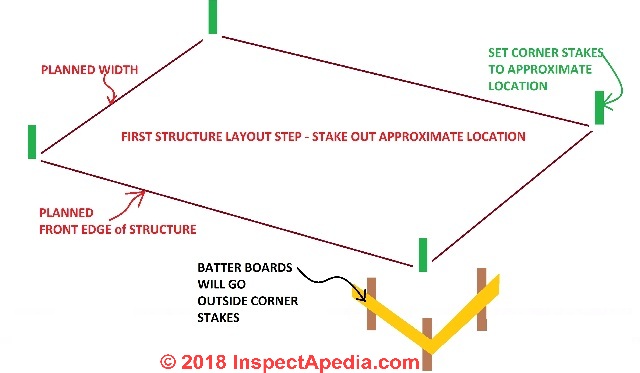
Start with setting the approximate deck location (sketch below) , paying careful attention to the front edge or to whichever side of the structure has a most-critical location, such as back from a property line or parallel to a building (or attached to it in which case your work will be simpler.
But even for an attached deck you will need to make accurate square and level and plumb measurements of the three sides of the deck that are to be built to the building.
Our sketch shows how to lay out the deck, building, or foundation location using string-lines, posts, and batter boards.
Though the first stake locations are just approximate (the green stakes in my sketch), you might want a tack in the top of each stake so that later they can be placed more-precisely according to string lines.
Watch out: take care to make all layout measurements from a single common point. Choose one corner, mark that "home" and take all tape measurements from there. Otherwise your measurements will contain errors.
Here we're laying out a new structure on open ground. If you're building a deck attached to a building, one end of the ledger board, bolted to the existing structure, will be your home base measurement point.
In our sketch the two green stakes along the line indicating the planned front of the structure are our first rough line. These are driven in a line parallel to the desired front face of the structure - from here on we'll call it a deck, though as I've said it could be a foundation for a home, or something else.
Step 2: Build the Batter Boards
Using 1x3 or 1x4 or similar lumber make three or four pointed stakes that are long-enough to drive into the soil securely and that will be tall enough that you can level your string lines over the ground. For very steep sites see "Referencing a high deck" found in DECK LAYOUT.
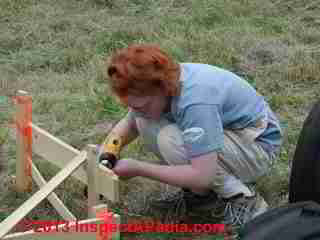
Below is a photo of worker K assembling one of the four sets of batter boards needed to lay out our project. For this project instead of building a single 90° batter board with three stakes, we used two independent batter boards each with its own pair of stakes.
Still the two batterboard halves need to be set into the ground at approximately a 90° angle to one another.
The batterboards do not need to be a precise 90° angle (though you can use a framing square to accomplish that quite easily). That's because we're going to be moving our string lines along the top of the batter boards to get our 90° angles for the structure's corner posts.
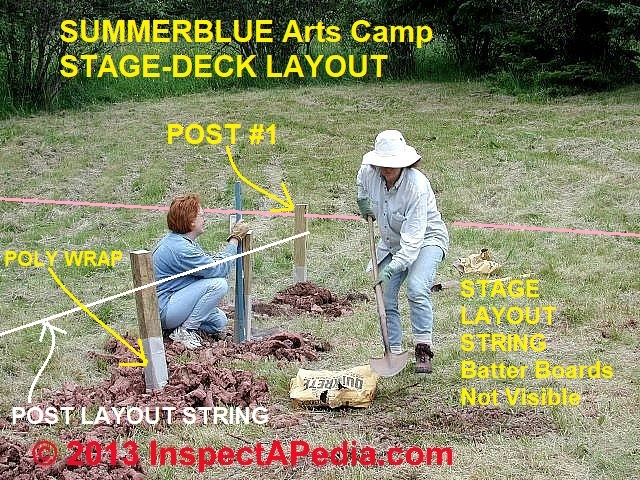
This project involved building a large, free-standing deck over gently-sloped terrain for the Summerblue Arts Camp in Two Harbors, Minnesota.
We first put out batter boards - stakes and horizontal wood strips - to mark the locations of the corners of the stage (not shown in this photo).
Step 3: Place the Batter Boards in the Right Location
We started by locating the front of the stage, picking one corner as the "home base" from which ALL other measurements are taken.
 Choosing and making measurements from a single point avoids ugly errors creeping into a deck or porch or foundation layout. Those errors can result in a structure that is not square.
After choosing the home base corner from which the rest of the stage would be located, we chose the front line of the stage to fit as wanted on the terrain which was certainly not level nor smooth.
Choosing the line of the front line of the stage plus its outer dimension, combined with our stage drawing plan (posts are set a bit in from the actual deck or stage final outer perimeter, we then set the spots for the second post, the sides, and the back line of the same rectangle by measuring in from the original layout string (pink in our photo).
All four of those locations are defined by driving the stakes and batter boards some distance outside of the actual perimeter of the final structure.
Typically we set the batter boards 3-4 feet back from the corners of the planned outside dimensions of the finished structure.
Watch out: the batter boards have to be large enough or long enough that when set back 3-4 ft. from the actual dimensions of the structure your string lines, laid across the tops of the batter boards, can be placed directly over the intended outer edge of the finished structure.
Then nails driven into the top edge of the batter boards, and some string, let us set the exact locations of the perimeter and of the posts.
Key is to locate the stake-and-batter-boards a few feet outside the actual desired post locations of the deck or stage corners.
Otherwise the batter board setup will be in the way when you go to dig or drill the post holes. Moving the batter boards to drill the post hole would lose all of the initial layout.
For this project, because a tractor and auger had to have access to drill our post holes, the batter boards were set well back from the actual post locations - which is why you don't see them in my photo.
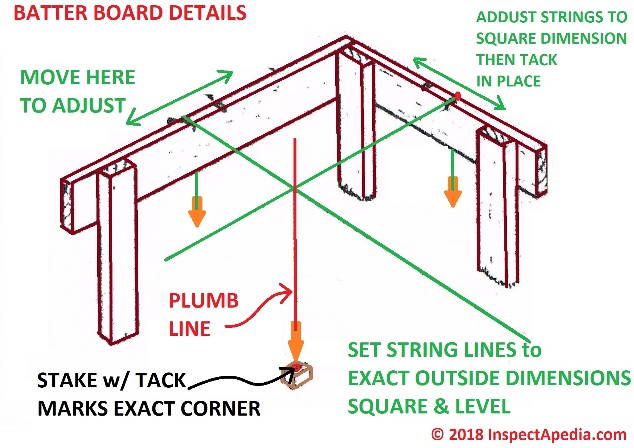
Step 4: Attach String Lines to the Batter Board Top Edges
Some builders hang the strings over the batter boards with weights to make adjustment easy. Others saw a notch in the top edge of the batter boards to mark the final string location.
To hold our strings in a temporary and later (after adjustment) in their final position we might also use finishing nails or even drywall screws that are easy to move and that don't split the boards.
Step 5: Adjust Batter Board String Lines to Form a Perfect Rectangle of Proper Size
Assuming that we want a rectangle and not an odd shape, after securing the front and right side string lines to our home base batter boards (the front right batter-boards in our sketch), we adjust the string positions on the remaining three batter boards until the string corners are
- Place the front string: The front string is over the intended or planned outside front edge of the finished structure (or of its supporting frame).
- Level the rectangle: check that the string lines are all level.
Watch out: if the string lines are not level then all of your measurement lengths will be in error - making them too long for the actual framed structure when it's assembled.
Well not always. For the stage-deck being constructed in some of these photos, the director wanted the deck to slope from its rear edge towards the front for theatrical reasons.
Similarly, for improved drainage you might want to slope a deck away from a building to which it is attached.
Still the right way to build a deiberately-sloped deck or porch is to first measure and lay it out leve, plumb, and square, and then calculate and measure the desired slope or drop.
For example, if you want your deck to slope 1/8" per foot over an 8-foot distance from high to low side, you would calculate (1/8" / ft. slope) x (8 ft distance) = 1" total fall. Then once your "low" end of the deck has been set square and level you'll drop the elevation of the low side by 1" from that point.
Watch out: Over a small deck or over a span between deck girders that is itself short, 8 ft. or less, that drop will be barely noticeable in cutting the joists to fit but for a large joist span you should double-check the length measurements before cutting your joists. - Square up the string rectangle: Using the 6-8010 rule discussed at DECK LEVEL PLUMB SQUARE-UP 6-8-10 RULE, we make sure that each string pair that meet forms a 90° angle
- Place the side strings front ends: The side string front ends are brought in or out along the top edge of the front sets of batter boards until we have the correct width of the front line.
Measuring the lengths of the sides and adjusting the strings over the batter boards, properly locate the sides over the planned outside dimension of the structure - Place the side string back ends: The side string back ends are brought in or out along the top edge of the rear sets of batter boards until we have the correct width of the rear line.
- Place the rear string line: The rearmost string is set across the top edge of the rear batter boards until it marks the proper width of the final structure.
- Check the side, front and rear measurements: We check again with our tape measure to assure that parallel sides are of equal length
- Check the square: We check squareness again by measuring the diagonals - equal lengths assures us that the four sides form a rectangle, not a trapezoid or other weird shape.
Below is a photo (click to enlarge) showing our layout strings during construction of the Summerblue Arts Camp Stage in Two Harbors Minnesota. This was basically a large free-standing deck.
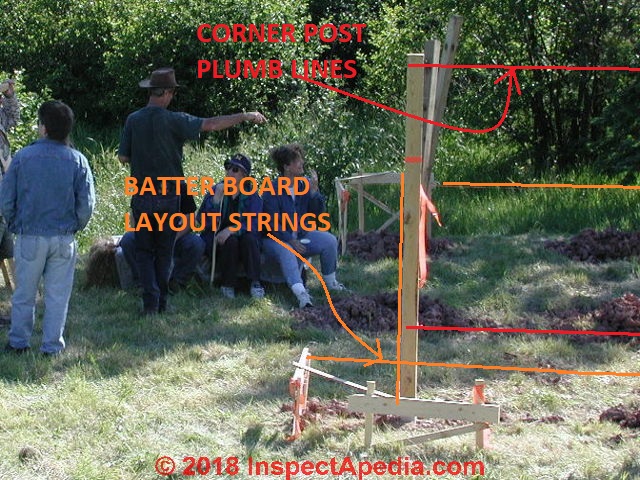
Step 6: Set Corner Post Holes According to the String Lines
- Mark the post hole: Using a plumb line held at the intersecting string corners we place a stake at the center of where each corner post hole should be dug.
- Dig the post hole: We dig the post holes to the proper depth and prepare the hole with a solid block, pier, or other details according to the construction plan and local codes
Each post hole, starting with the key corner posts, was centered on its desired spot - the hole center can be within a few inches of exact because we can adjust the post within the hole to its exact location along the string lines:
Watch out: Remember to put the bottom of your post below the frost line if you're in a freezing climate. Remember to get engineering help if you're building on a steep slope or in un-stable soils.
- Place the posts: The post holes were large enough that we could set each intermediate stage (or deck) post to its exact location by aligning it with the string now wrapped around our corner posts and pulled tight.
You can see one of the workers (A) setting post #2 dead plumb by using the level on two sides of the post (and taking into account if a post is not dead straight).
For this project, each post was set on a solid concrete block that was level in the hole bottom. - Backfill the posts: When worker (A) has the post in the exact position with its outer face flush with the string she holds it in place while the second worker (J) pours in our ready-mix Quickcrete (we were using holes without form tubes in this project).
After the Quickcrete was in place worker (J) back-filled with soil and tamped it down.
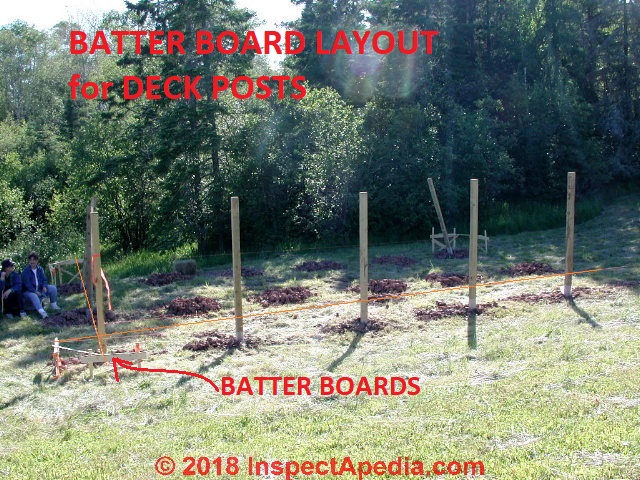
Step 7: Set Intermediate Post Holes Along the String Line
 If the structure requires intermediate posts, string lines between the corner posts are used to line up the intermediate ones.
Drop a plumb bob from the correct locations along the string line, always measuring from the same home base point, and then have your helper drive a small stake into the ground.
Continue measuring along the string line to find the remaining post hole locations.
In our photo we had set the first post at our home base - the stage front right corner in this case - and backfilled so that the post was absolutely solid and plumb.
Once the four corner posts were set, backfilled, and solid, correctly in place, then using the batter boards, the orange layout strings, and a measuring tape (and the deck plans) we used a second set of strings (red in the photo shown here and white in the earlier photo above) to give the exact location of the face of each post.
The horizontal ristance for the intermediate posts was set always by measuring with the dumb-end (starting point) of our measuring tape at the deck/stage home base corner.
At that point we drilled holes for the remaining posts. You can see the soil was dense clay so digging was out of the question. We hired a local post hole driller who had a huge auger mounted to his tractor.
In the photo above I'm the carpenter standing, pointing to his right, back to camera, giving instructions that are being pointedly-ignored by everyone else in the work crew.
Below: once our posts were set in approximate location and rough-trimmed to a few inches above their anticipated finish-height (to allow space for accurate cutting to level the structure), each post was held in exact position both from the corner as well as plumb. In that position the post-hole was back-filled with ready-mix concrete and then atop that, soil.
We discuss this deck post installation job at DECK POST CONSTRUCTION.
Because this structure was being built in a freezing climate, the buried portion of each post was wrapped in two layers of 6-mil poly - a measure to prevent frost lift of the posts by ice lensing.
Those details are at FOUNDATION DAMAGE by ICE LENSING.
Step 8: Secure Ledgers or Beams to the Posts
The sooner we can get framing attached to our rows of posts the more-securely they'll stay in line.
Below is a photo later in the construction of the Summerblue stage - once the posts were all in place we attached the three main deck beams.
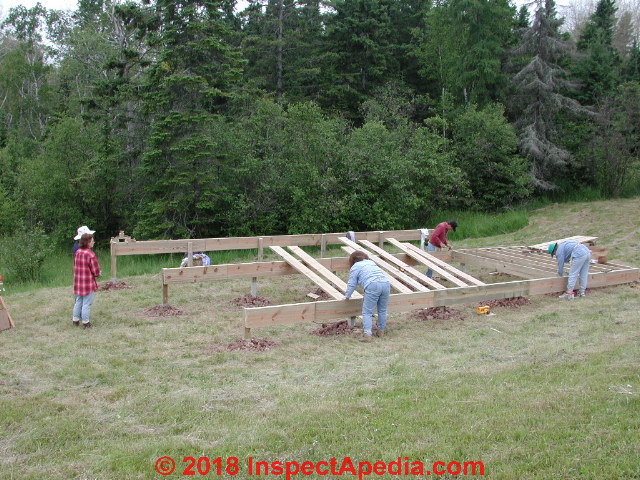
In our photo above workers are also tacking a few of our heavy 2" T&G treated wood deck board in place as a temporary brace to keep the three post and beam structures rigidly in place until the intermediate deck joists could be installed.
Continue Construction
The stage build project continued with joist installation (DECK JOIST INSTALLATION) and finally, the deck-floor installation (DECK FLOOR INSTALLATION).
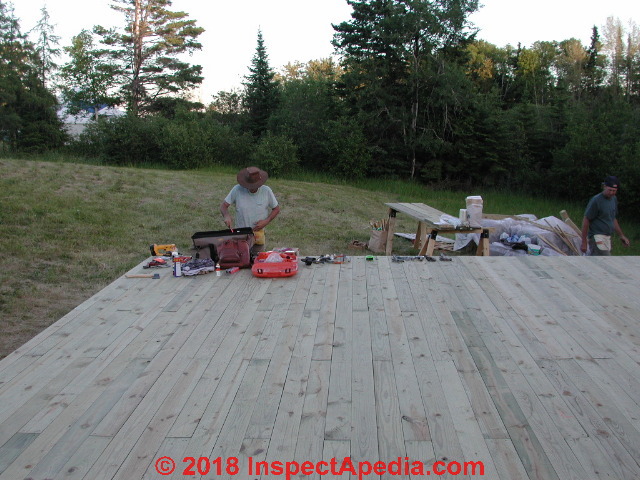
Below I'm packing up tools as we finished building this deck-stage in the summer of 2001.
Below is the finished stage in use in 2005.

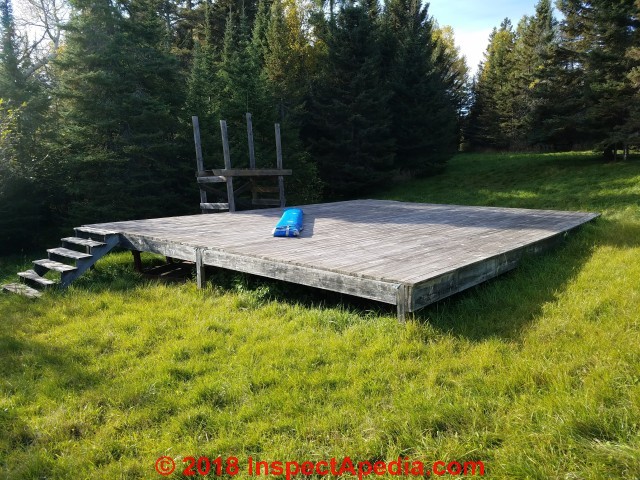
Below is the Summerblue Arts Camp stage in 2017, sixteen years later. There has been very little movement in the structure; it appears that ice-lensing was not a problem for our deck / stage posts.
Details: using the 6-8-10 Rule to Square Up Corners
Below: a recap of the 6-8-10 procedure for squaring up layout lines.
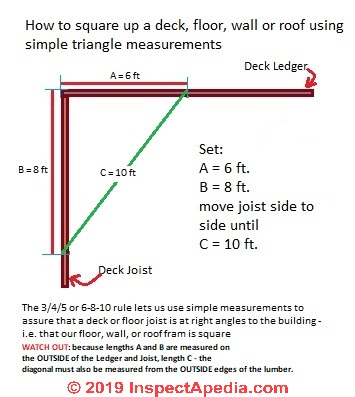
Details of procedures to square up string lines, framing, a deck or a foundation or even a roof are given in a practical example at DECK LEVEL PLUMB SQUARE-UP 6-8-10 RULE and in more technical and mathematical detail at FRAMING SQUARE-UP 6-8-10 RULE
Details: Checking the Diagonals for Square
If lengths B and A are NOT the same, then if B is too long, you would push the two ends of B closer together, deforming your trapezoid back towards being a perfect rectangle.
Keep adjusting until the two diagonals are the same length.

Watch out: if your diagonal measurements are not level your measurement distances will be in error.
Portions of this article discussing how to build, install, and use batter boards and string to layout a foundation, structure, or deck were adapted and expanded from:
- Cobb, Hubbard H. & Sigman-Ward, Your Dream Home: How to Build it for Less Than $3,500. Wm. H. Wise, & Co., Inc., New York, 1950.
Chapter 7 FOUNDATION of the HOUSE [PDF]
Sigman-Ward, architectural consultants, produced the original illustrations in that text. This book is out of print but you can read PDF versions of its chapters prepared by InspectApedia.com © 2018.
...
Continue reading at DECK LAYOUT or select a topic from the closely-related articles below, or see the complete ARTICLE INDEX.
Or see these
Recommended Articles
- 6-8-10 RULE to SQUARE UP ANY STRUCTURE
- DECK & PORCH CONSTRUCTION - home
- BATTER BOARDS LAYOUT METHOD
- DECK BOARD GAPS & SPACING
- DECK CONSTRUCTION BEST PRACTICES
- DECK FLOOR LAYOUT
- DECK FLOOR INSTALLATION
- DECK FLOOR INSTALLATION TIPS
- DECK JOIST LAYOUT
- DECK JOIST INSTALLATION
- DECK LAYOUT
- DECK LEVEL PLUMB SQUARE-UP 6-8-10 RULE
- DECK POST CONSTRUCTION
- FOUNDATION for the HOUSE where we give a detailed example of using batter boards to lay out excavation for a hous
- FOUNDATION DAMAGE by ICE LENSING includes a review of the long term performance of this outdoor stage structure
- FRAMING TRIANGLES & CALCULATIONS
Suggested citation for this web page
BATTER BOARDS LAYOUT METHOD at InspectApedia.com - online encyclopedia of building & environmental inspection, testing, diagnosis, repair, & problem prevention advice.
Or see this
INDEX to RELATED ARTICLES: ARTICLE INDEX to BUILDING DECKS & PORCHES
Or use the SEARCH BOX found below to Ask a Question or Search InspectApedia
Or see
INDEX to RELATED ARTICLES: ARTICLE INDEX to BUILDING STRUCTURES
Or use the SEARCH BOX found below to Ask a Question or Search InspectApedia
Ask a Question or Search InspectApedia
Try the search box just below, or if you prefer, post a question or comment in the Comments box below and we will respond promptly.
Search the InspectApedia website
Note: appearance of your Comment below may be delayed: if your comment contains an image, photograph, web link, or text that looks to the software as if it might be a web link, your posting will appear after it has been approved by a moderator. Apologies for the delay.
Only one image can be added per comment but you can post as many comments, and therefore images, as you like.
You will not receive a notification when a response to your question has been posted.
Please bookmark this page to make it easy for you to check back for our response.
Our Comment Box is provided by Countable Web Productions countable.ca
Citations & References
In addition to any citations in the article above, a full list is available on request.
- [1] Steve Bliss's Building Advisor at buildingadvisor.com helps homeowners & contractors plan & complete successful building & remodeling projects: buying land, site work, building design, cost estimating, materials & components, & project management through complete construction. Email: info@buildingadvisor.com
Steven Bliss served as editorial director and co-publisher of The Journal of Light Construction for 16 years and previously as building technology editor for Progressive Builder and Solar Age magazines. He worked in the building trades as a carpenter and design/build contractor for more than ten years and holds a masters degree from the Harvard Graduate School of Education. Excerpts from his recent book, Best Practices Guide to Residential Construction, Wiley (November 18, 2005) ISBN-10: 0471648361, ISBN-13: 978-0471648369, appear throughout this website, with permission and courtesy of Wiley & Sons. Best Practices Guide is available from the publisher, J. Wiley & Sons, and also at Amazon.com - [2] Decks and Porches, the JLC Guide to, Best Practices for Outdoor Spaces, Steve Bliss (Editor), The Journal of Light Construction, Williston VT, 2010 ISBN 10: 1-928580-42-4, ISBN 13: 978-1-928580-42-3, available from Amazon.com
- [3] Prescriptive Residential Wood Deck Construction Guide, based on the 2009 International Residential Code, American Forest & Paper Association, Inc., provided by reader Mark Morsching from Everflashing.
- [2] Manual for the Inspection of Residential Wood Decks and Balconies, by Cheryl Anderson, Frank Woeste (Forest Products Society), & Joseph Loferski, October 2003, ISBN-13: 978-1892529343,
- Our recommended books about building & mechanical systems design, inspection, problem diagnosis, and repair, and about indoor environment and IAQ testing, diagnosis, and cleanup are at the InspectAPedia Bookstore. Also see our Book Reviews - InspectAPedia.
- In addition to citations & references found in this article, see the research citations given at the end of the related articles found at our suggested
CONTINUE READING or RECOMMENDED ARTICLES.
- Carson, Dunlop & Associates Ltd., 120 Carlton Street Suite 407, Toronto ON M5A 4K2. Tel: (416) 964-9415 1-800-268-7070 Email: info@carsondunlop.com. Alan Carson is a past president of ASHI, the American Society of Home Inspectors.
Thanks to Alan Carson and Bob Dunlop, for permission for InspectAPedia to use text excerpts from The HOME REFERENCE BOOK - the Encyclopedia of Homes and to use illustrations from The ILLUSTRATED HOME .
Carson Dunlop Associates provides extensive home inspection education and report writing material. In gratitude we provide links to tsome Carson Dunlop Associates products and services.
 | HOME | ABOUT | ASK a QUESTION | CONTACT | CONTENT USE POLICY | DESCRIPTION | POLICIES | PRIVACY | |
| © 2024 - 1985 Publisher InspectApedia.com - Daniel Friedman | |||||||||