
InspectAPedia® FREE Encyclopedia of Building & Environmental Construction, Diagnosis, Maintenance & Repair |
Question? Just ask us! InspectAPedia
|
 Deck Joist Layout Procedure
Deck Design-Build Online Guide, How to use batter boards
- POST a QUESTION or COMMENT about deck construction
Deck joist layout procedure:
How to mark the locations for connecting deck joists to the ledger board and supporting girder for decks - design/build deck project guide.
This article explains how to mark joist spacings along the ledger board for consistent, accurate deck or other floor construction.
We continue with advice on attaching joist hangers along the ledger board to make later joist placement easy and fast. This article series describes critical safe-construction details for decks and porches, including avoiding deck or porch collapse and unsafe deck stairs and railings.
Page top photo: construction of a performing arts stage in Two Harbors Minnesota.
InspectAPedia tolerates no conflicts of interest. We have no relationship with advertisers, products, or services discussed at this website.
How to Layout Deck Joists - Wood Frame Floor Construction Procedures

Joists are the structural members that support the decking. The size of the joists, as well as their span and spacing, should be determined in the planning stage.
Joist spacing is commonly given as “on center” (o.c.), which means the spacing is measured from the center of one joist to the center of the next one.
The most common joist spacings are 12, 16, and 24 inches on center.
Watch out: nobody with any sense actually lays out joists by measuring to their center. We lay out floor joists by marking lines corresponding to one face of the joist. To avoid confusion we mark an X on the side of the line to which the joist will be placed.
So long as your lines are 16" apart your joists will be 16" O.C. as well.
Note that the distance from the end joist to the first intermediary joist is often less than 16 inches on center, to allow decking boards to reach or overhang the outside edge of the end joist.
Joists are attached at one end to the ledger with joist hangers. At the other end, they typically overhang the beam for a foot or two and are attached to it with toenails or metal fasteners known as hurricane or seismic ties. In some deck designs, joists are installed at the same level as beams, and are attached to both the ledger and the beam with joist hangers.
Choose joist stock carefully. Look for the straightest boards available, and always install them with the crown side up.
Although you may have to square the ends where they meet the ledger, individual joists do not need to be cut to length at this stage; cut them only after all the joists are installed. If your design calls for double joists, do not disrupt the regular on-center spacing. Instead, treat the center of the gap between the double joists as a single joist center.
Mark the Deck Joist Positions on the Ledger Board
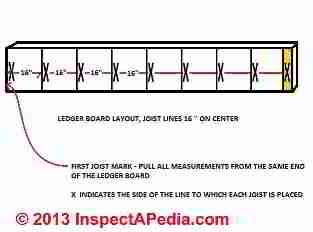 Before installing the intermediary joists, measure and mark the ledger for the location of each joist. Begin the layout from the edge of the deck.
Hook a tape measure over the outside face of an end joist, then mark along the top of the ledger according to the planned on-center spacing. If your joists are to be installed 16 inches on center, mark the ledger every 16 inches.
You can reduce (but not extend) the spacing to the end joists if it better suits the length of the decking boards you are buying.
Then take a framing square and make a vertical line on the ledger at each mark. This line represents the edge of a joist, so you need to mark an X alongside it to indicate where to place the joist.
Framing tip: ALWAYS pull all of your deck measurements from the same spot. Consistency in measurement helps avoid errors and a crooked deck or floor structure. We pull our measurements from the left end of the ledger board.top corner at the building wall.
Is Now the Time to Mark the Joist Positions on the Girder?
Well you could, but as you haven't squared-up the girder and end joists and ledger into a perfect rectangle there is a good chance that your marks corresponding to the girder-end of the joists won't be exactly in the right place with respect to the leger board markings.
Marks for joist layout are explained in the next of this article series
For this reason we don't mark the joist positions on the girder until we've installed the end joists and squared the structure.
Should You Also Lay Out the Outer Rim Joist or Header Joist?
You might however want to lay out the rim joist - the joist that will be nailed against the ends of the floor joists and will be parallel to the ledger board. The rim joist (also called a header joist) covers the ends of the other joists.
The rim joist is not going to help you build the deck floor because you won't trim the deck joist outer ends to an exactly uniform length until all of them are in place.
Laying out the rim joist is an optional step, and one I have never seen a carpenter do but according to some, it does come in handy when you need to check to see that the joists are square.
On a basic rectangular deck, the rim joist is the same length as the width of the deck. Use the straightest board you can find and cut it to length. Hook your tape measure over an edge, and mark the joist spacing along the inside face. Mark vertical lines and Xs
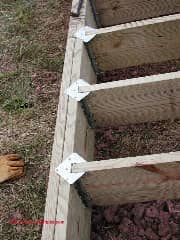
Attach Joist Hangers along the Ledger Board
 To create a flat surface for your decking, the tops of all the joists must be level with the top of the ledger, and the only way you can achieve that is to install joist hangers in just the right position.
Carpenters sometimes use a short piece of joist stock as-a guide to help mount and nail joist hangers but you'll see in our warning below that you can get in trouble with this approach. Slide a joist hanger onto the 2x4, fasten one side to the ledger, then fasten the other side.
Or as we prefer, leave the right side un-nailed for now.
Framing tip: when attaching joist hangers make darn sure that they are going to hold the joist perpendicular, that is tha the hanger is not twisted to one side along the ledger board.
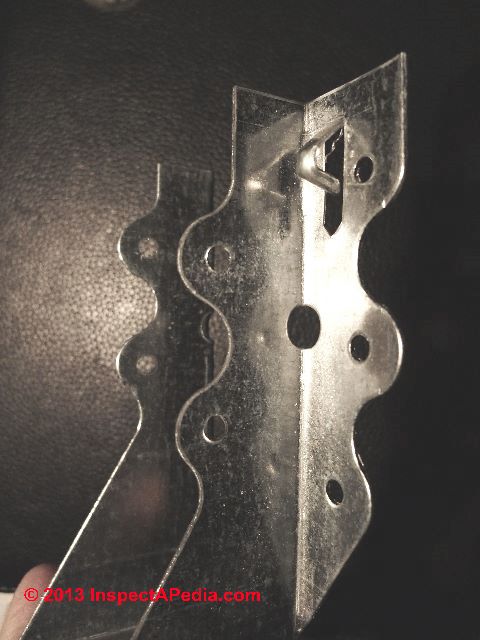
Joist hangers are available to fit almost any size joist imaginable. Always use joist hangers that are made specifically for the size joists you are using, and attach them with the type and quantity of fasteners specified by the manufacturer.
And no, that little bent over angled clip near the top of the joist hanger (red arrow) is NOT a structural fastener. It is there simply to help you mount the joist hanger in place.
Position the hanger where you want it and give that bent-up pin a hammer-smack. That will hold the hanger in place until you've installed the appropriate construction nails or screws.
Watch out: use the proper sized joist hanger. Don't use a joist hanger designed for 2x4's on a 2x10 joist. It may be tempting to use those smaller hangers, especially if someone just gave them to you, but your deck joists will not be properly connected. Engineers figured out how many framing fasteners are needed to connect a 2x10 to the ledger board.
All is not lost if some fool already built your deck with 2x10 joists and just 2x4 joist hangers. You can add the missing fasteners as common nails or possibly structural screws above the hanger, working from both sides of each joist until the required number have been installed.
If the proper sized joist hanger is used, it tells you how many nails to use - one per hole.
Joist Hanger Framing Tip: some carpenters have learned the hard way and don't nail both sides of the joist hanger in place until the joist has been set into it.
They nail left side of the joist hanger so that the joist side itself will fall right on the joist line marked on the ledger board, but they leave the right side of the hanger open for now.
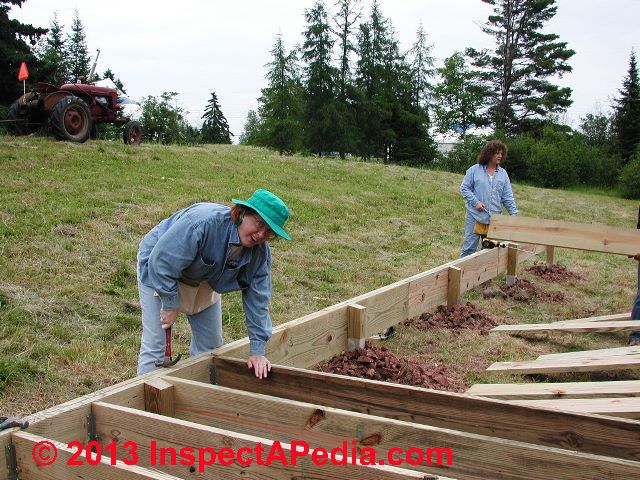
Why? Well if you didn't take care to keep the joist hanger open adequately when nailing the second side, you'll find that some hangers won't accept their joist.
In fact some of your joists may be thicker than the scrap lumber you used to align and keep the hangers open during the two-sided nailing approach.
Removing nails and then re-nailing all over again is not so great either. Pulling out a nail and then driving a new one into almost exactly the same location loses strength.
The original construction, installation and long term performance of this outdoor performing arts stage floor are described in a series of articles beginning
at BATTER BOARDS LAYOUT METHOD.
Batter Boards
 On 2018-07-14
by george
On 2018-07-14
by george
drawings of the batter boards and strings layout
On 2018-07-14 by (mod) -
George,
Excellent suggestion. We've published so many articles on the details of deck building that I've neglected a string and batter-board layout description.
See complete details on using batter boards now found at
Some excerpts and discussion of batter boards is also posted just below on this page.
If you have photos, drawings, or specific questions those would be most helpful.
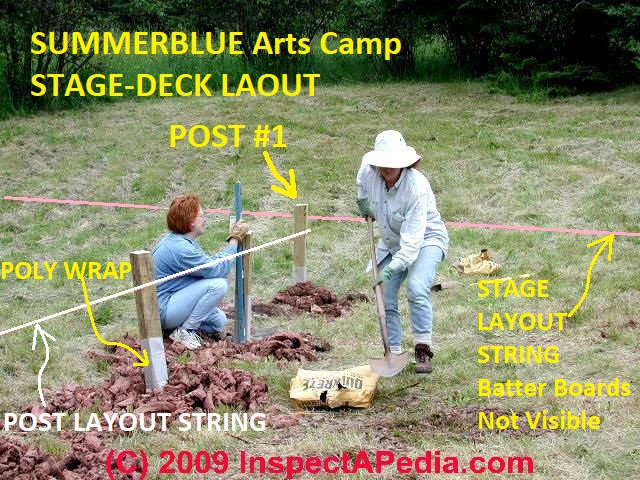
Below is a photo (click to enlarge) showing our layout strings during construction of the Summerblue Arts Camp Stage in Two Harbors Minnesota. This was basically a large free-standing deck.
We first put out batter boards - stakes and horizontal wood strips - to mark the locations of the corners of the stage (not shown in this photo).
We started by locating the front of the stage, picking one corner as "home base" from which ALL other measurements are taken.
Choosing and making measurements from a single point avoids ugly errors creeping into a deck or porch or foundation layout. Those errors can result in a structure that is not square.
After choosing the home base corner from which the rest of the stage would be located, we chose the front line of the stage to fit as wanted on the terrain which was certainly not level nor smooth.
Choosing the line of the front line of the stage plus its outer dimension, combined with our stage drawing plan (posts are set a bit in from the actual deck or stage final outer perimeter, we then set the spots for the second post, the sides, and the back line of the same rectangle by measuring in from the original layout string (pink in our photo).
All four of those locations are defined by driving the stakes and batter boards some distance outside of the actual perimeter of the final structure. Then nails driven into the top edge of the batter boards, and some string, let us set the exact locations of the perimeter and of the posts.
Key is to locate the stake-and-batter-boards a few feet outside the actual desired post locations of the deck or stage corners. Otherwise the batter board setup will be in the way when you go to dig or drill the post holes. Moving the batter boards to drill the post hole would lose all of the initial layout.
For this project, because a tractor and auger had to have access to drill our post holes, the batter boards were set well back from the actual post locations - which is why you don't see them in my photo.
In our photo (below), we had set the first post at our home base - the stage front right corner in this case - and backfilled so that the post was absolutely solid and plumb.
Once the four corner posts were set exactly in place using the batter boards, string, and a measuring tape (and the deck plans) we used a second string (white in the photo) to give the exact location of the face of each post. The horizontal distance for the intermediate posts was set always by measuring with the dumb-end (starting point) of our measuring tape at the deck/stage home base corner.
At that point we drilled holes for the remaining posts. You can see the soil was dense clay so digging was out of the question. We hired a local post hole driller who had a huge auger mounted to his tractor.
Each post hole was centered on its desired spot - within a few inches. The holes were large enough that we could set each intermediate stage (or deck) post to its exact location by aligning it with the string now wrapped around our corner posts and pulled tight.
You can see one of the workers (A) setting post #2 dead plumb by using the level on two sides of the post (and taking into account if a post is not dead straight).
Each post was set on a solid concrete block that was level in the hole bottom.
When worker (A) has the post in the exact position with its outer face flush with the string she holds it in place while the second worker (J) pours in our ready-mix Quickcrete (we were using holes without form tubes in this project). After the Quickcrete was in place worker (J) back-filled with soil and tamped it down.
On 2018-07-14 by (mod) -
Below is a photo of worker (K) assembling our stakes and batter boards to mark the Summerblue Arts Camp stage first corner after we'd marked its approximate location a bit inside of the batter boards themselves.

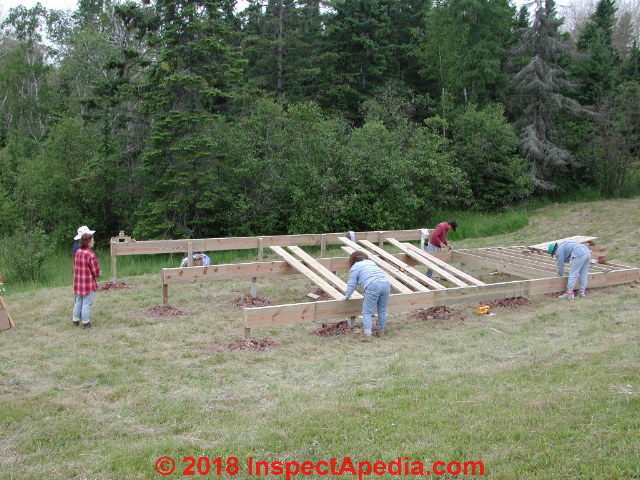
And below is a photo later in the construction of the Two Harbors MN Summerblue stage - once the posts were all in place we attached the three deck beams.
...
Continue reading at DECK JOIST INSTALLATION or select a topic from the closely-related articles below, or see the complete ARTICLE INDEX.
Or see these
Recommended Articles
- BATTER BOARDS LAYOUT METHOD - procedures for laying out and squaring-up the accurate location of a structure, its foundation, footings, posts or other support.
- DECK & PORCH CONSTRUCTION - home
Suggested citation for this web page
DECK JOIST LAYOUT at InspectApedia.com - online encyclopedia of building & environmental inspection, testing, diagnosis, repair, & problem prevention advice.
Or see this
INDEX to RELATED ARTICLES: ARTICLE INDEX to BUILDING DECKS & PORCHES
Or use the SEARCH BOX found below to Ask a Question or Search InspectApedia
Or see
INDEX to RELATED ARTICLES: ARTICLE INDEX to BUILDING STRUCTURES
Or use the SEARCH BOX found below to Ask a Question or Search InspectApedia
Ask a Question or Search InspectApedia
Try the search box just below, or if you prefer, post a question or comment in the Comments box below and we will respond promptly.
Search the InspectApedia website
Note: appearance of your Comment below may be delayed: if your comment contains an image, photograph, web link, or text that looks to the software as if it might be a web link, your posting will appear after it has been approved by a moderator. Apologies for the delay.
Only one image can be added per comment but you can post as many comments, and therefore images, as you like.
You will not receive a notification when a response to your question has been posted.
Please bookmark this page to make it easy for you to check back for our response.
Our Comment Box is provided by Countable Web Productions countable.ca
Citations & References
In addition to any citations in the article above, a full list is available on request.
- [1] Steve Bliss's Building Advisor at buildingadvisor.com helps homeowners & contractors plan & complete successful building & remodeling projects: buying land, site work, building design, cost estimating, materials & components, & project management through complete construction. Email: info@buildingadvisor.com
Steven Bliss served as editorial director and co-publisher of The Journal of Light Construction for 16 years and previously as building technology editor for Progressive Builder and Solar Age magazines. He worked in the building trades as a carpenter and design/build contractor for more than ten years and holds a masters degree from the Harvard Graduate School of Education. Excerpts from his recent book, Best Practices Guide to Residential Construction, Wiley (November 18, 2005) ISBN-10: 0471648361, ISBN-13: 978-0471648369, appear throughout this website, with permission and courtesy of Wiley & Sons. Best Practices Guide is available from the publisher, J. Wiley & Sons, and also at Amazon.com - [2] Decks and Porches, the JLC Guide to, Best Practices for Outdoor Spaces, Steve Bliss (Editor), The Journal of Light Construction, Williston VT, 2010 ISBN 10: 1-928580-42-4, ISBN 13: 978-1-928580-42-3, available from Amazon.com
- [3] Prescriptive Residential Wood Deck Construction Guide, based on the 2009 International Residential Code, American Forest & Paper Association, Inc., provided by reader Mark Morsching from Everflashing.
- [4] Mark Morsching, Everflashing, Tel: 800-550-1667, Email: everflashing@gmail.com. The Everflashing product comes in G-185 and Stainless Steel and is intended for use with treated lumber with copper in it. Everflashing produces a variety of specialty flashing products including flashings for use with decks at deck ledgers and deck perimeters.
- [2] Manual for the Inspection of Residential Wood Decks and Balconies, by Cheryl Anderson, Frank Woeste (Forest Products Society), & Joseph Loferski, October 2003, ISBN-13: 978-1892529343,
- [5] Claudia Hudson, Asheville NC, Tel: 828-252-0644 Email: claudiahudson@charter.net . Ms. Hudson is an SEO copyrighter / content writer. She has provided background research and text for InspectApedia's articles on deck and porch construction methods & procedures. April 2013.
- In addition to citations & references found in this article, see the research citations given at the end of the related articles found at our suggested
CONTINUE READING or RECOMMENDED ARTICLES.
- Carson, Dunlop & Associates Ltd., 120 Carlton Street Suite 407, Toronto ON M5A 4K2. Tel: (416) 964-9415 1-800-268-7070 Email: info@carsondunlop.com. Alan Carson is a past president of ASHI, the American Society of Home Inspectors.
Thanks to Alan Carson and Bob Dunlop, for permission for InspectAPedia to use text excerpts from The HOME REFERENCE BOOK - the Encyclopedia of Homes and to use illustrations from The ILLUSTRATED HOME .
Carson Dunlop Associates provides extensive home inspection education and report writing material. In gratitude we provide links to tsome Carson Dunlop Associates products and services.
 | HOME | ABOUT | ASK a QUESTION | CONTACT | CONTENT USE POLICY | DESCRIPTION | POLICIES | PRIVACY | |
| © 2024 - 1985 Publisher InspectApedia.com - Daniel Friedman | |||||||||