
InspectAPedia® FREE Encyclopedia of Building & Environmental Construction, Diagnosis, Maintenance & Repair |
Question? Just ask us! InspectAPedia
|
 Deck Layout Procedure
Lay Out the Deck's Framing Details -
Deck Design-Build Online Guide
- POST a QUESTION or COMMENT about deck construction
How to lay out the deck:once the the ledger board installed against the building that board forms the home-base from which all other deck measurements are made.
With the ledger in place we now explain how to place the accurate location the deck piers, posts, and beams using string, batter boards, and a few other tricks of the trade.
This article series describes construction steps in a design-build project for a deck or porch floor.
InspectAPedia tolerates no conflicts of interest. We have no relationship with advertisers, products, or services discussed at this website.
Deck Design & Build Online Guide: how to lay out the deck & locate piers & posts
If you are building a deck attached to an existing building, then with the ledger installed on the building (DECK LEDGER BOARD INSTALL) and the site prepared, you can begin to lay out your deck.
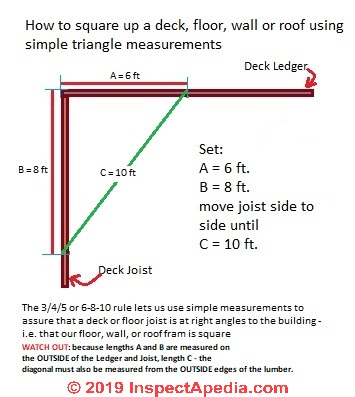
However if the deck is free-standing, you'll need to set the deck's rough location (shown in our sketch) and then its exact location.
In either case the deck layout involves establishing the edges of the proposed deck framing with string lines, then using the string lines to locate the planned foundation holes. The work is not physically challenging, but it is critically important. An accurate layout is much easier to accomplish if you have a helper.
[Click to enlarge any image]
Watch out: before fixing the deck location on your building or site, if you haven't seen it, read DECK LOCATION.
What are Batter Boards & Why We Use Them?
Batter- boards are temporary attachment points for string lines. They are usually made with 1 x 4s or 2 x 4s, but you can use any scrap lumber available.
Each batter- board consists of a crosspiece mounted on two stakes, which are cut with pointed bottoms and can be driven into the ground. To make the string lines level, the top of the crosspiece must be level with the top of the ledger.
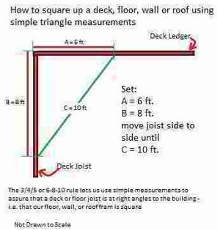
If you are building on a flat site, you can usually use 3-foot-long stakes. On a sloping site, however, the stakes will have to be longer. For a basic rectangular deck, you will need two pairs of batterboards.We can also use the 6-8-10 triangle shown at page top to be sure that we are projecting our deck sides straight out from the building.
Details about setting up and using batter boards to give a precise location of your deck and to be sure it's laid-out level and square, are found at BATTER BOARDS LAYOUT METHOD.
Referencing a high deck - how do we mark the locations for a deck to be high off the ground?
 If you are building an elevated deck, it would not be fruitful to attach string lines to the ledger itself.
Instead, attach a plumb bob to each outside edge of the ledger and drop it to near ground level.
Set up batterboards so that the front edges of the crosspieces are plumb with the front face of the ledger. (In some cases, you can attach the crosspieces directly to the house.)
The sketch and method discussed above for laying out a structure over sloped or rough ground is explained further at STAIR DESIGNS for UNEVEN / SLOPED SURFACES where we describe how to locate the supporting posts for stairs (or a deck) built over un-even or sloping ground.
There are several methods for leveling a structure over a large drop-off or slope.
- Straight edge boards and level:
A small structure like a stairway may be laid out using the method shown in our sketch. All of the components must be held dead level and plumb in both directions. - Laser level:
Using a perfectly plumb board and laser level we may use a level containing a built-in laser project a straight line with a red spot that marks the location of the down-slope stake or post.
Provided we took time to check that our laser spotter was itself dead level, I've had excellent success with a laser level for measuring elevation changes during construction, both indoors and also outside. A laser level is also a handy way to check the slope of a deck or floor that has already been built. - Builder's transit:
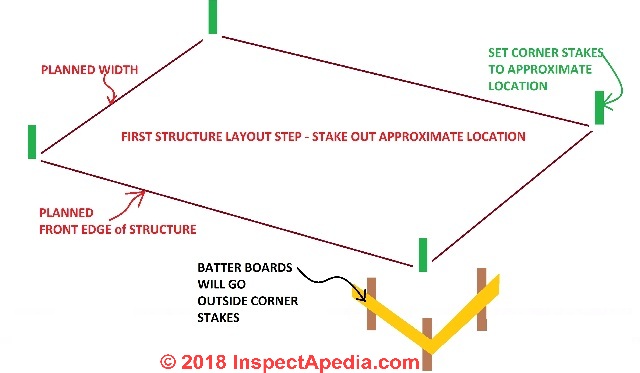
A larger structure like a deck might be levelled using a dumpy level or builder's transit - Water level:
Some texts recommend using a simple water-level: something you can build yourself using clear tubing.
Watch out: I tried using a water level on several jobs and found mine was way too much trouble and very unreliable. Our water level tubing would get air into it - that completely ruins its accuracy and the air in a long water-filled tube can be a pain to remove.
Then a plug would pop out of the tubing ends during rough handling, water would leak under the seat of our truck, or Katie the dog would chew a hole in the tubing, or on the job the tubing would be just a bit too short, and so-on. In a pinch this may be all you can put together but I'm just sayin'.
Locating the Deck to a Ledger Board
To account for the end joists that will be attached to the ledger later, measure 1 1/2 inches outside the plumb bob on each side and make a mark.
Drive a nail or screw at each mark to attach the layout string lines, which will represent the framed sides of the deck.
Position the batterboards a few feet beyond the edges of the planned deck, drive a screw or nail into the ends of the ledger, and tie a length of string to each screw or nail 1 1/2 inches from the ledger.
The other ends of the string lines will be tied to screws or nails driven into the tops of the crosspieces after the lines are positioned.
String lines can be used to mark the perimeter of the deck framing on all sides, or the positions of all foundation holes or a combination of both.
The goal is to position the string lines so that they are perfectly square, then to determine hole locations on the ground using a plumb bob. After the holes have been dug and the footings and piers poured, string lines can also be used to check the alignment of the posts and to position the beam properly.
Use the same approach when you are building a deck that is not just a rectangle.
If you are building a deck that wraps around a corner of the house, run a single corner string line out from one of the ledgers. This creates two rectangles, each of which can be checked for square.
If you want to create a deck with mitered corners, begin by establishing a standard rectangular layout. Then measure back from the outside string line an equal distance on both sides and run another string line.
Even more complicated decks can be laid out in similar fashion. Try to break the deck down into a series of rectangles, each of which can be checked easily for square.
- Run String Lines to Mark Deck Sides
For a rectangular deck, measure 1 1/2 inches out from the ends of the ledger (to allow for the end joists) and run string lines to represent the sides of the deck framing. Set up another string line parallel to the house to represent the center line of the posts, piers, and footings.
Check that the outside string line is the same distance from the ledger on both ends, then set the other two lines as close to square as possible.
Details of laying out a deck or any other structure to get it properly-located, square, and level, including free-standing decks, are
at BATTER BOARDS LAYOUT METHOD. - Check for Square in the Deck Layout
With a helper, carefully measure the diagonals within the string lines.
Adjust the strings as-needed until the two measurements are identical. Drive screws into the tops of the crosspieces where the string lines meet them and tie the strings around the screws.
See DECK LEVEL PLUMB SQUARE-UP 6-8-10 RULE - How to Locate the Deck's Foundation or Post Pier Holes
With the string lines squared, measure in from the side strings to find the center of the outside footing holes. The exact distance will depend on your plans, including how far you plan to have the beam overhang the posts.
Drop a plumb bob from the correct location, and then have your helper drive a small stake into the ground. Continue measuring along the string line to find the other hole locations.
...
Continue reading at BATTER BOARDS LAYOUT METHOD - how to lay out any structure on the ground, or select a topic from the closely-related articles below, or see the complete ARTICLE INDEX.
Or see these
Recommended Articles
- BATTER BOARDS LAYOUT METHOD
- DECK LEVEL PLUMB SQUARE-UP 6-8-10 RULE
- DECK PIER CONSTRUCTION if you've done the level, plumb and square-up of the deck from the ledger board (building attached decks & porches) or from batter boards (for a free-standing deck ).
Suggested citation for this web page
DECK LAYOUT at InspectApedia.com - online encyclopedia of building & environmental inspection, testing, diagnosis, repair, & problem prevention advice.
Or see this
INDEX to RELATED ARTICLES: ARTICLE INDEX to BUILDING DECKS & PORCHES
Or use the SEARCH BOX found below to Ask a Question or Search InspectApedia
Or see
INDEX to RELATED ARTICLES: ARTICLE INDEX to BUILDING STRUCTURES
Or use the SEARCH BOX found below to Ask a Question or Search InspectApedia
Ask a Question or Search InspectApedia
Try the search box just below, or if you prefer, post a question or comment in the Comments box below and we will respond promptly.
Search the InspectApedia website
Note: appearance of your Comment below may be delayed: if your comment contains an image, photograph, web link, or text that looks to the software as if it might be a web link, your posting will appear after it has been approved by a moderator. Apologies for the delay.
Only one image can be added per comment but you can post as many comments, and therefore images, as you like.
You will not receive a notification when a response to your question has been posted.
Please bookmark this page to make it easy for you to check back for our response.
Our Comment Box is provided by Countable Web Productions countable.ca
Citations & References
In addition to any citations in the article above, a full list is available on request.
- [1] Steve Bliss's Building Advisor at buildingadvisor.com helps homeowners & contractors plan & complete successful building & remodeling projects: buying land, site work, building design, cost estimating, materials & components, & project management through complete construction. Email: info@buildingadvisor.com
Steven Bliss served as editorial director and co-publisher of The Journal of Light Construction for 16 years and previously as building technology editor for Progressive Builder and Solar Age magazines. He worked in the building trades as a carpenter and design/build contractor for more than ten years and holds a masters degree from the Harvard Graduate School of Education. Excerpts from his recent book, Best Practices Guide to Residential Construction, Wiley (November 18, 2005) ISBN-10: 0471648361, ISBN-13: 978-0471648369, appear throughout this website, with permission and courtesy of Wiley & Sons. Best Practices Guide is available from the publisher, J. Wiley & Sons, and also at Amazon.com - [2] Decks and Porches, the JLC Guide to, Best Practices for Outdoor Spaces, Steve Bliss (Editor), The Journal of Light Construction, Williston VT, 2010 ISBN 10: 1-928580-42-4, ISBN 13: 978-1-928580-42-3, available from Amazon.com
- [3] Prescriptive Residential Wood Deck Construction Guide, based on the 2009 International Residential Code, American Forest & Paper Association, Inc., provided by reader Mark Morsching from Everflashing.
- [4] Mark Morsching, Everflashing, Tel: 800-550-1667, Email: everflashing@gmail.com. The Everflashing product comes in G-185 and Stainless Steel and is intended for use with treated lumber with copper in it. Everflashing produces a variety of specialty flashing products including flashings for use with decks at deck ledgers and deck perimeters.
- [2] Manual for the Inspection of Residential Wood Decks and Balconies, by Cheryl Anderson, Frank Woeste (Forest Products Society), & Joseph Loferski, October 2003, ISBN-13: 978-1892529343,
- [5] Claudia Hudson, Asheville NC, Tel: 828-252-0644 Email: claudiahudson@charter.net . Ms. Hudson is an SEO copyrighter / content writer. She has provided background research and text for InspectApedia's articles on deck and porch construction methods & procedures. April 2013.
- Our recommended books about building & mechanical systems design, inspection, problem diagnosis, and repair, and about indoor environment and IAQ testing, diagnosis, and cleanup are at the InspectAPedia Bookstore. Also see our Book Reviews - InspectAPedia.
- In addition to citations & references found in this article, see the research citations given at the end of the related articles found at our suggested
CONTINUE READING or RECOMMENDED ARTICLES.
- Carson, Dunlop & Associates Ltd., 120 Carlton Street Suite 407, Toronto ON M5A 4K2. Tel: (416) 964-9415 1-800-268-7070 Email: info@carsondunlop.com. Alan Carson is a past president of ASHI, the American Society of Home Inspectors.
Thanks to Alan Carson and Bob Dunlop, for permission for InspectAPedia to use text excerpts from The HOME REFERENCE BOOK - the Encyclopedia of Homes and to use illustrations from The ILLUSTRATED HOME .
Carson Dunlop Associates provides extensive home inspection education and report writing material. In gratitude we provide links to tsome Carson Dunlop Associates products and services.
 | HOME | ABOUT | ASK a QUESTION | CONTACT | CONTENT USE POLICY | DESCRIPTION | POLICIES | PRIVACY | |
| © 2024 - 1985 Publisher InspectApedia.com - Daniel Friedman | |||||||||