
InspectAPedia® FREE Encyclopedia of Building & Environmental Construction, Diagnosis, Maintenance & Repair |
Question? Just ask us! InspectAPedia
|
 6-8-10 Rule to Square a Structure
& How Set It
Plumb & Level
How to use the 6-8-10 Rule to square any structure, how to make a structure plumb (vertical) & Level (Flat)
Design-Build Online Guide
- POST a QUESTION or COMMENT about deck construction
How to measure the level & plumb position of a deck, floor, post, wall or other structure. This article summarizes methods to check that a deck or other structure is level and plumb - important measures to assure that a structure and its connections are safe and properly made.
This article series describes critical safe-construction details for decks and porches, including avoiding deck or porch collapse and unsafe deck stairs and railings.
InspectAPedia tolerates no conflicts of interest. We have no relationship with advertisers, products, or services discussed at this website.
Get the Deck or Any Other Structure Plumb, Level & Square
 The cardinal rule of carpentry can be summarized as follows: build it plumb, level, and square.
Watch out: building a structure that's out of square is more than an aesthetic problem or an eyesore.
If by accident your structure is out of square, cutting and filling in the studs (if it's a wall), floor joists, ceiling joists, or rafters if it's a roof is going to be hell as every cut will have to be different, the plywood (sold in 4x8 ft. squares) you might use for sheathing isn't going to fit without trimming, and installing siding or roofing is also going to get really ugly.
[Click to enlarge any image]
The best materials, finest tools, and greatest design cannot overcome a structure that has been put together contrary to this principle, since errors in any one of these attributes can quickly multiply as the project progresses.
Here we will describe simple procedures to make your structure plumb (vertical), level or "flat", and square. This article assumes you already know exactly where your deck will be located.
Article Contents
- USE the 6-8-10 RULE to SQUARE UP ANY STRUCTURE - detailed step by step procedure - it's easy!
- CHECK to SEE if ANY STRUCTURE is SQUARE
- MAKE ANY STRUCTURE PLUMB (DEAD VERTICAL)
- MAKE ANY STRUCTURE LEVEL (DEAD LEVEL or DEAD FLAT)
If you need to place a deck, foundation, or other structure accurately on the ground
see BATTER BOARDS LAYOUT METHOD and for decks also
see DECK LAYOUT.
Use the 6-8-10 or 3-4-5 rule to Determine square or right angles in deck, porch, floor, wall, or roof framing or any other building framing or construction task
To check a single corner of any structure such a deck, floor, wall, or roof section for squareness, use the 6-8-10 rule (or if the sides are too short use “3-4-5”) technique that we give in detail here.
Here we will illustrate exactly how to make these measurements to square up any structure.
The underlying magic of the 6-8-10 rule comes from plane geometry where we learned that for any right triangle (having two sides meeting at a perfect 90° angle), we can write this equation that describes the lengths of the triangles three sides:
a2 =b2 +c2 - the square of the length of the hypotenuse (a) equals the squares of the lengths of the opposite sides of a right triangle (b) and (c). You can skip the geometry read just below the steps in making these measurements.
If you want to understand the why and how the math works see details given
at FRAMING TRIANGLES & CALCULATIONS .
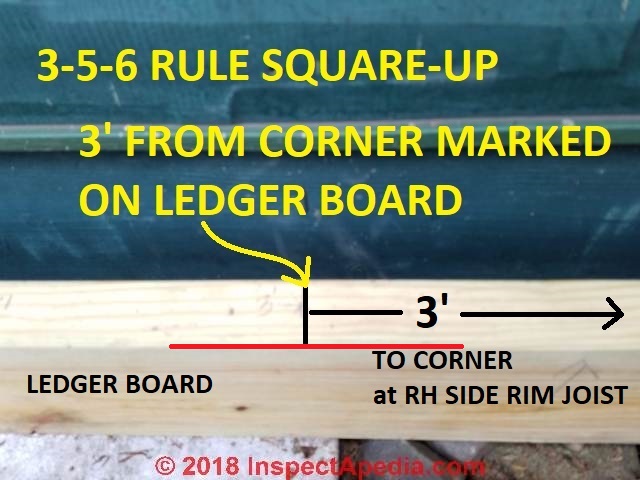
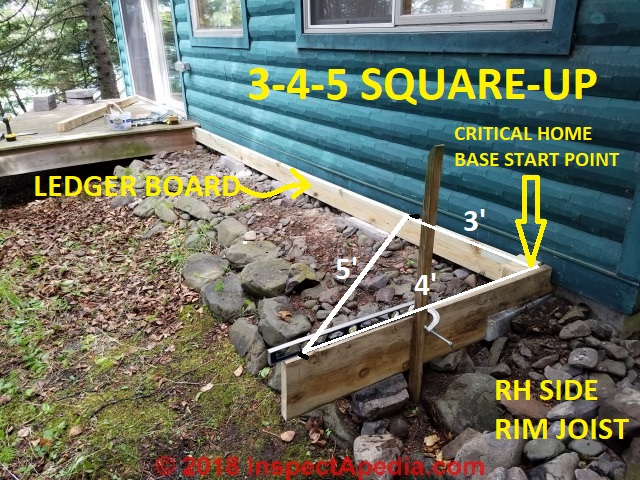
Step 1: Measure & mark 3 ft. along one side of the framed structure triangle.
Here I'm going to measure along one side 3 feet along the top of the ledger board (already bolted to the building) from the home base corner and mark that spot on top of the framing member. The red line reminds us that I'm taking all of my 3-4-5 measurements along the inside edge of the framing member.
In my first photo - just above - I've measured IN from the right hand corner of the new structure, along the top of the ledger board.
Watch out: not only must you take all measurements along the same surface (top in this case) of the framing members and from the same "home base" corner (right corner in this case)
Watch out: you must also make all measurements along the same edge (inside edge in my example - see the red lines) of the framing member.
So measuring in along the ledger board from the right hand corner to 3ft. if I started my tape at the inside surface of the right side rim joist and measure in along the ledger for 3ft. then I must also use the inside surface of the existing ledger board when I measure out along the right side rim joist to make my 4 ft. mark - below.
Step 2: Measure & mark 4 ft. along the second side of the triangle
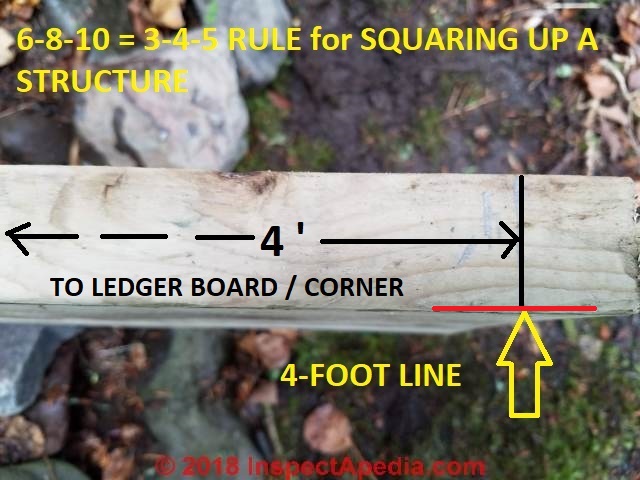
Measure along a perpendicular side 4 feet from the same home base corner and mark that spot on top of that framing member. Again, my measurements are being taken on the inside of the framing member.
Watch out: I could have used the framed structure outside edges but I have to be consistent - all measurements from outside or all from inside edge of the joist. Otherwise one or more of my measurements will be wrong by 1 1/2" - the thickness of the joist.
Step 3. Measure the diagonal distance between the two square-up marks
Finally, measure the diagonal formed between these two marks.
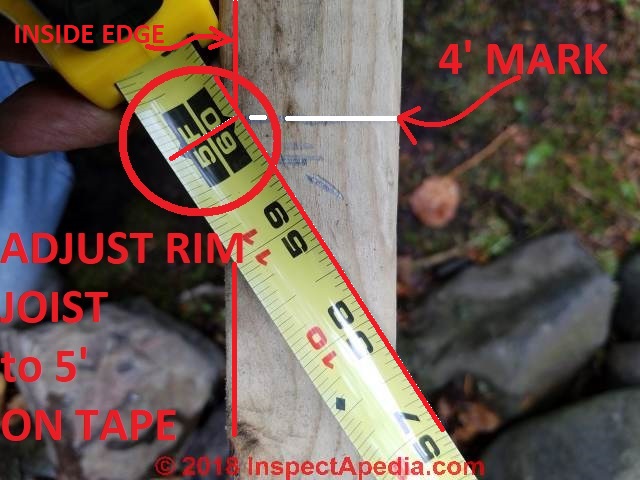
When the diagonal measures equals 5 feet, the framing around that corner is square.
If you click to enlarge my diagonal measurement above you'll see that on the tape my 5ft. mark is just slightly in from the rim joist's inside edge - this is an error. Frankly it was darn hard to hold the tape, the rim joist, and the camera all at once so my photo does not show the precisely correct measurement.
After I put the camera down I moved the joist out slightly - to the right - so that my diagonal would be exactly 5 ft.
This approach can be even more accurate if you use a set of larger numbers that have the same ratio, such as 6-8-10 or 9-12-15. But in my example the right hand side of our deck addition was just 4'1" in total length so I had to mark at just 4 ft. to square it up.
Everything you ever wanted to know about the 6-8-10 rule for squaring up anything you're building can be read and the mathematical underpinnings of angles, slopes, and tangents can be read
at FRAMING TRIANGLES & CALCULATIONS.
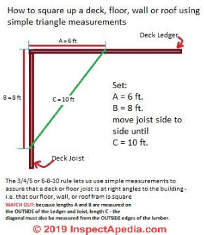
Below is a drawing showing the details of a 6-8-10 framed structure squaring-up measurement.
Unlike my real-world photos above, the drawing has us taking all measurements along the outside of the deck ledger and rim joist. That's fine. Just be consistent.
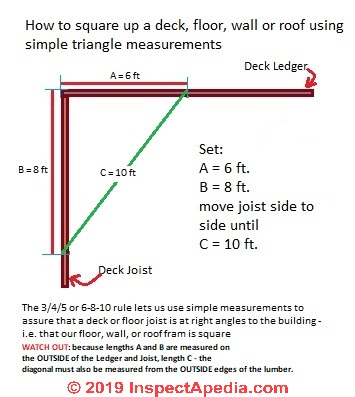
Avoid this Error when Making Measurements Using the 3-4-5 rule
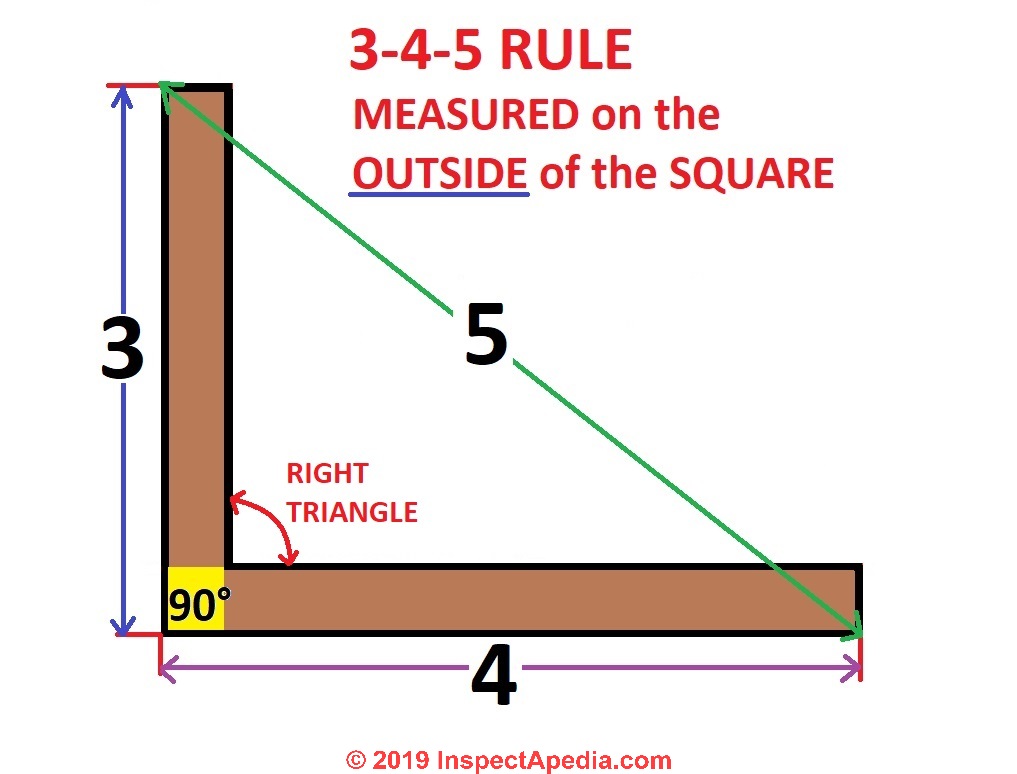
Watch out: because we measure lengths A and B along the OUTSIDE edge of the deck ledger and deck joist, when we measure the diagonal C we must pull the tape from and measure to the OUTSIDE edge of those same members.
If you mess up and measure C from the inside or A or B on the inside your deck won't be square nor at right angles to the building.
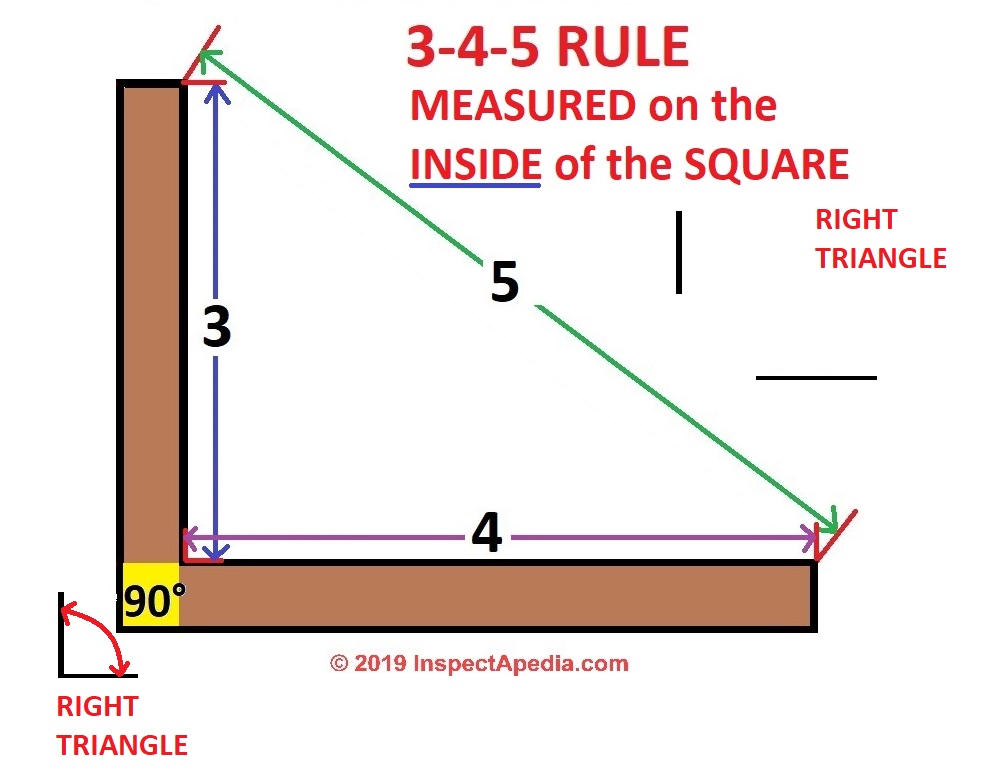
Re-stating this measurement warning, you can of course make all of your measurements from the INSIDE of the framing triangle as we illustrate in my little drawing below.
You know now that the 3-4-5 rule is the same as the 6-8-10 rule, right? You can extend this rule to any longer length you want, as long as you multiply all three numbers (3-4-5) by the same multiplier.
On the back of most framing squares, along the tongue (the shorter arm) near the heel (the 90 degree angle formed by the two arms) you will find
a special set of numbers 18-24-30 which is nothing but
another case of the 3-4-5 rule multiplied by 6 - that would let you build a brace with one arm 18 units long, another arm of 24 units long, and a diagonal between them of 30 units.
Or
More about this inside outside measurement mistake and how to avoid it is
...
How to Lay-Out & Measure Diagonals to Determine if any Rectangle is Properly Squared
If you are building or have rough-framed-up a rectangular structure, the lengths of its opposite sides must be parallel and of equal length.
But you could, by accident, also be building a trapezoid like the one I show below.
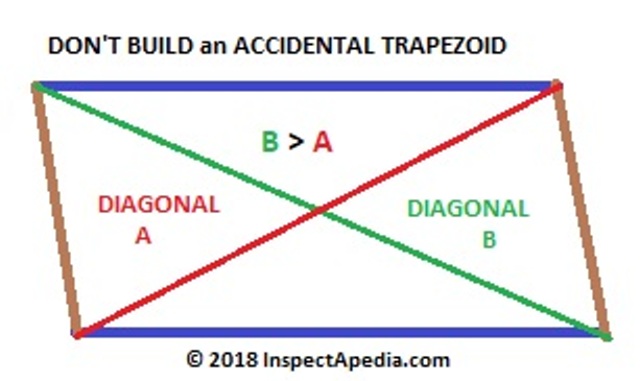
In my drawing the green diagonal B will be longer than the red diagonal A.
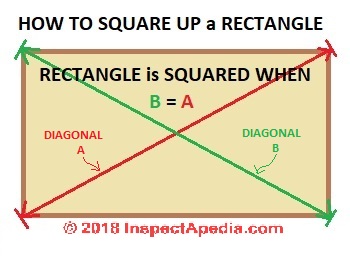
To quickly determine if a rectangle is square, measure both diagonals. If they are identical, the corners are square.
If lengths B and A are NOT the same, then if B is too long, you would push the two ends of B closer together, deforming your trapezoid back towards being a perfect rectangle.
Keep adjusting until the two diagonals are the same length.
Watch out: remember to make both A and B measurements the same way - measuring to the outside of the corners formed by the framing members for both diagonals or the inside of the framed corners for both measurements. Either is OK just make both measurements the same way.
This works for any rectangle - that is, the opposite sides are parallel and of the same length. You do not have to be making a square (in which all four sides are the same length.
Watch out: Be sure in using this method to first confirm you are working with a true rectangle; check that opposite & parallel pairs of sides are exactly the same length.
Watch out: if your diagonal measurements are not level your measurement distances will be in error.
How to Check Any Framed Structure for Squareness
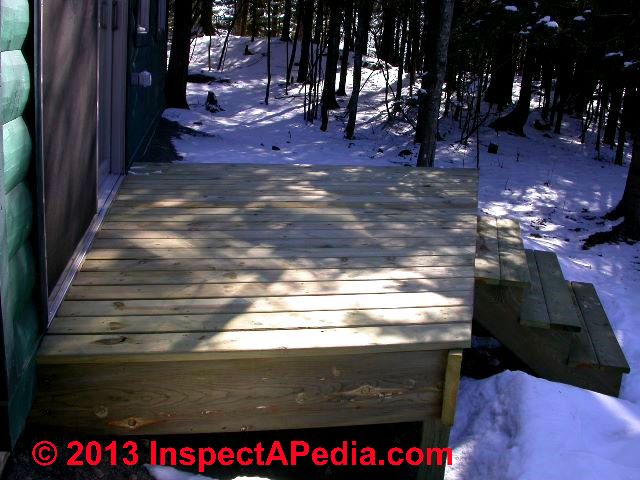
 Most decks are rectangular or made up of several adjoining rectangles. If the corners of the frame are not square, the decking will be harder to install and the results may look odd or worse.
Here we are building a very small addition to an existing deck, and we need to be sure that the right-hand side rim joist is square, or at right angles to the building and to the ledger board that is already in place.
Since we can't move the building nor the ledger board attached to it, we are going to use measurements to move the right hand side rim joist to be exactly perpendicular to the existing structure.
There are simple methods used by carpenters to check for square, depending on the situation - the 3-4-5 rule for very small structures and the 6-8-10 rule or longer measurements for larger structures.
We also use a framing square periodically during framing to be sure that we're keeping our structure and all of its members squared. Also see FRAMING SQUARE USER'S GUIDE
Tips for Accurate Square-Up Measurements
For the most accuracy be sure you do the following:
- Use the largest square-up triangle that you can fit on the structure.
- Always make all measurements from the same corner or "home base"
- Always make all measurements consistently on the inside or outside edge of the framed-structure.
When squaring up framing lumber such as the joists shown in my photo, always make all measurements on the same side of all of the joists - in the photo you'd use either the outside edge or the corresponding inside edge of the framing lumber that is enclosing the triangle you're measuring.
In this case as I'm building a tiny addition to complete an previous restoration of a deck that used to be there by adding onto an existing structure, it's easier to read the tape measure on the "inside" edges of the framed enclosure.
Typically you'll keep one side, probably the ledger board that's already bolted to the building, as fixed in position and you will move the perpendicular side of your structure in or out until your diagonal measures exactly 10 ft. if you're using the 6-8-10 rule or until it measures 5 ft. if you're using, as I am here, the 3-4-5 rule.
...
How to Make the Structure Plumb: Perfectly Vertical Posts, Walls, Other Structures
When you start installing the posts for your deck, you will need to make sure that each one is plumb. To do so, hold a carpenter’s level securely against the post, then move the post until the bubbles are centered in the two end vials. Check and plumb two adjacent sides.
Another tool that can be used is a plumb bob. On a still day, a plumb bob will hang perfectly straight up and down from a piece of string.
Definition of plumb structures
“Plumb” means true to a vertical plane. A plumb object takes maximum advantage of gravity, transferring loads directly to the earth. “Level” means true to a horizontal plane (that is, to the horizon).
And when a plumb object meets a level object, they form a 90-degree angle, which is the basis of “square.”
Fortunately, each of these properties can be checked easily with the techniques described here. By monitoring your deck building for plumb, level, and square at each step, you can ensure that succeeding steps start off on the right foot.
Watch out: when checking a post or wall for plumbness be sure to check with your level on two sides of the post or wall-end. Otherwise your structure may lean, fouling up the rest of its construction.
...
How to Make a Structure Level
 Beams, joists, and decking should all be level - unless you are building a surface with a deliberate slope such as a slight pitch in a deck to drain away from a building.
Using the procedures given here, you can check supporting posts and beams as well as finished floors for level easily with a carpenter’s level placed in the horizontal position.
Watch out: when laying out a new structure be sure that the boards or string lines used in layout are level. Otherwise your length measurements may be incorrect.
How to use a Carpenter's Level
When the bubble is centered in the middle vial, the object is level.
When you are using a level to check a long board or post, place the level at several spots along the entire length.
If the bubble changes resting spots from one location to another, the lumber is probably bowed and may need to be replaced.
Squaring up an irregularly-shaped deck (left) still requires that its surface be properly leveled and its posts properly plumb.
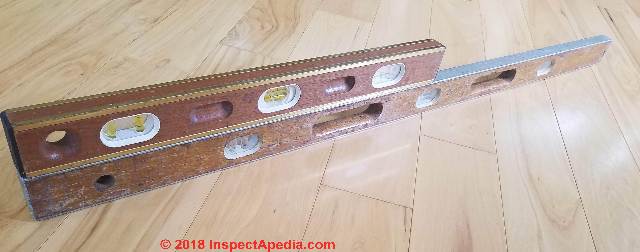
Watch out: when checking level or flatness your level itself could be off. Over a long distance that can be important.
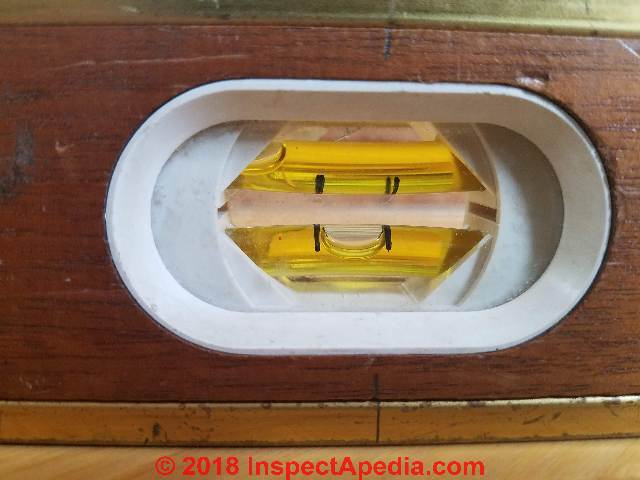 Levels are some-what delicate tools.
To see if yours is accurate, place it on a flat, solid surface that is nearly plumb or level. With the level in position, take a close look at the location of the bubble. Then, without lifting the level, rotate it on its axis 180 degrees, and let it come to rest in the same position on the surface.
If the bubble is in the same position as before, the level is accurate.
Sometimes you'll find that in a pair of level bubble gauges (as in my photo) one of them is spot-on while the other is slightly off - the error can be in the level not in the surface it's sitting upon.
Tip: I put a mark to one side of the center bubble set in my level so that I can see which way I've turned-it. Then if I find that one of the pair of level bubble scales is spot-on I mark the level to always put that side of the level UP. A few pricey levels have bubble gauges that can be adjusted.
Sometimes you need to establish a level between a reference point on one surface, such as a ledger, and a point on another, such as a post, without having an installed board between them on which to set a level.
How to Level a Larger Structure
There are several methods to accomplish this chore easily and reliably when the distance between two framing members that you want to level is longer than your level itself. .
- Use a level extender:
The first is to set the level at the center of a long, straight board, then move the board up and down until the bubble is centered. If you're doing this a lot you can also purchase an extendable and rigid strait-edge that can be used with your level.
This effectively allows you to turn a 2- or 4-foot level into an 8-, 10-, or 12-foot level. - Use a water level:
For those times when a carpenter’s level will not reach, such as when you are establishing ledger locations on two sides of a house or are determining post heights for a large deck, a water level is indispensable.
It operates on the principle that water in a flexible tube will seek the same level on each end. You can make your own using any length of 3/8-inch or 5/i6-inch clear vinyl tubing.
Fill it with water and a little food coloring for visibility. Make sure there are no air bubbles or kinks in the tubing and keep the tubing ends open. Set one end of the tubing so that the water level aligns with your reference mark.
Then place the other end of the tubing in the desired location. Once the water stabilizes, it will be level with the other end.
An even simpler approach is to buy a commercial water level that beeps when level has been established in the tube. - Use a Builder's Transit or Dumpy Level:
Buy, rent, or borrow a dumpy level, transit, or builder's transit or level and tripod. This approach can be very accurate but requires some learning and skill to make proper use of the instrument.
...
Adjustment of a Deck or Floor to Level
 If your structure, say a floor or deck is meant to be level and it's not, you'll need to move its perimeter frame sides up or down until your level tells you it's now flat. The choice of which side has to move up or down may be limited.
If for example you've bolted a ledger to the building to construct a deck, it's easier to move the deck's outer rim joist up or down than to relocate the ledger board.
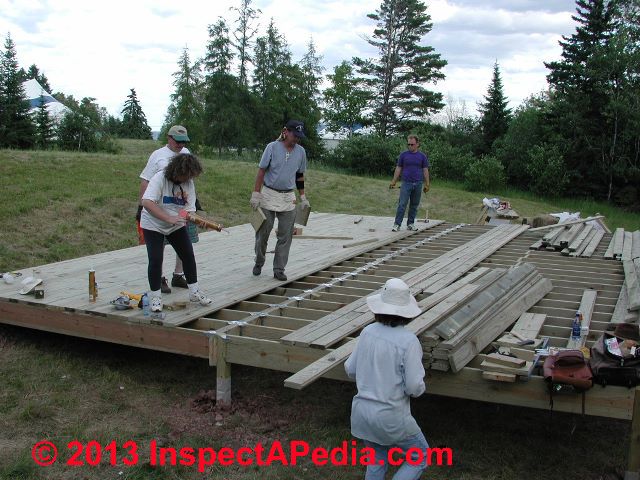
Deliberate Adjustment Out of Level
Some structures like the Summerblue Arts Camp stage shown in our photo should be built deliberately sloped in one direction.
We might slope the surface of a deck slightly, perhaps 1/8" per foot, to improve drainage and to send its drainage away from the building to which its attached.
In the case of the stage, the director wanted the stage to slope slightly down towards the audience and to raise its rear for theatrical purposes.
But the stage couldn't slope too much or it might have led to another form of slip-ups among its actor-users.
The original construction, installation and long term performance of this outdoor performing arts stage floor are described in a series of articles beginning
...
...
Continue reading at DECK PIER CONSTRUCTION or select a topic from the closely-related articles below, or see the complete ARTICLE INDEX.
Or see these
Recommended Articles
- BATTER BOARDS LAYOUT METHOD for basic layout procedures to place a structure on the ground.
- DECK PIER CONSTRUCTION
- DECK & PORCH CONSTRUCTION - home
- FRAMING SQUARE BRACE TABLE
- FRAMING TRIANGLES & CALCULATIONS - using the 6-8-10 rule for stairs, roofs, walls, or other structures
Suggested citation for this web page
DECK LEVEL PLUMB SQUARE-UP 6-8-10 RULE at InspectApedia.com - online encyclopedia of building & environmental inspection, testing, diagnosis, repair, & problem prevention advice.
Or see this
INDEX to RELATED ARTICLES: ARTICLE INDEX to BUILDING DECKS & PORCHES
Or use the SEARCH BOX found below to Ask a Question or Search InspectApedia
Or see
INDEX to RELATED ARTICLES: ARTICLE INDEX to BUILDING STRUCTURES
Or use the SEARCH BOX found below to Ask a Question or Search InspectApedia
Ask a Question or Search InspectApedia
Try the search box just below, or if you prefer, post a question or comment in the Comments box below and we will respond promptly.
Search the InspectApedia website
Note: appearance of your Comment below may be delayed: if your comment contains an image, photograph, web link, or text that looks to the software as if it might be a web link, your posting will appear after it has been approved by a moderator. Apologies for the delay.
Only one image can be added per comment but you can post as many comments, and therefore images, as you like.
You will not receive a notification when a response to your question has been posted.
Please bookmark this page to make it easy for you to check back for our response.
Our Comment Box is provided by Countable Web Productions countable.ca
Citations & References
In addition to any citations in the article above, a full list is available on request.
- [1] Steve Bliss's Building Advisor at buildingadvisor.com helps homeowners & contractors plan & complete successful building & remodeling projects: buying land, site work, building design, cost estimating, materials & components, & project management through complete construction. Email: info@buildingadvisor.com
Steven Bliss served as editorial director and co-publisher of The Journal of Light Construction for 16 years and previously as building technology editor for Progressive Builder and Solar Age magazines. He worked in the building trades as a carpenter and design/build contractor for more than ten years and holds a masters degree from the Harvard Graduate School of Education. Excerpts from his recent book, Best Practices Guide to Residential Construction, Wiley (November 18, 2005) ISBN-10: 0471648361, ISBN-13: 978-0471648369, appear throughout this website, with permission and courtesy of Wiley & Sons. Best Practices Guide is available from the publisher, J. Wiley & Sons, and also at Amazon.com - [2] Decks and Porches, the JLC Guide to, Best Practices for Outdoor Spaces, Steve Bliss (Editor), The Journal of Light Construction, Williston VT, 2010 ISBN 10: 1-928580-42-4, ISBN 13: 978-1-928580-42-3, available from Amazon.com
- [3] Prescriptive Residential Wood Deck Construction Guide, based on the 2009 International Residential Code, American Forest & Paper Association, Inc., provided by reader Mark Morsching from Everflashing.
- [4] Mark Morsching, Everflashing, Tel: 800-550-1667, Email: everflashing@gmail.com. The Everflashing product comes in G-185 and Stainless Steel and is intended for use with treated lumber with copper in it. Everflashing produces a variety of specialty flashing products including flashings for use with decks at deck ledgers and deck perimeters.
- [2] Manual for the Inspection of Residential Wood Decks and Balconies, by Cheryl Anderson, Frank Woeste (Forest Products Society), & Joseph Loferski, October 2003, ISBN-13: 978-1892529343,
- [5] Claudia Hudson, Asheville NC, Tel: 828-252-0644 Email: claudiahudson@charter.net . Ms. Hudson is an SEO copyrighter / content writer. She has provided background research and text for InspectApedia's articles on deck and porch construction methods & procedures. April 2013.
- Our recommended books about building & mechanical systems design, inspection, problem diagnosis, and repair, and about indoor environment and IAQ testing, diagnosis, and cleanup are at the InspectAPedia Bookstore. Also see our Book Reviews - InspectAPedia.
- In addition to citations & references found in this article, see the research citations given at the end of the related articles found at our suggested
CONTINUE READING or RECOMMENDED ARTICLES.
- Carson, Dunlop & Associates Ltd., 120 Carlton Street Suite 407, Toronto ON M5A 4K2. Tel: (416) 964-9415 1-800-268-7070 Email: info@carsondunlop.com. Alan Carson is a past president of ASHI, the American Society of Home Inspectors.
Thanks to Alan Carson and Bob Dunlop, for permission for InspectAPedia to use text excerpts from The HOME REFERENCE BOOK - the Encyclopedia of Homes and to use illustrations from The ILLUSTRATED HOME .
Carson Dunlop Associates provides extensive home inspection education and report writing material. In gratitude we provide links to tsome Carson Dunlop Associates products and services.
 | HOME | ABOUT | ASK a QUESTION | CONTACT | CONTENT USE POLICY | DESCRIPTION | POLICIES | PRIVACY | |
| © 2024 - 1985 Publisher InspectApedia.com - Daniel Friedman | |||||||||