
InspectAPedia® FREE Encyclopedia of Building & Environmental Construction, Diagnosis, Maintenance & Repair |
Question? Just ask us! InspectAPedia
|
 Electrical Wire Stripping Tips for Homeowners
- POST a QUESTION or COMMENT about how to strip electrical wires
This article provides basic tips on how to strip the ends of electrical wires used in homes.
This website provides information about a variety of electrical hazards in buildings, with articles focused on the inspection, detection, and reporting of electrical hazards and on proper electrical repair methods for unsafe electrical conditions. Critique and content suggestions are invited. Credit is given to content editors and contributors.
Sketch at page top courtesy of Carson Dunlop Associates, a Toronto home inspection, education & report writing tool company [ carsondunlop.com ].
InspectAPedia tolerates no conflicts of interest. We have no relationship with advertisers, products, or services discussed at this website.
Electrical Wire End Stripping Tips
Watch Out: Do not attempt to work on your electrical wiring, switches, or outlets unless you are properly trained and equipped to do so. Electrical components in a building can easily cause an electrical shock, burn, or even death.
Even when a hot line switch is off, one terminal on the switch is still connected to the power source. Before doing any work on the switch, the power source must be turned off by setting a circuit breaker to OFF or removing a fuse
. See SAFETY for ELECTRICAL INSPECTORS and ELECTRICAL WIRING BOOKS & GUIDES
Different kinds of cables and electrical wire are commonly used by the homeowner or electrician when performing routine wiring tasks.
These tasks are fairly easy to do but practice with the techniques involved always helps. Before actually working with a type of wire or cable that is new to you, cut off a short piece and try stripping, joining, etc. Experiment a bit to find out which of the tools you have available are easiest for you to use and which do the best job. A little time spent in trial and error will make the job go faster.
How to Strip the Wire Ends for Plastic-Sheathed Electrical Cable
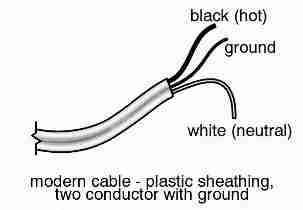
Permanent indoor installations are made by running lengths of wire between outlets and switches along or inside walls, floors, and ceilings. An electrical circuit always needs a hot and a neutral conductor plus a ground for safety.
When these individually insulated wires (black for hot, white or gray for neutral) are held together inside plastic or metal sheathing, the unit is called an electrical cable.
The most commonly used electrical cable for indoor wiring is the flat, white plastic type plastic-covered wire, or "Romex" (a trade name). Properly plastic-covered electrical wire is called "NMC" - non-metallic-sheathed cable. .
While there are many types and grades of non-metallic cable electrical wire, there are three basic kinds of interest to homeowners for most residential applications.
Sketch courtesy of Carson Dunlop Associates, a Toronto home inspection, education & report writing tool company [ carsondunlop.com ].
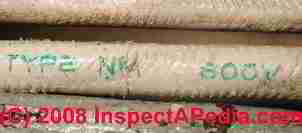
The type of electrical wire and its intended use is indicated by code letters printed on or embossed into the plastic wire jacket. (Our photo shows an obsolete aluminum conductor NM wire made by Primus).
- Type NM electrical cable is designed for normal indoor electrical wiring such as lighting and receptacle circuits.
- Type NMC electrical cable is insulated well enough to use above ground or in damp areas indoors
- Type UF electrical cable can be buried outdoors. (Underground Feeder). Note that UF electrical cable intended for use underground may not be rated for above-ground outdoor use where sunlight can cause deterioration of the cable sheathing and thus may make the wiring unsafe.
How to Remove the Plastic Sheathing from Plastic-Sheathed Electrical Wire
- Make certain that the electrical power has been turned off
and that you've used a test tool such as a VOM or neon tester to confirm that the wires you're working on are not electrically live.
Failure to take this step risks a fatal electrical shock. - Place cable on a solid flat surface.
- Determine the length of insulation to be removed.
The cut through the plastic wire jacket should be six to eight inches long. Some electricians spread their hand wide and use the distance between the tip of their pinkie and the tip of their thumb to choose the length of wire to be stripped. - Cut the wire cable covering in its center. Use enough pressure to penetrate the sheathing but not so much that you cut the insulation on the inner wires.
- Use a utility knife to cut the sheathing along the flat side. Try to make the cut straight and as nearly as possible in the center of the sheathing.
- Alternatively, use the inexpensive NMC wire stripping tool
available at any electrical supply store or building supply store.
This tool is a simple metal device that slips over the end of the plastic-covered electrical cable; when the two sides of the tool are pressed together a small metal tooth cuts into the center of the cable; holding the cable body in your left hand, grasp the stripping tool in your right hand, squeeze it on the wire and simply pull it towards the end of the wire and off.
You'll see that this little tool makes a nice cut down the very center of the wire and that it will not damage any of the conductors.
Why do we start our wire stripping procedure in the center of the wire?
When you cut the end of a NMC electrical wire you'll see how the electrical wires are arranged: you'll see an insulated black wire (the hot wire) on one side of the cable, an insulated white wire (the neutral wire) on the opposite side of the cable, and running in the center you will see a bare (or paper-wrapped) copper ground wire.
By cutting in the center of the wire to begin your wire stripping procedure, your knife tip will run alongside the bare ground wire and you'll minimize the chance of nicking or damaging the black or white insulation on the individual hot or neutral wires.
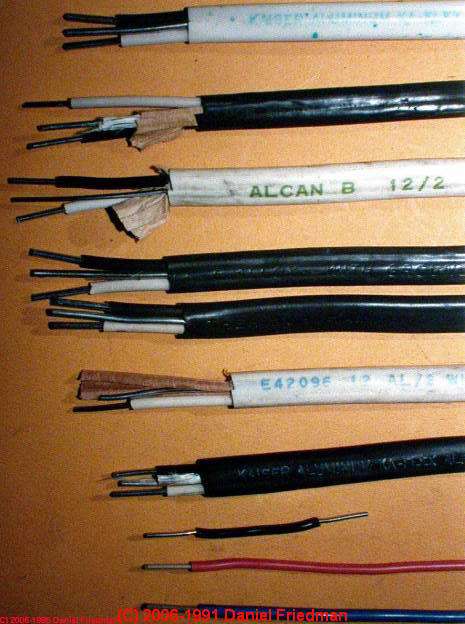
Above: photo of stripped ends of aluminum electrical wiring.
See ALUMINUM WIRING HAZARDS & REPAIRS - home
- Peel back the plastic sheathing to the beginning of the cut.
- Trim oft the plastic with wire cutters or large shears.
- Remove and cut off the paper that is wrapped around the inner ground conductor.
- If you see that you have nicked the insulation
covering the hot or neutral conductors or that you have nicked the bare ground wire, simply trim off the section and try again. Above is a photo of stripped wire ends [image] (obsolete solid conductor aluminum wire)
How to Remove the Metal Sheathing from Armored Cable ("BX") Electrical Wires or from Flexible Conduit
Armored cable or metallic-sheathed electrical cable has been in use since 1896 (in the U.K.) and in its most basic form contains two electrical conductors (black-hot and white-neutral) each individually insulated and both usually wrapped with a spiral of paper which is in turn enclosed in a flexible metallic sheathing such as shown in our abandoned-wire photograph below.
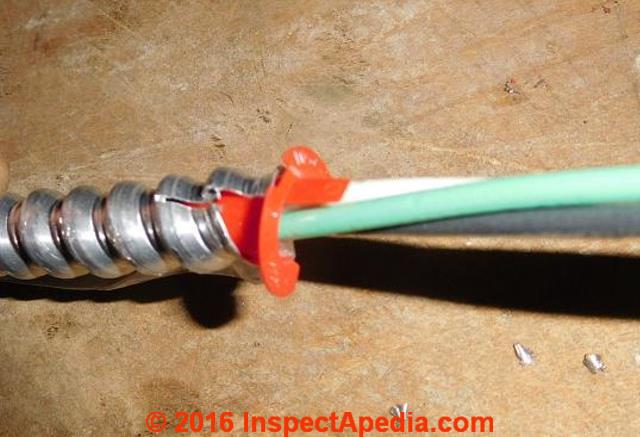
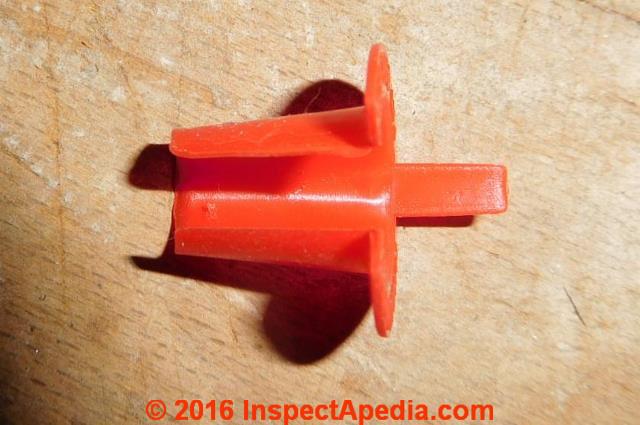
Don't leave a cut like the BX FMC shown above. Do use a plastic bushing insert to protect the conductors from damage.
Hacksaw method for stripping armored cable (AC), BX cable, metallic cable (MC) or flexible metal conduit
- Make certain that the electrical power has been turned off
and that you've used a test tool such as a VOM or neon tester to confirm that the wires you're working on are not electrically live. Failure to take this step risks a fatal electrical shock. - Determine the length
of metal cable covering to be removed - Cut diagonally across one of the metal ribs
at the desired distance from the end of the wire. Cut carefully and stop as soon as you have cut through the metal to avoid cutting into the wire insulation. If you use a hacksaw, a fine-toothed blade will work best. - Snap the armored cable:
Next grasp the cable on each side of the cut and bend the cable back and forth until the armor snaps. - Slide the armor off the cable.
- Unwrap the paper from the inner conductors and cut it away.
- Check the inner conductors for damaged insulation.
Check both at the point where you cut the armored jacket and also along the length of the conductors since in pulling off the armored jacket you could have damaged the individual conductors anywhere along their length.
If the conductor insulation has been damaged you should cut off the damaged wires and begin again.
Below: a red-head bushing intended to protect the conductors from damage by the sharp edges of the cut metal BX sheath.
More about identifying and actual wiring methods when using flexible metal conduit / armored cable - BX is given in detail
at BX WIRING GUIDE where we illustrate using the special BX conduit cutting tool.
at ARMORED CABLE or BX WIRE IDENTIFICATION
How Much Insulation Should Be Removed From the Actual Wires Themselves?
How much insulation should be stripped off of the individual wire conductors once the wire jacket has been removed? As my friend and mentor Mark Cramer, Tampa home inspector and educator, says, "Well ... it depends." It depends on the device to which the wire is to be connected.
We want to remove enough insulation to assure good contact area between the wire and the connecting device, but not too much.
![]()
![]()
![]()
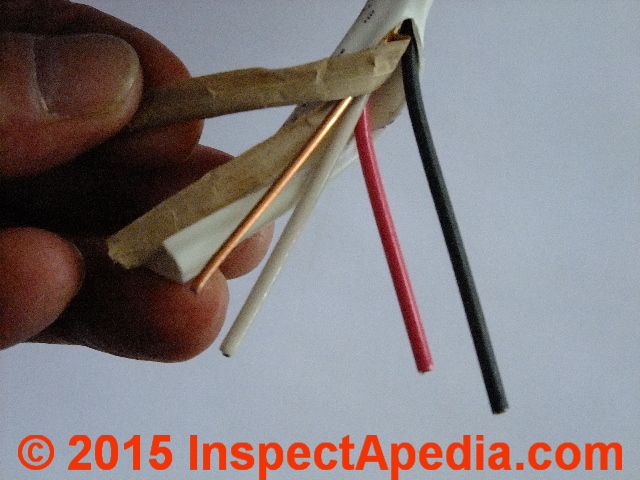
Watch out: not all devices use the same conductor insulation strip-back amount. In general you will need to remove more insulation to wrap a wire around a binding head screw connector than to push the wire into a push-in type connector. Above I've removed the jacket from 14-3 NMB electrical wire.
The ground wire is already bare but I'll need to remove insulation from the black, red, and white conductors before they can be connected to a device or to a splice.
Excerpting from HOW to CONNECT WIRES to a RECEPTACLE or SWITCH
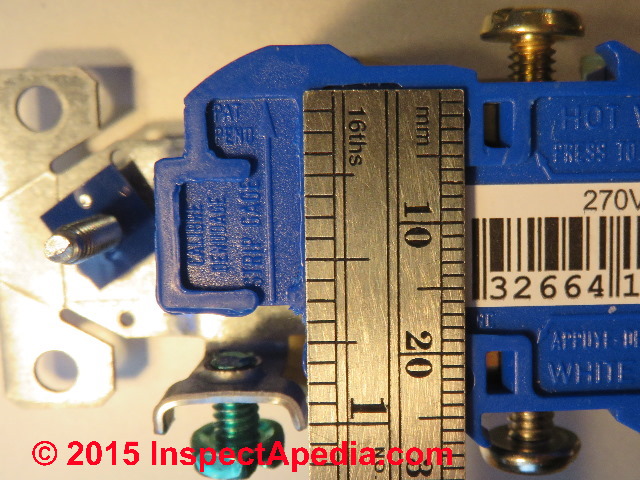
Above I'm showing the wire strip-back gauge area marked on the back of a 15A electrical receptacle. This gauge shows the amount of insulation that should be removed presumably for either of the types of connectors provided on this particular device.
For the device shown above we are to remove from 1/2" to 5/8" of insulation, or about 16mm.
Below is a rather shorter wire stripping gauge telling us that for the device where this gauge appears - in this case a screw-clamp type wire connector, somewhat less insulation is to be removed. For the device shown below we are to remove 9mm of insulation - about 0.35" - quite a bit less insulation than for the device above.
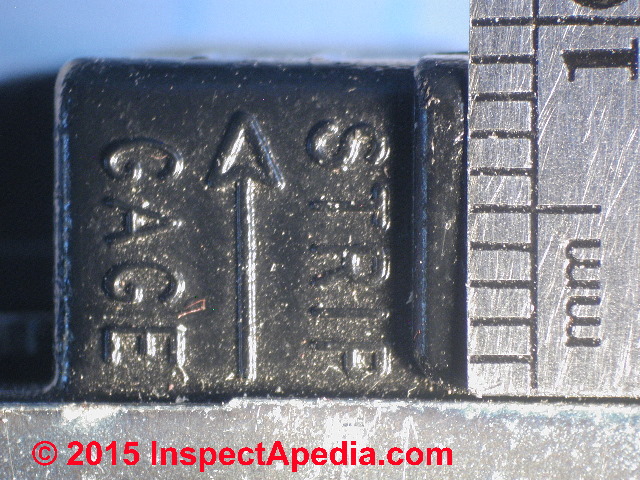
Watch out: don't strip off too little insulation or the wire will not make a safe, reliable electrical connection: either the wire won't push far enough into the screw-clamp connector or the insulation may prevent the binding head screw from pinching the wire - it'll pinch onto the insulation instead, making a loose, poor electrical contact.
And don't strip off too much wire insulation or the extra length of bare wire may cause a short circuit when you push the device back into its electrical box. That's more than embarrassing, it's dangerous. Trust me.
Most light switches and receptacles include this indicator that tells you how much insulation the manufacturer recommends stripping off when wiring this device.
Typically we're removing from 1/2" to about 5/8" of insulation, taking care not to damage or notch the wire. It makes sense, then, to actually look at these instructions given by the manufacturer, as not all strip gauges show the same strip-back quantity.
...
Continue reading at ELECTRICAL WIRING COLOR CODES or select a topic from the closely-related articles below, or see the complete ARTICLE INDEX.
Or see these
Recommended Articles
- ELECTRICAL BASICS
- ELECTRICAL OUTLET, HOW TO ADD & WIRE
- ELECTRICAL RECEPTACLE CONNECTION DETAILS
- ELECTRICAL SPLICES, HOW TO MAKE
- ELECTRICAL WIRING COLOR CODES
- HOW to CONNECT WIRES to a RECEPTACLE or SWITCH
Suggested citation for this web page
ELECTRICAL WIRE STRIPPING TIPS at InspectApedia.com - online encyclopedia of building & environmental inspection, testing, diagnosis, repair, & problem prevention advice.
Or see this
INDEX to RELATED ARTICLES: ARTICLE INDEX to ELECTRICAL INSPECTION & TESTING
Or use the SEARCH BOX found below to Ask a Question or Search InspectApedia
Ask a Question or Search InspectApedia
Try the search box just below, or if you prefer, post a question or comment in the Comments box below and we will respond promptly.
Search the InspectApedia website
Note: appearance of your Comment below may be delayed: if your comment contains an image, photograph, web link, or text that looks to the software as if it might be a web link, your posting will appear after it has been approved by a moderator. Apologies for the delay.
Only one image can be added per comment but you can post as many comments, and therefore images, as you like.
You will not receive a notification when a response to your question has been posted.
Please bookmark this page to make it easy for you to check back for our response.
Our Comment Box is provided by Countable Web Productions countable.ca
Citations & References
In addition to any citations in the article above, a full list is available on request.
- Elizabeth Sluder, Montross, VA, the original author of this article, is a public school teacher who writes basic educational articles about a variety of building, construction, and other topics. Her husband, a licensed electrician, consults for her writing on electrical topics. Her articles appearing at the InspectAPedia TM Website have been edited, illustrated, and on occasion content has been added by the website author. These articles are © 2010 InspectAPedia copyright-protected, all rights reserved.
- Mark Cramer Inspection Services Mark Cramer, Tampa Florida, Mr. Cramer is a past president of ASHI, the American Society of Home Inspectors and is a Florida home inspector and home inspection educator. Mr. Cramer serves on the ASHI Home Inspection Standards. Contact Mark Cramer at: 727-595-4211 mark@BestTampaInspector.com
- John Cranor [Website: /www.house-whisperer.com ] is an ASHI member and a home inspector (The House Whisperer) is located in Glen Allen, VA 23060. He is also a contributor to InspectApedia.com in several technical areas such as plumbing and appliances (dryer vents). Contact Mr. Cranor at 804-873-8534 or by Email: johncranor@verizon.net
- NFPA - the National Fire Protection Association can be found online at www.nfpa.org
- The 2008 NEC National Electrical Code (ISBN 978-0877657903) Online Access LINK (you'll need to sign in as a professional or as a visitor)
- The 2008 Residential Wiring Code, a subset of the 2008 NEC, can be understood through Mastering the NEC at http://www.2008nec.com/shopping/pgm-more_information.php?id=18
- Reference: Wikipedia.org on electrical wiring, September, 2008
- "Electrical System Inspection Basics," Richard C. Wolcott, ASHI 8th Annual Education Conference, Boston 1985.
- "Simplified Electrical Wiring," Sears, Roebuck and Co., 15705 (F5428) Rev. 4-77 1977 [Lots of sketches of older-type service panels.]
- "How to plan and install electric wiring for homes, farms, garages, shops," Montgomery Ward Co., 83-850.
- "Simplified Electrical Wiring," Sears, Roebuck and Co., 15705 (F5428) Rev. 4-77 1977 [Lots of sketches of older-type service panels.]
- "Home Wiring Inspection," Roswell W. Ard, Rodale's New Shelter, July/August, 1985 p. 35-40.
- "Evaluating Wiring in Older Minnesota Homes," Agricultural Extension Service, University of Minnesota, St. Paul, Minnesota 55108.
- "Electrical Systems," A Training Manual for Home Inspectors, Alfred L. Alk, American Society of Home Inspectors (ASHI), 1987, available from ASHI. [DF NOTE: I do NOT recommend this obsolete publication, though it was cited in the original Journal article as it contains unsafe inaccuracies]
- "Basic Housing Inspection," US DHEW, S352.75 U48, p.144, out of print, but is available in most state libraries.
- In addition to citations & references found in this article, see the research citations given at the end of the related articles found at our suggested
CONTINUE READING or RECOMMENDED ARTICLES.
- Carson, Dunlop & Associates Ltd., 120 Carlton Street Suite 407, Toronto ON M5A 4K2. Tel: (416) 964-9415 1-800-268-7070 Email: info@carsondunlop.com. Alan Carson is a past president of ASHI, the American Society of Home Inspectors.
Thanks to Alan Carson and Bob Dunlop, for permission for InspectAPedia to use text excerpts from The HOME REFERENCE BOOK - the Encyclopedia of Homes and to use illustrations from The ILLUSTRATED HOME .
Carson Dunlop Associates provides extensive home inspection education and report writing material. In gratitude we provide links to tsome Carson Dunlop Associates products and services.
 | HOME | ABOUT | ASK a QUESTION | CONTACT | CONTENT USE POLICY | DESCRIPTION | POLICIES | PRIVACY | |
| © 2024 - 1985 Publisher InspectApedia.com - Daniel Friedman | |||||||||