
InspectAPedia® FREE Encyclopedia of Building & Environmental Construction, Diagnosis, Maintenance & Repair |
Question? Just ask us! InspectAPedia
|
 LED Light Bulb Replacements for Fluorescent Tube Bulbs
- POST a QUESTION or COMMENT about LED light bulbs & lighting types for use inside or outside of buildings
Replace a fluorescent tube bulb with an LED light bulb:
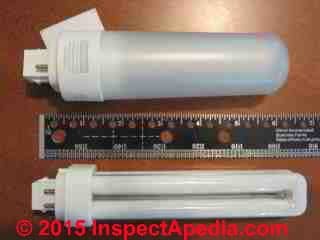
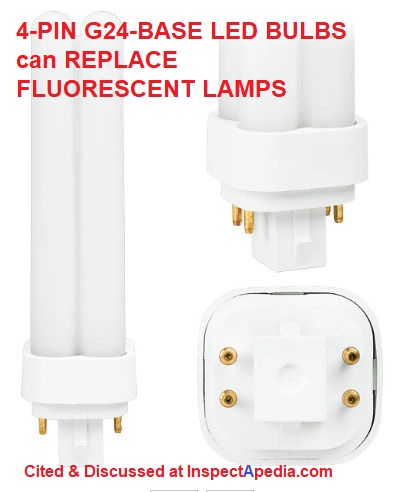
How to replace a tube-type fluorescent light bulb with an equivalent LED light bulb in fluorescent light fixtures. This article explains the key steps in installing an LED bulb (top of photo above) to replace a fluorescent light bulb (bottom of page top photo). The LED G-24 type bulb offers long life, lower energy consumption, but at a higher initial cost for the bulb.
Wiring changes, physical fit of the bulb, and heat dissipation are concerns that the manufacturer points out must be considered in making this bulb replacement. It's actually easy but this bulb swap is not suitable for some light fixture types.
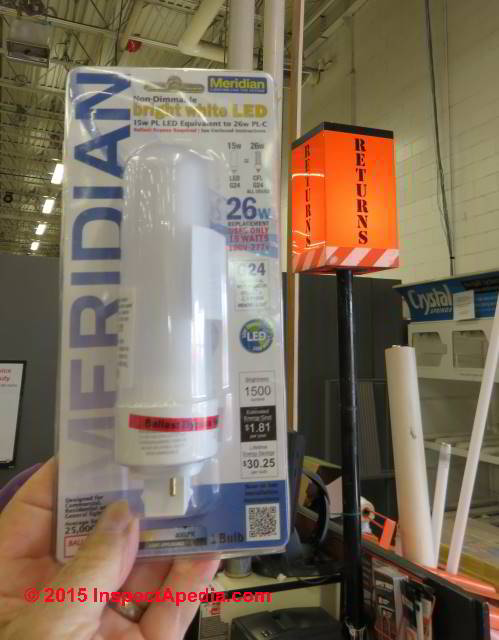
Our page top photo illustrates a 15-W Meridian® LED Type G24 bulb (top of photo) that can replace a conventional fluorescent G24 bulb (bottom of photo).
This article series details guidelines for selecting and installing interior lighting to meet the requirements for different building areas.
InspectAPedia tolerates no conflicts of interest. We have no relationship with advertisers, products, or services discussed at this website.
Installing LED Bulbs in Tube-Type Fluorescent Light Fixtures
 Replacing a conventional tungsten type light bulb with a fluorescent or with an LED light bulb offers considerable energy savings, heat reduction, and longer bulb life. What about replacing a tube type fluorescent light bulb such as the type G24 fluorescent with a G24 LED bulb as shown at the top of this page?
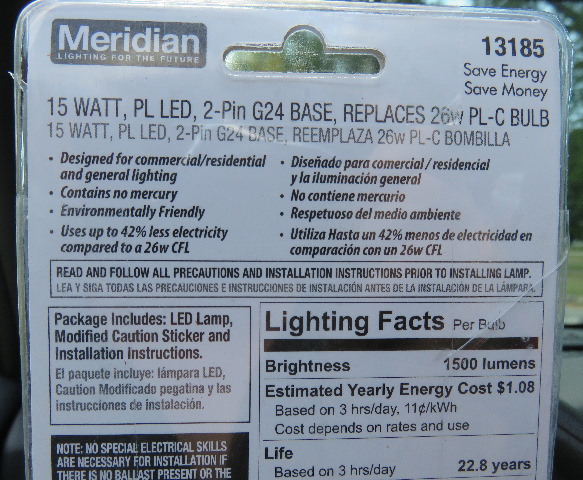
The Meridian G24 LED bulb shown here is rated for 25,000 hours (about 2.8 years if the bulb were left on 24 hours a day, or about 22 years of life if the bulb is left turned-on for 3 hours a day).
The LED G24 has about the same light output (26 Watts) as the fluorescent that it replaces, but its energy consumption is only 15W. At 1500 lumens of light output and an annual operating cost of $1.81 per year (3 hours on per day and 11 cents per KWH) the bulb is an appealing alternative to its fluorescent cousin.
The Meridian G24 LED bulb will replace all -D -X and -Q CFL (fluorescent) bulb types and will fit into any of those lamp sockets or bases.
The company's packaging notes that the lifetime savings of this bulb in energy cost is about $30.00 U.S. which is about the cost of the bulb ($32.97 in September 2015, Home Depot). In short, the bulb, though more expensive than the fluorescent G24 bulb that it replaces, will pay for itself over its life. A note about the abbreviations in these bulb names:
- CFL = compact fluorescent bulb
- LED = light emitting diode type bulb
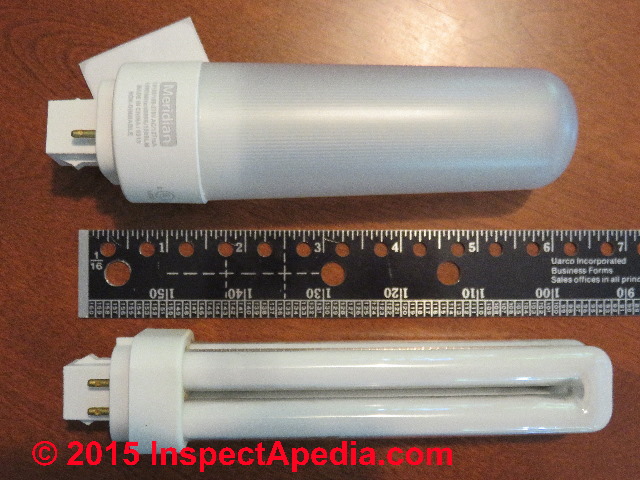
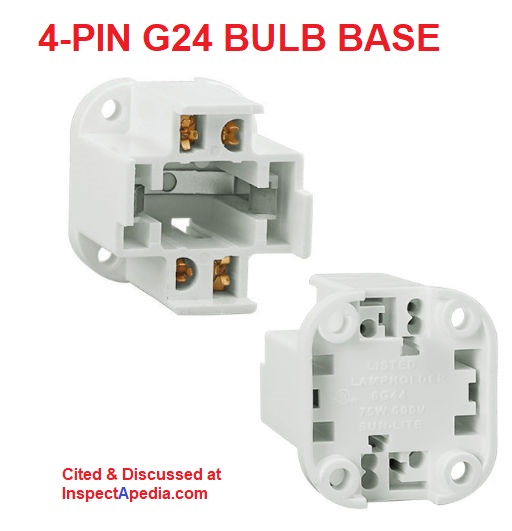
Shown below is the standard, CFL G24 plug-in direct replacement for an un-modified fluorescent light fixture.

Our example is a Phillips CFL G24-3 4-pin base fluorescent bulb ($6.47 in September 2015 at Home Depot) has a brightness of 1800 lumens, an estimated 11-year life, and an estimated annual operating cost of $3.13. The color temperature of this fluorescent bulb is 3500K.
Above you can see the standard 4-pin base used by G24 type bulbs.
The photographs and comments below explain how an LED bulb can be used to replace some tube-type fluorescent light bulbs and where the restrictions and snafus (LED-G24 BULB CONVERSION SNAFUs) may lie.
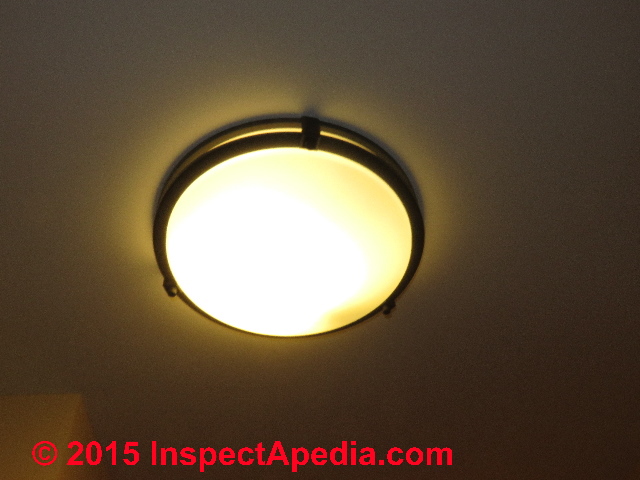
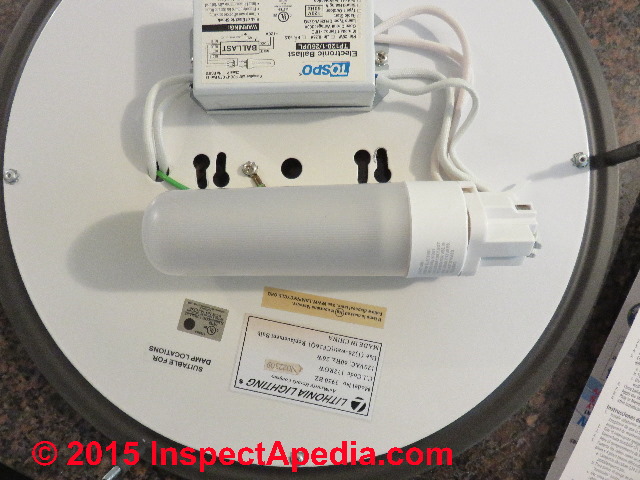
Above is a typical indoor fluorescent light fixture that incorporates a CFL G-24 bulb.
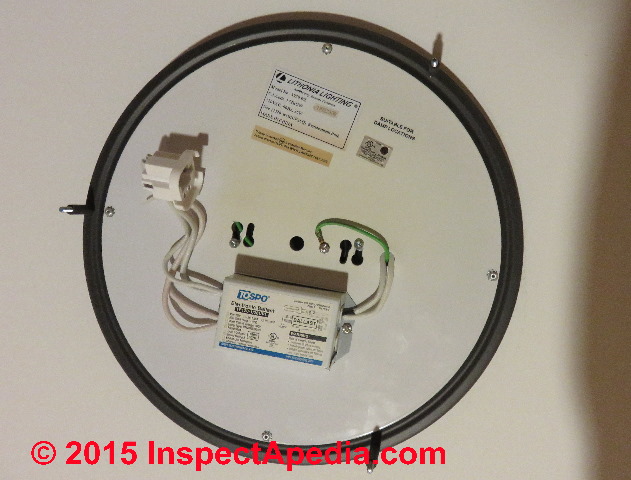
These bulbs are not pretty and in residential use they will usually be in an enclosed fixture such as this one. At above right you can see the white square ballast; 120V or 220V power from the light circuit enters the ballast at its left side (two white wires) and exits the ballast in four wires at its right-side.
If your electrician is going to modify this light fixture to bypass the ballast to accept the LED G-24 bulb the wiring changes are actually pretty simple, but the wire cuts, connections, and splices must be correctly made and properly secured and insulated or your installation will be unsafe (and it may not work either).
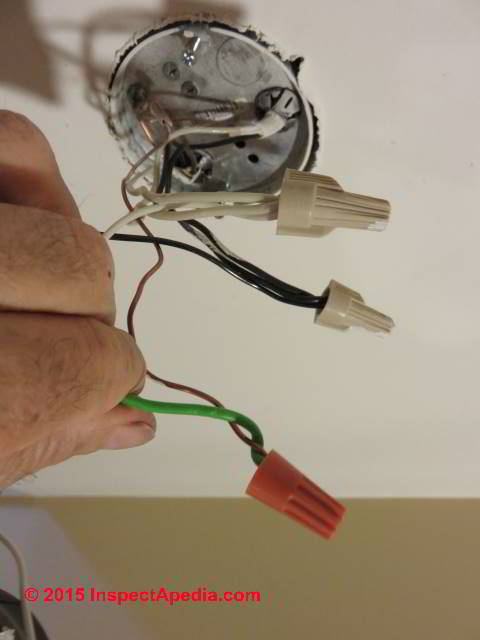
With the electrical power turned OFF to the circuit, and having used a neon tester or DMM or VOM to confirm that power is off at the light fixture, it can be removed.
After the ceiling light fixture mounting screws are loosened the fixture is rotated slightly to let the screws pass through the larger openings to expose the actual electrical wiring connections to the electrical outlet box.
White wires: neutral
Black wires: hot
Green wire: ground
One white and one black wire will connect to the light fixture or in this case to the ballast in the fluorescent light fixture while the bare copper circuit ground wire connects to a ground connection on the fixture or to the fixture's own ground wire (green).
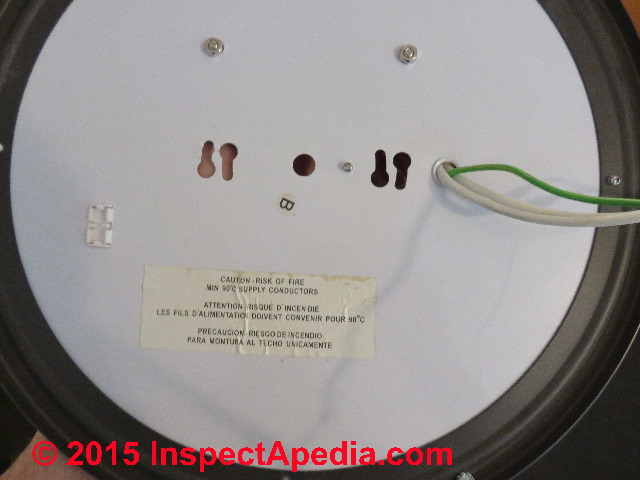
Above you can see two white and one green (ground) wire entering the light fixture. We're looking at the "up" side of the fixture that will be against the ceiling and against the electrical box when the fixture is mounted in place on a ceiling (or wall).
Watch out: When we see two white wires and no black wire here we might think that the manufacturer is telling us that it does not matter which wire gets the circuit "hot" (black) and which gets the circuit "neutral" (white) wires - there is no polarity to be respected at the ballast input wires.
Really? Not necessarily. Flipping the light fixture over and pulling back an outer insulating cover we see that at the input wires to the light fixtures's ballast there is indeed a white and black wire.

Connect white to white and black to black.
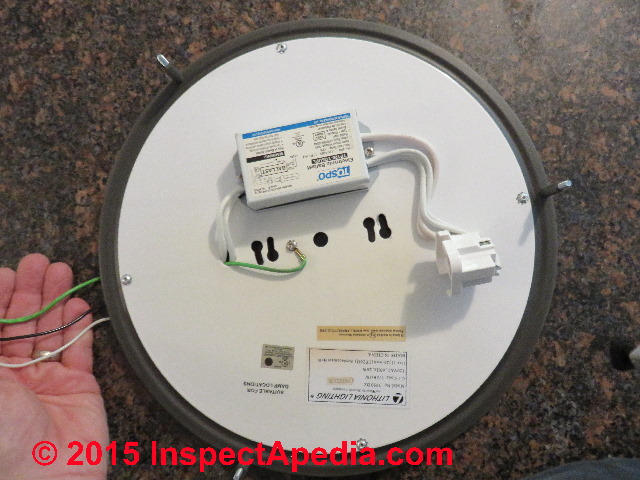
At above right I've pulled out (temporarily) that extra heat and mechanical damage protecting insulation to show the white, black, and green (ground) wire for the fluorescent light fixture. If you were installing this fixture anew in a ceiling to use a fluorescent light bulb you would not modify any wiring and you'd use a CFL-G24 4-pin base bulb like the Phillips bulb shown earlier in this article.
Check the LED G24 Bulb Fit Before Starting Wiring Modifications
Watch out: before cutting and splicing wires or modifying your fluorescent light fixture to perform the ballast bypass (discussed below), check that the slightly-larger LED-G24 bulb will fit where the fluorescent CFL G24 bulb previously plugged in.
Check the Light Fixture Type, Shape & Cover Before Starting Wiring Modifications
Watch out: before before cutting and splicing wires or modifying your fluorescent light fixture to perform the ballast bypass (discussed below), check as well that the type of light fixture into which you're installing the LED bulb is one that is approved by the manufacturer.
That was when we discovered that the particular ceiling fluorescent light fixture shown in this article was not recommended by Meridian for use with this LED G24 bulb: it is an "enclosed" fixture that will be covered when fully installed.
The concern is that heat generated by the LED G24 bulb may reduce bulb life or cause improper or unsafe operation of the light.
Details are at LED-G24 BULB CONVERSION SNAFUs. We considered installing the bulb in the enclosed fixture anyway then decided to obey the manufacturer's warning. We returned the bulb to its place of purchase.
Ballast Bypass Wiring Changes for Using an LED G-24 Bulb in a Fluorescent CFL G-24 Light Fixture
Modifications of the Ballast: ballast bypass to convert a CFL G-24 light fixture to an LED G-24 light fixture are given by the installation instructions from the manufacturer.
An example is shown here. Be sure to read and follow the instructions provided by the manufacturer for the specific bulb you (your electrician) is installing, including the ballast bypass conversion details.
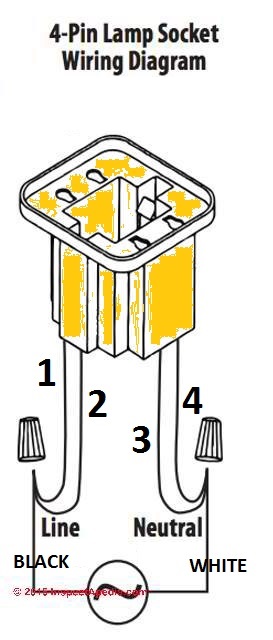
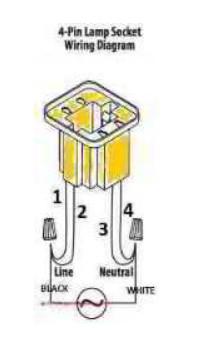
The illustration at left is adapted from Meridian's instructions for ballast conversion for a 4-wire bulb socket.
2-pin and 4-pin bulb sockets have somewhat different wiring details.
The CFL G-24 light fixture we show above and at left is a 4-pin socket: you'll see in the photograph four wires exiting the ballast and connecting to each of the four pins of the socket. But in both cases the line and neutral wires will, on ballast bypass conversion, be connected respectively to the two diagonally-opposed pins on the LED G-24 bulb that is going to plug into the original four pin socket.
In the example wiring instructions (above left) the "line" or "hot" or "black" wire is connected to wires 1 and 2 on the lamp socket so that one of the two diagonally-opposed pins of the bulb will connect to the line side of the circuit when power is on.
In the wiring instructions above the "white" or "neutral" wire is connected to wires 3 and 4 so that the other diagonally opposed bulb pin will connect to the neutral wire.
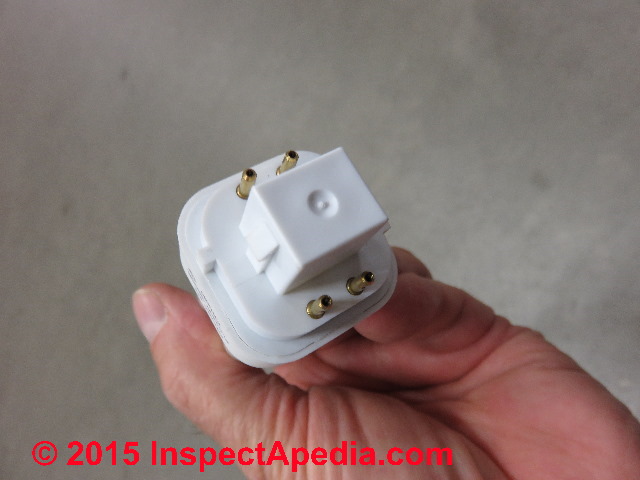
Watch out: you will want to double check the bulb base to observe how the bulb plugs into the lap socket and to triple check the manufacturer's wiring ballast bypass instructions to be sure that you are making the correct connections. Ultimately the circuit line wire will connect to one of the LED G24 bulb base pins and the circuit neutral wire will connect to the second LED bulb base pin.

Above you can see the two-pin LED G24 bulb base (above left) compared with the four-pin original fluorescent CFL G24 light bulb. Notice the two projecting flanges or ears on the right and left side of each base that assure that the bulb can not be plugged in improperly.
Install the "Fixture Modified" Sticker on your Light Fixture
Watch out: after bypassing the ballast on a fluorescent light fixture you must attach the manufacturer-provided warning sticker to tell future electricians or homeowners that the fixture has been converted to LED-bulb use.
The manufacture warns that once the ballast has been bypassed (in fact we think you should remove it completely) you can no longer use this light fixture as it was originally intended: that is you cannot later install a conventional fluorescent bulb - the CFL G24 bulb that was originally used. That may be just fine considering the 22-year life expectancy of the LED G24 that you've installed.
Reader Question: Can I install an LED tube to replace a Fluorescent Tube Light?
(Feb 13, 2015) BD said:
what about installing LED tubes where fluorescent fixtures and ballasts were before?
Reply: Yes but ... watch out!
There are LED tube type lights that can replace some fluorescent light fixtures but I include these warnings:
1. LED Bulb fit space: Be sure that the LED tube light you purchase can physically fit where the fluorescent bulb fit before; some replacements are a bit larger due to a base that includes additional circuitry
2. Re-wiring needed for this LED bulb:
Watch out: you'll have to "bypass" the ballast in the original light fixture by following re-wiring instructions included with the LED bulb that was designed to replace the fluorescent bulb. Failure to perform this wiring change risks shock or fire or injury.
Typically, because you'll be using the existing bulb connection socket you'll disconnect wires from the ballast and feed the proper pairs of wires to the proper bulb base terminals.
I tried one of these replacements recently and found a third problem that caused me to give up and return the LED bulb:
3. Cannot use (some?) LED Replacement Bulbs in enclosed light fixtures: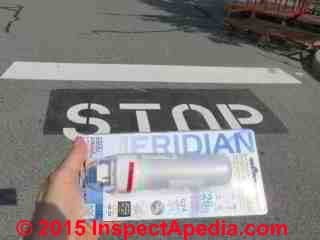
Watch out: The LED bulb may include a warning that it is "not intended for use in enclosed fixtures" and that "Installing in an enclosed fixture will reduce bulb life".
This advice does not expressly prohibit the bulb's use in an enclosed light fixture, leaving us confused about whether the concern is bulb life or electrical and fire safety.
Since many fluorescent bulbs are used in enclosed fixtures, and since this warning is hidden inside the bulb packaging (not visible on the store label, not visible on the package exterior) you wont' discover this critical limitation until you've bought the bulb, opened its packaging, and read the instructions.
In my OPINION the bulb manufacturer and perhaps its lawyers knew perfectly well that the "do not enclose" restriction would make this bulb undesirable for at least some applications for which purchasers would buy the bulb, take it home, then discover that they could not or should not use it.
The package front and back do include multiple warnings
- Warnings to read the instructions before installing the bulb
- Warnings that ballast bypass wiring is required, with a statement that "no special electrical skills are required if the ballast has already been bypassed"
which you should read to mean that if you are replacing a fluorescent bulb the ballast will not have been bypassed and special electrical skills are required. - Warnings that the bulb can only be installed in certain fixtures that are illustrated on the enclosed instructions
which later you'll find out means you don't want to install the bulb in an enclosed fixture - which most residential light fixtures are going to be where a CFL G24 bulb is in use.
The package front includes a scan code that will display the installations instructions on your smart phone.
Really? We ask that any readers who have ever used such a scan code to read the installation instructions before purchasing the bulb should let us know using the page top or bottom CONTACT link as we suspect the number who have used this nice feature is infinitesimally small.
OPINION: The cost and trouble of returning even an expensive $30. bulb to the store will perhaps be too much for a homeowner who took a bus across town to buy a replacement bulb during her lunch hour. The bulb goes in the trash or into storage instead.
Really? Really? Yeah: on the original package of the Meridian LED G24 the warning that you cannot use this bulb in an enclosed fixture did not appear on the package exterior. That image is below.
[Click to enlarge any image]
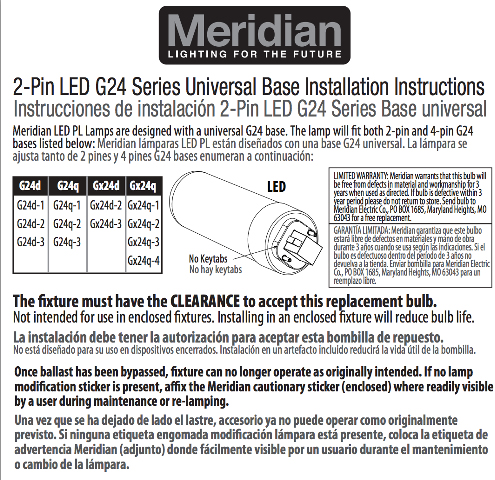
However the company's online instructions shown at above right make this restriction entirely clear. The online instructions are excerpted here, - retrieved 24 Sept 2015 original source https://www.meridianlighting.com/qrcodes/13185-instructions.pdf
Contact Meridian Lighting at
- Meridian Lighting Company, PO BOX 1685 Maryland Heights, MO 63043, U.S.A, Email: contact@meridianelectricco.com Website: https://www.meridianlighting.com
Reader Comments, Questions & Answers About The Article Above
Below you will find questions and answers previously posted on this page at its page bottom reader comment box.
Reader Q&A - also see RECOMMENDED ARTICLES & FAQs
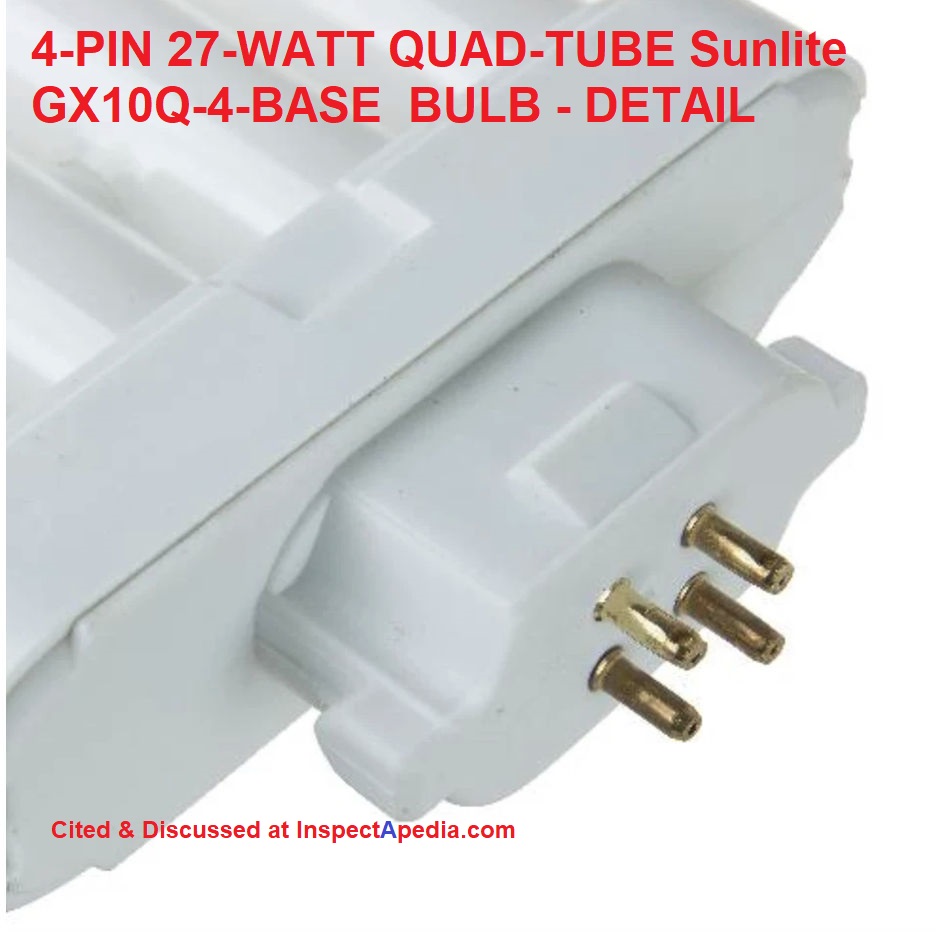
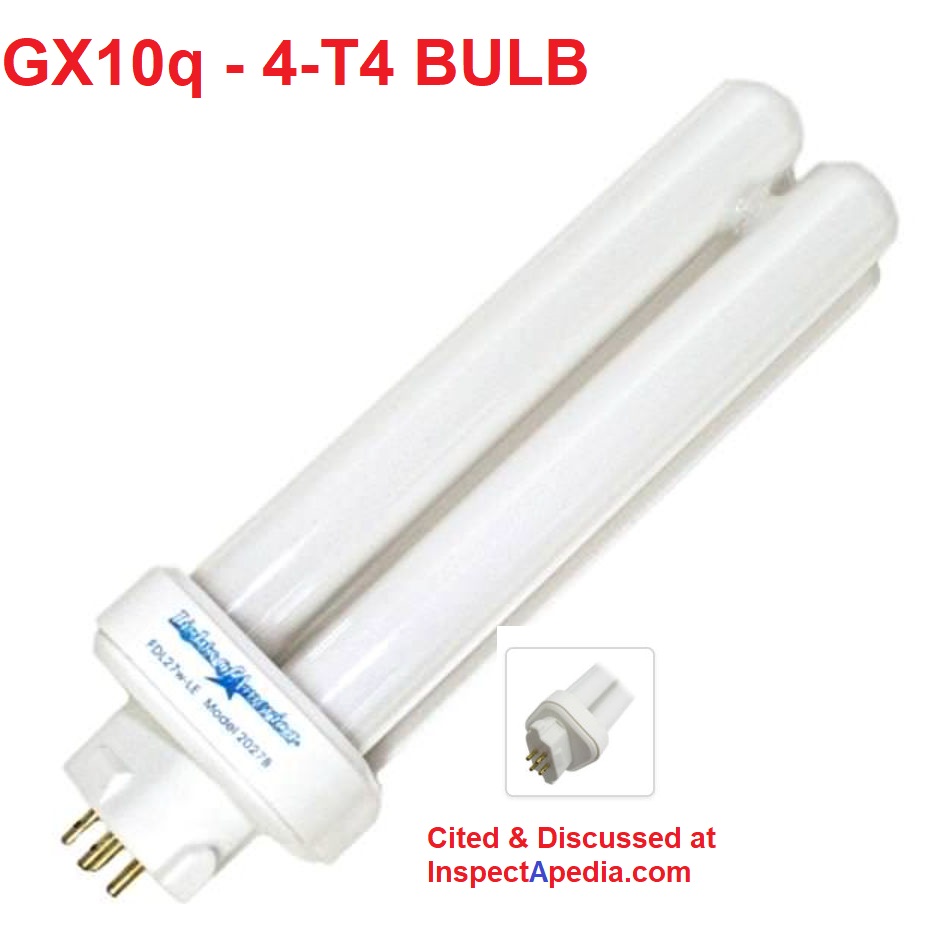
On 2021-03-18 - by (mod) - 27 watt - T4 - 4-Pin (GX10q-4) Base - 2,700K - Warm White - Double Tube / 4-tube Fluorscent or LED Bulbs
On 2021-03-18 - by (mod) -
or this Sunlite 27 Watt FML 4-Pin Quad Tube, GX10Q-4 Base, Daylight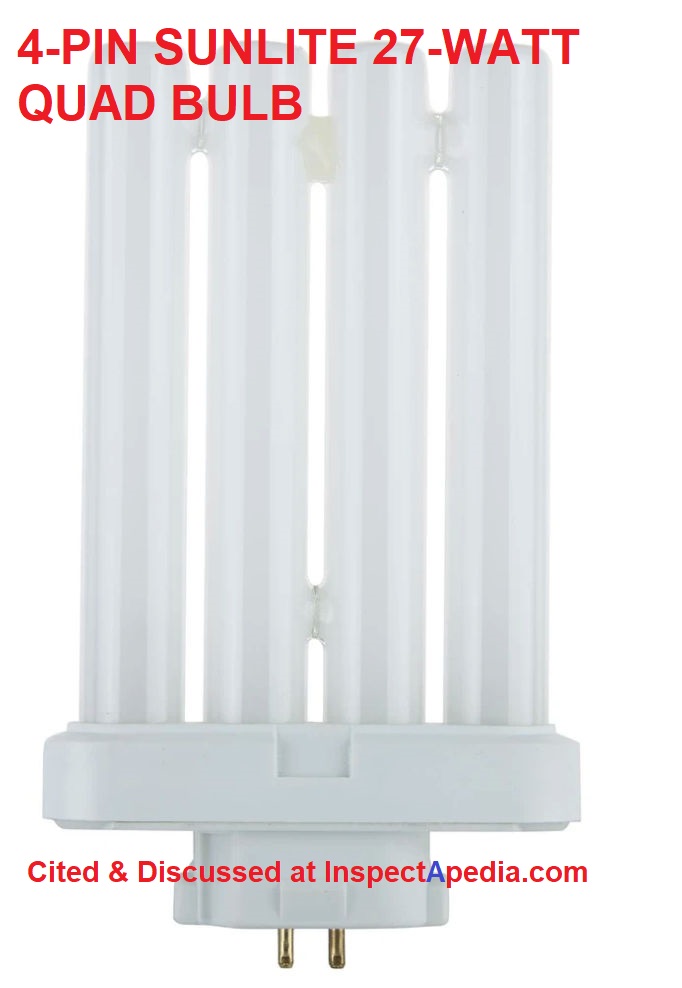
On 2021-03-18 - by (mod) -
@Ar Com, looks like a variant of a 4 pin CFL (compact fluorescent ) in a shape that fit that lamp;possibly a 27 watt - T4 - 4-Pin (GX10q-4) Base - 2,700K - Warm White - Double Tube
There are LED replacements for CFLs - I can't know what was in your lamp previously as it's not in view.
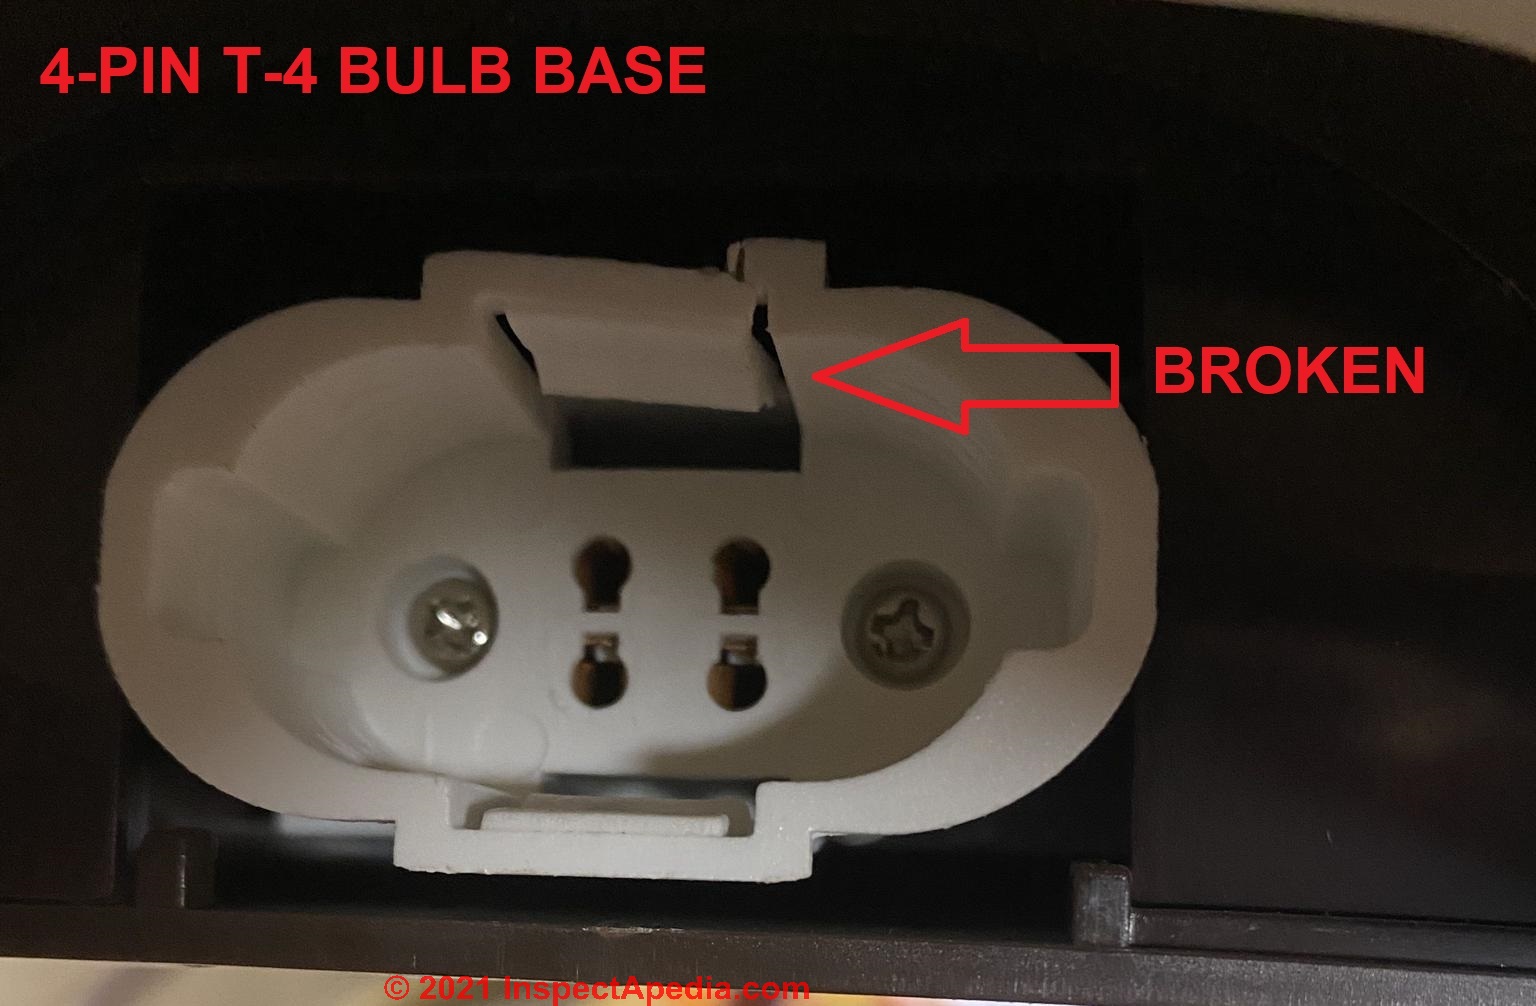
Watch out: the bulb base or "socket" in your photo is broken- as we have annotated on your image
On 2021-03-18 by Ar Com
Here is a pic of the socket.
On 2021-03-18 by (mod)
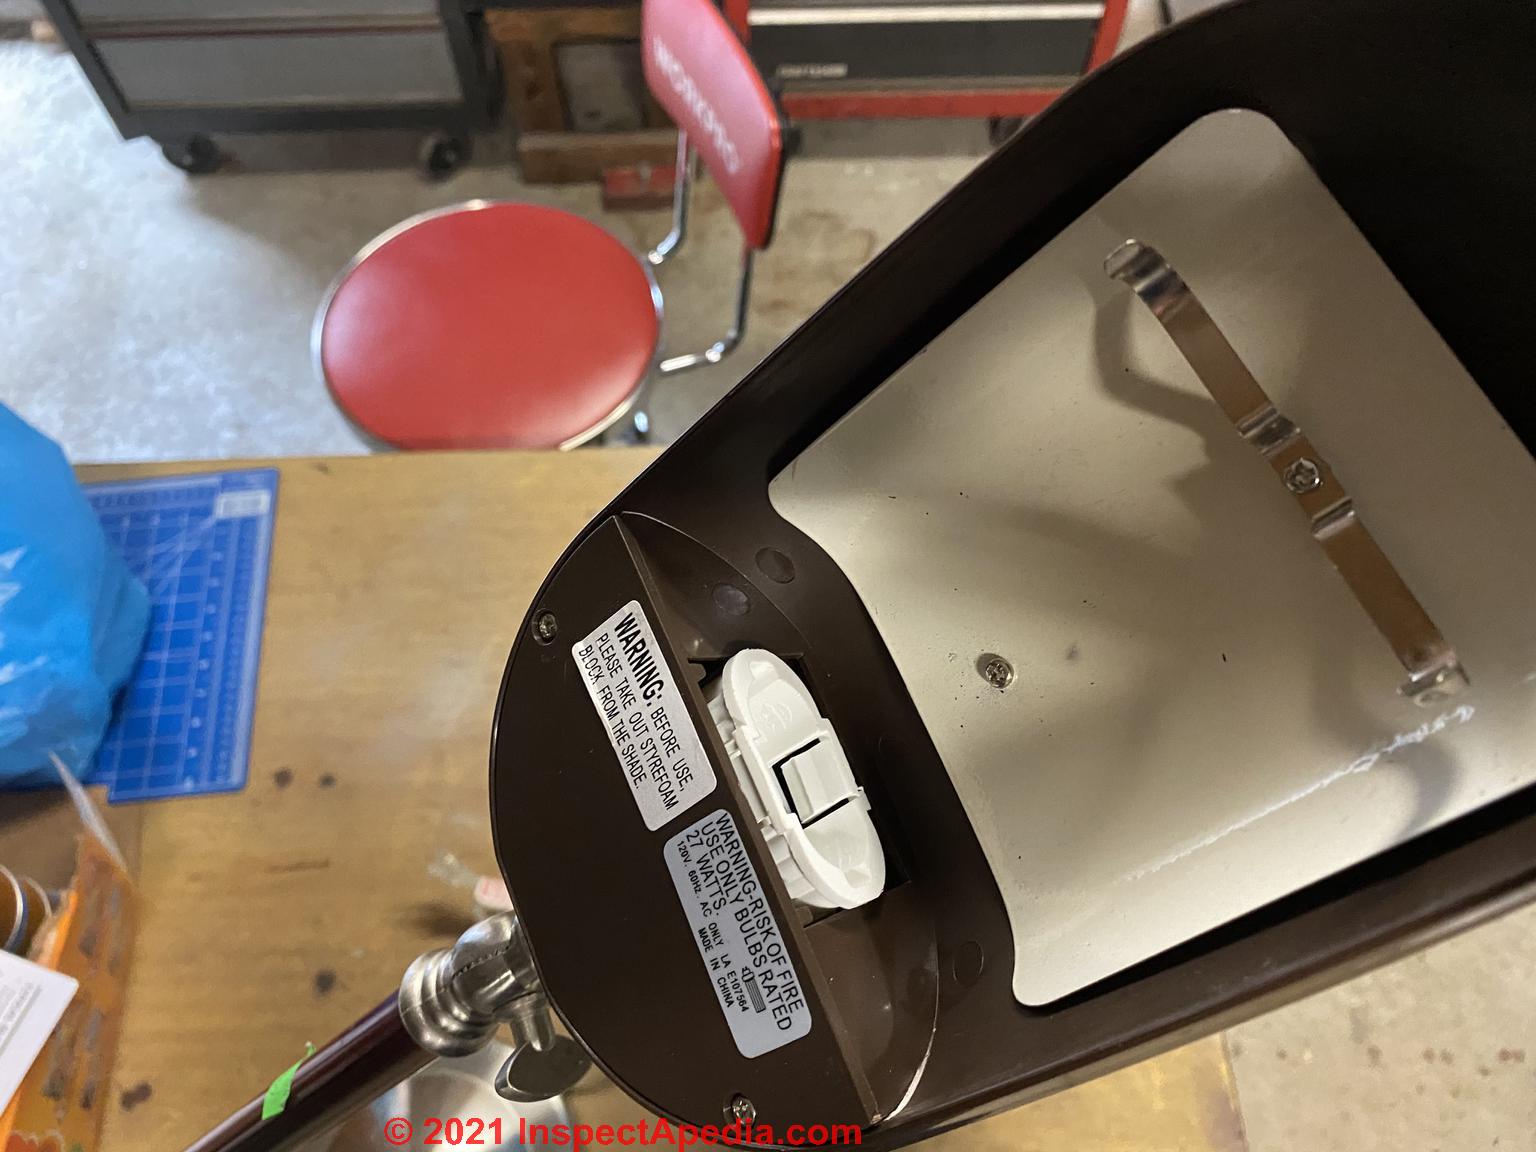
@Ar Com, you want a 25-watt 120VAC bulb whose base matches the bulb socket (not visible) in your lamp;
If you don't have the old bulb to use for a match at your local building supplier or electrical supplier, you will need to bring in the lamp.
On 2021-03-18 by Ar Com
I have a desk lamp that i can not find a bulb for. Can you 4-Phelp?
On 2019-12-20 - by (mod) -
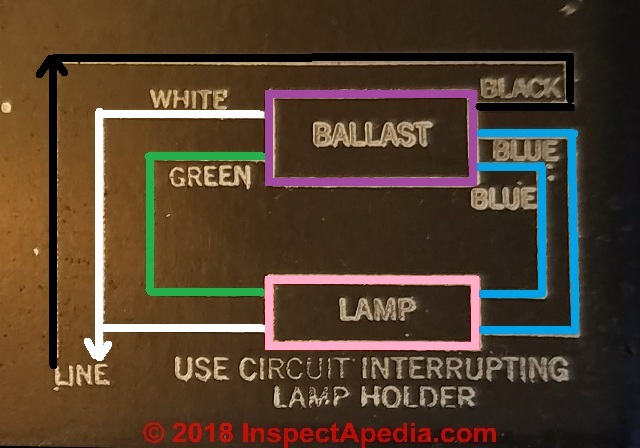
One more detailhttps://inspectapedia.com/electric/Fluorescent-light-ballast-replacement.php FLUORESCENT LIGHT TRANSFORMER / BALLAST REPLACEMENT
we include this simple example of a fluorescent light ballast wiring diagram - a similar one is found on every ballast.
You'll see that the ballast will always have, somewhere on it, a black (line voltage) and white (neutral) wire connection.
When you're converting a fluorescent fixture to use LED bulbs, when you remove the ballast you'll be able to physically see a black and white wire at the ballast - follow these inside your light fixture to find the original hot and neutral wires of the lighting circuit.
On 2019-12-20 - by (mod) -
Here is a typical 4-pin G-24 bulb base; some of these bases us a simple wire push-in connector (visible on the base underside in the photo) The 2 pins of an LED or the 4 pins of an original fluorescent G24 bulb plug into opposing pairs of these wires.The shape of the bulb base will assure that the LED Gx24 bulb's pins will plug into Hot on one side and Neutral on the other.
On 2019-12-20 by (mod) - to bypass the ballast on a light that has a Gx24 socket
Pete
Watch out: DO NOT connect the wires coming OUT of the ballast to the bulb as those will be the wrong voltage for the G-24 base LED bulb. The replacement bulb is a 124VAC device.
Instead we're going to remove the old ballast entirely and then wire the black and white line and neutral wires to the bulb base by salvaging lengths of the old #18 wire (if it's in good condition, else buy new) that came out of the ballast.
First details about a G-24 or Gx24 base bulb wiring when converting from fluorescent bulb to LED bulb - as we do in the article above on this page.
Wiring details for converting a G24 flourescent light fixture to LED - bypassing the ballast:
In the wiring diagram below you're connecting LINE HOT (black) and LINE NEUTRAL (white) to the two opposite sides of the G24 base.
As I think you already realize, because this is AC current, which side of the Gx24 4-pin socket gets which wire isn't critical: ONE SIDE or ONE PAIR of connectors in the socket gets the LINE BLACK (hot) and the OTHER SIDE or Pair of pings gets the LINE WHITE (Neutral);
You'll see that an LED type G24 bulb will have just two pins and that they are diagonally opposed to one another so that you can't make a mistake when plugging in the bulb; one pin will touch white - neutral and the other black- white.
Now moving on to your question in detail:
So which wires connect to the Gx24 bulb socket and which get capped off?
There are two options but BOTH, to be safe, require finding the original fluorescent light ballast.
AT THE BALLAST you should find
1. a pair of line voltage wires, BLACK and WHITE.
2. a ballast with a wiring diagram right on the ballast.
What I recommend, as you are abandoning use of fluorescent bulbs in your fixture, is the following:
1. With power OFF, remove the ballast entirely, and remove all of its wire connections to the lamp socket.
2. Connect the Black line voltage to one of the Gx24 bulb socket pins at the base by splicing a short length of #18 wire (using a twist-on connector to make the splice) onto the line voltage wire and connect the other pin to one of the pairs of wires from one side of the G-24 socket if wires extend from it, else connect to its pair of connectors on one side as in the drawing you attached.
3. Connect the White line neutral wire through a twist-on connector to a section of #18 wire and on to the other side of the G24 socket.
4. Plug in your replacement 2-pin LED G-24-base bulb (example shown below) and turn power on and the bulb should light.
5. Dispose of the old ballast correctly. This may mean returning it to your local hardware store or building supplier and paying a small fee for proper environmental handling of the old ballast as it may contain toxic PCBs or other chemicals.
On 2019-12-20 by captpete43
I am trying to bypass the ballast on a light that has a Gx24 socket.. I have 2 blue wires and 2 yellow wires coming from the socket. Which do I attach to the black and white input wires? Or is it just blue to one and yellow to the other?
Thanks.
...
Continue reading at LED BULB & LIGHTING TYPES or select a topic from the closely-related articles below, or see the complete ARTICLE INDEX.
Or see these
Recommended Articles
Suggested citation for this web page
LED BULB REPLACES FLUORESCENT at InspectApedia.com - online encyclopedia of building & environmental inspection, testing, diagnosis, repair, & problem prevention advice.
Or see this
INDEX to RELATED ARTICLES: ARTICLE INDEX to BUILDING LIGHTING
Or use the SEARCH BOX found below to Ask a Question or Search InspectApedia
Ask a Question or Search InspectApedia
Try the search box just below, or if you prefer, post a question or comment in the Comments box below and we will respond promptly.
Search the InspectApedia website
Note: appearance of your Comment below may be delayed: if your comment contains an image, photograph, web link, or text that looks to the software as if it might be a web link, your posting will appear after it has been approved by a moderator. Apologies for the delay.
Only one image can be added per comment but you can post as many comments, and therefore images, as you like.
You will not receive a notification when a response to your question has been posted.
Please bookmark this page to make it easy for you to check back for our response.
Our Comment Box is provided by Countable Web Productions countable.ca
Citations & References
In addition to any citations in the article above, a full list is available on request.
- [1] Diane Dardwell, "LEDs Emerge as a Popular "Green" Lighting", The New York Times, 22 January 2013, P. B1-2
- [3] GE 13-Watt (60W) A19 Omni Directional Dimmable LED Light Bulb, Model # LED13DA19/830, Internet # 203670150, advertised by Home Depot Stores, retrieved 11/5/2013, original source http://www.homedepot.com
- [4] Phoebus Cartel: the "light bulb cartel", Phoebus was a Swiss corporation named "Phoebus S.A. Compagnie Industrielle pour le Développement de l'Éclairage". Osram, Philips, Tungsram, Associated Electrical Industries, ELIN, Compagnie des Lampes, International General Electric, and the GE Overseas Group were members. Wikipedia Web: https://www.wikipedia.org/ provided background information about some topics discussed at this website provided this citation is also found in the same article along with a " retrieved on" date. NOTE: because Wikipedia entries are fluid and can be amended in real time, we cite the retrieval date of Wikipedia citations and we do not assert that the information found there is necessarily authoritative. 11/5/2013, retrieved.
- "Electrical System Inspection Basics," Richard C. Wolcott, ASHI 8th Annual Education Conference, Boston 1985.
- Best Practices Guide to Residential Construction, by Steven Bliss. John Wiley & Sons, 2006. ISBN-10: 0471648361, ISBN-13: 978-0471648369, Hardcover: 320 pages, available from Amazon.com and also Wiley.com. See our book review of this publication.
- Steve Bliss's Building Advisor at buildingadvisor.com helps homeowners & contractors plan & complete successful building & remodeling projects: buying land, site work, building design, cost estimating, materials & components, & project management through complete construction. Email: info@buildingadvisor.com
Steven Bliss served as editorial director and co-publisher of The Journal of Light Construction for 16 years and previously as building technology editor for Progressive Builder and Solar Age magazines. He worked in the building trades as a carpenter and design/build contractor for more than ten years and holds a masters degree from the Harvard Graduate School of Education. Excerpts from his recent book, Best Practices Guide to Residential Construction, Wiley (November 18, 2005) ISBN-10: 0471648361, ISBN-13: 978-0471648369, appear throughout this website, with permission and courtesy of Wiley & Sons. Best Practices Guide is available from the publisher, J. Wiley & Sons, and also at Amazon.com - In addition to citations & references found in this article, see the research citations given at the end of the related articles found at our suggested
CONTINUE READING or RECOMMENDED ARTICLES.
- Carson, Dunlop & Associates Ltd., 120 Carlton Street Suite 407, Toronto ON M5A 4K2. Tel: (416) 964-9415 1-800-268-7070 Email: info@carsondunlop.com. Alan Carson is a past president of ASHI, the American Society of Home Inspectors.
Thanks to Alan Carson and Bob Dunlop, for permission for InspectAPedia to use text excerpts from The HOME REFERENCE BOOK - the Encyclopedia of Homes and to use illustrations from The ILLUSTRATED HOME .
Carson Dunlop Associates provides extensive home inspection education and report writing material. In gratitude we provide links to tsome Carson Dunlop Associates products and services.
 | HOME | ABOUT | ASK a QUESTION | CONTACT | CONTENT USE POLICY | DESCRIPTION | POLICIES | PRIVACY | |
| © 2024 - 1985 Publisher InspectApedia.com - Daniel Friedman | |||||||||