
InspectAPedia® FREE Encyclopedia of Building & Environmental Construction, Diagnosis, Maintenance & Repair |
Question? Just ask us! InspectAPedia
|
 Zinsco Replacement Circuit Breakers & Electrical PANELS
- POST a QUESTION or COMMENT about finding replacements for Zinsco & Zinsco-Sylvania electric panels & circuit breakers
Zinsco Replacement Panels & Circuit Breakers:
This document describes how to replace Zinsco Circuit Breakers, Zinsco Electric Panels, or Zinsco-type Sylvania Electric breakers and electrical panels in buildings. We describe two methods for correcting this safety hazard in buildings.
Option 1 - replacement of the panel bus assembly or "load center" while leaving the original electrical panel enclosure or "box" and its attached wires intact, by using the Eaton Corp., Cutler Hammer Products "Adjustable Retrofit Kit" and
Option 2 - conventional removal and replacement of the entire electrical panel.
InspectAPedia tolerates no conflicts of interest. We have no relationship with advertisers, products, or services discussed at this website.
Replacement Electrical Panels: for Replacement of Zinsco or Zinsco-type Sylvania Electric Panels
 How should Zinsco electrical panels be repaired: Options for Replacing Zinsco Electric Panels & Zinsco-Sylvania Electric Panels. Zinsco electrical panel replacement alternatives. Field reports on performance of CE or other Zinsco replacement circuit breakers.
Article Contents
- ZINSCO REPLACEMENT PANELS - CONTENTS: How should Zinsco electrical panels be repaired: Zinsco electrical panel replacement alternatives
- OPTION #1 RETROFIT KIT Option of using a retrofit electrical panel replacement kit can save a big part of repair cost
- WHY IT WORKS
- RETROFIT COST What are the typical costs to replace a Zinsco or Zinsco-Sylvania Electrical Panel?
- RETROFIT INSTALLATION procedure
- COMPONENT SELECTION for replacing Zinsco panel bus assemblies, breakers
- PRODUCT SOURCES for replacement Zinsco panel bus assemblies, breakers
- CODE COMPLIANCE for replacement Zinsco panel bus assemblies, breakers
- BACKGROUND & reasons for using replacement Zinsco panel bus assemblies, breakers
- OPTION #2 REPLACEMENT of the entire panel instead of the bus assembly
- OPTION #1 vs OPTION #2 comparing costs & benefits
Watch Out: working with electrical equipment can involve fire, and fatal shock hazards. Electrical repairs must be performed by a qualified, licensed professional electrician. Good workmanship, following manufacturer's instructions, and local and other appropriate code compliance are also essential for a safe and successful outcome.
[Click to enlarge any image]
This is information for building inspectors, home buyers, home owners, and electricians regarding steps to reduce the hazards associated with Zinsco and Zinsco-type GTE Sylvania Zinsco circuit breakers and electrical panels.
Watch Out: as with any electrical installation or repair, these steps must be performed by a licensed and qualified electrician and must comply with appropriate building codes and regulations.
Good workmanship and an accurate assessment of the condition of the electrical panel enclosure which is to be re-used are important for Zinsco Electric Panel.
Watch Out: We do not recommend mere replacement of Zinsco circuit breakers themselves.
Option1 - replace the Zinsco Sylvania panel interior bus assembly using a retrofit kit: The first section of this document OPTION #1 RETROFIT KIT describes how to replace Zinsco or Zinsco-type Sylvania Electric
Panels in buildings using a retrofit kit provided by Eaton Corp., Cutler Hammer Products (E-CH):
Option 1 - replacement of the panel bus assembly or "load center" while leaving the original electrical panel enclosure or "box" and its
attached wires intact, by using the Eaton Corp., Cutler Hammer Products (E-CH) "Adjustable Retrofit Kit".
Option 2 - replace the entire Zinsco Sylvania electrical panel: In a second document section OPTION #2 REPLACEMENT we discuss Option 2 - conventional complete removal and replacement of the entire electrical panel.
Comparison of Options 1 & 2 for Zinsco electrical panel repair or replacement: In a third document section OPTION #1 vs OPTION #2 we express an opinion which compares these two methods.
Where the original panel enclosure is in good condition, Option 1 should cost less and be a faster job than Option 2 because less labor and less disruption is involved.
We do not recommend mere replacement of Zinsco circuit breakers themselves, as discussed at ZINSCO REPLACEMENT CIRCUIT BREAKERS. Also see FPE REPLACEMENT BREAKERS.
This is information for building inspectors, home buyers, home owners, and electricians regarding steps to reduce the hazards associated with Zinsco Electric circuit breakers and service panels.
Safety warning: as with any electrical installation or repair, these steps must be performed by a licensed and qualified electrician and must comply with appropriate building codes and regulations. Good workmanship and an accurate assessment of the condition of the electrical panel enclosure which is to be re-used are important for Zinsco Electric Panel
OPTION #1 RETROFIT KIT - Zinsco/Sylvania Panel Replacement - Option #1 Using the Eaton Corp., Cutler Hammer (E-CH) Products Adjustable Retrofit Kit
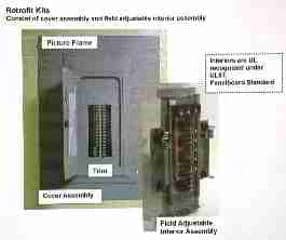
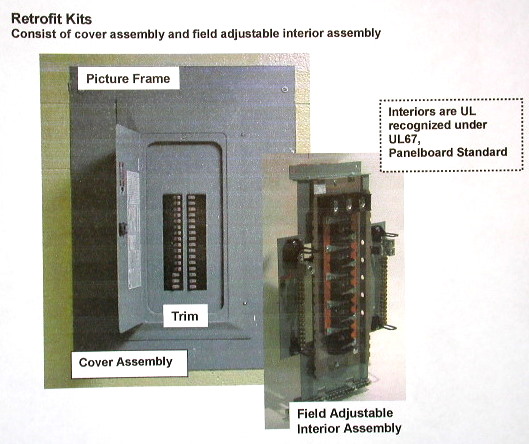
Adjustable Zinsco Sylvania Electric Panel Retrofit Kits produced by Eaton Corp., Cutler Hammer Products are a patented design new electric panel interior designed to replace aging electrical panels in residential and light commercial applications.
The unique features are that the existing box and wiring can be re-used for convenience, if still in good working condition. Also, a custom trim to fit the existing box is available.
Using the retrofit kit involves disconnecting the electrical circuits from the existing load center "bus assembly" circuit breakers. The old bus assembly and other internal parts (neutral bus, ground bus, etc) in the existing panel are removed. The panel box or "enclosure" itself is left in place, and the electric circuit wires which entered that box are left undisturbed.
After inspection by the installer to confirm the soundness of the panel box, any openings in the box body are closed, a new load center (panel bus and circuit breaker set, ground and neutral bus bars) is mounted in the existing electric panel box, and the existing circuits are connected to the new circuit breakers.
The "field adjustable electric panel interior assembly" consists of an adjustable riser, the required interior bus assembly, and the appropriate neutral assembly and ground bar assembly. Additional kit components permit a new panel face to correctly fit the new bus assembly which has now been mounted in the old panel box.
On completion, all of the electrical parts inside the original electric panel have been replaced. Only the steel panel enclosure or "box" has been retained.
The new parts and installation are made using UR and UL approved components. Wiring to comply with the electrical code, workmanship, and final code approval are the responsibility of the installing electrician, assured by an inspection by the local electrical inspector.
Not all Electrical Panels can be Upgraded using the Retrofit Kit - Size Matters
Field reports and comments from the manufacturer have pointed out that not every electrical panel is a candidate for upgrading using the retrofit kit discussed here. If the original electrical panel enclosure is itself too small to meet the size and space requirements of current electrical codes the entire panel will need to be replaced.
The following text provides an example of a case where, unfortunately, the old electrical panel was just too small to upgrade:
From email between a reader and the product manufacturer
While researching the service panel in a home I purchased this summer, I came across your retrofit kit for FPE service panels at https://InspectAPedia.com/fpe/FPE_Panel_Replacements.php
I have a Stab-Lock C1410-14-125NI panel, 125amp, 120/240, 1 phase 3 wire. It currently has one 30a (dryer), one 40a (range) and one 50a (all other
circuits) controlling 6 15a and 4 20a.
I would like to upgrade to 150amp with a few more breaker spaces, if possible.
The box measures 4 inches deep, 10 inches wide, 22-3/4 inches high inside measurements. The load center w/breakers is approximately 6-1/2inches wide by 15 inches high.
The range wire is aluminum. I'm not sure if the incoming service wires are aluminum as well. The home was built in 1960. The existing panel is in excellent condition, no rust, all holes intact or in use. The existing wiring is in excellent shape. One local electrician told me that your product violates code.
Here is a clear and concise reply from the manufacturer:
Our retrofit kits are designed to be installed into enclosures where there is sufficient space to wire according to the National Electric Code. As the local electrician pointed out, the enclosure that you have is not large enough to allow for our kits to work.
Being from 1960, the existing electrical panel was constructed prior to two NEC revisions that expanded the necessary wire bending space requirements. In addition, to increase the ampacity of the panel would require slightly more space. Unfortunately, for the application described, a new service will need to be installed.
WHY IT WORKS - Key Features of the Eaton Corp., Cutler Hammer Products (E-CH) Adjustable Retrofit Kit
Key in making this retrofit approach possible in the replacement of Zinsco or other problematic electrical panels is E-CH's development of:
- Load Centers: a series of replacement load centers of varying capacity in amperage and number of circuit breakers, and varying also in overall dimensions
- The Adjustable Retrofit Kit: which offers a set of parts which permit the new load center, mounted in the old electric panel enclosure,
to be framed-in or enclosed properly regardless of the dimensions of the enclosure itself.
The electrician simply measures the existing enclosure and orders the appropriate load center and adapter kit parts. The Adjustable Retrofit Kit parts may include:- A "picture frame" which adapts the existing enclosure to allow a new "trim/cover" assembly to be mounted as seen in the figure on page 2 of the
E-CH product PDF file available here (450KB to download).
The "picture frame" is .073 powder coat painted galvanized steel which not only adapts the trim to the existing enclosure, it extends past the enclosure edge several inches to provide a professional looking finish when the old plaster or drywall is damaged. - An adjustable "riser" combined with the adjustment feature in the dead front solves the depth issues and helps greatly when the old enclosure was not installed plumb/square.
- The "trim/cover assembly" is the standard replacement loadcenter/panelboard trims that offered by CH as replacement items and as such carry the standard UL cabinet front label.
- A "picture frame" which adapts the existing enclosure to allow a new "trim/cover" assembly to be mounted as seen in the figure on page 2 of the
E-CH product PDF file available here (450KB to download).
One of the biggest hurdles the manufacturer faced was the panel enclosure depth issue. To solve this, CH offers the adjustable depth feature. This allows the "riser" to be adjusted to accommodate enclosures from 4" to 6" in depth. When this is combined with the "picture frame" and "trim" the final product is a very safe, solid, and professional looking final assembly.
To date (June 2014) CH engineers have not had any reports of any brand or model specific enclosure that these have not worked in. Due to the adjustability of the CH kit, it is unlikely there would be an electric panel model that these kits wouldn't fit.
Very shallow panel enclosures:
Eaton Corp., Cutler Hammer Products have just finished the design & patent work on phase 2 of this program. This will consist of an adjustable "extension collar" which will attach to the enclosure and extend it out from the wall for those installations that are very shallow. This will extend them out and then the standard "Retrofit Kit" can be used. This will accommodate enclosures clear down to 3" or less in depth.
More Reading:
Eaton Corp., Cutler Hammer Products Adjustable Retrofit Kit Ordering Instructions PDF file 450KB to download.
RETROFIT COST - Cost of Replacing an Zinsco Panel with the Eaton Corp., Cutler Hammer Products Adjustable Retrofit Kit
CH was unable to inform me of "typical" costs are hard to cite as there really isn't a typical application for this product - it is used in a wider variety of circumstances than just replacement of Zinsco electric panels or Zinsco-type Sylvania electrical panels. These vary from the smallest single phase, main lug, 125amp units to the largest three phase, main breaker, 42-circuit. 225-AMP kits.
In addition, custom size adapter collars can add to the costs as well. Materials costs typically run from $225 to $500 per kit plus installation cost. From the feedback CH has received from the field, when you figure in labor, the installed kit is less than half the cost of Option #2 - complete removal and replacement of the electrical panel.
That is exactly in line with my own (DJF's) guess based on the labor and building disruption savings. If there is much cosmetic work with the Remove-and-Replace process, the savings are even greater.
Quotes from electrical contractors on Zinsco electrical panel replacement using the retrofit kit or using a complete new replacement electrical panel can be expected to vary by area of the country, hardware needed, replacement panel size in ampacity and number of circuits, accessibility to perform the work, and other factors that affect labor or materials.
That said, we've heard Zinsco Sylvania electrical panel replacement costs using the Cutler Hammer retrofit panel ranging from about $900. all the way up to $4000. If you are surprised by the quotation you receive from your electrician, ask for a bid from a competitor and compare labor, materials, and other costs.
See
REPLACEMENT PANEL COSTS for the
latest data we have on typical electrical panel replacement costs.
RETROFIT INSTALLATION - Eaton Corp., Cutler Hammer Products Hammer Adjustable Retrofit Kit Installation Tips
See the E-CH PDF file (450KB) which explains how this replacement program works. Obtain and follow the installation instructions that come with the equipment. Here are some additional comments:
Distinctive about this approach is that it is not necessary to cut the existing building wall for wire access, and not necessary to disconnect the existing circuits from the original metal panel enclosure "box". Avoiding these steps significantly reduces the labor and installation time.
The Adjustable Retrofit Kit installation procedure is roughly this:
- Choose electrical load center size: select the proper sized load-center that will fit in the existing panel enclosure - measure the existing panel interior dimensions, including depth carefully.
- Buy other electrical panel parts needed: if necessary, purchase additional panel enclosure parts such as a frame extension (if the panel Enclosure is too shallow) and a new panel cover front and door may be needed.
- Disconnect the old electrical panel "bus assembly": remove the existing load center (power has been cut off of course). If I were doing it I'd Unscrew each circuit so as to have plenty of length to work with, but most will probably just Cut individual circuit wires close to the old breaker.
- Remove the old Zinsco-Sylvania bus assembly: remove the old load center from the electrical panel
- Cover the remaining electrical panel enclosure openings: cover with metal any improper openings such as knockouts (to assure that the existing enclosure is properly fire resistant
- Install the new electrical panel bus assembly in the old panel enclosure: mount the new load center
- Connect existing circuits to new load center: connect the existing circuits to breakers in the new load center
- Install any "fit" parts needed: mount any panel enclosure box extensions (the "picture frame") and electric panel cover
- Assure the Existing Panel Enclosure is Sound: before ordering the CH Replacement Load Center and Electrical Panel Enclosure Adapter parts, the electrical contractor should take a careful, honest, look at the existing enclosure. If it is not structurally sound don't use the retrofit kit. Some of those older enclosures are 50+ years old, rusted, bent up etc. In that case pull it out and start over. These kits are designed and intended to be used in good, safe, sound enclosures. [See More Reading below.'
- Cover Openings in the existing panel enclosure (which is to be re-used). Any existing unused holes should be covered. On the smaller holes, this can usually be accomplished by inserting a pan head sheet metal screw of appropriate size to cover the hole. Any unused open knockouts in an enclosure should always be appropriately plugged whether it's a retrofit, repair, new installation etc.
- Measure carefully: before ordering the particular retrofit enclosure parts, including the depth of the existing panel enclosure, so that the correct retrofit can be supplied.
- Existing studs or other protrusions: if in the (to be re-used) panel enclosure there are existing studs in the old enclosure that are in the way these will have to be cut off and removed.
- Flush Mount vs. Surface Mount: These are intended as a "flush mount" application. While they could be used as a "surface mount" the "picture frame" which acts as the adapter collar will extend past the edges of the existing enclosure and may not give a "finished" appearance. This may or may not be of consequence to the owner.
COMPONENT SELECTION - Selecting the Proper Retrofit Kit Components
By following the Zinsco Sylvania electrical panel "Retro Size Grid" on page 5 of the PDF file (450KB), in combination with the selection charts on the following pages, it can be determined just what exactly can be installed in which size enclosure and meet NEC requirements, wire bend etc.
The Zinsco panel retrofit kit sizing charts in the PDF (450KB) detail the most common devices asked for and explain the bus amperage rating, number of circuits, and wire size restrictions for minimum enclosure sizes. However since we can not possibly foresee all of the combinations, we have included our 800# to help explain or offer guidance when needed for those who are not sure or have questions or concerns.
The one thing stress by CH is that these are guidelines to meet the minimum requirements per National Electrical Code. Cutler Hammer cannot assume responsibility for these units when they are not sized or installed correctly.
All final decisions are the responsibility of the AHJ. To date, with 2 years experience, we have had no issues with any AHJ when these are properly installed.
More Reading:
Rust and Corrosion in Electrical Panels, A Study and Report on Frequency and Cause for Electrical and Home Inspectors at Residential Electric Panels
PRODUCT SOURCES - Sources for Adjustable Retrofit Kit for Zinsco/Sylvania Panels
Eaton Corp., Cutler Hammer Products Adjustable Retrofit Kits, E-CH Load Centers and load center parts can be purchased through any Eaton Corp., Cutler Hammer Products distributor.
If your electrician reports that local electrical suppliers are having difficulty finding or specifying kits any of the CH sales force can help. If that effort is not satisfactory contact CH directly at 800-330-6479 or by EMAIL to FlexCenterLincoln@eaton.com.
Other electrical panel brands for replacing Zinsco Sylvania products: if you are not taking the retrofit kit route (see OPTION #1 vs OPTION #2) then a wide range of electrical panels are available from electrical suppliers and building supply sources.
CODE COMPLIANCE - Code and Legal Acceptance of the Replacement Load Center and CH Adjustable Retrofit Kit
I have corresponded with the lead design engineer for Eaton Corp., Cutler Hammer Products, the company that produces these Replacement load centers. He said that all interiors, neutrals & grounds are their standard UR listed OEM interior components and carry a UR label.
- UL-Listed The products are all UL Listed. The individual internal components are UR listed and the trim/cover is UL listed as a cabinet front.
- Code authority accepted: CH have had no code authority refusals
- Field installations: CH has sold these products in large numbers, sometimes in the thousands to public housing authorities.
Local code approval: Readers should review the CH product specifications and listing information with their electrician and with local code enforcement officials. As with any electrical work, independent inspection and approval of the work is recommended and is required in many jurisdictions.
As CH informed me: As we have no control over how /where these are installed, we don't have a "file" we can list these under. Individual OEMs that use many of these on a repeat basis actually get a UL listing on their own device.
This is where CH relies on the local inspectors or AHJ to make sure that electricians are installing these products in a safe, and professional manner.
BACKGROUND - Eaton Corp., Cutler Hammer Products Adjustable Electric Panel Retrofit Kit Development Background
The E-CH electric panel adjustable retrofit program was begun in response to an overwhelming number of contractors who were buying complete load centers (metal enclosure, bus assembly, breakers, neutral and ground bars, etc), removing the interior components, neutrals etc and trying to "cobble" something together with "whatever" cover/trim in order to retrofit a new bus assembly into an existing, already mounted electrical panel.
The manufacturer reports that often they saw electric panel interiors shimmed with an unbelievable assortment of items, covers that were questionably attached and in general a "less than professional" final job. Early on it was discovered that there is a tremendous assortment of old electrical enclosures in the field.
These old enclosures vary greatly in size (width, length & depth) and in how they were originally installed.
In response to those problems E-CH patented the "Adjustable Retrofit Kit".
OPTION #2 REPLACEMENT - Zinsco/Sylvania Complete Panel Replacement - Option #2 Conventional R & R Method
Traditional Electric Panel Replacement by Complete Removal of Old Equipment
The traditional and conventional method of replacement of an obsolete (or in this case unsafe) electrical panel has been to completely remove the complete original electrical panel by disconnecting all wires from their individual circuit breakers, disconnect every strain relief, pull the wires out of the panel enclosure, and then to remove the entire electrical panel, enclosure and all.
The new electrical panel is then mounted in place and all of the existing wires are routed back into the new panel, strain reliefs secured, and wires routed to breakers in the new panel. (See "Short wire problem" below).
If the panel being replaced has been mounted on a finished wall (such as behind drywall or paneling) additional labor and disruption are necessary to provide access for wiring and panel mounting.
Electrical Panel REPLACEMENT COST Typical cost of the traditional Zinsco or Zinsco Sylvania Electrical Panel Replacement
A number of factors affect the actual cost of replacing an electrical panel, including base labor cost variations in different geographic areas, costs of electrical permits, and the specifics of a particular installation: working space, wire lengths, condition of old wiring, and other factors.
In order to more easily add electrical cost updates in one place, our section on typical costs to replace an electrical panel have been moved to a separate web page. Please seeREPLACEMENT PANEL COSTS
OPTION #1 vs OPTION #2 - Comparing Use of the CH Adjustable Retrofit Kit vs. Complete Replacement of Zinsco Electric Panels
WHEN TO USE OPTION#2 - When replacing an Zinsco Electric Panel When Should the Entire Panel and Enclosure be Replaced?
Using the Retrofit Kit is not appropriate, and complete electrical panel removal and replacement, including the panel enclosure or "box" is going to be necessary when:
- The existing panel enclosure is not structurally sound, such as if it has become badly rusted.
- The building needs a larger ampacity service, say moving
from 100A to 200A at a building, and the building needs more electrical distribution circuits than what are presently installed.
In this case it is likely that even if a new bus assembly that could handle the higher ampacity of a new service it will not handle the needed number of circuit breakers. The installer may consider a retrofit anyway, using a circuit in the retrofit panel to feed a new subpanel which is located elsewhere in the building and which provides additional circuits.
That approach may suit where the added circuits and ampacity are in support of a building addition such as a new wing or level. - The area where the panel is located is being gutted and re-modeled in concert with installing a new larger panel, service, ampacity, and number of circuits.
- The electric panel is not built into a finished wall (for example exposed in a basement or garage), so that all of the panel's exterior is readily accessible, and the panel capacity is not being upgraded. In this case I'd do a cost comparison of all of the retrofit equipment needed vs. the whole new box approach. CH believes that even in this case the retrofit approach might be less costly.
- The electrical panel needs to be relocated for other reasons.
More Reading:
Rust and Corrosion in Electrical Panels, A Study and Report on Frequency and Cause for Electrical and Home Inspectors at Residential Electric Panels
Comparing the Two Electric Panel Options: #1-Adjustable Retrofit Kit or #2-Complete R&R Replacement of Everything
[Opinion offered by the web author]
- Cost: Option #2, Zinsco/Sylvania Panel removal and replacement with a new Brand-x electrical panel is likely to cost twice as much as Option #1 with the CH Replacement Load Center and Electrical Panel Enclosure Adapter.
- Time: Option #2 can be expected to require at least twice the labor of Option #1.
- Disruption: When the original Zinsco Electrical Panel (or Sylvania) is installed in a finished wall, Option #2 requires partial demolition for working space that should not be necessary for Option #1
- Availability: Option #2 permits choice of any manufacturer's electrical equipment; Option #1 is available only from Eaton Corp., Cutler Hammer Products. This is a widely distributed brand but may not be stocked at the same levels as products by other manufacturers. Additional delay may be encountered if your electrician's electrical supply house has to order the CH Panel Enclosure Adapter parts. I will report here what readers encounter - feedback is invited.
- Suitability: Option #2 is required when the original panel enclosure is damaged or for other reasons I listed earlier. Option #1 is not suitable in those cases.
Where Option #1 is suitable it strikes me as appealing for reasons of cost and trouble.
When performing a conventional electrical panel replacement, in order to have adequate wire length to connect things in the new electrical panel the electrician would have to not only disconnect or clip wires at each breaker, s/he would also have to unscrew every strain relief and pull each individual wire out of the existing panel enclosure - a crowded and tedious operation that has to be done with great care so as not to damage the insulating jacket on the existing wires.
This has to take considerably more time than just replacing the load center in the existing panel enclosure where all of the wires entering the original box can be left in place.
There is no cosmetic damage to the wall where the existing panel is mounted when using Option #1. By comparison, with an conventional electrical panel replacement if the panel is in a finished area, the electrician has to cut away the finished wall surface to have access to the individual wire strain reliefs entering the panel box in order to disconnect them, and also in order to have working room to get the new wires into the new electrical panel enclosure.
Further, it is unlikely that a new panel enclosure will have the same dimensions or "footprint" as the old, possibly meaning additional adjustments at the finish wall.
Many people have contacted me to ask advice about Zinsco electric panel replacement options. More than I am able to answer by telephone or even email. Both for individual home owners and especially for larger buildings or building complexes where there are many, sometimes hundreds of Zinsco electric panels installed, the cost of a complete gut-out replacement of the panel is a significant burden.
If this sounds as if I'm writing a commercial, that's not my intention, and I have no connection with the manufacturer of this product nor any financial interest in it nor in any other products discussed at this website.
I am afraid that the cost of complete electrical panel replacement has been a factor in moving some owners to try to just "replace the Zinsco circuit breakers themselves" with the mistaken notion that somehow this reduces their risk of a fire or other failure. Unfortunately it does not appear to do so.
I have found no data suggesting that replacement Zinsco breakers, if they can even be located, perform any better than their predecessors, not to mention the price gouging that goes on when buying obsolete electrical equipment.
Even if a new perfectly reliable circuit breaker were built to fit these panels, I suspect that there are underlying problems with the Zinsco bus design, bus materials, breaker to bus connections, and bus overheating and failures would remain. This is why I continue to recommend a complete panel replacement for these problem brands.
Information Source Citations & Feedback Request on Zinsco Electrical Panels
Information Source Notice: portions of the text of this document are from email exchanged between the web author and the Eaton Corp., Cutler Hammer Products Lead Design Engineer and Eaton Product Manager involved with the products discussed in this document. The illustration at page top is from the Eaton Electrical PDF which describes their product line. The author has no financial nor any other connection with Eaton Corp., Cutler Hammer Products, nor any other company whose products are discussed at this website. Corrections of errors or omissions, product user feedback, or other critique are invited. Our editorial policies are at Accuracy & Bias Pledge
I'd welcome some photos and description of field experience from installing electricians and from consumers. Contact Us to report field experience with this equipment.
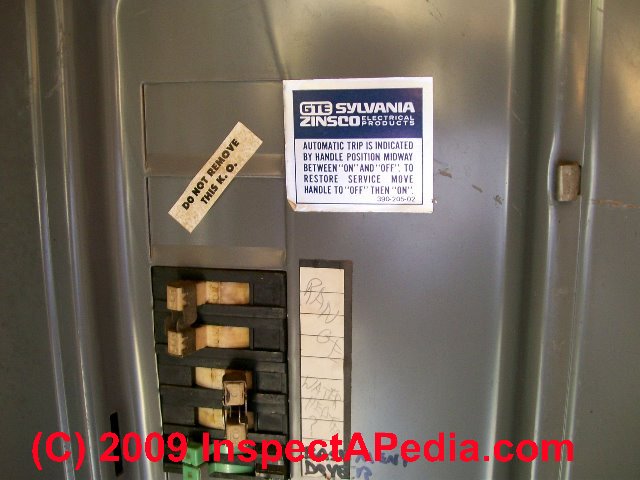
Question: Two Zinsco breaker failures, pitted burned busbars, where to put new breakers?
Sir,
I have read your listings and they are informative. I have a Zinsco 100 A external panel on my house. A stove switch failed and so did the 40 A Zinsco breaker. I pulled out the double breaker and purchased another.
However as I inspected the panel I found that in the position of the failed breaker the bus bar is pitted. I would like to replace the bus bar or even easier just purchase a Zinsco breaker that has the bus bar clips on the opposite side of the breaker so the the new breaker contact clips would contact that part of the bus bar that is not used. Is that possible?
If so who makes it or were can I obtain such a breaker? - Thank You - your insight has been invaluable - M. & L., Gilroy CA
Reply:
I don't know of offside zinsco breakers, but as we elaborate below, another alternative is to us a previously unoccupied spot in the panel and a new breaker.
As doubtless you read at ZINSCO SYLVANIA ELECTRICAL PANELS, my opinion is you should replace the Zinsco electrical panel entirely.
Watch out: don't assume the known-bad breaker connection is the only one in the panel. Because corrosion, arcing burns, pitting, and other circuit breaker and connection problems can be hidden from direct view (unless the panel is disassembled) there may be other problems developing in the same electrical panel where you have already had two failures.
Indeed we do not recommend connecting circuit breakers to a burned pitted bus bar in any electrical panel. Options include complete electrical panel replacement, replacement of just the bus bars themselves, and in some cases, a temporary repair might be made by installing the new circuit breaker at a location in the panel such that it will connect to a clean, un-damaged bus bar spot.
Question: failure report involving a Zinsco Circuit Breaker - can I use a CE Replacement for Zinsco Circuit Breakers
When my wife and I retired we acquired a small house in Ponte Vedra FL. In adding a light in the laundry room I accidentally cut into a live wire. Half melted my wire cutters, but did not trip the breaker. The electrical shop had a new CE breaker which he said was a “safe” replacement for the zinsco. He told me enough that I checked out this issue on line and found your site. Since ripping out and replacing the old panel is way over our expense budget, my intended fix was to replace the Zinsco breakers with new CE breakers and perhaps “clean” the main bus, leaving only the “ Main “ switch. Does this sound like a reasonable fix? Thanks, J.D., Ponte Vedra FL 11/5/2012
Reply:
Sorry, I don't know - we have no data on the field performance of CE breakers used as replacements for original Zinsco circuit breakers.
Watch out: in any case, even if the CE breakers have an improved design or arcing and corrosion resistant components (Zinsco breakers frequently corrode and arc and burn at their bus connection, leading to catastrophic failures) here may remain an important hazard as the Zinsco problem also burns the bus to which breakers attach.
Thus when you do not replace the entire original Zinsco bus assembly, failure risks remain including:
- Connecting a new or replacement circuit breaker, CE or other brand, to a burned or damaged bus position in an electrical panel is unreliable and unsafe
- Removing and replacing a circuit breaker from a Zinsco electrical panel can score or cut plating on the existing bus, possibly a factor in future corrosion and failure
- The performance of the replacement breakers when inserted into a known problematic designed electrical panel bus assembly has not been adequately tested - you should consider that its performance at a level of reliability comparable with "non-problematic" products (where such failures are generally rare) cannot be assured.
Look into a whole electrical bus assembly replacement instead, see Eaton Cutler Hammer Zinsco replacement options discussed in the article above.
Question: why not just use antioxidant paste on Zinsco Bus Bars to avoid trouble?
I see expensive suggestions for the issue with the bus bars and clips but I haven’t seen any mention about using NOAlux at the contact points. While it might not solve the occasional problem with a breaker not tripping, it certainly should prevent or reduce damage to the bus bar and possibly the breaker. I have seen the burned damage to Zinsco (and other) breakers but never have heard of a fire starting.
Nearly all of the damaged breakers I have seen were on 220 circuits where someone had failed to use NoAlux with aluminum wiring which tells me the wiring is more of a culprit than the breakers. Have you seen or heard of an actual fire occurring that damaged something other than inside a panel? - A.R. Sacramento CA
Reply:
Thanks, Andy
You've asked an interesting question, and I agree in principle that if there are more than one sound and safe approaches to solving a problem, especially where costs vary widely, it makes sense to report them. A competent onsite inspection by an expert usually finds additional clues that help accurately diagnose a problem or explain a failure, including in a Zinsco panel; most failures are not examined by experts.
That said, here are some things to consider:
You haven't seen an InspectApedia recommendation for using anti-corrosive or antioxidant paste at the breaker-bus connection in a Zinsco panel because the bus bars are often severely burned, breakers are often internally damaged, even burned or blown-out; no one wants to bet their house and kids' education on promising the safety of a coating as a retrofit. In sum, where there is already damage, the antioxidant is almost certainly an unsafe repair - worse if owners think that the system is now safe and so might ignore future warning signs.
Your comment about aluminum wiring of course adds fuel to the fire of overheating and failing electrical panel parts. It's well established that antioxidant is not a recommended "repair" for nor will it alone prevent overheating and failures of aluminum electrical wire.
But where you are seeing failures in aluminum-wired Zinsco electrical panels, the hazards are multiplied. And antioxidant would be by no means an acceptable way to repair the wiring. See ALUMINUM WIRING HAZARDS & REPAIRS for details.
About electrical panel burnups and blow-outs, of course we've heard of, and have published many such reports, though fewer specifically for Zinsco than FPE - a different product with different concerns.
For examples of field reports of Zinsco failures take a look at these 4 articles:
- ZINSCO FAILURE REPORTS
- ZINSCO OVERHEAT IR PHOTOS
- GTE-SYLVANIA-ZINSCO FAILURE MECHANISM & PHOTOS
- ZINSCO OVERHEAT IR PHOTOS
But even if someone you ask has not personally "heard of" something, relying on such a reply as authoritative would be nonsense. It makes more and safer sense to look for more authoritative sources - which we do. Interesting also, CPSC and other experts estimate that only a very small percentage of electrical panel fires or failures ever get reported (for many reasons); and when there is a building fire, much of the causal evidence is burned to a crisp, making accurate identification of the original cause difficult for those who are not real forensic experts; That means that even a few reports are almost certainly representative of a much larger problem occurrence rate.
On the other hand, Andy, it MIGHT be a safety improvement to use antioxidant on the electrical connections you describe if first they are inspected and confirmed to be undamaged; but even that makes me very nervous.
The arcing, overheating, and burnups appear to occur in Zinsco panels precisely at the point of origin of the scratch that was made on the bus bar when the breaker was first installed there; The scratch may be cutting through a plating; At least in some products we've learned that repeated removal and installation of parts, where scratching is a relevant factor, can actually increase the later hazard. Only if the manufacturer recommends using a coating or antioxidant would it sound safe to me.
Reader Comments, Questions & Answers About The Article Above
Below you will find questions and answers previously posted on this page at its page bottom reader comment box.
Reader Q&A - also see RECOMMENDED ARTICLES & FAQs
On 2020-12-11 - by (mod) -
Thanks Glenn
I'll see what I can find - indeed I haven't checked on availability for some time.
In my OPINION it's not a great option anyhow, as by today's standards these older panel boxes are likely to be too small for the number of circuits a modern home wants to use.
Eaton said:
If your electrician reports that local electrical suppliers are having difficulty finding or specifying kits any of the CH sales force can help. If that effort is not satisfactory contact CH directly at 800-330-6479 or by EMAIL to FlexCenterLincoln@eaton.com.
On 2020-12-10 y Glenn McWilliams
I am in Sacramento CA. Neither the local Cutler Hammer distributor nor our electrical supply specializing in breakers and distribution pnels of all types have heard of this retrofit for Zinsco boxes. Is this still available?
On 2019-06-21 - by (mod) -
Joanne,
The page top EXPERTS DIRECTORY is one way to find some electricians who are familiar with the Zinsco panel, though any licensed electrician ought to be able to replace any panel.
The retrofit, while it's feasible, may not make sense depending on the house age and number of circuits.
On 2019-06-20 by Joanne
We are in San Mateo, California and need to retro-fit or replace Zinsco panel for an apartment building. Is there anyway to locate an electrician who has retro-fit in my area.
On 2018-08-13 by Roy Horsley
I'm looking for a zinsco panel box that measures 12 inches wide 29 inches tall where can I find one located in Georgia
On 2018-06-19 by Janet71
I have a GTE/Sylvania 390-205-09 electrical breaker box that I only want to replace the surface cover and door. Any suggestions where I can find the proper size?
On 2016-02-13 - by (mod) -
Robert, you could do that provided the old box is only working as a junction box, that is all of its breakers are removed. It's a bit messy and I'm not sure all of that splicing and wiring is easier than removing and replacing the old panel.
However I have done exactly as you describe when we needed to relocate an electrical panel that was in an incorrect location or where it lacked adequate working space.
In those cases the old panel became a large junction box and all of the circuits were extended over to the new, properly-located electrical panel. It saved a lot of re-wiring ripout work.
On 2016-02-13 by Robert Larson
Why go to the trouble of tearing out the old panel? Instead why not install a new panel next to it and use the old one as a large junction box to tie into the existing branch circuits?
...
Continue reading at ZINSCO REPLACEMENT PANEL COSTS or select a topic from the closely-related articles below, or see the complete ARTICLE INDEX.
Or see these
Recommended Articles
- ZINSCO SYLVANIA ELECTRICAL PANELS - home
- GTE-SYLVANIA-ZINSCO FAILURE MECHANISM
- GTE-SYLVANIA-ZINSCO FAILURE REPORTS
- IDENITFY FRANK ADAM ELECTRICAL PANELS
- IDENTIFY GTE SYLVANIA-ZINSCO PANELS
- IDENTIFY KEARNEY PANELS
- IDENTIFY SYLVANIA ELECTRICAL PANELS
- IDENTIFY WALKER ELECTRICAL PANELS
- IDENTIFY ZINSCO ELECTRICAL PANELS
- IDENTIFY ZINSCO SYLVANIA METER BASE
- OK to USE ZINSCOS?
- UBI FPE CIRCUIT BREAKER TEST RESULTS
- ZINSCO CIRCUIT BREAKER INDEPENDENT TESTS
- ZINSCO CIRCUIT BREAKER TEST REPORT
- ZINSCO ELECTRICAL PANEL AGE & HISTORY
- ZINSCO FAILURE PHOTOGRAPHS
- ZINSCO FAILURE REPORTS
- ZINSCO OVERHEAT IR PHOTOS
- ZINSCO FAILURE REPORT PROCEDURE
- ZINSCO REPLACEMENT CIRCUIT BREAKERS
- ZINSCO REPLACEMENT PANELS
- ZINSCO REPLACEMENT PANEL COSTS
- ZINSCO SAFETY PRECAUTIONS
- ZINSCO SUMMARY PAGE for Reproduction
- ZINSCO WARRANTY & CONTACT INFO
Suggested citation for this web page
ZINSCO REPLACEMENT PANELS at InspectApedia.com - online encyclopedia of building & environmental inspection, testing, diagnosis, repair, & problem prevention advice.
Or see this
INDEX to RELATED ARTICLES: ARTICLE INDEX to ELECTRICAL INSPECTION & TESTING
Or use the SEARCH BOX found below to Ask a Question or Search InspectApedia
Ask a Question or Search InspectApedia
Try the search box just below, or if you prefer, post a question or comment in the Comments box below and we will respond promptly.
Search the InspectApedia website
Note: appearance of your Comment below may be delayed: if your comment contains an image, photograph, web link, or text that looks to the software as if it might be a web link, your posting will appear after it has been approved by a moderator. Apologies for the delay.
Only one image can be added per comment but you can post as many comments, and therefore images, as you like.
You will not receive a notification when a response to your question has been posted.
Please bookmark this page to make it easy for you to check back for our response.
Our Comment Box is provided by Countable Web Productions countable.ca
Citations & References
In addition to any citations in the article above, a full list is available on request.
- "Evaluating Wiring in Older Minnesota Homes," Agricultural Extension Service, University of Minnesota, St. Paul, Minnesota 55108.
- Our recommended books about building & mechanical systems design, inspection, problem diagnosis, and repair, and about indoor environment and IAQ testing, diagnosis, and cleanup are at the InspectAPedia Bookstore. Also see our Book Reviews - InspectAPedia.
- In addition to citations & references found in this article, see the research citations given at the end of the related articles found at our suggested
CONTINUE READING or RECOMMENDED ARTICLES.
- Carson, Dunlop & Associates Ltd., 120 Carlton Street Suite 407, Toronto ON M5A 4K2. Tel: (416) 964-9415 1-800-268-7070 Email: info@carsondunlop.com. Alan Carson is a past president of ASHI, the American Society of Home Inspectors.
Thanks to Alan Carson and Bob Dunlop, for permission for InspectAPedia to use text excerpts from The HOME REFERENCE BOOK - the Encyclopedia of Homes and to use illustrations from The ILLUSTRATED HOME .
Carson Dunlop Associates provides extensive home inspection education and report writing material. In gratitude we provide links to tsome Carson Dunlop Associates products and services.
 | HOME | ABOUT | ASK a QUESTION | CONTACT | CONTENT USE POLICY | DESCRIPTION | POLICIES | PRIVACY | |
| © 2024 - 1985 Publisher InspectApedia.com - Daniel Friedman | |||||||||