
InspectAPedia® FREE Encyclopedia of Building & Environmental Construction, Diagnosis, Maintenance & Repair |
Question? Just ask us! InspectAPedia
|
 Diagnose & Repair Skylight Leaks

- POST a QUESTION or COMMENT about leaky skylights & how they are repaired or avoided
Skylight leaks:
This article explains how to find the cause of skylight leaks and other sloped glazing leaks. The article continues with simple suggestions for skylight leak repair and leak prevention.
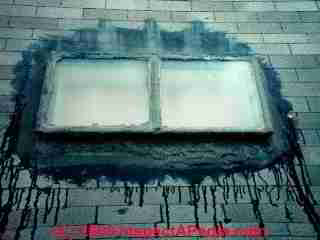
Our photo at page top of a leaky roof skylight that has suffered repeated and non-durable repair attempts using roofing cement can be seen at left. From the pattern of sealant application we suspect that the leaks at this skylight were around the window frame due to improper roof flashing at the time of installation.
InspectAPedia tolerates no conflicts of interest. We have no relationship with advertisers, products, or services discussed at this website.
How to Diagnose & Repair Skylight Leaks
[Click to enlarge any image]
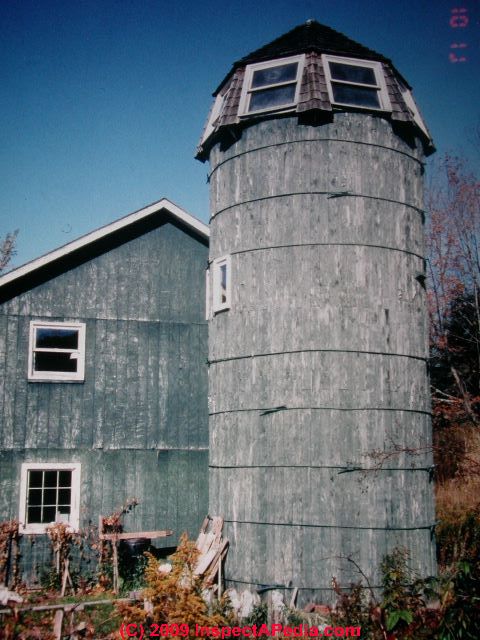
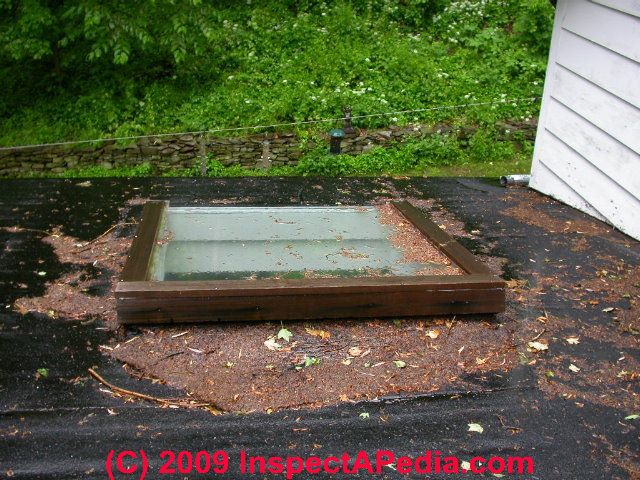
Our photograph (left) shows an interesting sloped window installation on the roof of a barn silo that had been converted to living space. Conventional wood-frame double-hung windows were set into the sloped silo roof - this was not a successful installation and the windows rapidly rotted, leaked, and disintegrated.
Article Contents
- HOW TO DIAGNOSE & REPAIR SKYLIGHT LEAKS
- ROOFTOP SKYLIGHT LEAKS
- HOW TO WATER TEST SKYLIGHTS
- HOW TO REPAIR SKYLIGHT LEAKS
- HOW TO AVOID OR PREVENT SKYLIGHT LEAKS
As Mr. Bliss points out in SLOPED GLAZING DETAILS, a glazing system must perform many functions. It has to shed and drain water, support and cushion the glass to avoid mechanical pressure points, and seal against air and water leakage. It should be attractive and economical.
Yet many subtle and pervasive forces are working against you: thermal and structural movement, high UV radiation, wind and weather. A pretty redwood cross batten is no match for sliding sheets of ice.
The problems inherent in vertical glazing are multiplied in sloped glazing: higher levels of UV, water damming at the lower edges of sloped window frames or between the roof and the upper section of window and skylight frames, and structural loading.
See VERTICAL GLAZING DETAILS
Professionals in the large scale curtain wall industries, as well as residential contractors, have encountered problems with skylights and other forms of sloped window glazing.
Fortunately, many new products and systems have been developed to beat the elements as well as to reduce the chances of installation errors leading to leaky skylights and related structural damage or even leak-related mold contamination in buildings.
Sloped glazing such as roof skylights probably has historically had more leaks into the roof structure due to improper roof flashing than other window failure causes.
Leaks at skylights, left unattended, can lead to costly structural damage, rotted roof sheathing, rotted roof framing, and wet, moldy insulation as well. These skylight leaks should not be blamed on faulty product design, although at some leaky skylights we find a combination of multiple failures.
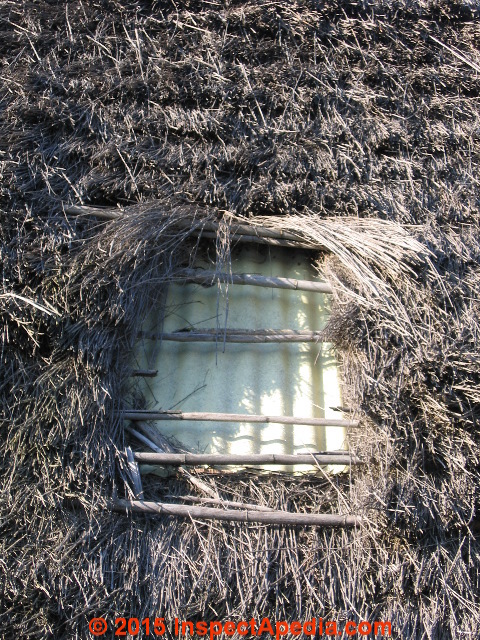
The photo just above illustrates a site-built skylight using a corrugated fiberglass panel in a palapa-style roof in Mexico.
Building owners, having trouble determining exactly where the skylight leak is occurring, sometimes simply slather caulk or roof cement all over everything in sight (an approach that is ugly but might work. But a roof-cement slathered skylight that is still leaking may be even more difficult to diagnose. Here are some tips that might help diagnose the actual leak point at a skylight:
Indoor Clues Help Diagnose Skylight Leaks
- Indoors, look very closely at where water stains originate
inside the building - trace stains to their highest point. The leak will be at or up-roof from that spot.
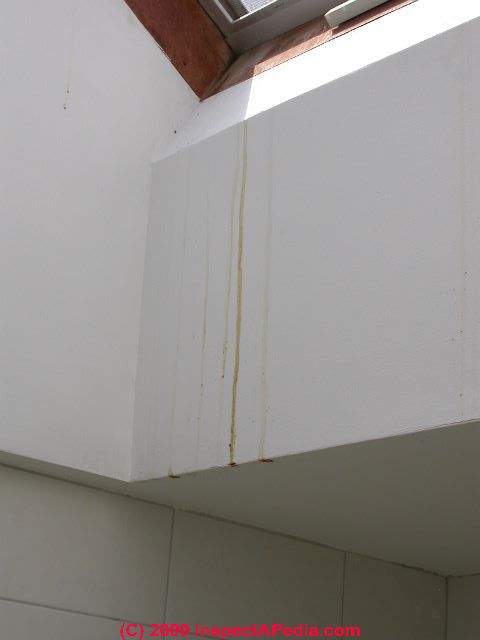
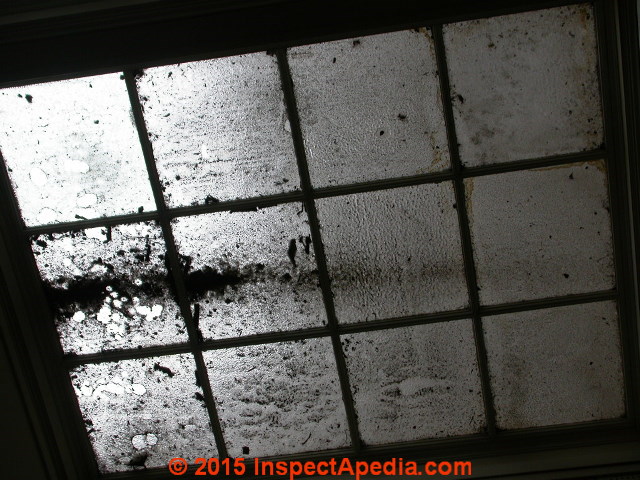
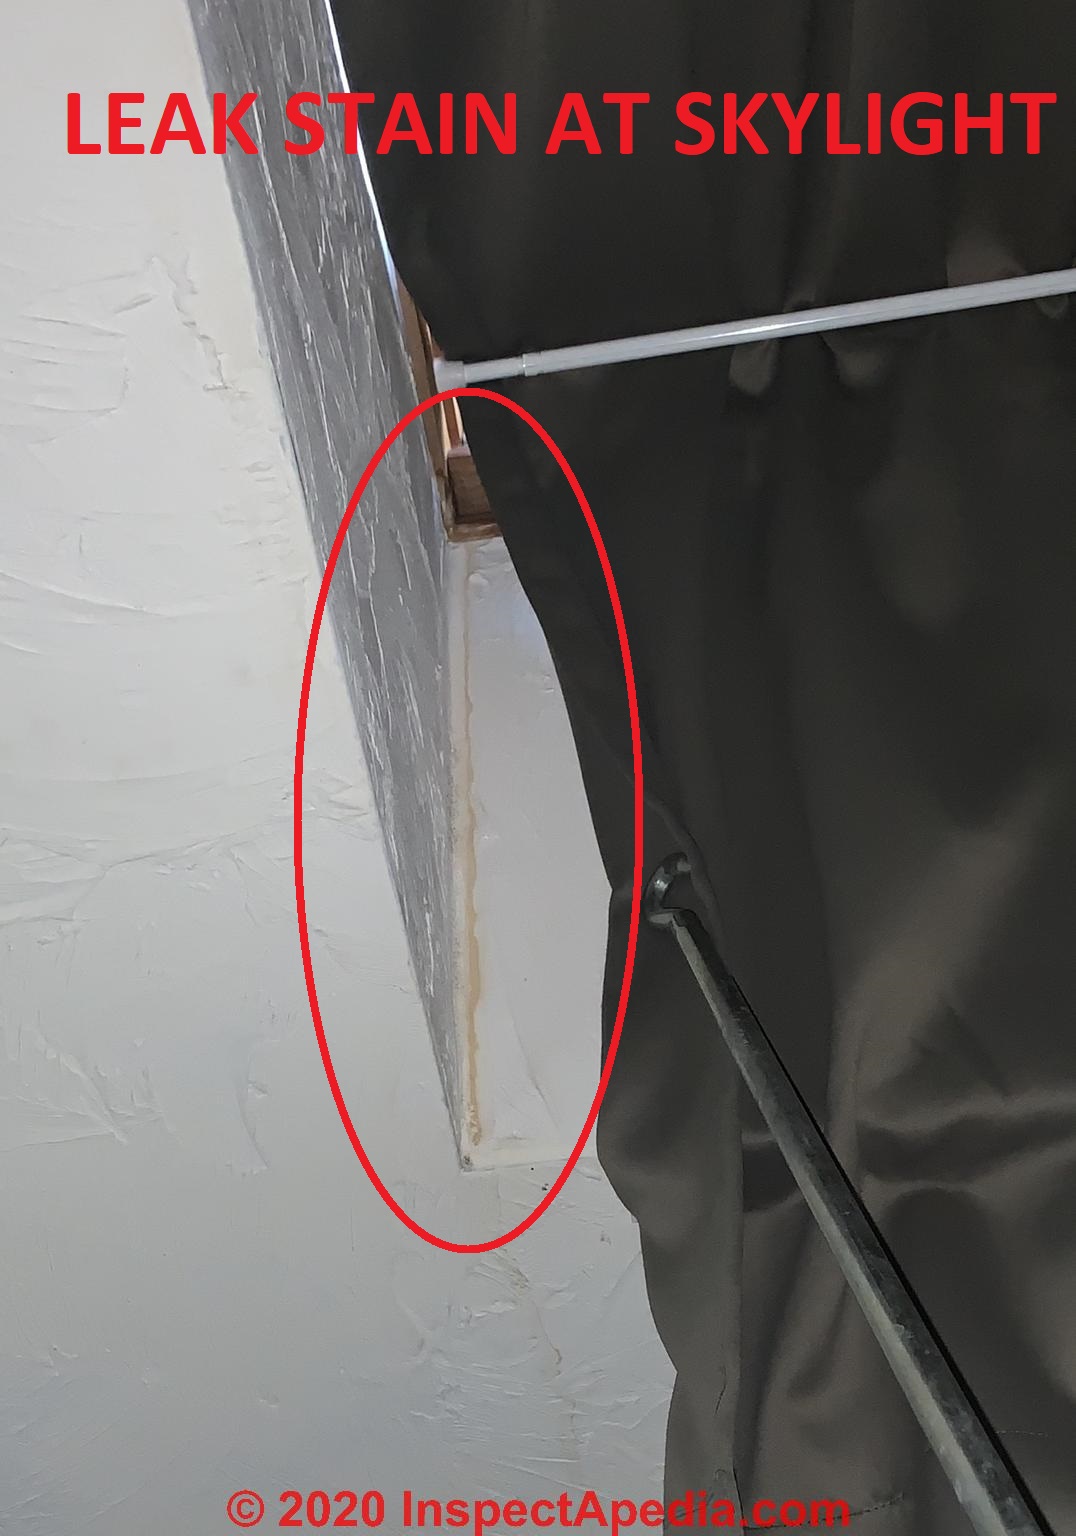
Our indoor photo of a skylight leak shows a stain that is on top of the ceiling drywall; because this leak does not appear to be coming from within the ceiling cavity, we suspect that this stain is either caused by a leak at the skylight upper glass frame itself or the leak is from indoor condensation. A closer look (from a ladder) was needed. - Indoors, distinguish between a true skylight leak and indoor condensate stains
that originate from indoor moisture condensing on the cool skylight surface, running down into, and overflowing a small condensate drip tray that some skylights include. - Cut a small ceiling inspection opening:
indoors, if the ceiling drywall is only modestly leak stained, there is a chance that ceiling insulation has become wet and may even contain hidden mold. In this case, unless the stain is really trivial in size, it may be justified to cut a small opening near the leak to investigate the roof cavity for rot, visible mold, or wet insulation. - Remove ceiling drywall:
indoors, if the ceiling drywall is badly leak stained it is appropriate to remove the damaged drywall material completely, remove any wet or stained fiberglass insulation, and clean the ceiling cavity. Leave the ceiling open around the offending skylight first to permit things to dry out thoroughly, and second to permit our next diagnostic steps just below.
Roof Flashing, Flashing Cement & Other Skylight Leaks
Outside, on the roof, inspect the skylights including flashing, use of sealants, glass, curb details and look for signs of prior repairs.
Watch out: don't try this if you are not able to access your roof safely, and don't work alone - falling off of a roof can be fatal), inspect the skylight for visibly obvious damage such as open seams, roof damage, or roof debris; also look for evidence of previous repair attempts such as in the photo above.
Damaged Skylight Flashing May Hint At Lost Glass Seal Too

Our three photos, courtesy of InspectApedia.com reader C. illustrate clues that the skylight flashing itself may have been improperl-installed or may have been damaged during installation.
The first photos (above and below) show bent, rippled skylight curb flashing and what looks like a torn or open end of the flashing as well (the yellow arrows). If those ripples in the flashing occurred during installation - as seems most likely - then the skylight glass seal might also have been damaged: explaining why the homeowner found leaky skylight glass as well as other skylight leaks.

Below: a clower look at the open, bent-out end of skylight flashing on this home.

Four Types of Roof Flashing Cement Failures
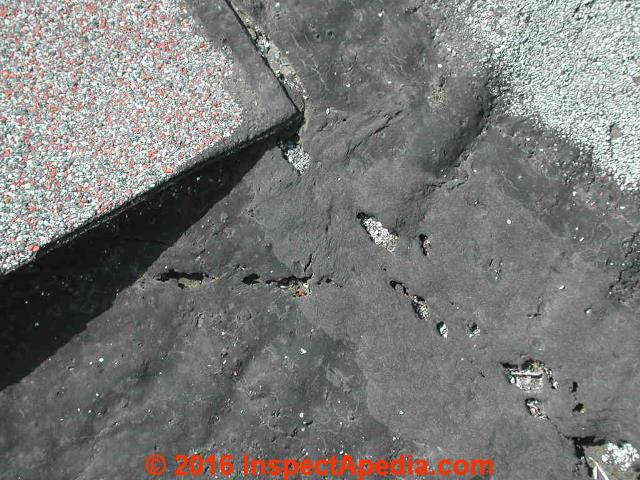 Our photo of a roof cement "patch" on an asphalt shingle roof close to a skylight shows four types of roof cement patch failures that mean this patch is not really keeping water out of the building.
- Flashing cement gaps:
first, at upper center you see that the flashing cement did not bridge the gap between two shingles where the applicator was trying to make a seal. - Flashing cement bonding failures:
second, the roof cement did not bond to the shingle material below - probably it was applied over dirt or over a wet shingle - notice the raised cement surface around the hole in the cement in the center of the photo.
Also see AVOID AHESION WINDOW SEALANT FAILURES for details. - Thermal Expansion/Contraction sealant failures:
third, the roof cement has not survived thermal expansion and contraction as temperatures changed on the roof and in the roof materials. The result was a stretching motion that pulled the roof cement apart in a diagonal pattern of holes running from upper left to lower right in the photo.
See TEMPERATURE EFFECTS on WINDOWS and also for technical data
See THERMAL EXPANSION of MATERIALS for the effects of temperature changes on materials. - Flashing cement pinholes:
the fourth roof cement patch is harder to see unless you (click to) enlarge the photograph. Small openings in the roof cement at the lower center of the photo show that this patch material has not only dried and lost its elasticity, but it is developing pinhole perforations.
If the skylight is relying on roof cement
To prevent roof leaks, look very carefully at the flashing cement for cracks, openings, or for failure to bond to the skylight or to the roof. Often something that looks "sealed" is actually an open leak.
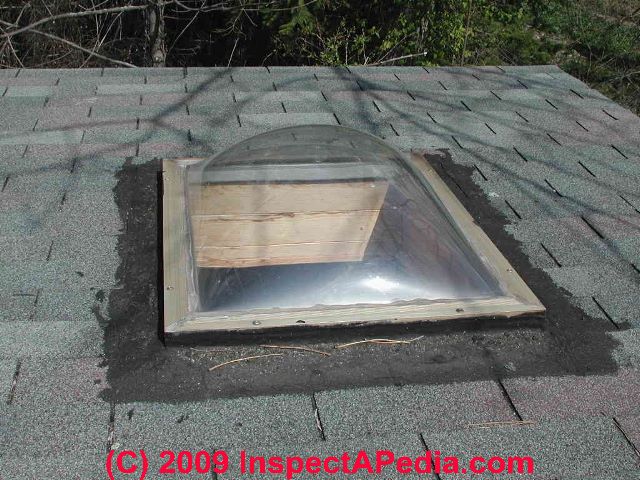
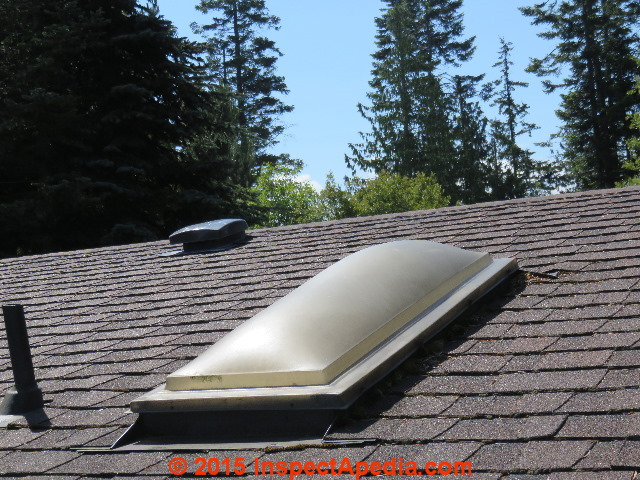
Our photo (above left) shows an older bubble-type skylight that was heavily patched around its perimeter using roof flashing cement.
This unit has a two-inch raised perimeter to get the plastic bubble above the roof deck. Below we see the sort of leak stains one may find around a problem-skylight.
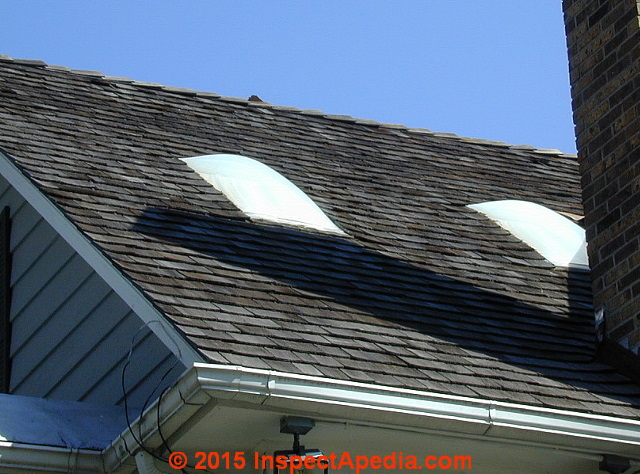
Still older bubble type skylights that were mounted flush with the roof surface (shown below) are notorious leakers because they relied entirely on sealants between shingles and the skylight. Newer curbed skylights (having a raised perimeter to get the sloped glazing above the roof surface) are much more reliable.
Water Testing for Finding Skylight Leaks
- Garden Hose Skylight Test 1:
Outside, and from on the roof surface : in dry weather, try pulling a garden hose to the rooftop to permit live water testing of the skylight for leaks.
First allow water to run down-roof onto the up-roof end of the skylight and around the unit. Look inside the building at the skylight for signs of new water penetration. - Garden Hose Skylight Test 2:
Next allow hose-water to run onto the skylight surface itself. If the leak appears around the glass frame, visible from inside, then the problem includes at least a glass sealing problem.
If leaks around the skylight appear only when water is flowing down the roof surface and not onto the upper surface of the skylight, there is a skylight roof flashing problem.
Don't soak the building interior - just use enough water to see it appearing indoors.
Simple Repairs for Skylight Leaks
If the insulating glass unit of the skylight has failed, you can seal the unit against further water leakage, but only replacing the unit will remove condensation, opaque skylight glass, and a failed window unit.
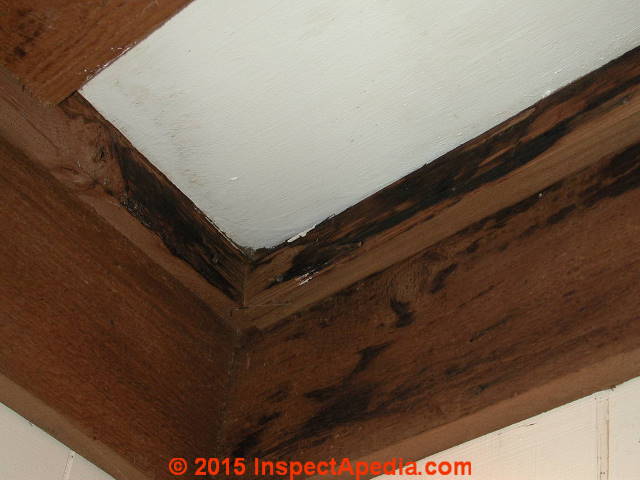
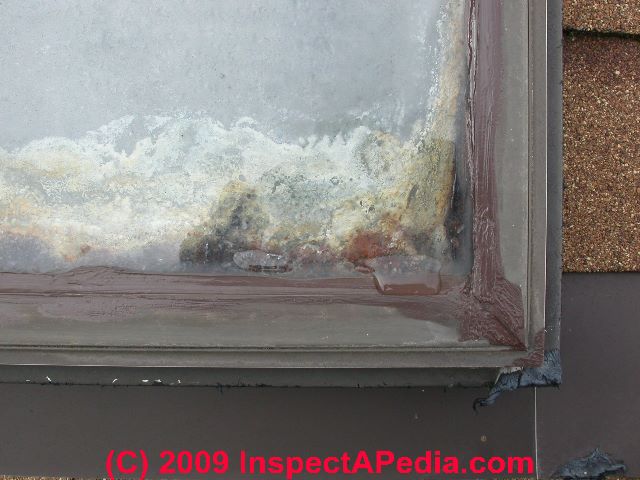
Our closeup photo of the down-roof corner of a leaky skylight (left) shows what is probably a double failure.
Leaks at the insulated-glass frame permitted water to enter the window structure where the freeze-thaw climate at this New York home continued to damage the window by forcing apart and losing the seal of the insulated glass itself.
See SEALED WINDOW JOINT FAILURES for more on this skylight failure.
If the skylight leak is at the roof flashing, it may be possible to make temporary repairs using roof flashing cement around the perimeter of the unit, but a proper repair will require removing shingles near the skylight, installing proper head, side, and foot flashing around the unit, as you reinstall new shingles in the area.
Avoiding or Preventing Skylight Leaks
In addition to installing skylights properly, using the methods discussed in this article and following the manufacturer's instructions, a period inspection for evidence of leaks into or around the glazing unit can avoid costly building damage by early detection and repair of any problems.
If debris collects on or around a skylight (see our photo above) the water held in that location combined with the working action of extra winter ice (if the building is in a freezing climate) will reduce the roof life around the glass unit, leading to early leaks in this area. Try gently brushing debris away from and off of your skylights when performing a roof inspection. Don't walk carelessly on a debris-covered roof - it's like walking on ball bearings.
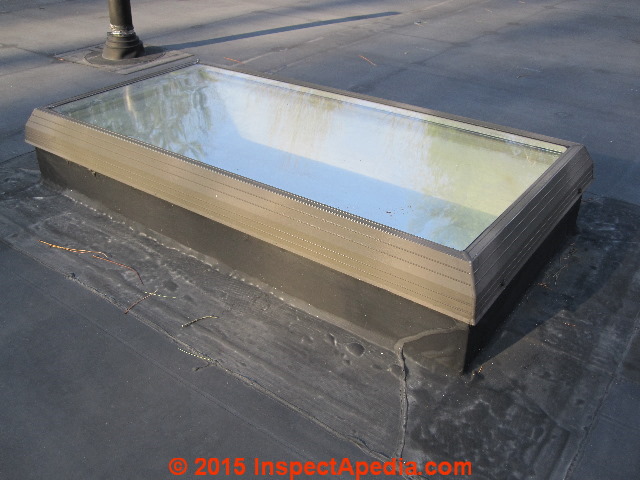
Modern factory-built skylight units such as the skylight shown below on a home in Port Angeles, Washington in the U.S. have been designed by their manufacturers to make the window as idiot-proof as possible, including factory-made skylight flashing kits and simple, clear instructions.
Our skylight photo below illustrates a curbed skylight in a brand new installation in on a nearly-flat EPDM roof in Poughkeepsie, New York ca. 1999.
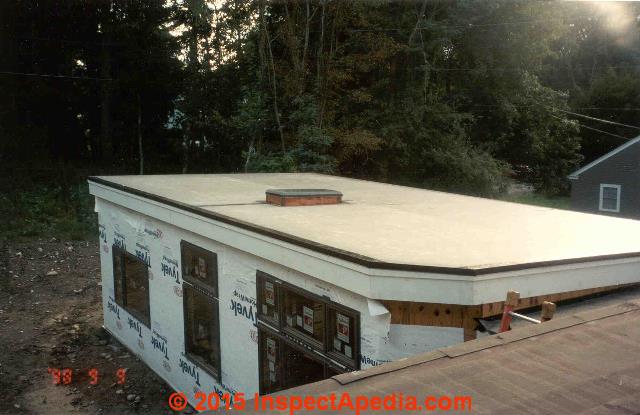
Below is this same skylight, now more than fifteen years old. It has not leaked, but as it is installed over a bathroom, condensation on the interior of the skylght glass can still be an annoyance.
Still if the contractor is inexperienced with skylight installation, if the skylight was installed later in the life of the building as a retrofit, and especially if the installer did not read the instructions provided by the manufacturer, leaks at the skylight are likely.
Seal Skylight Flashing at Time of Skylight Installation to Prevent Future Leaks
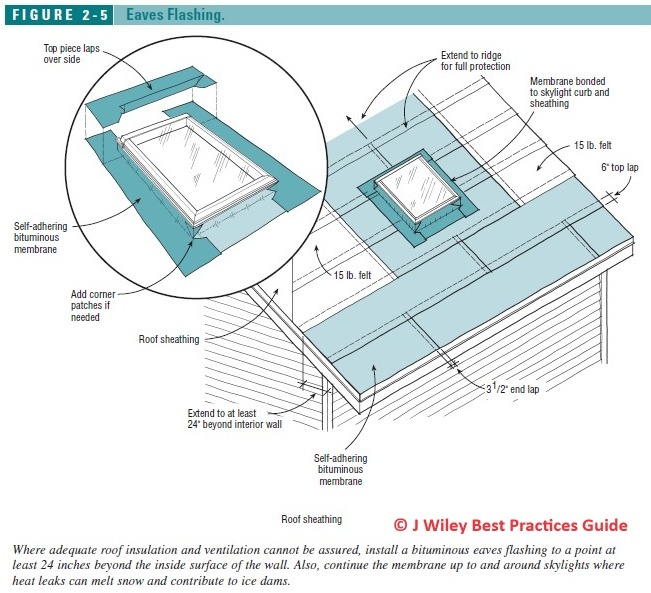
As discussed in Best Practices Guide to Residential Construction (Steve Bliss, J Wiley & Sons) , chapter
As a backup to prevent leaks at skylights, during skylight installation and even though modern skylights are usually provided with a factory-built flashing and counterflashing, it is always a good idea to seal the skylight curb and surrounding roof area with a bituminous membrane (see Figure 2-5 at left).
- - Adapted with permission from Best Practices Guide to Residential Construction (Steve Bliss, J Wiley & Sons) .
Skylight Manufacturers & Product Sources
- Andersen Windows and Doors www.andersenwindows.com Skylights and roof windows with exterior sash clad with glass-fiber-reinforced material
- Milgard Windows and Doors www.milgard.com Skylights with aluminum frames (thermal break optional) with vinyl subframes on operable models; optional motorized controls with rain sensor
- Pella Windows and Doors www.pella.com Wood interior, aluminum exterior, optional motorized controls, and manual or motorized fabric-pleated shades
- Roto Frank of America www.roofwindows.com Wood interior, aluminum exterior, optional motorized controls, and manual or motorized fabric-pleated shades; Sweet16 model fits 16 in. o.c. framing
- Velux America Inc. www.velux.com Skylights and roof windows with wood interior and aluminum-clad exterior. Options include insect screens, blinds, motorized controls and shades with rain sensor, electrochromatic glass, and flashing kits for metal and tile roofs and mulled units
- Skylight Light Tube Manufacturers & Sources
- SolaTube www.solatube.com Light tubes from 10 to 21 in. in diameter; options include electrical lighting, daylight dimmer, and integral bath fan
- Sun-Tek Skylights www.sun-tek.com Light tubes from 10 to 21 in. in diameter; options include electrical lighting and multitube Spyder skylight
- Velux America Inc. www.velux.com Sun Tunnel light tubes from 14 to 22 in. in diameter with flexible or rigid tubes
Reader Comments, Questions & Answers About The Article Above
Below you will find questions and answers previously posted on this page at its page bottom reader comment box.
Reader Q&A - also see RECOMMENDED ARTICLES & FAQs
On 2020-09-30 by danjoefriedman (mod) - what's causing this skylight leak?
 Ellen,
That leak stain could be at the flashing or it could be an overflow from a condensate tray found at the lower end of some skylights. Your cover prevents us from seeing enough of the window to be confident that we know what's going on. Perhaps you can post another image with that spring-rod and cover put aside.
On 2020-09-21 by Ellen Rollings
Just noticed this stain today, definitely on top of the drywall and not coming from within. Is this likely to be a leak from the glass? It looks similar to one of the example photos on this page. I’m not sure if the trickle stain is coming from under to wood trim or over it.
On 2017-11-26 - by (mod) -
You may be able to make a temporary repair working from the roof surface using flashing cement or even clear silicone caulk. But what would be most productive would be a very careful inspection to find the exact reason for the leak such as damaged loose missing or incomplete flashing. If you can safely access your ruview best hire a roofing repair contractor.
On 2017-11-12 by Eric
I have a leaky rectangular bubble skylight that has developed leaks in the 2nd floor bathroom. seems to be coming from the high point corners. should i use roof repair caulk or what do u recommend? thanks
On 2016-07-30 - by (mod) -
No, Lisa. The curb allows installation of flashing around the perimeter of the skylight at the intersection of skylight edges and roof surface.
Without that flashing the skylight would leak like mad into the roof structure and into the building below; flashing around any roof penetration (skylight, chimney, plumbing vent) is of critical importance. For a time in the 1970's a nearly-flat skylight was popular, was almost impossible to seal satisfactorily, and was a notorious leak source.
On 2016-07-28 by Lisa
What is the purpose of a curb when a skylight is installed on a low pitched roof? Is the curb just to raise the skylight to allow for rain possibly not draining off the roof quickly? Or is the curb supposed to add pitch so that the skylight itself is pitched more than the roof, allowing water to run off the skylight quicker?
Very confused since I see examples of both pitched curbs and curbs that are equal height all around.
On 2016-04-08 - by (mod) -
Anne:
Probably not. Sealing the inside of any leaking roof component is likely to drive the leaking water horizontally into other roof components. Almost always, a roof leak needs to be repaired from outside, on the roof surface.
On 2016-04-08 by Anne
My skylight is a smaller version of the first one on your post. There's a wood beam in the middle on the inside of my apartment that gets wet from outside when it rains. I can feel an obvious breeze from it and I can hear everything outside, even cars and sirens passing by.
I have no access to the roof.. Is there any way I can repair it from inside? The manager of my apartment refuses to get it fixed professionally.
Comment:
(June 23, 2011) Debbie G. said: Very helpful info. Thanks!
Question: is it condensation or a leaky skylight
(June 23, 2011) catherine said:
my skylight drips when it rains , I am not sure if it is condensation or a leak , the skylight is on my sun roof , it is a slightly raised slanted hardtop roof
Reply: If the skylight drips ONLY when it rains
If the skylight drips ONLY when it rains I suspect there is a leak in the roof flashing around the unit, or in the skylight itself. Try spraying water up on your sunroof in warm dry weather and see if you can reproduce the condition.
Be careful about on-roof inspections on sunroofs as you don't want to damage other sunroof panels (nor slide off and fall).
Question: protective film to stop skylight leaks?
July 18, 2011) Jean said:
HIOw's about if the skylight itself has a leak? does a protective film would be useful to stop such a leak?
Reply:
I don't think a protective film on skylights is going to do much to stop most skylight leaks, Jean. Most skylights leak at their surrounding flashing. Skylight films are plastic coatings applied to the glass.
Question: why is skylight leaking after new roof?
(Sept 1, 2012) Anonymous said:
skylight leaks and I wonder why? New roof put over the old roof and the the gap between the new roof and the skylight is now much less, would that cause a leak, the 3 leaking skylights are operable and the one non leaking skylight is in operable. When I leave the skylights open a crack they do not leak
Reply:
I can't diagnose this or even speculate from just the information in your note. Check for improper flashing around the skylights or failing to even install flashing when the new roof was installed.
Question: leaks at skylight during hurricane
(Oct 30, 2012) Todd said:
skylight just started to leak from lower corner, huricane sandy hitting western Pa as of now. could this be from rain blowing, condensation from colder air, or acuall leak
Reply:
Probably a leak
Question: light penetration around skylight - is this a leak?
(May 27, 2014) Debbie said:
What does light penetration into the attic mean in regards to a skylight?
Reply:
Debbie I think what we're talking about is inspecting in an attic for points that may be leaking. Sometimes (not always) if you look up at a roof from inside an attic and see daylight, that's a hole or a leak point.
The reason I say not always is because light may be reflected indirectly up-roof through flashed openings or between wood shingles or slates nailed over spaced sheathing boards.
When you see a point of light or "a thousand points of light" in your roof, look there for water leak stains as well as checking the floor surface below that area for leak marks.
Question: risks associated with skylights
(June 2, 2014) Jen W-C said:
Hi and thanks so much for all this info!
My question relates to the risks associated with skylights. I am in the U.S. at the moment but lived in Denmark the last 8 years and there, you see skylights on almost every house. I am helping a friend get a new roof on her log cabin, and want to strongly recommend skylights.
I know Velux has had excellent flashing that go with their windows and he slope is good. She has spoken with others (men, actually, whereas I am female but have a lot of experience with construction) and three have told her not to install skylights.
Her house is so dark that even in summer if you want to see anything in detail, you have to turn lights on during the day ($$).
Assuming that one buys proper windows and uses highly capable contractors to install them when a new roof is being put on, do you think there is a substantial risk of failure down the line or think perhaps the people she spoke with were referring to window failures from the days when they were installed improperly, at a bad time (i.e. over the roof versus with the roof) or were less effectively designed products? Thank you for your response!
Reply:
Thanks for the question, Jen.
I don't know who the men are with whom your friend has spoken but it sounds like a lot of bluffing and arm-waving to me.
Modern skylight products have evolved significantly from early (leaky) products. The manufacturers have a great interest in the success of their product, and to that end have designed raised curbs that bring the skylight above the roof surface, and pre-packaged roof flashing components that are very reliable and leak-proof if the installer follows the manufacturer's installation instructions.
The people with whom she was speaking could be
1. remembering the older products from 30+ years ago that were not so well designed
2. confusing indoor condensation with roof leaks
3. people who installed skylights willy-nilly without using the proper components nor reading the installation instructions. I was talking with such a builder about a leak on a home he had just finished constructing.
"They all leak like that" he said, as if that meant it was OK. Well he was right, all of his houses leaked at that point because he built them all the same way - with the flashing installed backwards. Some builders know construction. Others are better at arranging financing.
Jen
Please also see
inspectapedia.com/BestPractices/Skylight_Installation_Procedures.php
on skylight flashing.
The skylights shown there were installed in a truss-roofed cabin in Northern Minnesota, in a climate exposed to severe weather at the edge of Lake Superior. They don't leak.
Shown also on that page are the older "low profile" "bubble" type skylights that didn't have such a great success record.
Question: skylight leak sealant
(June 13, 2014) Gail said:
my skylight is leaking around the wood part of the skylight. what can i use on this to seal it
Reply:
Clean the surfaces and try a silicone sealant
Question: many big skylights leak: we want to install a roof over the whole shebang
Larry and Kathy Boso said:
I have a question. We have a roof that has 16 double 5x8 windows. The leak during rain and they leaks are in different places. We have tried fixing all of them, but decided to just put a roof over them all. Our delema is, how to put a roof over them. We are thinking about a free staind roof. Cant put any weight on the windowed roof. Each window weighs 200lbs? It would cost an arm and a leg to get a crane operater to lift out the windows. Afraid of the whole roof colapsing. Any ideas? Help?
Reply:
L&K
Wow what a dramatic fix for leaky roof windows. I understand the frustration. But before you decide on the roof-over option there are some considerations that lead to a bottom line: you need help from a design professional and from your local building department. Concerns include:
1. Even with a roof over, unless the edges are enclosed on all sides, blowing rain may still cause leaks at the skylights.
2. Special construction, perhaps trusses, would be needed to bear on the ridge and eaves walls to span over the existing roof.
3. With a "double roof" construction there may be fire safety and fire code issues. Firefighters don't want to have to chop through multiple roofs if fighting a fire.
4. Ultimately the cost of the roof over project, done properly, may lead to a different approach: eliminating most of the 16 double roof windows in the existing roof, replacing any roof windows to be kept with curbed units with proper flashing, and then re-roofing that surface.
Use our email found at our CONTACT link to send me some photos and I may be able to commnent further.
...
Continue reading at SKYLIGHT VENTILATION DETAILS or select a topic from the closely-related articles below, or see the complete ARTICLE INDEX.
Or see these
Recommended Articles
- ROOF SEALANTS & MASTICS
- SLOPED GLAZING DETAILS - proper skylight and other sloped glazing installation
- SKYLIGHT GLASS BREAKAGE.
- SKYLIGHT VENTILATION DETAILS
- WINDOWS & DOORS
Suggested citation for this web page
SKYLIGHT LEAK DIAGNOSIS & REPAIR at InspectApedia.com - online encyclopedia of building & environmental inspection, testing, diagnosis, repair, & problem prevention advice.
Or see this
INDEX to RELATED ARTICLES: ARTICLE INDEX to DOORS & WINDOWS
Or use the SEARCH BOX found below to Ask a Question or Search InspectApedia
Ask a Question or Search InspectApedia
Try the search box just below, or if you prefer, post a question or comment in the Comments box below and we will respond promptly.
Search the InspectApedia website
Note: appearance of your Comment below may be delayed: if your comment contains an image, photograph, web link, or text that looks to the software as if it might be a web link, your posting will appear after it has been approved by a moderator. Apologies for the delay.
Only one image can be added per comment but you can post as many comments, and therefore images, as you like.
You will not receive a notification when a response to your question has been posted.
Please bookmark this page to make it easy for you to check back for our response.
Our Comment Box is provided by Countable Web Productions countable.ca
Citations & References
In addition to any citations in the article above, a full list is available on request.
- Best Practices Guide to Residential Construction, by Steven Bliss. John Wiley & Sons, 2006. ISBN-10: 0471648361, ISBN-13: 978-0471648369, Hardcover: 320 pages, available from Amazon.com and also Wiley.com. See our book review of this publication.
- ....
- Our recommended books about building & mechanical systems design, inspection, problem diagnosis, and repair, and about indoor environment and IAQ testing, diagnosis, and cleanup are at the InspectAPedia Bookstore. Also see our Book Reviews - InspectAPedia.
- In addition to citations & references found in this article, see the research citations given at the end of the related articles found at our suggested
CONTINUE READING or RECOMMENDED ARTICLES.
- Carson, Dunlop & Associates Ltd., 120 Carlton Street Suite 407, Toronto ON M5A 4K2. Tel: (416) 964-9415 1-800-268-7070 Email: info@carsondunlop.com. Alan Carson is a past president of ASHI, the American Society of Home Inspectors.
Thanks to Alan Carson and Bob Dunlop, for permission for InspectAPedia to use text excerpts from The HOME REFERENCE BOOK - the Encyclopedia of Homes and to use illustrations from The ILLUSTRATED HOME .
Carson Dunlop Associates provides extensive home inspection education and report writing material. In gratitude we provide links to tsome Carson Dunlop Associates products and services.
 | HOME | ABOUT | ASK a QUESTION | CONTACT | CONTENT USE POLICY | DESCRIPTION | POLICIES | PRIVACY | |
| © 2024 - 1985 Publisher InspectApedia.com - Daniel Friedman | |||||||||