
InspectAPedia® FREE Encyclopedia of Building & Environmental Construction, Diagnosis, Maintenance & Repair |
Question? Just ask us! InspectAPedia
|
 Guide to Siding or Wall-to-Slab or Foundation Top Flashing
Wall & Foundation Flashing for Building Exteriors
- POST a QUESTION or COMMENT about how to install wall, foundation, siding flashing at horizontal surfaces on buildings
Building wall or siding flashing details at horizontal surfaces:
Wall or siding connection to foundation top, porch floors, slabs: flashing materials, choices, installation details & specifications: this aritcle describes the cause, repair and prevention of leaks & rot damage at a wood framed wall that was not properly flashed and sealed at the wall bottom. A wall or siding needs special detailing to prevent leaks and damage where the wall encounters any horizontal surface such as a foundation wall top or a concrete porch slab.
This article series provides details of foundation tops, building walls, exterior trim, wall corners, and roof-wall intersection flashing to prevent leaks & water damage. We describe the different flashing materials that can be used, how and where flashing should be installed at various building wall intersections and corners, at the intersection of a roof and building wall, at other locations, and how to seal these locations against leaks or insect damage.
InspectAPedia tolerates no conflicts of interest. We have no relationship with advertisers, products, or services discussed at this website.
Guide to Siding or Wall Flashing at Horizontal Surfaces
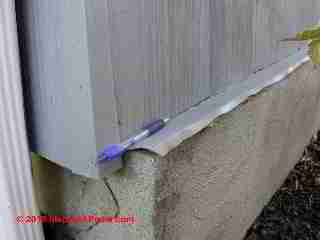
 Our photo of foundation top flashing at page top shows a couple of problems: the foundation extended past the building wall, forming a shelf that invites leaks as rain runs down the building wall. The metal flashing placed on wall top slopes back towards the building, directing water inside the structure.
Details like this risk rot and insect damage to the structure. Maybe, in this case, the flashing extends "upwards" behind the building siding, forming a zee-shape that might reduce this risk. Without further inspecting we don't know.
At left and below are photographs provided by the reader whose porch wall flashing and leak damage repair are discussed below.
[Click to enlarge any image]
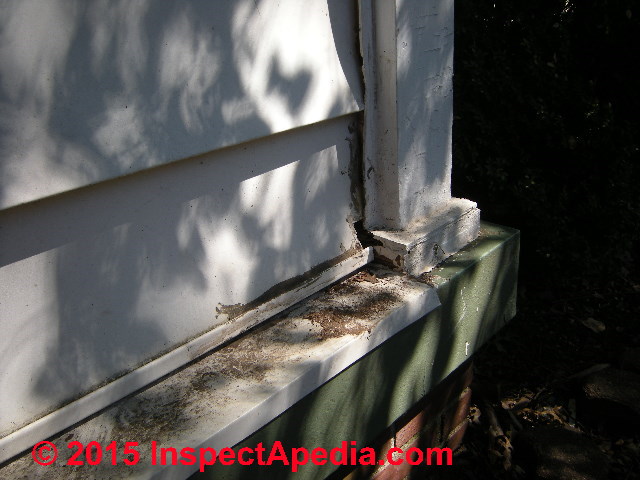
At above-left we see aluminum wall siding (probably 1960's vintage) installed on the enclosed wall of a porch on an Indiana home. The intersection of the corner column with the wall and the explosed plinth block at the column base make me think this was originally an open or screened porch later enclosed to add three or four-season-occupiable space to the home.
Reader Question: exterior porch wall-to-slab flashing damage, repair, design details
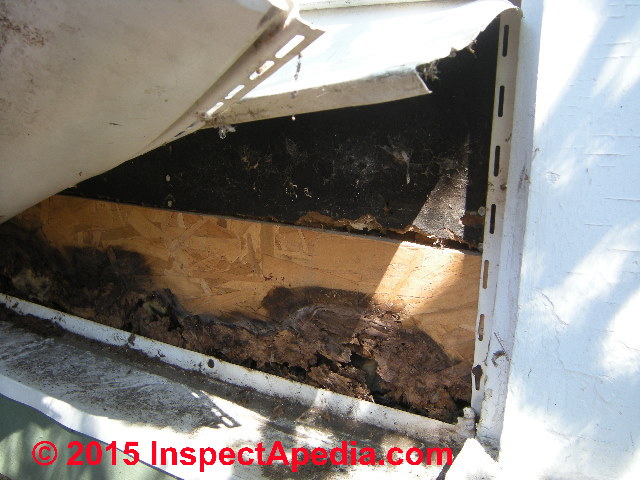
Here are pictures of my closed in porch, and two sketches of how I was thinking of repairing the wall (or having it repaired). In the last two pictures you can see that in the past someone cut out some of the old sheathing and put in chip board, which rotted along the bottom because water got in. You can see that the flashing, only comes up less than an inch.
Proper wall-to-slab or wall-to roof flashing and sealing deatils are important if we are to avoid leaks, rot, insect damage, mold contamination or other unpleasant problems over the life of a building.


What we don't know from the house exterior is just how much leak, rot, and water damage may be lurking behind the aluminum sided wall, but the fact that this is 1960's vintage-looking siding would lead an experienced home inspector to be alert for rot and damage.
Aluminum wall siding is not a waterproof building skin; the bottom edges of each siding course are clipped together, often including vent openings. Wind-blown rain can easily enter the wall at all sides of the windows as well as between siding segments and possibly at the wall bottom near those corner posts.
Reader's remarks continue:
Above where you see the rotten chip board, everything in the walls seems to be fine – studs, drywall, etc. Below that, it’s all rotten. There must be some studs that aren’t all rotten because the place hasn’t fallen down, but in the spot in the pictures its rotten.
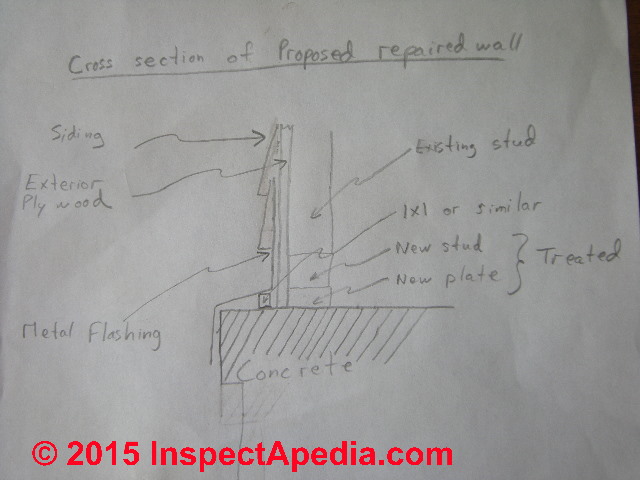
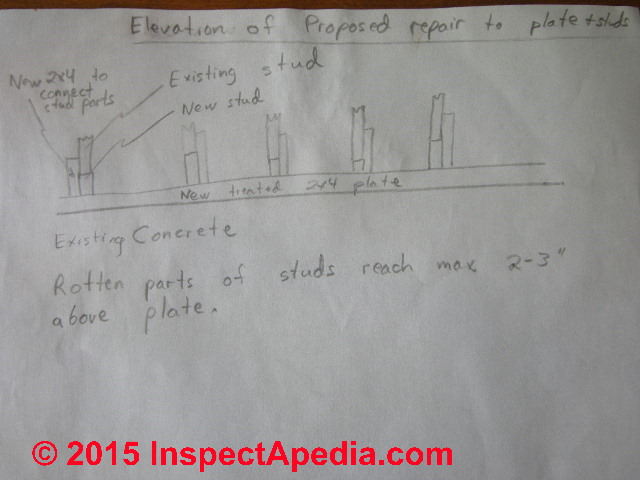
So I am hoping that we can fix the water problem by adding some fairly tall flashing, probably with a small board under it to make it slope across the concrete and shed water, and cut out the rotten plate and the bottoms of the studs and replace them with a new plate and short studs screwed to the sound parts of the existing stud. I am not sure what to do with the places at the bottom of the “posts”.
I think the little blocks of wood at the bases of the posts also catch water.
In good construction house wrap and flashing details aroudn the porch windows would have redirected any such water back to the building exterior. But a retroft porch enclosure installed decades ago may hide some surprises
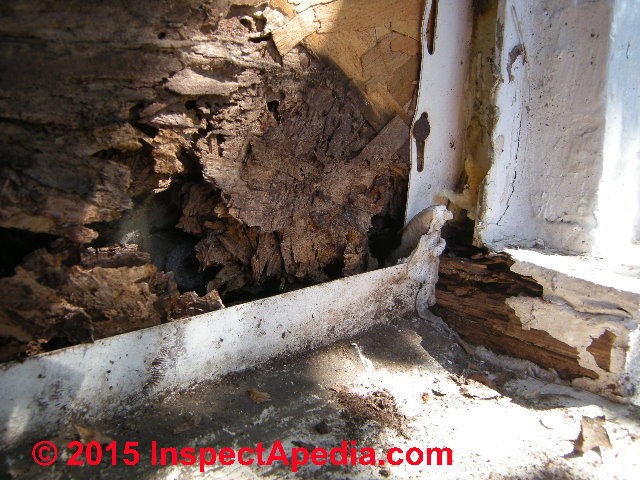
Indeed, as we'd predict, leaks in the wall, particularly around the wall bottom J-channel have rotted the siding. But on a closer look at the photos I have to correct myself - which is a warning about assuming too much when you are an ignoramus: click to enlarge each of the photos above and you'll see that:
The siding looks like vinyl, not aluminum, suggesting a more recent installation
There is a section of OSB run horizontally along the bottom of the wall - that light yellow coloured material; it has rotted from wall bottom leaks.
Above the OSB we see the chopped-off bottom of fiberboard sheathing, telling us that the original porch enclosure may have been as old as I thought, but the wall was repaired more recently, probably within the last 10-15 years or even less.
The absence of housewrap on this wall means that wind-blown rain could have leaked into the wall at windows or at higher wall sections. The wax-impregnated fibergboard is pretty water-resistant but the wall-bottom J-channel trapped water and allowed those basidiomycetes (wood rotting fungi) to go to town on the OSB.
You can bet that when the wall is opened we're going to find some rot or insect damage or both at the wall bottom sill plate and at the lower portions of the wall studs.
The rotted OSB as well as deterioration of the plinth block below the corner column (above right) tell us that the more recent repair, probably performed in response to leaks into the enclosed porch, was not the best, and that it too leaked.
Reader's remarks continue:
So my main questions are these:
1. Could my ideas work? Should I do it with the existing siding, which is still pretty flexible and in OK shape, or replace the siding?
2. What should I do about the corner posts? Would it help to have the posts go all the way down straight, with no wider block, or would it be best to remove the posts altogether?
By remove the posts, I mean remove the outside planks; the posts are hollow boxes, maybe with something inside, and maybe by removing the outside planks we could just make a smooth wall right out to the corners. Here are my sketches of proposed repairs:
Any advice you could give me would be great. - S.M. , Terre Haute, Indiana, USA, 24 August 2015 [by private email]
Reply:
 What you propose looks almost exactly right. What remains to be considered includes
- How to seal the top of wall-to-slab flashing: We need to be sure that water that can be blown into the upper siding on the wall cannot run behind that wall bottom Zee flashing.
If you were going to remove all of the siding for this repair you'd install new housewrap and bring it down over the outside of the top of the zee flashing.
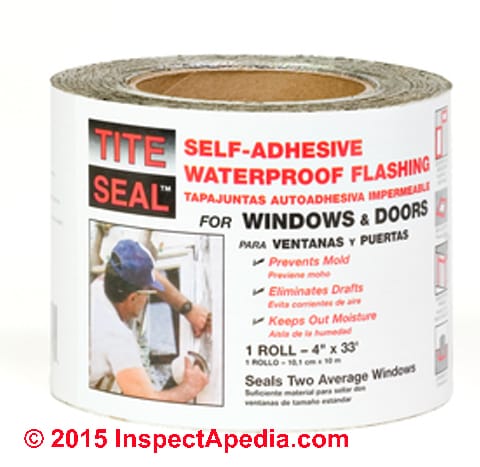
If you are just removing bottom courses of siding, then you might get away with gooey flashing tape (image at left) that is taped over the top of the flashing and whose upper half is well-bonded to the plywood or board wall sheathing. - Avoiding holes in flashing: Similarly we don't want punctures in the zee flashing that might be caused when nailing the bottom siding ocurse. To that end, the use of flashing tape can solve the problem as it should seal around nails.
- Sloping flashing over horizontal projections or surfaces: As you are using a small spacer block to give durable slope to the otherwise too-horizontal portion of the zee flashing, I suggest that you either use tapered wood (cedar shingles would be ok) or the heaviest metal flashing you can obtain. I don't want someone to later bend down or punch into the unsupported but sloped portion of the flashing.
- Other job repairs to be combined: Going to this much trouble means we don't want to do this job twice. So I'd think about replacing those plinth blocks under your corner columns with pre-fab fiberglass open bottom vented units or at least replacing them with sound, sealed treated wood.
See PORCH COLUMN REPAIR or REPLACEMENT for some ideas about repairing your porch columns and venting them.
Reader follow-up:
I will definitely replace the plinth blocks with something like what you suggest; I replaced them once already with whatever wood I had around just to keep from having open holes, and they are rotting again. I should have realized I needed to do more then (maybe 5 years ago).
Let me be sure I understand a couple of things.
- I'll guess from 1 that if we don’t take off all the siding and do new wrap we should basically cover the sheathing with gooey flashing tape as far up as we can reach? The old wall sheathing, by the way, is some kind of fiberboard-tarpaper combo.
- In 2, do you mean I should run a strip of flashing tape over the flashing where I’m going to nail on the bottom course of siding, so that I’m nailing through it and the flashing, and the tape should seal up those holes?
- In 3, I think you’re saying get some cedar shingles and cut off the thin ends to make them the right length to go from the wall to the edge of the concrete, and then set a whole row of them down on the concrete so that the flashing can rest on them and not get bent down. Is that right?
Reply: more details about flashing and sealing a wall to a concrete porch edge or projecting foundation wall
- You don't necessarily need to remove all of the siding on the walls to be re-flashed, though depending on what structural repairs are needed you may end up doing that.
Certainly I would not leave in a wall cavity fiberglass insulation that has been soaked. But you do need to be confident that any wind-blown rain that enters the wall siding system will be directed down the wa
ll and out on the exterior of the wall bottom-to-slab flashing.
Wind-blown rain can enter at butt joints of wall sheathing if they are not tight and where housewrap was omitted.
I suspect you may find it difficult to get the wall flashing top sealing flashing tape to adhere well to Homasote (fiberboard) type wall sheathing materials as that sheathing was often wax-coated.
The decision to pull off all siding and install proper housewrap depends in part on what you find: evidence of a history of leaks through the siding such as water stains on either side of the wall would bear consideration, as will evidence of more insect damage or rot damage to the wall studs than was apparent at the wall bottom
See HOUSEWRAP AIR & VAPOR BARRIERS
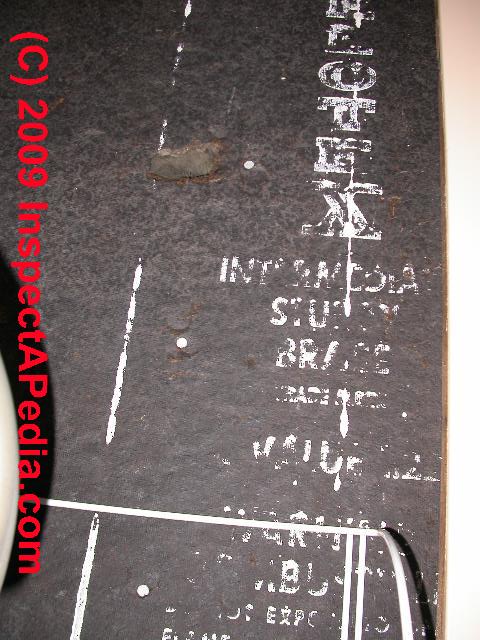
If your wall sheathing looks like the material shown at left, that's a fiberboard product.
See SHEATHING, FIBERBOARD
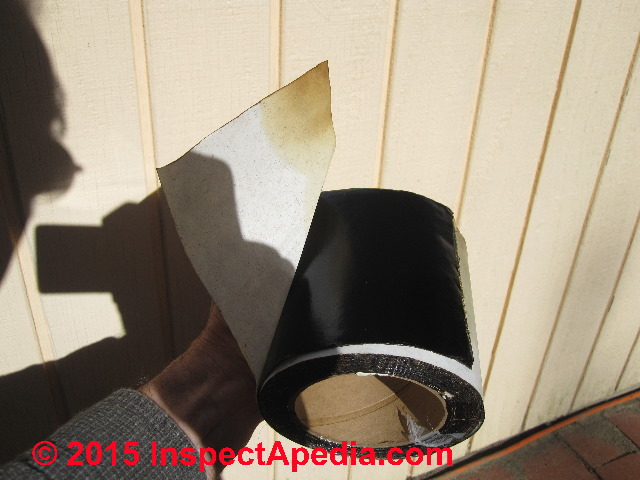
- The flashing tape runs over the top of the metal flashing and is bonded on its upper half to the wall sheathing and lower half to the metal flashing. There should be no nails below the area covered by the flashing tape.
At left you can see that the peel-off paper exposes a nice and gooey sticky surface of the flashing tape.
But if you find that you need to nail the bottom edge of siding (as you may need to install a J-channel to hold the first (lowest) siding course down at its lower edge) in that case I'd cover the entire vertical surface of the metal flashing with flashing tape so that it will seal around any nails.
Do not seal the outlet end of the flashing - we want any water that enters the wall to run on the outside of the vertical flashing, meet the sloped near-horizontal bottom bend of that flashing and run out over and past the end of the projecting concrete slab (or foundation in other applications). - Supporting the sloped nearly-horizontal bend of the wall-bottom flashing:
If you use thin aluminum flashing it may be easily punctured or bent down and then may fail to drain properly. Your support block would be enough if the flashing is thick copper but otherwise supporting it with tapered cedar shingles cut to fit will make for a more durable repair. - At the bottom edge of the near-horizontal flashing make an additional drip-edge lip
or bend (that I will illustrate here) so that water runs off of the edge of the flashing and drips to ground rather than running down the slab or foundation wall face.
Porch Slab to Wall Flashing Leaks
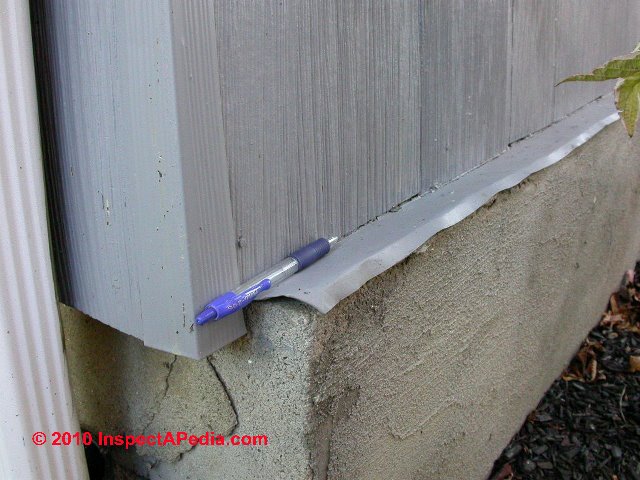
Below are examples of another wall-to-porch flashing problem that is more difficult to solve. The house exterior wall terminates at a concrete slab (over a basement) without proper sealing.
Though there was wall-bottom flashing, wind-blown rain or melting snow can send water back up under the flashing's near-flat lower extension onto the slab. Water leaked into the "basement" space that extends below the ecxterior slab (below right).
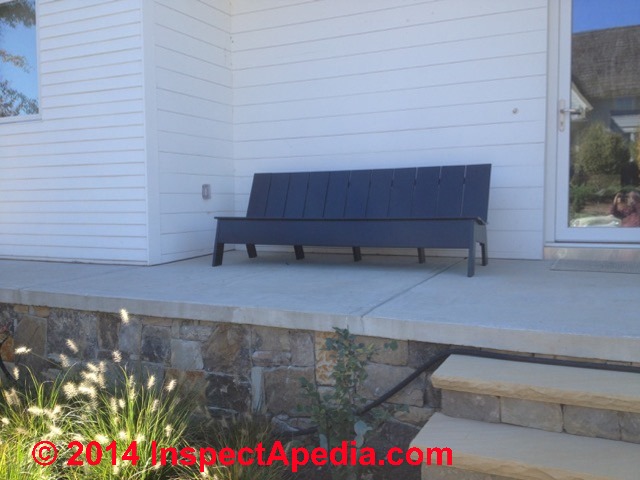
A better design would have brought the wall down to a raised concrete curb that itself was part of the slab pour or built and sealed onto the porch slab; A repair that might work would be careful sealing of the flashing to the slab surface.
Flashing Siding at the Top of a Non-Projecting Foundation Wall
Flashing the siding and wall sill plate at the top of a foundation wall that does not project out past the upper wall is pretty easy. Steve Bliss' sketches below illustrate flashing at a concrete foundation wall (below left) or at a house wall where a water table trim board is installed (below right).
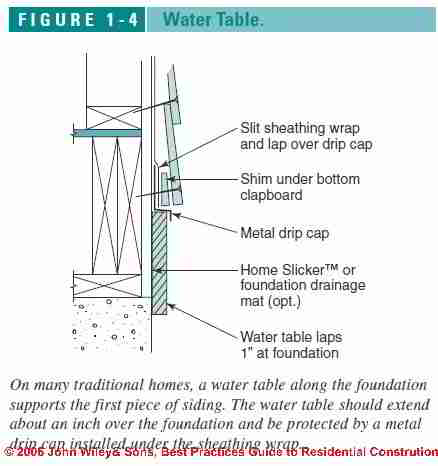
These less-annoying wall-bottom flashing procedures are discussed in detail
Flashing a Wall to a Flat Roof
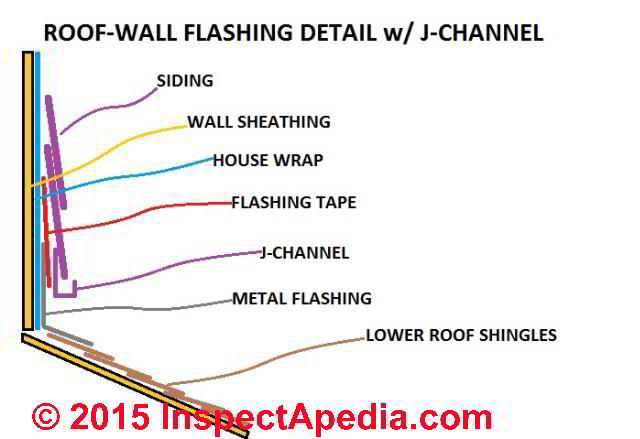
Similar wall flashing problems occur when an upper wall on a building abuts a nearly-flat roof surface such as the roof shown at below left. At below right is our recommended flashing detail [click to enlarge].
If the veritcal wall is being flashed to a flat roof we expect the roof to be covered with a membrane and we seal both the upper surface of the wall - roof flashing (to the wall sheathing) or we slip the upper edge of the wall flashing under properly-installed housewrap.
Then we seal the outer edge of the flat portion of the roof-wall flashing to the roof surface. This step is necessary on flat and low-slope roofs to prevent water from running back up under the flashing where it can enter the structure at the roof-wall juncture.

This installation is discussed in detail
Reader Comments, Questions & Answers About The Article Above
Below you will find questions and answers previously posted on this page at its page bottom reader comment box.
Reader Q&A - also see RECOMMENDED ARTICLES & FAQs
On 2020-07-08 (mod) - raise a masonry threshold to keep water off siding in contact with concrete porch
 John:
John:
When I've had this building situation I've found that
1. it's a mistake to flash over that bottom course of siding as moisture behind the flashing will still invite rot, insects, mold and
2. flashing over the siding or trying to shove flashing up under that bottom course leaves a risk of water entry at the building wall sill
-it's just not reliable to think we can seal that area absolutely against water entry;
the seal leaks, we can't see the leak, and trouble ensues.
3. The best solution IMO is
to do the following:
- remove the bottom course of siding
where it contacts the concrete porch surface
- build of a masonry sill using 4" solid concrete block - you may need to modify the wall sill plate by cutting studs and raising the sill but I think it's worth it, having investigated houses that suffered severe rot and insect attack with just this problem
- flash the remaining siding over the top of the block
You end up with something like this, but with concrete block rather than a poured concrete foundation:
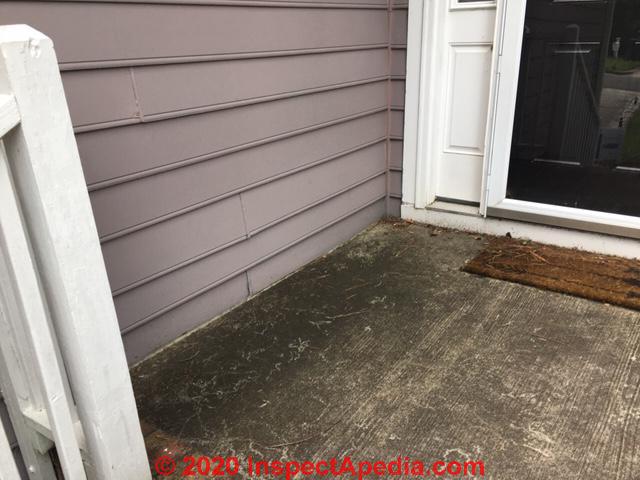
Watch out: your porch has what looks like black and green algae - the slipperiest stuff known to man - a trip and fall hazard as well as a clue that this is an area that tends to be damp.
SLIPPERY STAIRS, WALKS, ROOFS offers more detail on that hazard - which I acknowledge is a bonus, not something you asked.
On 2020-07-08 by John
First of all, thank you, this was a super informative article!
I have a situation that I can't seem to find a good solution for [Photo above].
Our masonry front porch stoop meets the masonite sided wall of our garage, and has no flashing.
When it rains hard and water collects on the stoop, it seeps under the siding and the wall studs and sill boards get wet. It's not often, and never much water, but I'd prefer never and none. Is there a way to retrofit flashing to an existing masonry porch?
I believe I'd need to seal it to the porch to be effective. Thanks again!
On 2019-10-27 by LP - flashing details at front entry platform: aluminum vs adhesive membrane
 Hi,
Hi,
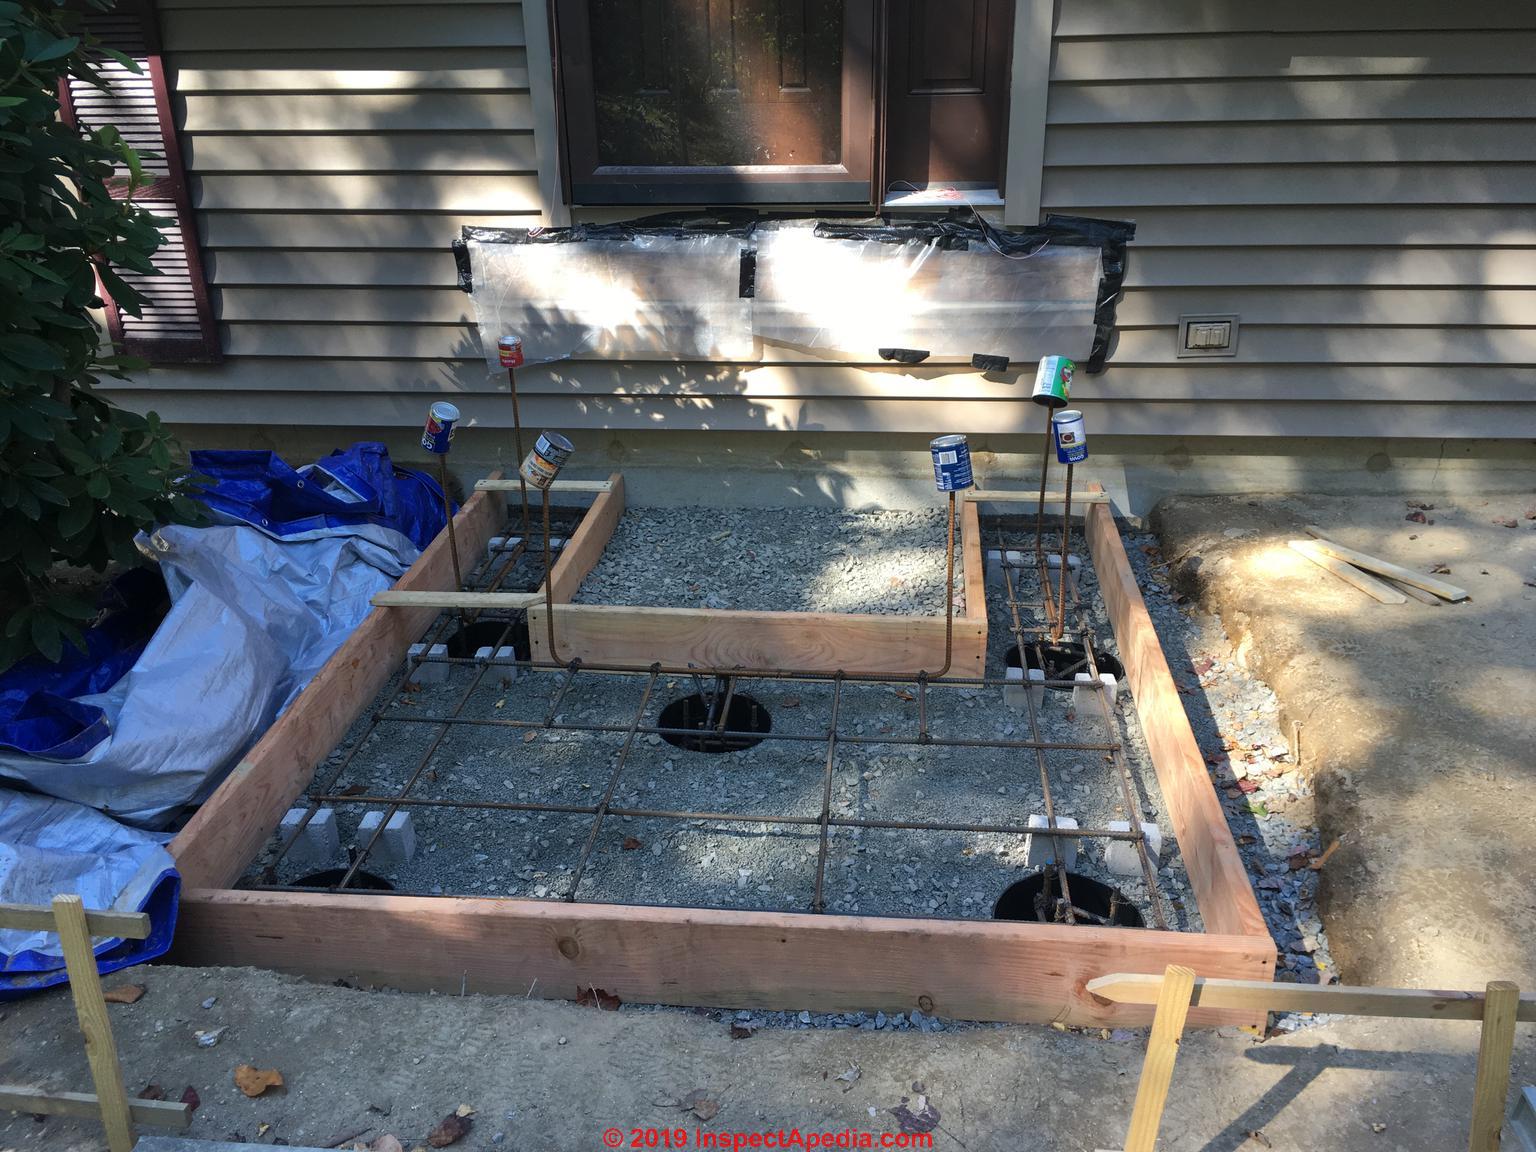
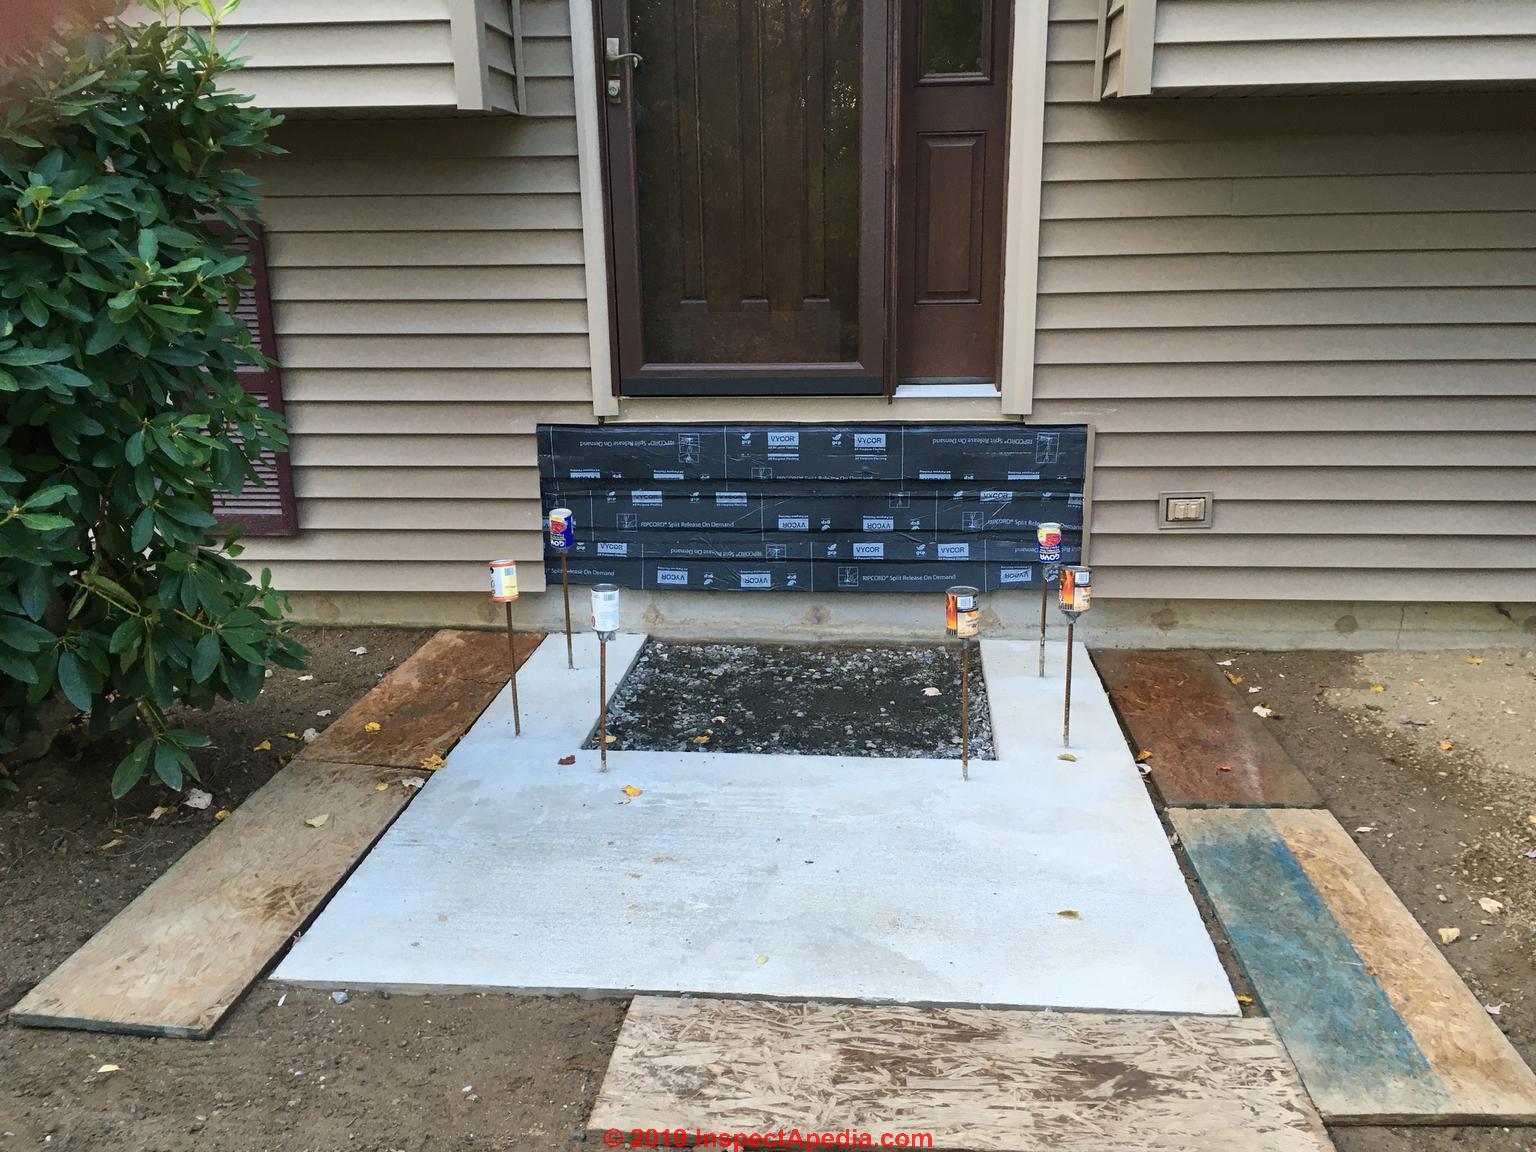
I live in CT and I am replacing my wooden from deck entrance with a masonry stoop. I have already removed the wood deck and poured a concrete base with 5 piers, rebar and a 7.5” pad all in one pour.
I plan to build a cinder block wall (on 3 sides) to form the upper platform area where you would walk out the door.
The area in the middle void (between the walls) will be compacted stone and process and the last few inches near the top will be concrete (with rebar) to make a base for the blue stone
The steps will also be cinderblock with blue stone treads. I will be adding stone veneers on the side walls and steps.
The previous area under the wood deck’s ledger board was vinyl siding. I have already removed the vinyl below that area to get down to the previous wood clapboard siding.
I scrubbed that clean, made sure it was dry and added a water membrane from bottom up using a shingle-type install method all the way up over the old ledger and under the door.
My plan is to also add aluminum flashing on top of the water membrane for extra protection especially since there will be stone and process leaning against it.
My questions:
1. Is it a good idea to run a metal flashing over the water membrane all the way down (appx 30”) or should I only run the metal flashing down about 6-12” from under the door? Are there any downsides to running it all the way down creating this double physical barrier? (Vapor barrier issues, etc.)
2. The flashing I plan to use is painted aluminum. Do I have to worry about that touching the cinder blocks?
3. Should I put tar paper between any of these elements to eliminate direct contact?
4. Are there any other comments or suggestions you might have for me?
Thanks in advance for your help.
Regards,
LP (in Connecticut)
On 2019-10-27 by (mod) - flashing details at front entry platform: aluminum vs adhesive membrane
 LP:
LP:
While I've seen aluminum flashing that looked perfect 20 years after having been set in contact with a concrete block foundation, it's also the case that we sometimes see corroded aluminum flashing = depending on flashing thickness, moisture or water exposure, possibly variations in chemistry of some concrete or concrete blocks, and probably other factors I've not considered.
But your application - padding out the membrane with aluminum flashing is a different concern.
OPINION: (that means this isn't an authoritative answer): Even corroded the aluminum will give some protection against penetration or cuts by the stonework pressed against it; Sure you could add some layers of "tar paper" (roofing felt) or of course one could simply double or even triple the adhesive membrane in that location.
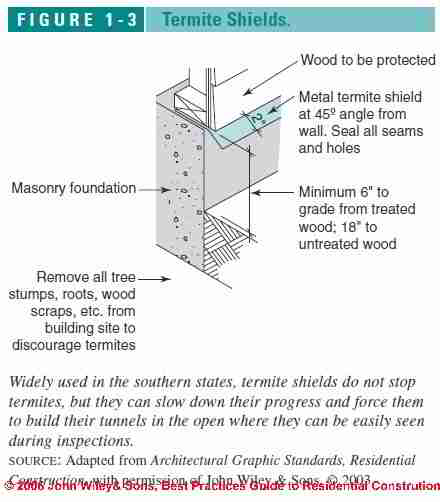
IN addition to wanting to avoid leaks at the flashing location, we'd like to avoid giving an attractive passage for wood destroying insects, particularly termites, also carpenter ants, up into the building sills.
For that reason it's important to be sure that your stoop is sealed against water leaking down between the entry platform and the building walls anywhere near wood framing.
I'd want any flashing around the entry platform to extend not just up under the siding below the door but preferably over the entry door sill, and not just "to" the cut-away siding on the lower wall, but in behind it and atop the housewrap that we hope was installed - for 4" or more.
Question: what's behind the self-adhesive flashing in your photo: wood framed wall and wood sheathing, or is it solid masonry? The risks of insect attack (and rot) are different.
Also see WINDOW FLASHING & SEALING Guide as that advice will also help with flashing below a door.
On 2019-01-25 by (mod) -
Tawny
Before sealing the gap in your photo - as a move to stop air leaks and compensate for what might be sloppy construction, you need an onsite expert to help us understand the type of construction and to explain whether this is just a gap to be sealed or whether it's an indication of serious structural movement and defects.
Try the EXPERTS DIRECTORY at page top to see if you can find an experienced home inspector of engineer.
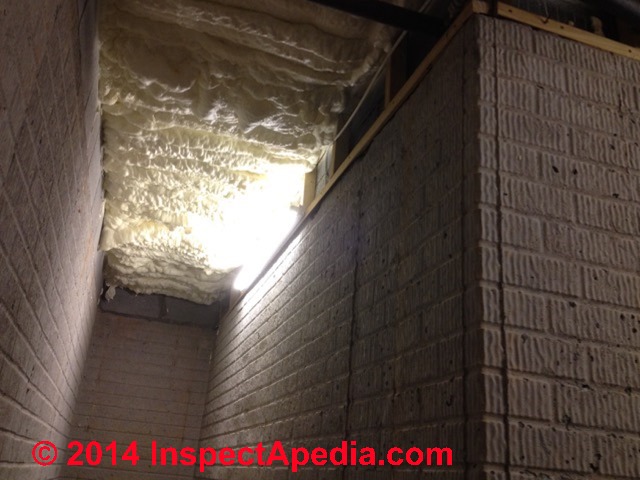
On 2019-01-23 by Tawny Greene
This is a picture of what I see when looking up under the siding above the foundation. This is a brand new home. We can see a huge gap and the plywood. Is this normal? How would it be fixed? Also this was found by us because we feel super cold air coming into the house along our baseboards ok the other side of this wall.
IMAGE LOST by older version of Clark Van Oyen’s useful Comments code - now fixed. Please re-post the image if you can. Sorry. Mod.
On 2018-09-16 by (mod) -
Rick
Thank you for the photo and interesting question.
If the home in your photo is built over either a crawl space or a basement, the risk of building damage (wet crawl space or basement, mold, rot, insect attack) from water entry into the wall structure is more significant than if the home is actually built as a slab on grade.
With that introduction, it seems to me that the central risk in the foundation you show is not snakes (though they may not enjoy finding themselves cemented into the foundation wall) but rather water.
Normally a concrete block foundation, properly constructed, rises above grade level, and the hollow blocks are capped with a solid concrete block cemented in space, giving some resistance to the entry of groundwater or roof spillage or surface runoff that otherwise want to pour into the foundation wall from above.
So if your home sits over a basement or crawl area, start by looking inside that space for water entry and related water problems and tell us what you find.
IF your home sits on a slab that is on or above the outdoor grade level, it would still be better construction practice to seal that top course of blocks with solid masonry cemented in place, but the damage risks are likely to be less significant.
On 2018-09-15 by Rick
Bought a house last year and saw a snake trying to go down behind a brick near an exterior wall. After moving the brick I could see the top of the foundation wall (see pic). It appears all along that side of the house is like that. Does this need to be corrected and if so how? Do I move the brick, and fill the holes in the foundation wall with dirt?
Do I cement the bricks to the foundation wall or does it need a flashing? Home was built in 1970. Thanks.
IMAGE LOST by older version of Clark Van Oyen’s useful Comments code - now fixed. Please re-post the image if you can. Sorry. Mod.
On 2017-06-20 by Bruno
Hi I have a problem with water leaking into my basement and wondering if brick ledge flashing may be the problem.
It is sticking out of the bottom layer of the brick and in some places it is wavy and slanted towards the brick wall.
On 2017-06-05 by (mod) -
Sheila,
Probably that would work but unfortunately if external caulking hasn't fixed this problem I'm - as my sister Linda Ann used to say - waay too scared.
More to the point: it's possible that wind-blown rain is getting into the wall well above the window where the leak shows up. If so, and as water may be running behind the house wrap or even inside the wall cavity, just adding flashing over the window (which will require removing siding to do that) won't fix the trouble.
So I'd start with an outdoor inspection, perhaps with help from a home inspector who has an electronic moisture meter, to see if we can get confident about where the water problem is starting. That's where we have to fix the problem.
On 2017-06-05 by Shelia
I have a full brick on concrete block basement. I have a leak at the top on the metal flashing above a window in the unfinished part of basement. Window has been caulked inside and out. But we are having lots of rain and today I actually saw it pouring in. Would the waterproof flashing you showed work for my problem. slinder1@bham.rr.com
...
Continue reading at FLASHING WALL DETAILS or select a topic from the closely-related articles below, or see the complete ARTICLE INDEX.
Or see
- CAULKS & SEALANTS, EXTERIOR
- FLASHING on BUILDINGS - home
- FLASHING MEMBRANES PEEL & STICK
- FLASHING ROOF-WALL SNAFU for examples of roof-wall abutment flashing foul-ups to avoid
- RAIN SPLASH-UP SIDING DAMAGE For more details about splashback or splash-up water damage to exterior walls, see
Suggested citation for this web page
FLASHING WALL to FOUNDATION or SLAB at InspectApedia.com - online encyclopedia of building & environmental inspection, testing, diagnosis, repair, & problem prevention advice.
Or see this
INDEX to RELATED ARTICLES: ARTICLE INDEX to BUILDING FLASHING
Or use the SEARCH BOX found below to Ask a Question or Search InspectApedia
Ask a Question or Search InspectApedia
Try the search box just below, or if you prefer, post a question or comment in the Comments box below and we will respond promptly.
Search the InspectApedia website
Note: appearance of your Comment below may be delayed: if your comment contains an image, photograph, web link, or text that looks to the software as if it might be a web link, your posting will appear after it has been approved by a moderator. Apologies for the delay.
Only one image can be added per comment but you can post as many comments, and therefore images, as you like.
You will not receive a notification when a response to your question has been posted.
Please bookmark this page to make it easy for you to check back for our response.
Our Comment Box is provided by Countable Web Productions countable.ca
Citations & References
In addition to any citations in the article above, a full list is available on request.
- Eric Galow, Galow Homes, Lagrangeville, NY. Mr. Galow can be reached by email: ericgalow@gmail.com or by telephone: 914-474-6613. Mr. Galow specializes in residential construction including both new homes and repairs, renovations, and additions.
- Mark Cramer Inspection Services Mark Cramer, Tampa Florida, Mr. Cramer is a past president of ASHI, the American Society of Home Inspectors and is a Florida home inspector and home inspection educator. Contact Mark Cramer at: 727-595-4211 mark@BestTampaInspector.com 11/06
- In addition to citations & references found in this article, see the research citations given at the end of the related articles found at our suggested
CONTINUE READING or RECOMMENDED ARTICLES.
- Carson, Dunlop & Associates Ltd., 120 Carlton Street Suite 407, Toronto ON M5A 4K2. Tel: (416) 964-9415 1-800-268-7070 Email: info@carsondunlop.com. Alan Carson is a past president of ASHI, the American Society of Home Inspectors.
Thanks to Alan Carson and Bob Dunlop, for permission for InspectAPedia to use text excerpts from The HOME REFERENCE BOOK - the Encyclopedia of Homes and to use illustrations from The ILLUSTRATED HOME .
Carson Dunlop Associates provides extensive home inspection education and report writing material. In gratitude we provide links to tsome Carson Dunlop Associates products and services.
 | HOME | ABOUT | ASK a QUESTION | CONTACT | CONTENT USE POLICY | DESCRIPTION | POLICIES | PRIVACY | |
| © 2024 - 1985 Publisher InspectApedia.com - Daniel Friedman | |||||||||