
InspectAPedia® FREE Encyclopedia of Building & Environmental Construction, Diagnosis, Maintenance & Repair |
Question? Just ask us! InspectAPedia
|
 Mixing Valves & Anti Scald Valves on a Tankless Coil or Radiant Heat System
How to install & set hot water temperature for domestic hot water or for radiant heating systems
- POST a QUESTION or COMMENT about anti scald devices and mixing valves on hot water systems
Automatic mixing valves or tempering valves provide anti-scald protection at the tankless coil hot water system on a boiler or set the proper water temperature for radiant heating systems used in floors or ceilings.
This article explains how to install or locate the hot water temperature controlat the heating boiler and h ow to adjust or maintain this temperature control.
For tankless coil applications we describe what the tankless coil temperature control looks like, how it works, and how to set the output hot water temperature to avoid scalding burns. This article includes the hot water temperatures you can expect when using this type of mixing valve or anti-scald valve at a boiler.
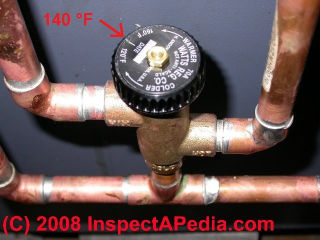
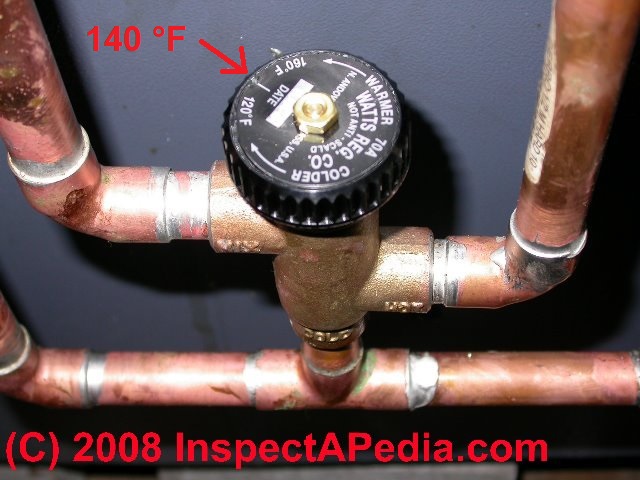
Page top photo: a Watts anti-scald valve installed at the tankless coil on a hydronic heating boiler.
In this article series we explain how to buy, install, adjust and inspect anti-scald equipment to prevent hot water burns. We explain what a mixing valve, tempering valve, or anti-scald valve is, where and why these valves are installed on hot water systems, and how they work.
InspectAPedia tolerates no conflicts of interest. We have no relationship with advertisers, products, or services discussed at this website.
Guide to Installing & Setting Hot Water Mixing Valves
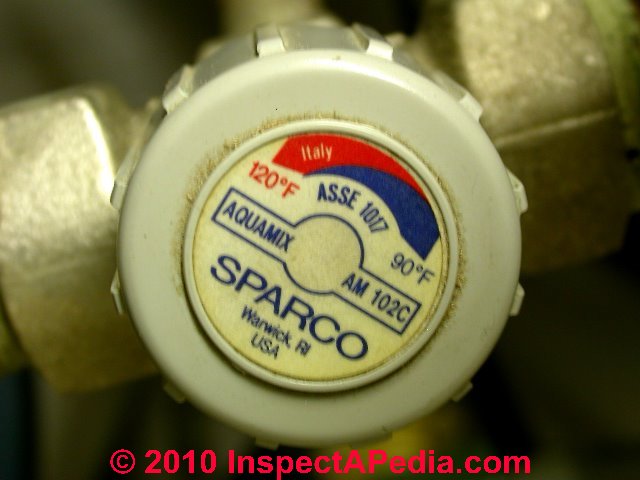
Photo: a Sparco Aquamix AM 100C automatic tempering valve or anti-scald valve. At page top, a Watts automatic anti-scald valve installed at a home heating boiler tankless coil used to provide domestic hot water.
[Click to enlarge any image]
Article Contents
Automatic Anti-Scald Tempering or Mixing Valves at a Tankless Coil - Water Pressure Balancing Type
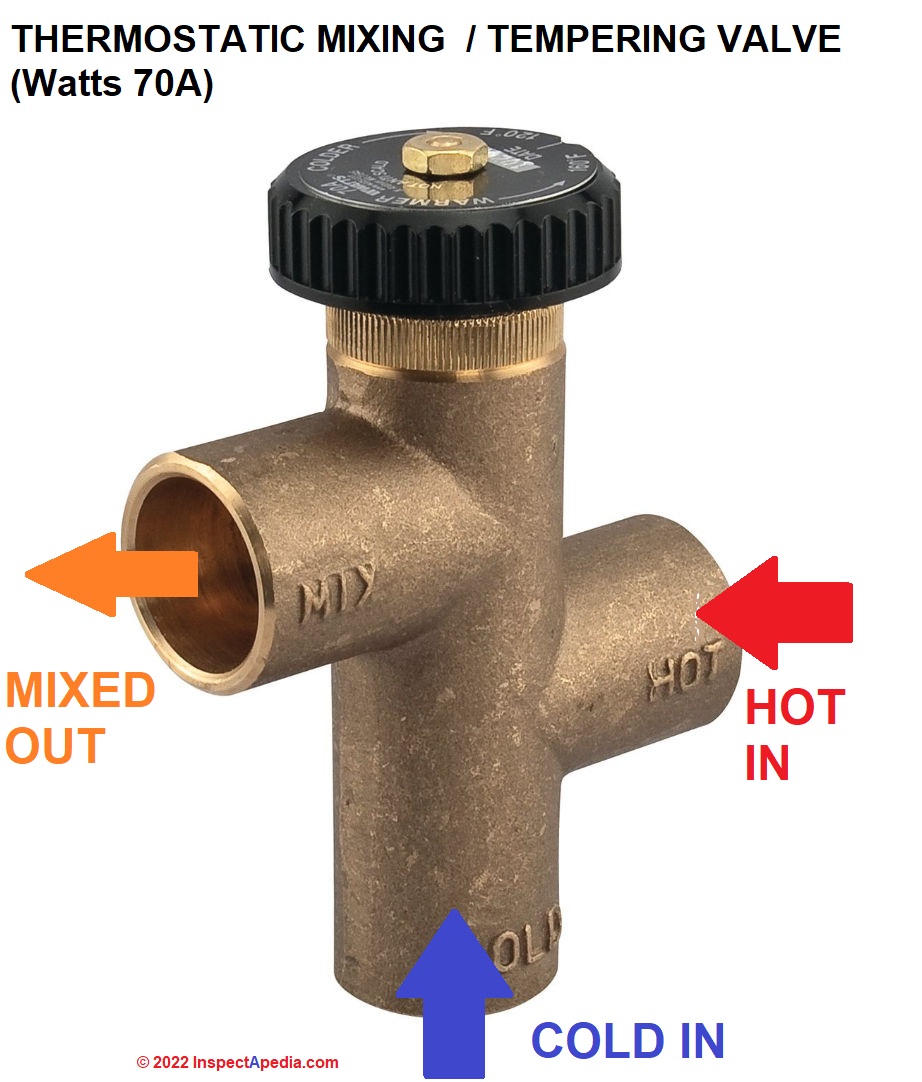
The Watts anti-scald valve shown above or the Sparco anti-scald valve shown earlier (or an equivalent product) is normally installed at a heating boiler tankless coil outlet or at the outlet of a stand-alone water heater.
This mixing or anti-scald valve contains an internal temperature sensor which permits the valve to add cold water to the outgoing hot water in order to limit the temperature of the hot water leaving the valve.
Our photo at left, taken at a heating boiler in Portland ME, shows a popular Watts™ anti-scald valve made by the Watts Regulator Company.
You can see that the black knob permits the user to set the outgoing hot water temperature leaving the valve, and if you look closely you can see the "HOT" and "COLD" and "MIX" indicators on the three ports of the body of the valve.
Turning this Watts Reg. Co. automatic mixing valve clockwise makes the outgoing water temperature cooler. Turning the Watts mixing valve counterclockwise makes the outgoing water temperature hotter.
Hot water enters the valve's right side, cold water enters the mixing valve's bottom, and mixed or tempered hot water leaves the valve at its left side.
Which Way do We Turn the Anti-Scald or Automatic Mixing Valve to Make Hot Water Cooler or Hotter?
Question about tankless coil or other hot water mixing valve operation - example using the Sparco Aquamix AM 102C:
I'm not sure which way to turn my hot water mixing valve. When you turn "down" on valve does it send less cold water or more. I believe it's less. Let me know. - U.S.A.
Answer:
There should be a direction arrow on the anti-scald valve telling you what it is doing and which turn direction will raise or lower the outgoing water temperature.
The Sparco Aquamix AM 102C tempering valve shown (above-left) is marked to explain that if we turn this valve counterclockwise (the direction of the red arrow) the outgoing water temperature will be hotter.
Turn this anti-scald valve (and most model) clockwise (in the direction of the blue arrow) to make the outgoing water temperature cooler.
Our photo of a Sparco™ Aquamix AM102C anti-scald or tempering valve (above-left) as well as our photo of a Watts™ mixing valve shown earlier in this article both show the arrow that we describe and indicates that turning the automatic mixing valve knob clockwise makes the outgoing water cooler, and turning the automatic mixing counterclockwise makes the outgoing water hotter.
We don't describe the valve direction as "up" or "down" because these valves can be installed in more than one position, making "up" and "down" a bit confusing.
For hotter output water [on the Sparco or Watts Tempering Valve models shown]: Turn the automatic mixing valve knob counter-clockwise (on the Sparco valve above, in the direction of the red arrow) to make the output water from the system hotter.
For cooler output water: Turn the automatic mixing valve clockwise (on the Sparco valve above, in the direction of the blue arrow) to mix in more cold water and thus to make the output water from the system cooler.
Note that because these mixing valves are automatic, that is once they have been set they maintain a specified hot water temperature for water leaving the water heater, you don't have to make seasonal changes to the valve adjustment.
The automatic mixing valve, tempering valve, or anti-scald valve approach of installing this safety control at or close to the water heater is discussed further at Thermostatic Mixing Valves.
Watch out: Be sure to take a close look at the indicating arrows on your own automatic mixing valve as some tempering valve models may work differently. And for manual hot water mixing valves that we discuss below, the direction to turn the valve may not be marked, but is easy to determine, as we will explain.
Thanks to readers Bruce Jones and Chris Martino and others for pointing out the need for clarity about about which way to turn the hot water mixing valve or tempering valve.
If your automatic tempering or hot water mixing valve has different instructions or operates differently from those discussed here, CONTACT us and send along a photo so that we can add that information here.

- Watts, INSTRUCTIONS SERIES LF1170 AND LFL1170 HOT WATER TEMPERATURE CONTROL VALVES [PDF] (2013) Watts Regulator Co. (2013), USA Tel: (978) 688-1811, Fax: (978) 794-1848,
Website: www.watts.com,
Canada: Tel: (905) 332-4090, Fax: (905) 332-7068, Website: www.watts.ca
Excerpts:
This Hot Water Master Tempering Valves cannot be used for tempering water temperature at fixtures. Severe bodily injury (i.e., scalding or chilling) and/or death may result depending upon system water
pressure changes and/or supply water temperature changes.
ASSE standard 1016, 1069 or 1070 listed devices should be used at fixtures to prevent possible injury.
These Hot Water Tempering Valves are designed to be installed at or near the boiler or water heater.
They are not designed to compensate for system pressure fluctuations and should not be used where ASSE standard 1016, 1069 or 1070 devices are required. These valves should never be used to provide “anti-scald” or “anti-chill” service.
Watts Anti-Scald Valve Life
To prolong the life of the Model LF1170-M2 or LFL1170-M2 valve, it is recommended that it be trapped as shown (Figure1 - shown above- Ed): i.e. the hot water inlet to the LF1170-M2 valve should be 8" – 12" (200 – 305mm) below the hot water supply feed.
Period Inspection/Maintenance of the Watts Hot Water Temperature Control Valve
This valve requires periodic inspection and verification of the outlet temperature by a licensed contractor. Corrosive water conditions, hot inlet water temperature over 200°F (93°C), unauthorized adjustments or repairs could render the valve ineffective for its intended service.
Regular cleaning and checking of thermostat assembly helps to maximize valve life and mixing function.
Frequency of cleaning depends on local water conditions.
Tankless Coil Hot Water Mixing Valve Output Temperatures
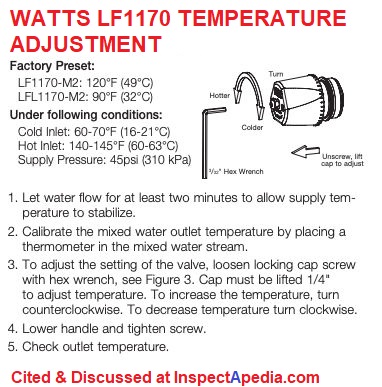
Using the modern Watts Regulator Co. Series LF1170 / LFL1170 Hot Water Temperature Control Valve instructions as an example, these valves control water temperature in the following ranges:
Table of Hot Water Mixing Valve Output Temperatures [Watts Series LF1170 & LFL1170] |
|||||
| Hot Water Mixing Valve Model | Cold Inlet Temperature | Hot Inlet Temperature | Factory Preset Outlet Temperature | Output Temperature Adjustment Range | Water supply pressure |
| Watts LF1170-M2 | 60-70 °F (16-21 °C ) |
140-145 °F (60-63 °C) |
120 °F (49 °C) |
90-160 °F (32-71 °C) |
45 psi (3.15 bar) |
| Watts LFL 1170-M2 | 90 °F (31 °C) |
60-120 °F (16-49 °C) |
|||
Notes to the table above
These mixing valves require a minimum supply pressure of 30 psi (207 kPa), and function with hot inlet water temperatures ranging from 120 to 200 °F (49-93 °C ), and with cold inlet temperatures from 40-85 °F(4-2 °C ).
Valve outlet temperature accuracy is +/- 3°F (1.7 °C ). There are other restrictions including a requirement that the difference between hot water and cold water pressures at the valve must not vary by more than 25%. The maximum tolerated pressure is 150 psi (10.3 bar). Lower pressure restrictions may apply when using CPVC or PEX piping & end connections.
Code approvals: CSA B125-certified and Listing: ASSE 10167 & IAPMO UPC.
Source: "Instructions Series LF1170 and LFL1170 Hot Water Temperature Control Valves", Watts Regulator Co. (2013)
Tankless Coil Anti-Scald Valve Safety Warnings
Watch out: read the installation instructions from the manufacturer of the product you are installing, both to make sure it's installed properly and thus will work as expected, and also so that you understand what to expect by way of hot water temperature control the product handles.
At TANKLESS COIL INSTALLATION PROCEDURE where we recommend the use of mixing valves we quote this warning from the Crown Boiler Company:
WARNING: Thermostatic mixing valves are intended to increase the supply of hot water available from the coil. They are not intended to prevent a scald hazard.
Similarly, the Watts Regulator Company's instructions for the installation of the Series LF1170 & LFL 1170 Hot Water Temperature Control Valves includes this warning: [Bold font is our emphasis]
WARNING: FAILURE TO COMPLY WITH PROPER INSTALLATION AND MAINTENANCE INSTRUCTIONS COULD CONTRIBUTE TO THE VALVE FAILURE.
This Hot Water Master Tempering Valves cannot be used for tempering water temperature at fixtures. Severe bodily injury (i.e., scalding or chilling) and/or death may result depending upon system water pressure changes and/or supply water temperature changes. ASSE standard 1016, 1069 or 1070 listed devices should be used at fixtures to prevent possible injury.
These Hot Water Tempering Valves are designed to be installed at or near the boiler or water heater. They are not designed to compensate for system pressure fluctuations and should not be used where ASSE standard 1016, 1069 or 1070 devices are required. These valves should never be used to provide “anti-scald” or “anti-chill” service.
The components of the system must be of materials with a construction capable of withstanding the high limit output temperatures of the water heating source. - Watts (2013)
Troubleshoot or Clean the Mixing Valve on a Radiant Heat System
On 2023-12-10 by Benoit Galarneau - unable to get enough hot water into radiant floor heating system
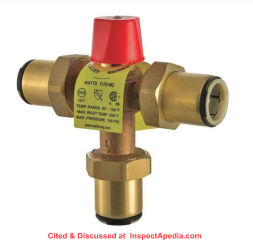
Above: Watts LF1170 mixing valve that may be used in radiant heating system temperature control. Cold enters the valve at its left side, hot enters at the valve right side opening and tempered water exits at the valve Tee bottom outlet.
[Click to enlarge any image]
Hi, question from Montreal.
My Watts LF1170C-M2 Mixing valve sets the water temperature before it runs into the radiant floor of the basement. I can't get enough hot water from it.
As soon as I turn the knob more than always on the Hot direction, the flow drops to almost zero in the radiant tube.
When I carefully turn clockwise, the best I can can get is 86F with a flow of 0,5 g/m. That is barely enough to heat the basement. Note that the boiler heats the water up to 160F and provides satisfactory heat to the first and second floor cast-iron radiators.
I suspect the hot water side of the MV to be clogged. If so, is to easy to clean? Or what other reason could there be? Thank you.
On 2023-12-10 by InspectApedia Publisher (mod)
@Benoit Galarneau,
The anti-scald valve that we discuss above on this page is intended for control of domestic hot water - for washing and bathing, OR at least for some models, also for control of a radiant heat floor system.
And indeed strainers inside the valve's two inlet openings can become debris clogged OR the valve's internals may become clogged by mineral scale if your water supply is hard or high in mineral content.
Watts says about your LF1170C
The LF1170 can be set to any temperature between 90°F and 160°F (60°F and 120°F for model LFL1170-M2) with flow rates as low as 0.5 gpm and as high as 23 gpm.
So you should be getting plenty of tempered water flow if nothing were clogged.
Typical residential radiant floor heat flow rate in gpm has to vary depending on loop length and other variables but might be around 0.5 to 0.8 gpm.
You're saying that the boiler is heating up to 160F - so why aren't we seeing that on the outlet side of the mixing valve? Your description sounds as if the valve thinks that the incoming "hot" from the boiler is so cool or its flow rate so restricted that it's slowing the outlet way down.
IF we pretend for a moment that the valve itself isn't defective, then let's look first for a zone loop balancing valve that is too far open or shut on the basement zone or on your other house zones.
#1: is this a new problem or has it always been the case since the system was installed?
#2. are there zone flow balancing valves on your system? and if so have you fooled with those at all?
#3 [added later]: has your radiant heat tubing system ever been flushed? Or has work on the system found high levels of sediment, rust, or debris in the piping or controls? Or have there been frequent leaks and a lot of makeup water added (risking a scale problem)?
And if you don't have the instructions for your Watts LF1170C-M2 mixing valve you can download a copy here at
Or see our whole collection of mixing valve installation, operation, & use manuals
To be clear and for other readers,
The Watts LF1170C-M2 mixing valve (shown above) can be used for radiant heat control.
Here's what Watts says about the control:
Series LF1170, LFL1170 Lead Free* Hot Water Temperature Control Valves are specifically designed for mixing hot and cold water on hot water supply systems.
They can be used for a variety of applications to reduce the temperature of the hot water from the system and are ideal for radiant heat applications.
This series features a double throttling design which combines the control of the hot and cold water to provide a sensitive response to changes in water temperature passing through the mixing chamber.
For a more-scholarly look at radiant heat floor flow rates see this recent study (highly technical):
- Lu, Lidi, Lulin Luo, and Jinhua Chen. STUDY ON PREDICTING THE RADIANT HEAT FLOW RATE OF FLOOR SURFACE OF RADIANT FLOOR HEATING [PDf] Energy and Buildings 301 (2023): 113704.
Abstract excerpt:
Radiant heat flow rate of radiant surface is crucial for radiant floor heating design and terminal selection. We found that the present empirical formula to predict radiant heat flow rate of radiant surface has limits under varied room size and surface emissivity circumstances. Wall insulation conditions also have substantial influences on the operating efficiency of floor radiant heating.
On 2023-12-13 by Anonymous - blocked radiant heat flow is a new problem on this system
@InspectApedia Publisher, Thank you for your thoughts.
Answer #1 : the system worked fine after the installation (and many tweaks) in 2019. It was working fine this fall when I tested it and purged any air out of it before winter.
#2: I don't believe I have any sort of flow balancing. The water, out of the MV, goes through a pump (An Armstrong 230Cl) and then right into the 5 tube manifold.
I have read the Watts manual, and the A.3 situation ( Filters are blocked by debris ) is my main suspect.
I asked if it was easy to clean the MV as I'm trying to figure out if I can do it myself since I can't find anyone willing to touch a system not installed by them. I had way too many issues with the original installer to call him back.
On 2023-12-13 by InspectApedia Publisher (mod) - nobody wants to clean or rebuild your radiant heat temperature control / mixing valve
@Anonymous, Benoit:
Frankly I don't think that cleaning the mixing valve is techically difficult, though if isolating shutoffs have not been installed around the valve, it becomes a much bigger job as you may have to drain and refill the system just to get the valve off and put it back on.
About cleaning a tempering or mixing valve on either a radiant heat system or a domestic hot water system, this is a common and troubling problem: no one is willing to do the manufacturer's "required service" for the Watts LF 1170C mixing valve.
Here is what the manufacturer's instructions say: about maintenance requirements for the Watts LF1170 or LFL1170 mixing valve:
Period Inspection/Maintenance
This valve requires periodic inspection and verification of the outlet temperature by a licensed contractor.
Corrosive water conditions, hot inlet water temperature over 200°F (93°C), unauthorized adjustments or repairs could render the valve ineffective for its intended service. Regular cleaning and checking of thermostat assembly helps to maximize valve life and mixing function.
Frequency of cleaning depends on local water conditions.
Really? In my OPINION sometimes a manufacturer includes a specification or requirement that they know perfectly well no one is going to obey or follow - it's a way to avoid liability.
Regrettably, and also just my OPINION, the cost to hire someone to disassemble this mixing valve and clean it, inspect it, possibly replacing any questionable parts, might exceed the cost of simply replacing the valve.
Consider that the labor to get the valve off for disassembly and inspection may be more than the labor to simply replace the valve.
The cost for a new Watts LF1170 ranges between about $114. and $280. U.S. as you can see from the quick check I'll post below.
[Click to enlarge any image]
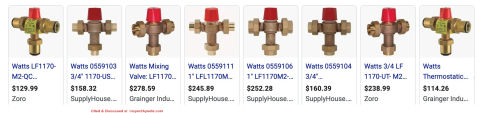
Now you or your service technician can by a Watts LF1170C-M2 Repair Kit ( RK LF1170M2 Repair Kit (1/2" - 1") ) from local plumbing suppliers or online vendors.
At Supplyhouse dot com that kit lists for just under $100. U.S. That's just $14. less than buying an entire new mixing valve (at the low end of its retail price range).
Now add to that $100. the labor time to disassemble, clean, reassemble the valve .
Now add to that the liability worry on the part of your plumber or service technician, and I think you'll agree that for most situations, we're going to simply have to replace the valve instead of servicing it.
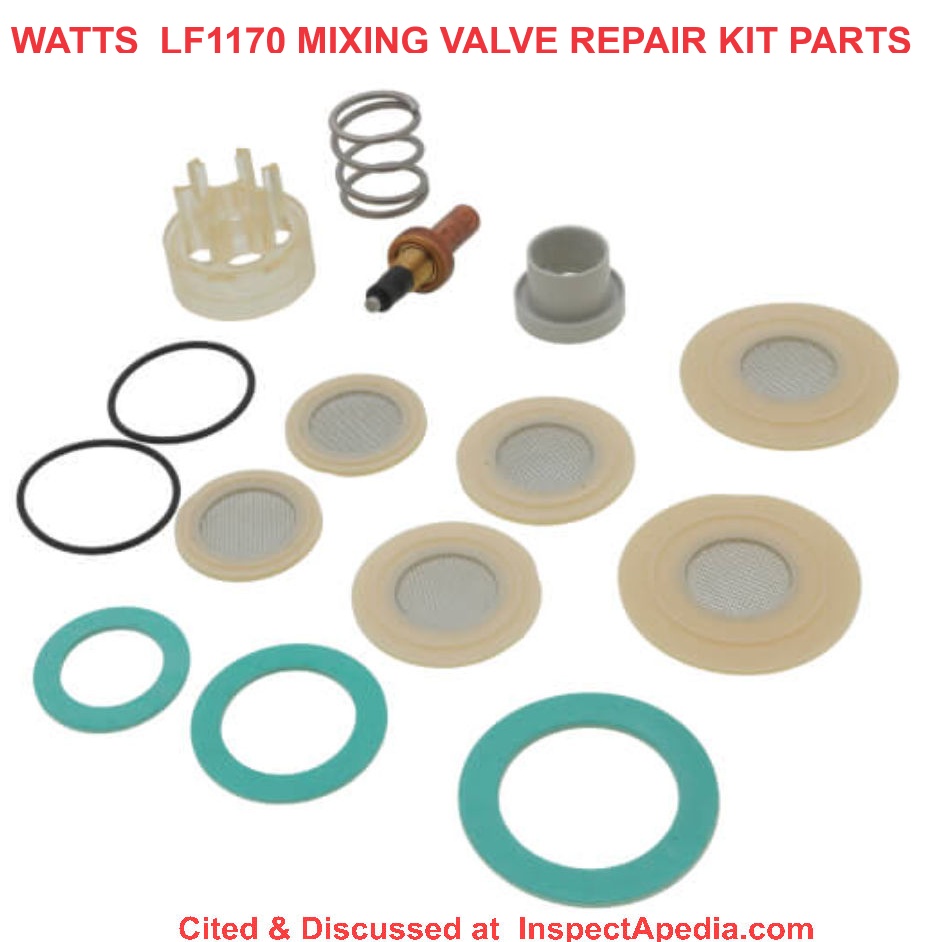
Now some mixing valves don't have replaceable parts but some brands such as Caleffi mixing valves have posted videos suggesting that you can remove the valve and soak it in a vinegar solution - that can, in my experience, if soaked for long-enough (I needed 24 hours or longer), soften and remove mineral scale that can clog the mixing valve and lead to malfunction.
When I've tried this I had to both soak the valve in vinegar (I used straight household white vinegar and soaked over night) and then I used a soft toothbrush to scrub an accessible surfaces.
There are commercial lime and scale removers (CLR for example) that can reduce the soak interval to a few hours.
SO ***IF*** your building water supply is high in mineral content (you have hard water) and IF you have not already installed a water softener, then mineral scale COULD be part of the trouble with your valve.
For commercial installations the servicing contractor may actually swap-in a mixing valve while the existing one is being soaked, cleaned, and having its sealing washers replaced.
Really? Well not really. In my opinion, mineral scale clogging is a likely problem on domestic hot water supply systems (washing and bathing) where the water supply is high in mineral content because we're constantly running "new" water through the water heating equipment and controls. That gives a considerable supply of minerals that can precipitate out as scale.
But normally the water inside of a hydronic heating system is a fixed volume or charge of water that is reused - it circulates in the system, it is not consumed and no new water is added unless there is a leak or other work on the system that requires draining and recharge.
These are uncommon and would not normally be a source of scaling in domestic heating systems (boilers, radiant heat systems, baseboard heat, hot water radiator heat, etc. - though yes in a steam heating system where we are constantly losing some water and introducing more, scale is a concern.)
FYI here's a schematic or drawing of the LF 1170 excerpted from
the Watts LF1170 & LFL1170 MIXING VALVE PRODUCT SPECIFICATIONS [PDF]

Bottom line:
If you're handy and comfortable doing plumbing you could buy a rebuild it and try disassembling and cleaning and rebuilding your mixing valve but the costs suggest that simply replacing the valve makes more sense, and also avoids having to leave the heating system off (no heat) for a longer period.
More information that you might want to read is at
RADIANT HEAT CONTROLS
Separately at
Where to Find Hot Water or Radiant Heat Mixing Valve Manuals & Instructions
- Watts Series LF1170 and LFL1170 Hot Water Temperature Control Valves SPECIFICATIONS [PDF] (2019), Watts Regulator Co. (2013), USA Tel: (978) 688-1811, Fax: (978) 794-1848,
Website: www.watts.com,
Canada: Tel: (905) 332-4090, Fax: (905) 332-7068, Website: www.watts.ca - Watts Series LF1170 and LFL1170 Hot Water Temperature Control Valves INSTALLATION INSTRUCTIONS [PDF] Installation, operating, and adjustment instructions for the LF1170 and LFL1170 mixing valves.
- See our complete hot water & radiant heat mixing valve / tempering valve documents at
ANTI SCALD VALVES & TEMPERATURE CONTROL / MIXING VALVES
[Click to enlarge any image]
Reader Comments, Questions & Answers About The Article Above
Below you will find questions and answers previously posted on this page at its page bottom reader comment box.
Reader Q&A - also see RECOMMENDED ARTICLES & FAQs
On 2020-09-19 - by (mod) -
Thanks for asking, Frank, I wondered the same thing. I'm not sure; the repair kit
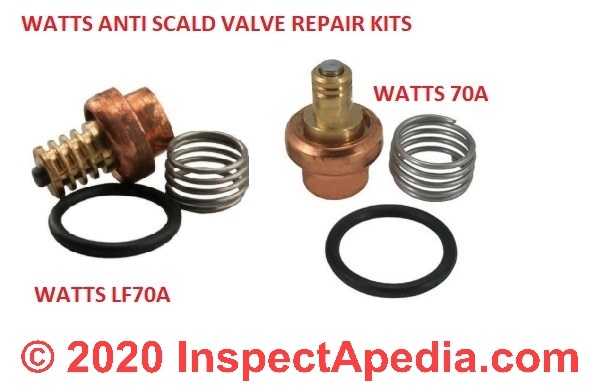
The Watts LF70A-RK repair kit looks just like the kit for the LF70 - perhaps its brass part is a low-lead version.
Some but not all of the listings for LF70 repair kits are described by the seller as
"Repair Kit for Watts 70A Series Low Temp Tempering Valve, 1/2" 70A-RK & 3/4" L70A-RK (Lead Free)"
There are subtle differences in some of the parts photos: the number of round threads/rims on the brass plunger but one can't say for sure if that's extant or just how the parts were photographed. I'll show the LF70A and 70A repair kits below.
On 2020-09-19 - by (mod) -
Thanks for asking, Frank, I wondered the same thing. I'm not sure; the repair kit
The Watts LF70A-RK repair kit looks just like the kit for the LF70 - perhaps its brass part is a low-lead version.
Some but not all of the listings for LF70 repair kits are described by the seller as
"Repair Kit for Watts 70A Series Low Temp Tempering Valve, 1/2" 70A-RK & 3/4" L70A-RK (Lead Free)"
On 2020-09-19 by Frank
Does the same repair kit fit that Watts 70a and LF70a?
On 2020-09-17 - by (mod) -
Sounds reasonable; my view is few plumbers you might hire would be interested in repairing the valve - it's too-small a job and includes some risk of being blamed for a later malfunction or even safety issue; instead they'll argue that the valve should just be replaced.
OPINION even though many components are well-engineered and designed to permit repair, typically people take the approach of simple replacement: less thought, less attention.
On 2020-09-17 by Frank
That is what I am thinking. I might just pay someone, I have never sweated pipes.
On 2020-09-16 - by (mod) -
Frank:
Sounds as if it's going to be less costly to simply install a replacement valve.
On 2020-09-16 by Frank
Mine won't come apart. It seems to be fused together, I tried to turn it with pliers just to see, and they just slipped. I am probably just going to pay someone to fix it.
Thank you so much, that will be very helpful!
On 2020-09-15 - by (mod) -
Frank
Please find your question and my detailed, illustrated procedure for installing the Watts 70A repair kit or LF70A repair kit now near the bottom of the article above on this page.
Let me know how that works for you and post photos if you can (one per comment) of what you find in disassembling your valve.
On 2020-09-15 by Frank
I have a Watts 70a which needs the repair kit installed. Are there any detailed instructions out ther, perhaps with pictures?
On 2020-09-15 by (mod) - Detailed Installation Instructions for the Watts 70A or Watts LF70A Mixing Valve Repair Kit
Frank,
This parts explosion, from the original installation instructions for the Watts 70A that I provided below, shows how the replacement parts will be assembled under the control handle.
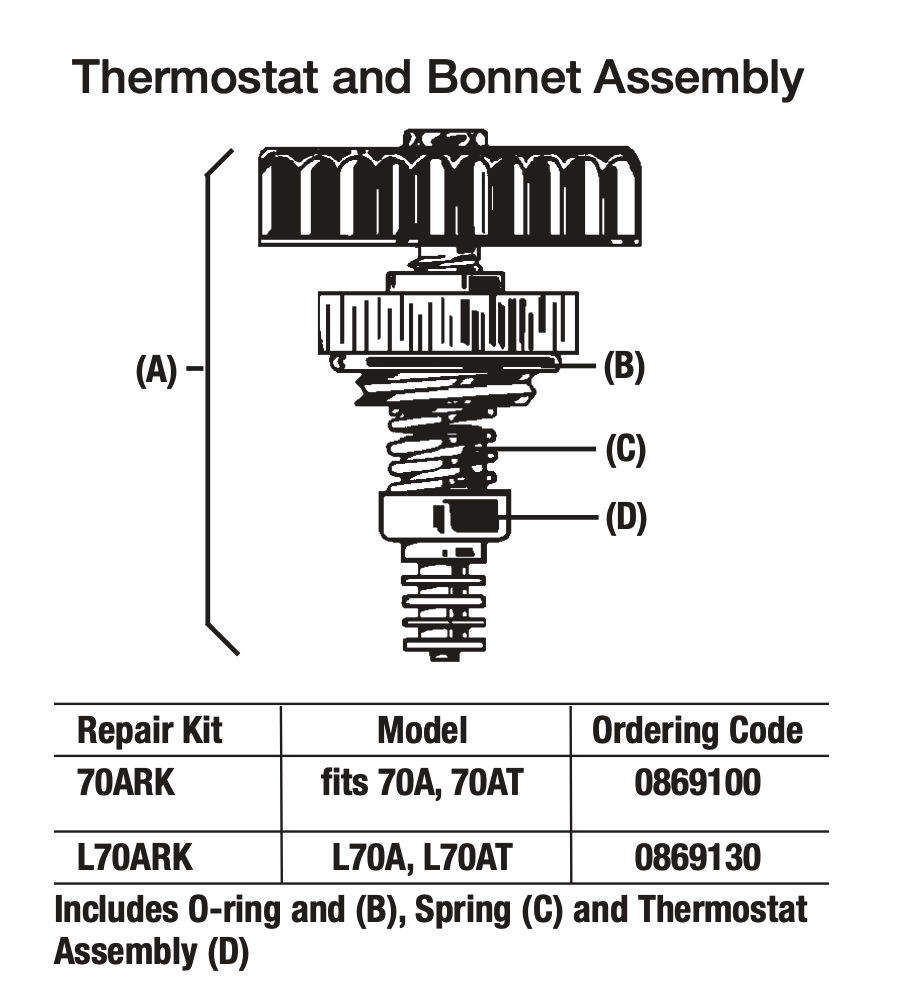 The Watts 70A or LF70A repair kit involves a simple dis-assembly and replacement of three parts in the valve assembly, performed in these steps:
- Let the heater where the mixing valve is installed cool down - turn it off and wait.
- Remove water pressure from the system
- Unscrew the valve top and remove the assembly by turning the brass ribbed knob under the black valve cap
- Unscrew the top screw that secures the black control knob from the valve stem and remove the knob
- Unscrew the brass nut that secures the mixing valve control assembly to the brass ribbed knob we cited at step 3
- Replace the parts in the original assembly with the new parts from the Watts 70A repair kit - the thermostat, spring and O-ring that's under the brass ribbed knob/cap
- Re-assemble the parts in reverse order of steps 5,4,3 above
- Restore water pressure
- Check for leaks
- Turn the heater back on
- Set the proper anti-scald temp at the Watts 70-A or Watts LF70A
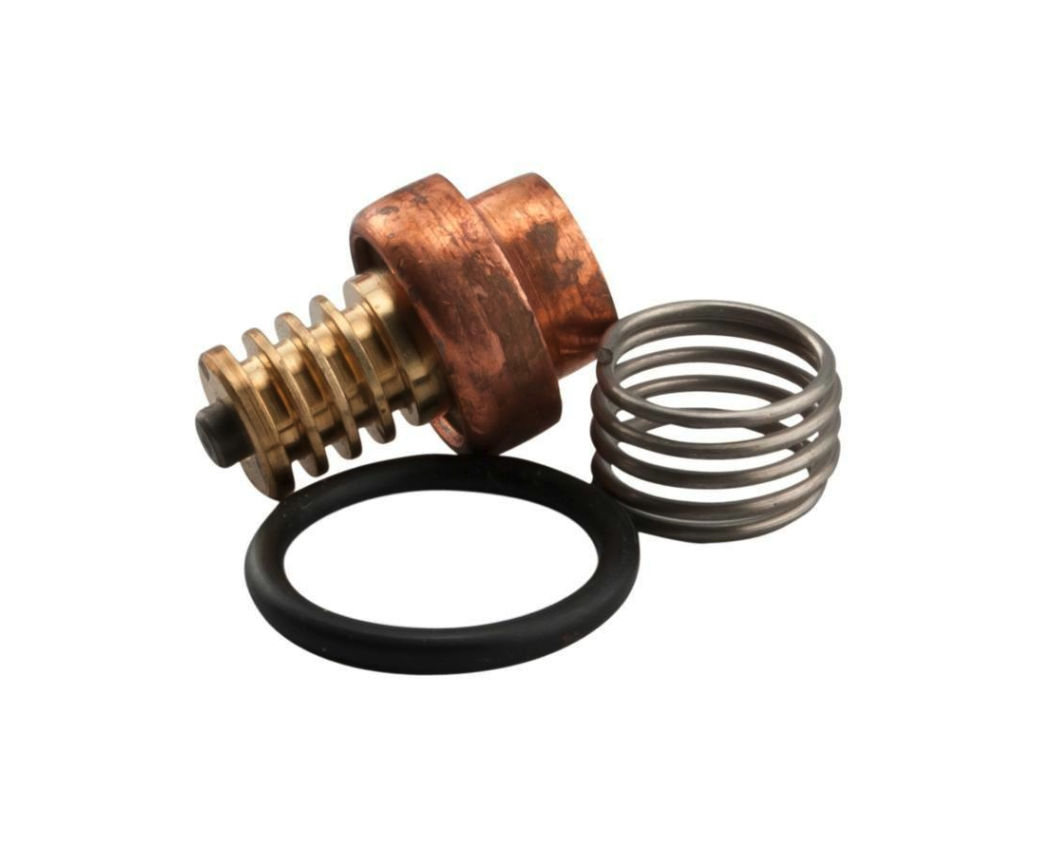
Below you'll see the current repair kit parts - these are for the LF70A and consist of a spring, an O-ring, and the actual thermostat that responds to temperature.
When you remove the valve parts from the top you'll also need to un-screw the cap to remove and replace these three parts.
To see details of the valve see these
WATTS 70A MIXING VALVE INSTALLATION INSTRUCTIONS [PDF]
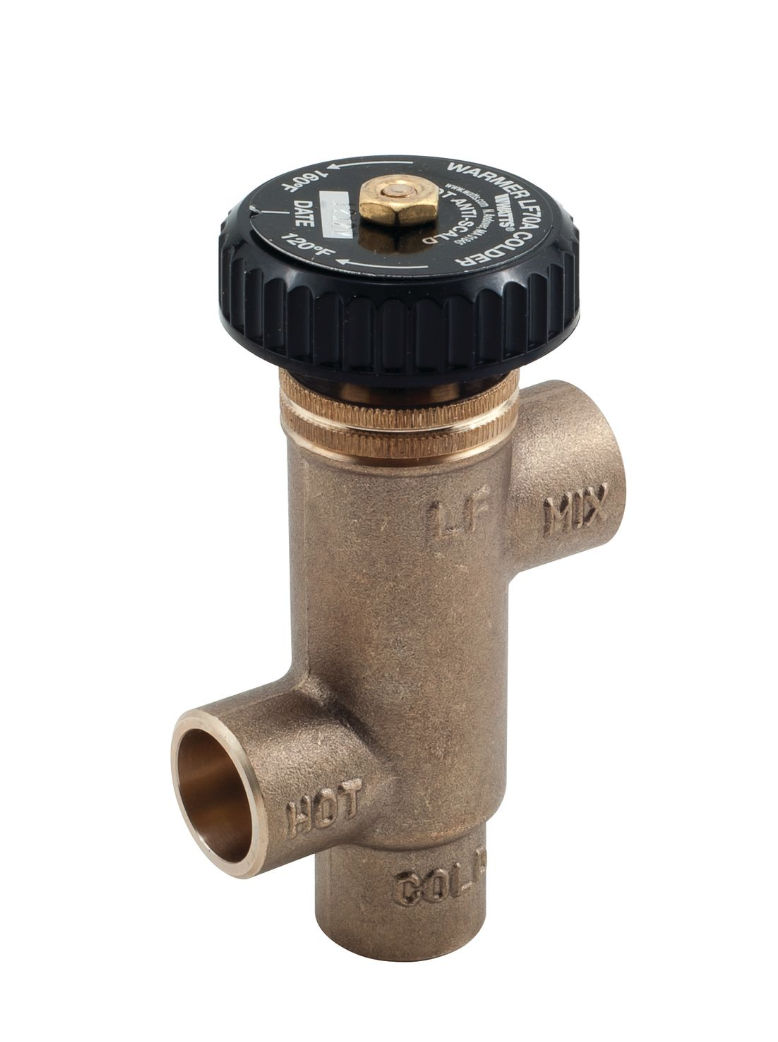
Watch out: the older Watts 70A mixing valve has been replaced with the Watts LF70A - a lead-free tempering valve that looks otherwise about the same as the original but has an LF molded into the brass body of the valve - shown below are the old and the newer LF Watts mixing valves
 ...
... 
On 2020-09-15 by Frank
I have a Watts 70a which needs the repair kit installed. Are there any detailed instructions out ther, perhaps with pictures?
On 2019-12-11 by (mod) - which way do I turn the anti-scald valve?
Thanks for asking about adjusting the Anti-Scald valve, Bob.
If your Watts anti-scald control valve looks like the one at the top of this page you should NOT need to loosen the nut atop the valve handle before turning it. That nut just holds the knob in place.
Watch out: not all anti-scald valves work the same way; the DIRECTION to turn the valve control knob is marked on the top of the knob to show which way to turn it for cooler or hotter water.
For the Watts anti-scald shown at the very top of this page the arrows show that for THAT SPECIFIC VALVE you'd turn the black knob clockwise (to the right) to make the water cooler and you'd turn the knob counter-clockwise (to the left) to make the water hotter.
The Sparco anti-scald valve shown near the start of this article has similar arrows and markings.
On 2019-12-11 by Bob
Do I turn the Watts anti scald valve counterclock wise using the knob or do I loosen the set nut before turning the knob
On 2018-01-19 by (mod) - How to adjust anti scald device
Tommy, for details
see ANTI SCALD VALVE TANKLESS COIL ADJUSTMENT
Set your anti-scald valve so that at the hot water outlet faucet that is closest to the boiler (thus the hottest) the water temperature is 120°F or below to avoid scalding.
and let me know if you have further questions
On 2018-01-19 by Tommy
How to adjust anti scald device
...
Continue reading at MANUAL ANTI-SCALD TEMPERING VALVES or select a topic from the closely-related articles below, or see the complete ARTICLE INDEX.
Or see these
Recommended Articles
- ANTI SCALD VALVES & TEMPERATURE CONTROL / MIXING VALVES - home
- ANTI_SCALD VALVES & HOT WATER QUANTITY
- ANTI-SCALD VALVE INSPECTION
- ANTI SCALD VALVE PROTECTION, Best Practices
- ANTI SCALD VALVE at TANKLESS COIL
- ANTI-SCALD WATER TEMPERATURE CONTROL TYPES
- MANUAL ANTI-SCALD TEMPERING VALVES - simple stop valve used to regulate hot water temp?
- POINT of USE BUILT-IN FIXTURE ANTI-SCALD VALVES
- POINT of USE ANTI-SCALD WATER TEMPERATURE ADJUST Pfister - how to adjust a point of use anti-scald valve
- SAFETY WARNINGS for ANTI-SCALD VALVES
- HOT WATER EXPANSION TANKS
- HOT WATER ANTI-SCALD REGULATIONS
- RADIANT HEAT CONTROLS - including temperature controls for radiant heating systems
- RADIANT HEAT TEMPERATURES
- WATER HEATER TEMPERATURE ADJUSTMENT CONTROLS - home - all types of water heater temperature controls & adjustment devices
- WATER HEATER TEMPERATURE TOO COLD or TOO HOT
Suggested citation for this web page
ANTI SCALD VALVE at TANKLESS COIL at InspectApedia.com - online encyclopedia of building & environmental inspection, testing, diagnosis, repair, & problem prevention advice.
Or see this
INDEX to RELATED ARTICLES: ARTICLE INDEX to WATER HEATERS
Or use the SEARCH BOX found below to Ask a Question or Search InspectApedia
Ask a Question or Search InspectApedia
Questions & answers or comments about anti scald devices and mixing valves on hot water systems
Try the search box just below, or if you prefer, post a question or comment in the Comments box below and we will respond promptly.
Search the InspectApedia website
Note: appearance of your Comment below may be delayed: if your comment contains an image, photograph, web link, or text that looks to the software as if it might be a web link, your posting will appear after it has been approved by a moderator. Apologies for the delay.
Only one image can be added per comment but you can post as many comments, and therefore images, as you like.
You will not receive a notification when a response to your question has been posted.
Please bookmark this page to make it easy for you to check back for our response.
Our Comment Box is provided by Countable Web Productions countable.ca
Citations & References
In addition to any citations in the article above, a full list is available on request.
- "BDS Series Oil-Fired Hot Water Boilers, Installation Instructions, Models GS-080 -> Crown BDS-236", Crown Boiler Company, BDS 12-99, Crown Boiler Co. P.O. Box 14818 3633 I Street Philadelphia, PA 19134 (215) 535-8900, Website: http://www.crownboiler.com, retrieved 2/26/2014, original source: http://www.crownboiler.com/manuals/content/ All_Models/BDS%20Series%20%28all%20models%29.pdf
The following link provides access to literature or manuals for previous Crown products:
http://www.crownboiler.com/Support/Manuals-And-Literature/Previous-Products - Mark Cramer Inspection Services Mark Cramer, Tampa Florida, Mr. Cramer is a past president of ASHI, the American Society of Home Inspectors and is a Florida home inspector and home inspection educator. Mr. Cramer serves on the ASHI Home Inspection Standards. Contact Mark Cramer at: 727-595-4211 mark@BestTampaInspector.com
- John Cranor [Website: /www.house-whisperer.com ] is an ASHI member and a home inspector (The House Whisperer) is located in Glen Allen, VA 23060. He is also a contributor to InspectApedia.com in several technical areas such as plumbing and appliances (dryer vents). Contact Mr. Cranor at 804-873-8534 or by Email: johncranor@verizon.net
- A.O. Smith water heater safety sticker: 182734-000 Rev.00 observed on the gas fired water heater shown at High Efficiency Gas Water Heaters
- Thanks to Bruce Jones, Renewable Energy Solutions Manager, for suggesting clarifications about which way to turn the mixing valve to make water supply hotter or colder. email August 2010.
- Thanks to reader J.S.A. for discussing hot water mixing valves and which way to turn the valve - July 2010
- Thanks to reader Athena for discussing hot water mixing valves and which way to turn the valve to make water hotter or cooler - October 2010.
- Thanks to reader Chris Martino for pointing out inconsistent text about which way to turn the hot water mixing valve or tempering valve. December 2010.
- Thanks to reader Bob for discussing clarifications needed to text about which way to turn the hot water mixing valve. January 2011.
- "Domestic Hot Water Scald Burn Lawsuits, The Who, What, When, Why, Where, How", Dr. D. Bynum Jr., Vernon L. Petri, Esq., John T. Myers, paralegal, Seminar and Technical Paper for the 25-28 Oct 98 Annual ASPE Meeting at the Indianapolis Convention Center, Indianapolis IN, websearch 09/21/2010,original source: http://media.wattswater.com/F-H20LS-Reprint.pdf [Large PDF]
- [5] "Water Saving Tips: For Residential Water Use, Indoors and Out", Alliance for Water Efficiency, 300 W Adams Street, Suite 601 Chicago, Illinois 60606, Tel: 773-360-5100, 866-730-A4WE, Email: jeffrey@a4we.org, web search 12/14/11, original source: plumbingefficiencyresearchcoalition.org/
- [6] "Danger in the Shower: 2008 Forum Looks at Hot Water", John Koeller, Home Energy, Jan/Feb 2009, Home Energy Magazine, 1250 Addison Street Suite 211B, Berkeley, Ca. 94702, Tel: (510) 524-5405 Email: contact@homeenergy.org
- In addition to citations & references found in this article, see the research citations given at the end of the related articles found at our suggested
CONTINUE READING or RECOMMENDED ARTICLES.
- Carson, Dunlop & Associates Ltd., 120 Carlton Street Suite 407, Toronto ON M5A 4K2. Tel: (416) 964-9415 1-800-268-7070 Email: info@carsondunlop.com. Alan Carson is a past president of ASHI, the American Society of Home Inspectors.
Thanks to Alan Carson and Bob Dunlop, for permission for InspectAPedia to use text excerpts from The HOME REFERENCE BOOK - the Encyclopedia of Homes and to use illustrations from The ILLUSTRATED HOME .
Carson Dunlop Associates provides extensive home inspection education and report writing material. In gratitude we provide links to tsome Carson Dunlop Associates products and services.
 | HOME | ABOUT | ASK a QUESTION | CONTACT | CONTENT USE POLICY | DESCRIPTION | POLICIES | PRIVACY | |
| © 2024 - 1985 Publisher InspectApedia.com - Daniel Friedman | |||||||||