
InspectAPedia® FREE Encyclopedia of Building & Environmental Construction, Diagnosis, Maintenance & Repair |
Question? Just ask us! InspectAPedia
|
 De-Winterizing Guide
How to Restore Water Supply Piping, Drain Piping, Water Pumps, Tanks, Heaters to Use
- POST a QUESTION or COMMENT about returning a winterized building back into service
Steps to de-winterize a building:
This article explains how to de-winterize a building, including turning the water supply back on and getting heat, plumbing fixtures and other systems working.
We also discuss what problems to look for when de-winterizing a building. The articles at this website will answer most questions about freeze protection for piping and other building plumbing and heating system components: how to winterize a building to avoid frozen pipes, and how to thaw frozen water supply & drain piping, wells, & water tanks.
InspectAPedia tolerates no conflicts of interest. We have no relationship with advertisers, products, or services discussed at this website.
Tips for Finding and Thawing Frozen Water or Heating Pipes
 "Frozen pipes" does not mean that the entire length of plumbing or heating lines has become frozen. More often pipes freeze at one or more "cold spots" such as those we've discussed above.
Our photo shows building piping running through a poorly insulated area behind a shower. The combination of lack of building insulation, lack of pipe insulation, and the inability of building heat to enter this chase-way resulted in a frozen water pipe where we're shining our flashlight.
[Click to enarge any image]
The steps below discuss how to find just where piping has frozen and how then to thaw it out safely.
Article Contents
Steps to Find & Thaw a Frozen Pipe
We've used simple touch, by hand, feeling pipes for changed in the pipe temperature, or infra-red scanners to scan along piping to look for a drop in pipe temperature that may mark a frozen pipe location. If the heating pipes are frozen, often a section of the heating baseboard will be hot (hot water rising into the piping by convection if not forced by the circulator pump).
Some methods we've seen used to thaw frozen pipes, in our preferred order include:
- Turn off water supply at the main valve?
If no water is running in the building and you leave the main valve open when pipes thaw your building may be flooded by leaks at burst pipes in ceilings, walls, or floors. But if water is still running in parts of the building take a look at different advice in steps 4 and 5 below. - Turn up building heat to thaw frozen piping:
This often works, but is the slowest, if safest, way to thaw frozen pipes. The risk is that you haven't found and warmed the frozen piping soon enough to prevent a burst water pipe. - Use a hair dryer blower to warm frozen piping.
A hair dryer is less likely to start a fire than other methods listed below, but nonetheless be watchful for sparks or debris and have a fire extinguisher handy. Just plug the hair dryer into a safe (GFCI) outlet and blow it back and forth along the suspected frozen pipe section. - Open the faucets:
If pipes are frozen you might reduce the chances of freeze-burst piping or reduce its extent by opening faucets.
Allowing even a small amount of water (from the un-frozen pipe sections) to drain out of the building supply piping might reduce some of the in-pipe pressure even if no water is flowing from the faucet. - Building Research Council (1996). [ I'm not sure the strongest freezing forces are always horizontal along pipes. Details about the forces exerted by ice in or on buildings are
at FREEZING FORCE of ICE. - DF]
Watch out: while some experts advise leaving faucets open or dripping to avoid freezing pipes, this advice is risky if the building drains are exposed to freezing. In many areas the building main drain exits above the frost line and can be exposed to very cold conditions. During normal plumbing use the surge of wastewater down the drain makes it past this cold spot without freezing.
Really? Well yes, for normal plumbing systems and water use a main building drain above the frost line is normally empty except for passing surges of water warm enough not to freeze in passage.
But a dripping faucet or running toilet, sending a small but continuous trickle of water down the drain can accumulate as ice until it expands, blocks the drain (leading to a sewage backup in the building) or until the drain line freezes and breaks. - When water begins to flow you may hear some gurgling if it's a heating line, or if the frozen line was a water supply pipe the faucet or fixture that was not operating may begin to flow as soon as the pipe is just partly un-frozen, when a passage for water is opened enough to let water flow.
Once this occurs, you can simply run more water to warm and free the remaining ice.
Watch out: when water begins to flow in a building where pipes have been frozen there is a risk of serious building flooding and water damage, even costly mold damage if broken pipes leak and soak building areas. When pipes have been frozen and are now thawed and water is turned on, make an immediate and thorough building inspection, looking and listening for running water. If you find that a pipe section has burst you will want to shut water off immediately to avoid flood damage. More advice is at step 9 below. - Use a heating tape to thaw a frozen section of piping.
This step may take a little longer than the hair-dryer approach, but it has the advantage that you can properly install and leave the heating tape in place until you've done a better job of warming the area where the problem pipe runs. - Use of a propane torch to thaw frozen piping?
This is a little faster than using a hair dryer blower, and also more dangerous. Open nearby faucets to let any steam or water vapor escape as the pipe thaws; work from the un-frozen pipe section back towards where you suspect the freeze-up has occurred; this will let you see water or steam begin to exit the pipe when you get to the ice.
Watch out: using any heat source more powerful than a hair dryer risks setting your building on fire . If you are going to ignore this warningthat you may burn down the house, do not aim a torch at combustibles without adequate fire protection and stand-by fire extinguishers.
A hidden hazard is that you may start a fire on the other side of something you are heating - in a place you cannot see. I watched a roofer, soldering copper roof flashing, set the roof structure on fire. By the time someone saw smoke outdoors the framing in the attic was lit afire.
Do not direct the torch too close to soldered joints or you are likely to de-solder the joint, causing the pipe sections to separate, leading to a more serious leak than ever.
Move the torch back and forth along the frozen pipe rapidly enough to avoid super-heating any small pipe section and thus reducing the chances of de-soldering a joint or causing unsafe pressure in the middle of a section of frozen piping. - Use an electric welder to thaw frozen pipes:
Some plumbers and others hook up an electric welder to plumbing lines to thaw frozen pipes. To us this seems dangerous and we wouldn't try it. - Listen and look for burst pipe leaks immediately
Your frozen pipe may also have burst or separated at a solder connection. So as soon as you hear water flowing, search the building thoroughly to be double sure that a pipe has not burst.
At PIPE FREEZE-UP POINTS we give some tips about where pipes often freeze, but you want to inspect the whole building, inside and out. (I once found water squirting through the building wall to the building exterior even though the inside looked as if there were no burst pipe problems. - DF)
If you find that your thawed pipe is leaking in one or more places:- Turn off the building water supply unless you can immediately find a shutoff valve that will just close water supply to the leaking pipe section
- Clean up the spilled water so you don't generate a mold contamination problem
How to Repair Water Supply or Drain Pipes that Burst or Leak
 Although we may have been careful to follow all of the best practices in winterizing a building, it is still possible that a pipe has frozen and burst during cold weather.
If a hot water heating pipe has frozen or a steam condensate heating pipe has frozen you won't see the leak until the building warms up but you may have trouble getting heat in some areas.
If a water supply pipe has frozen you will see the leak as soon as the building warms up and the frozen pipe thaws, unless water has been turned off.
If a drain pipe has frozen you'll notice it as the drain will be blocked. Worse will be the discovery of unsanitary water leaking when the piping thaws. Here are some tips for making repairs when these problems occur. A frozen fixture trap will be a smaller local leak that you should discover quickly by inspecting each fixture.
The exception which occurs commonly is a frozen bath shower trap in a bathroom over an unheated garage. Such traps or other plumbing leaks may drain into the garage ceiling where they cause more damage and take a bit longer to discover.
Find & repair the any frozen, leaky pipe breaks, cut out and replace that section of piping as described
Critical Steps in Returning a Winterized Building to Service
Although we may have been careful to follow all of the best practices in winterizing a building, it is still possible that a pipe has frozen and burst during cold weather.
So the procedure of turning heat and water supply back on in a building needs to include some careful and frequent checks for leaks or unsafe (heating system) conditions.
Never ever simply turn on water, heat, or even electricity in a building that has been shut-down without remaining to monitor for unsafe conditions, fire, smoke, improper heating system operation, or the presence of leaks.
Turning on the Heating System After a Building Has Been Winterized
We prefer to get heat working again in the building if it has been shut down, before starting other plumbing work.
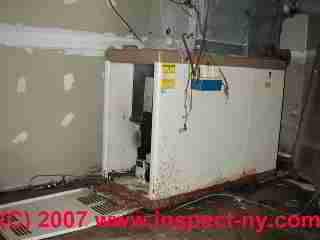
But look at the heating equipment before even thinking of turning it back on. If your furnace has been flooded as this one, it is possible that the system is unsafe and should not be turned back on.
Watch out: Before turning a heating system back on we need to:
- Know that the heating chimney and flue are safe and un-damaged
- Know that the heating distribution system is un-damaged (such as a visual check for frozen, burst hot water heating pipes.)
This inspection may be only an initial step since further checks and inspections will be in order as soon as the system is on and warming up. - Have heating fuel and electricity
- Heating service call recommended
Depending on what was done to turn off the heat, (such as draining a boiler), a service call from your heating service technician will be needed.
The service should include not only restoring the boiler or furnace to good operating condition, but also checking that the chimney and venting have not become blocked or unsafe (raccoons may build a home in an un-used chimney).
If the heating system was a steam or hot water boiler, check the boiler carefully for leaks when it is restored to service.
Particularly some models of cast iron heating boilers may include boiler sections which loosen when the boiler spends months in a "cold" state, leading to boiler section leaks when the heater is filled and returned to service.
Restoring the Building Drain System after a Building Has Been Winterized or "freeze-proofed"
Remember to replace any plumbing traps that were removed from sinks, tubs, showers, etc. before trying out a fixture by turning on its faucets.
Then when you are ready to turn on the water supply, remember to run enough water into each fixture to fill the trap, then check the trap for leaks.
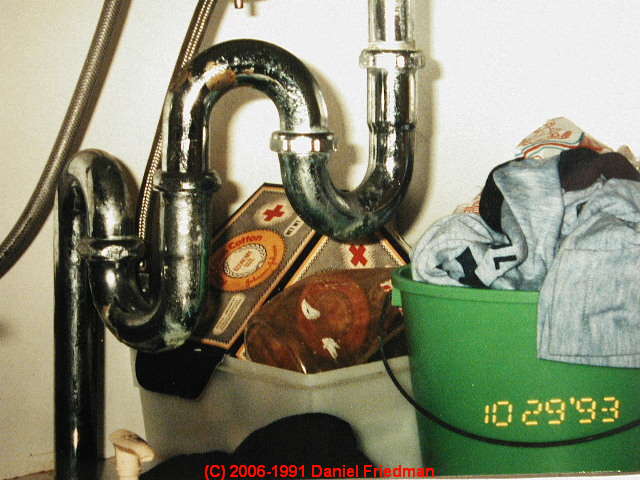
If your traps corroded, or if the trap arrangement is improper like this crazy collection of double-S-traps under a sink (photo at left), this is a good time to toss the old parts and have a plumber install a new trap that drains properly.
After you have turned on water supply, try each fixture by running a gallon or less of water into it. Then turn off the water and check the fixture trap for leaks.
When you're confident that you've restored the fixture trap without leaks, run water longer to test the building drain piping for blockage or leaks.
Stop, look, and listen for leaks.Before leaving the building that has been de-winterized, turn on one or more fixtures at a time, leave water running for a few minutes while you walk through the building looking and listening for evidence of a drain leak.
Watch out: Check for drain leaks both indoors and outside before leaving the building. Of course if you detect a leak in the drain system turn the water supply off immediately and remove any spills before starting the leak repair.
Staged Steps in Turning on Water Supply System to Minimize Water Leak Damage in buildings
Here we recommend that you follow a staged step by step approach to turning on water in a building where the water supply has been shut down over a winter or during a period of absence.
The staged approach lets us check each building area and fixture one by one, minimizing the chances of extensive water damage even if a leak has occurred while the building was unattended.
Even for buildings located in areas not subject to freezing and burst pipes, a staged water turn-on approach is useful. A pipe may have been damaged or cut by building activities, a trap may have corroded through, or other plumbing damage may be present even if no freezing conditions occurred.
Step by Step Details of the staged water-on procedure can be read
at TURNING ON WATER when you are "de-winterizing" a building or returning it to service.
Reader Comments, Questions & Answers About The Article Above
Below you will find questions and answers previously posted on this page at its page bottom reader comment box.
Reader Q&A - also see RECOMMENDED ARTICLES & FAQs
On 2017-05-05 - by (mod) -
Katy
Often I see this red water after it's sat for months in galvanized iron pipes - where rust is in the water; typically it'll flush out in minutes of running. But if rusty water entered your water heater tank too then you might need to turn off, drain, then re-fill the heater after you've also flushed the pipes.
Certain bacterial contamination can also cause red stains in water, as can iron in the well water supply source. So if your pipes are all copper, I'd start with a water test.
On 2017-05-05 by Katy
After the water has been turned on after the winter, the water runs brownish red. How long do I run the water? Any advice please.
Katy
On 2016-12-15 by diane
Also, The city could not turn water off at the street due to a stone in the shutoff location. Given water main is off at house should I insist on the city turning the water off at the main too? Will it not being turned off at the street increase the liklihood of the line between the house and the street freezing?
On 2016-12-15 by diane
My thermostat battery died on a vacant home resulting in losing heat in the home during several cold days/ several radiators burst and are frozen. I have turned off the water main to the building, opened all faucets within the house and opened the drain to the boiler and have allowed the system to drain.
I have installed several space heaters to the home to restore some heat....keeping it approximately at 45.
Do I need to thaw the radiators that have frozen to protect any other damage to ones that have not been damaged?
Also what steps do I need to do to the plumbing for bathrooms etc if I elect to simply winterize the building completely and do plumbing and hvac repairs in Spring?
On 2016-12-01 by Kim
Hi; first- time homeowner here. We have restored water service from our winterized house; the water runs properly with no leaks but it doesn't get hot.
Above each w/h, there is a loose wire--I'm thinking that's the grounding wire? If so, do I need to connect it--and what do I connect it to? Thanks in advance!
On 2016-06-04 - by (mod) -
A shutoff valve or multiple valves may still be off.
On 2016-06-04 by Dell
No water flow in house after water service turned on. Bought house and house was winterized. Water flow only in hit water tank not in faucets. What is wrong?
Question: no water pressure, frozen pipes, how can I get water going?
1/27/2014 Bill Schultz said:
Have had extreme cold weather here.
Last week we woke up one morning and had no water pressure.
Have submersible pump in 4" well casing.
After some heat application I noted a small increase in tank pressure - approx 10 lb.
Would not increase past that. I have been using panel switch to turn pump off and on
and I get a flow of close to pencil width. About 10 minutes to fill small pail.
Submersible has been in well for 30 years or so.
Can I check anything to get pressure or should I consider replacing pump?
Water line to house is close to surface and has a heat cable attached. It certainly
is a pain in this cold weather.
Reply:
Leave some faucets open in hope that you will relieve increasing water pressure in water supply piping that may be freezing. There is a chance that that will reduce the chance of burst pipes. Of course if water begins to flow at normal rate you'll shut it off.
Often if water supply piping anywhere in the system is PARTLY blocked by freezing but you can get water flowing, by leaving water running you'll thaw out the frozen line. So I'd try that too.
But I would NOT leave a well pump running if no water is being delivered as I'm worried about damaging the pump.
Check that your heating cable is live and working.
Beyond that, you can try using a normal hair dryer to blow warm air on the coldest pipe sections indoors. More suggestions for thawing out frozen water pipes while trying to avoid setting the house afire are
at THAW OUT FROZEN PIPES.
Search InspectApedia for the article PIPE FREEZE-UP POINTS for a series of articles on finding where pipes are most-likely to be freezing and how to deal with the problem.
Tool To Repair Leaking Water Supply Piping Without Shutting off Water Main
This topic has been moved to and expanded at LEAKY PIPE REPAIRS where we describe methods for shutting off building water when the water main shutoff valvce is inoperative or missing.
...
Continue reading at AIRBOUND HEAT SYSTEM REPAIR by WATER FEED VALVE or select a topic from the closely-related articles below, or see the complete ARTICLE INDEX.
Or see these
Articles on De-Winterizing Buildings
- ARTESIAN WELL FREEZE PROTECTION
- CHEMICAL TOILET FREEZE PROTECTION
- DE-WINTERIZE a BUILDING
- FREEZING FORCE of ICE
- FROZEN PIPE THAW-OUT
- LEAKY PIPE REPAIRS
- PIPE FREEZE-UP POINTS
- WATER SUPPLY / DRAIN PIPE LEAK TYPES
Suggested citation for this web page
DE-WINTERIZE a BUILDING at InspectApedia.com - online encyclopedia of building & environmental inspection, testing, diagnosis, repair, & problem prevention advice.
Or see this
INDEX to RELATED ARTICLES: ARTICLE INDEX to BUILDING FREEZE PROTECTION
Or use the SEARCH BOX found below to Ask a Question or Search InspectApedia
Ask a Question or Search InspectApedia
Try the search box just below, or if you prefer, post a question or comment in the Comments box below and we will respond promptly.
Search the InspectApedia website
Note: appearance of your Comment below may be delayed: if your comment contains an image, photograph, web link, or text that looks to the software as if it might be a web link, your posting will appear after it has been approved by a moderator. Apologies for the delay.
Only one image can be added per comment but you can post as many comments, and therefore images, as you like.
You will not receive a notification when a response to your question has been posted.
Please bookmark this page to make it easy for you to check back for our response.
Our Comment Box is provided by Countable Web Productions countable.ca
Citations & References
In addition to any citations in the article above, a full list is available on request.
- John Platts, "The World's Encyclopedia of Wonders and Curiosities of Nature and Art, Science and Literature: Representing Anatomy, Physiology, Phrenology, Astronomy, Botany, Geology, Natural History, Ichthyology, Mythology, Ornithology, Meteorology, Mineralogy, Chemistry, Zoology, Entomology, Biography, Etc." Union publishing house, 1880 - Encyclopedias and dictionaries - 958 pages (available as a Google e-Book. Quoting:
Astonishingly Expansive Force of Freezing Water. — Although cold, in general, contracts most bodies, and heat expands them, yet there are some instances to the contrary, especially in the extreme cases or states of these qualities of bodies. Thus, though iron, in common with other bodies, expands with heat; yet, when melted, it is always found to expand in cooling again. Thus also, though water expands gradually as it is heated, and contracts as it cools, yet in the act of freezing it suddenly expands again, and that with an enormous force, capable of rending rocks, or bursting the very thick shells of metal, &c. A computation of the force of freezing water, has been made by the Florentine academi cians, from the bursting of a very strong brass globe or shell by freezing water in it ; when, from the known thickness and tenacity of the metal, it was found that the expansive power of a spherule of water only one inch-in diameter, was suffi cient to overcome a resistance of more than twenty-seven thousand pounds, or thirteen tons and a half. - "An Investigation into Freezing and Bursting Water Pipes in Residential Construction Laboratory and field tests conducted to discover the mechanics of freezing and bursting of pipes and why they freeze", 51 pages, 1996, Building Research Council, School of Architecture University of Illinois at Urbana-Champaign, Building Research Council Order Dept 1 East St. Mary's Road Champaign, Illinois 61820, Tel: 800-336-0616, Website: http://brc.arch.uiuc.edu Contact: Jeff Gordon, jrgordon@uiuc.edu
- "New Electric Heat Tapes Help Prevent Fires," US Consumer Product Safety Commission (CPSC) #00936
- "Solar Water Heaters Begin your consideration of installing a solar water heater by understanding its five parts. Covers collectors, storage devices, circulation systems, safety systems, and freeze-protection systems", Building Research Council, School of Architecture University of Illinois at Urbana-Champaign, 8 pages, 1988
- Mark Cramer Inspection Services Mark Cramer, Tampa Florida, Mr. Cramer is a past president of ASHI, the American Society of Home Inspectors and is a Florida home inspector and home inspection educator. Mr. Cramer serves on the ASHI Home Inspection Standards. Contact Mark Cramer at: 727-595-4211 mark@BestTampaInspector.com
- John Cranor [Website: /www.house-whisperer.com ] is an ASHI member and a home inspector (The House Whisperer) is located in Glen Allen, VA 23060. He is also a contributor to InspectApedia.com in several technical areas such as plumbing and appliances (dryer vents). Contact Mr. Cranor at 804-873-8534 or by Email: johncranor@verizon.net
- "Freezeproof Your House," Mike McClintock, Rodale's New Shelter, p. 30, October 1985 (approximate date)
- "How to Winterize Your Pipes," Mike McClintock, Homeowners How-To Magazine, p. 59-62, Nov-Dec 1979.
- In addition to citations & references found in this article, see the research citations given at the end of the related articles found at our suggested
CONTINUE READING or RECOMMENDED ARTICLES.
- Carson, Dunlop & Associates Ltd., 120 Carlton Street Suite 407, Toronto ON M5A 4K2. Tel: (416) 964-9415 1-800-268-7070 Email: info@carsondunlop.com. Alan Carson is a past president of ASHI, the American Society of Home Inspectors.
Thanks to Alan Carson and Bob Dunlop, for permission for InspectAPedia to use text excerpts from The HOME REFERENCE BOOK - the Encyclopedia of Homes and to use illustrations from The ILLUSTRATED HOME .
Carson Dunlop Associates provides extensive home inspection education and report writing material. In gratitude we provide links to tsome Carson Dunlop Associates products and services.
 | HOME | ABOUT | ASK a QUESTION | CONTACT | CONTENT USE POLICY | DESCRIPTION | POLICIES | PRIVACY | |
| © 2024 - 1985 Publisher InspectApedia.com - Daniel Friedman | |||||||||