
InspectAPedia® FREE Encyclopedia of Building & Environmental Construction, Diagnosis, Maintenance & Repair |
Question? Just ask us! InspectAPedia
|
 Water Softener Resin Replacement
Install or replace resin in a water softener
- POST a QUESTION or COMMENT about replacing the media or resin in a water softener or water conditioner
Water softener resin replacement instructions:
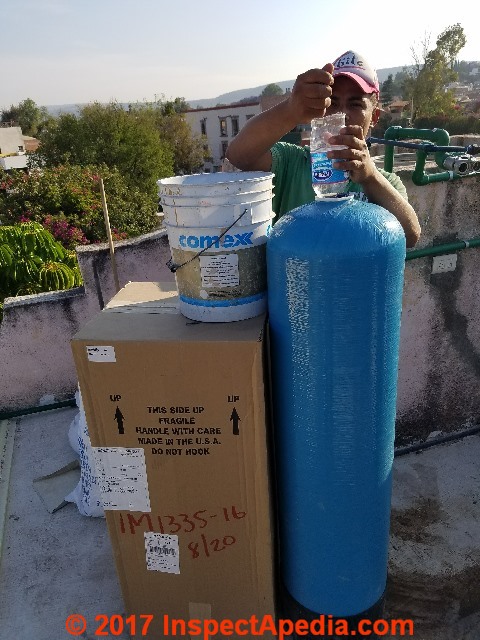
This article describes procedures replacing the resin media in a water conditioner or water softener, using the installation of a new water softener in Col. San Antonio, San Miguel de Allende, Guanajuato Mexico as an example.
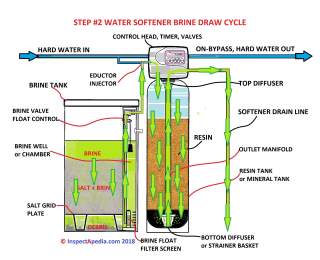
Page top sketch: during water softener regeneration the brine draw cycle refreshes the salt or sodium ion content in the water softener resin tank.
InspectAPedia tolerates no conflicts of interest. We have no relationship with advertisers, products, or services discussed at this website.
Water Softener Treatment Tank Resin Replacement Procedure
 According to Purloite
When operated correctly in a well-designed system, softening resin employing a premium strong acid cation resin can give reliable operation for over ten years. Two frequently encountered problems can greatly shorten the resin’s life.
- The attack of the resin matrix by oxidative chemicals dosed into the water supply to sterilize the supply.
- The effect of iron fouling. Experience tells us that many sites suffer from both problems to a lesser or greater effect.
In some extreme cases, there are sites where the units are worked hard and performance is critical. When these issues are not addressed, resin life can be reduced considerably, to less than one year. - (Purolite Resin Life 202).
When the resin beads in a water softener are no longer sufficiently active the beads stop attaching mineral ions and so stop softening the water supply.
Reader Question: how to replace the resin media inside of a water softener
8/31/14 Ron Fix It Man said:
My softener is 13 years old and I have read the resin becomes ineffective in about that life time. Iron out has been used with little benefit. Effectiveness of the softener has declined unless greater amounts of salt per cycle are used.
Troubleshooting reveals no improper cycle operation. Is it true the resin has a limited life? Can it be restored, say with a wash of dilute muriatic acid? If not, where can it be purchased?
This question and reply appeared originally at DIAGNOSE WATER SOFTENER PROBLEMS
Reply: procedure to replace water softener treatment tank resin media
Ron
Indeed it is possible to replace the resin in a water softener.
Water softener resin can last for 20 years or even longer, but may have a shorter life depending on the chemistry of the water being processed in the water softener. Some of the sources we reviewed give the view that chlorinated municipal water can cause water softener resin beads to deteriorate while others focused on iron contamination or even algae growth that could not be flushed from the resin tank.
Another common water softener resin tank contaminant is sand or debris entering the softener from sediment-containing well water.
Water softener resin that has been fouled by iron or by organic growth such as algae can often be cleaned by treating the resin tank with a resin cleaner (Iron-out, ResUp, Bleach treatments
- WELL CHLORINATION & DISINFECTION )
sold by your manufacturer or by separate water softener rehab suppliers (some are listed below in this article).
See WATER SOFTENER CLEANING & SANITIZING for advice about cleaning the water softener if you want to try this before replacing its resin.
I would contact the manufacturer of the brand of water softener you already own to obtain an installation an maintenance manual if you don't already have one. That should show how to open the tank, replace the resin media (typical cost for the resin is around $100 U.S. from third party suppliers but I'd prefer to use what the manufacturer provides).
At the same time you might find that there are controls that need repair or rebuilding such as replacing O-rings, check valves, or other controls. It makes sense to do these repairs at the same time.
Watch out: Before replacing the resin in the water softener I'd want to be sure that the unit is otherwise operating properly.
A very simple check would be to inspect for SNAFUs such as those we discuss in this article series (such as improper brine tank operation, sticking brine tank float, or other causes of not-softening).
If on the other hand you don't see a proper water volume entering and leaving the brine tank then the problem is probably there, not with the resin.
Then run the water softener through a regen cycle, observe that water does enter the brine tank, that salty water does backwash through the water softener and out through its drain. Confirm that your softener is using the proper salt dose by measuring incoming water hardness.
Then measure the hardness of treated water after a water softener regeneration cycle. If the unit is indeed not softening the water then media replacement may be in order. You'll need between .6 cu. ft. and about 2 cu. ft. depending on the volume or size of your water softener treatment tank.
Illustrated Guide to Installing Gravel and/or Resin into the Resin Tank of a Water Softener
Prepare the Resin Tank to Insert Gravel & Resin - using a Pentair Fleck 5800 LXT Downflow/Upflow water softener as example

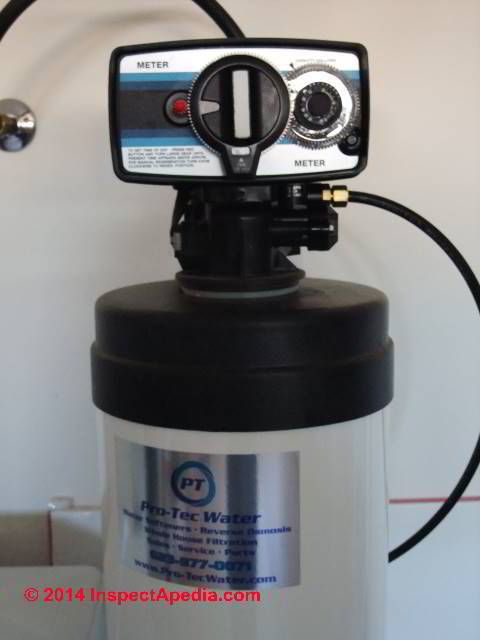
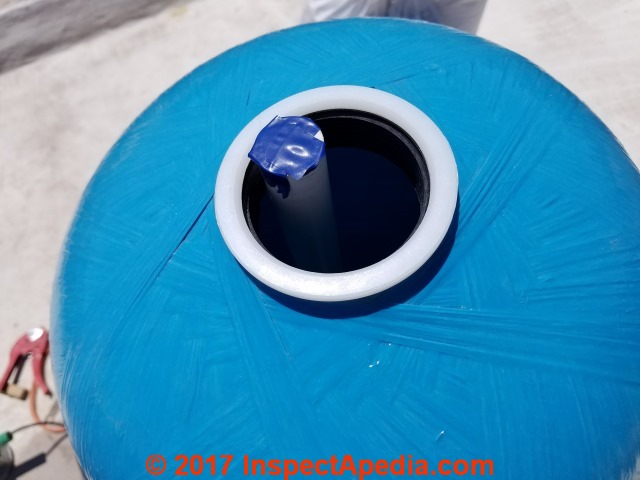
Photos above: a fiberglass (Vertex poly-glass 13x54-inch resin tank #65018 with central tub) water softener resin tank as delivered new, empty.
You can see the water softener distribution basket, a simple plastic filter screen on the bottom end of the water softener resin tank distribution riser pipe - this is the water pick-up tube that will be inserted into the resin tank.
More about distribution riser pipes and how they may need replacement is found
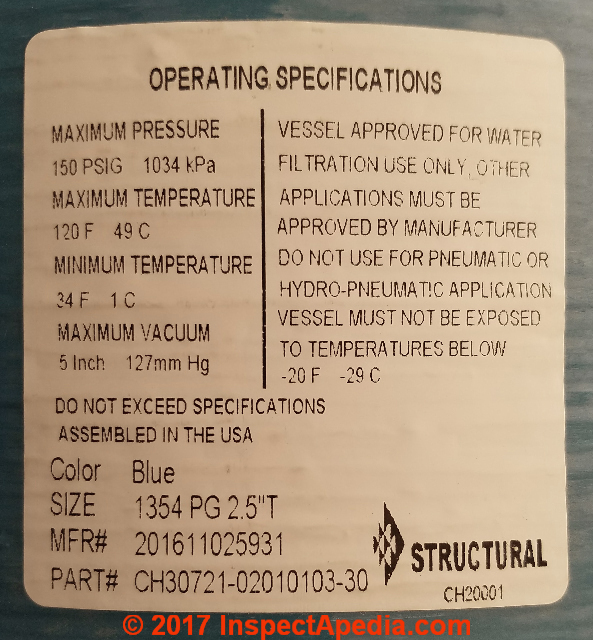
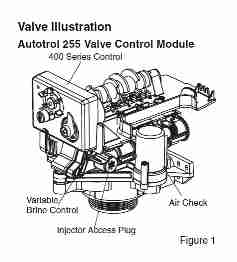
This resin tank will be assembled with a Fleck water softener control valve head #V5800MEDS SPEC# 5816-01LXTB34.
The control head uses an electronic timer (LXT-DC) for a "System 4 Meter" that operates on 12VDC via a voltage power adapter. The Brine valve is #1600, Injector size 1, meter size 3/4" turbine.
The second photo above shows the tube inserted into the resin tank. The open end of this tube will be connected to the softener control valve in the head of the water softener.
The quantity of resin required for the resin tank of a water softener depends on the tank size and is specified by the manufacturer [below].
Preparation of Gravel Media for Water Resin Tank Base
But first the tank needs to be filled with a layer of filtering gravel material in the tank bottom and then with the manufacturer's specified quantity of water softener resin.
Below: first gravel is washed thoroughly before it is inserted into the bottom of the water softener resin tank. The gravel acts as a filter to prevent loss of water softener resin beads.
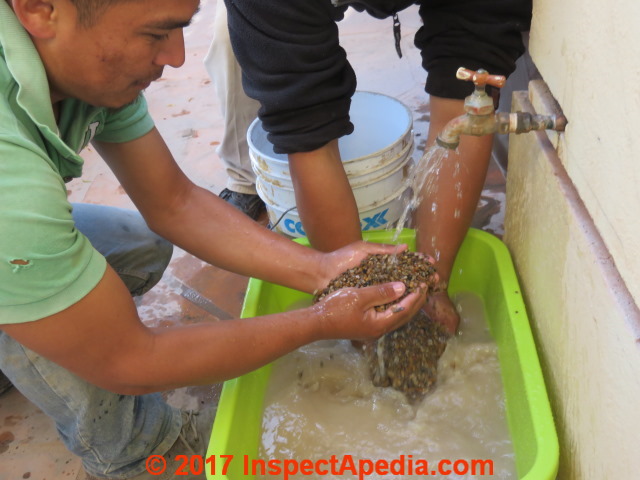
The size of this smooth gravel placed into the bottom of the water softener resin tank ranges from about 5mm to 1cm. It was placed to a depth of about 1 1/2 feet, covering the distribution basket and lower portion of the distribution riser pipe.
Below: we're using a plastic bottle fit over the taped end of the resin tank riser pipe to funnel first gravel, then resin, into the softener tank.
Properties of Water Softener Resin
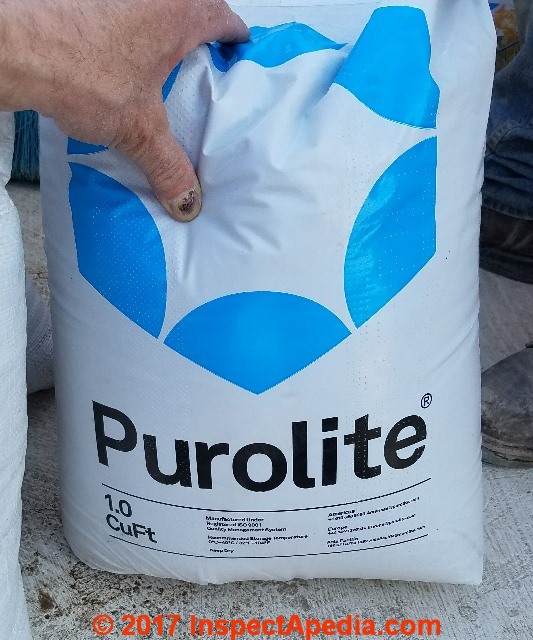
Below: our softener required three cubic feet of Purolite water softener resin beads.
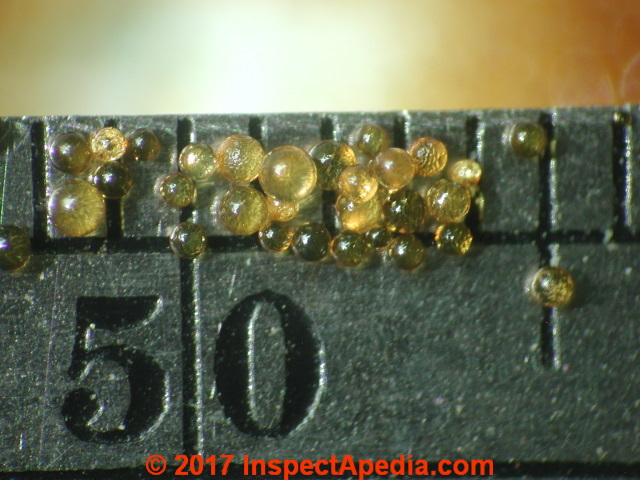
While there may be more than one formula, a common method of producing water softener resin is to combine poltystyrene beads in the 0.2 to 1.2mm size range with divinylbenzene (DVB) that serves as a binder to hold the resin together.
Water softener capacity is defined the amount of hardness the softener can remove from a given volume of water supply before a regeneration is needed.
To make any sense of a capacity measurement, such as a "water softener capacity setting of 1 to 99 kilograins" we also need to know the hardness of the water supply, the volume of water used, and the physical volume of the water softener's resin bead charge.
One cubic foot of water softener resin can remove the calcium and magnesium from about 3,200 gallons (12,000 liters) of water that has been measured at 10 grains of hardness. To do so will add about 750 milligrams of salt to each gallon of treated water.
The U.S. Food & Drug Administration (FDA) considers 750 mg/gallon to be in the low-sodium range as measured to permit the labeling of beverages as "low-salt" or "low sodium".
at WATER SOFTENER SALT SUBSTIUTE: POTASSIUM CHLORIDE we discuss the use of potassium chloride in place of salt (sodium chloride) that can reduce the salt level in water, replacing it with potassium. Different water softener settings may be required.
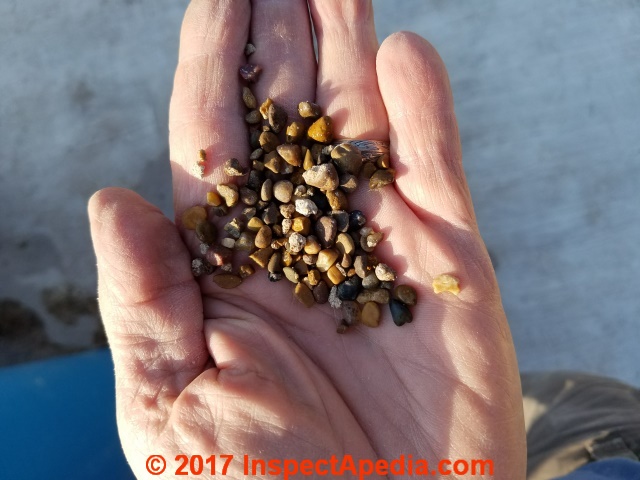
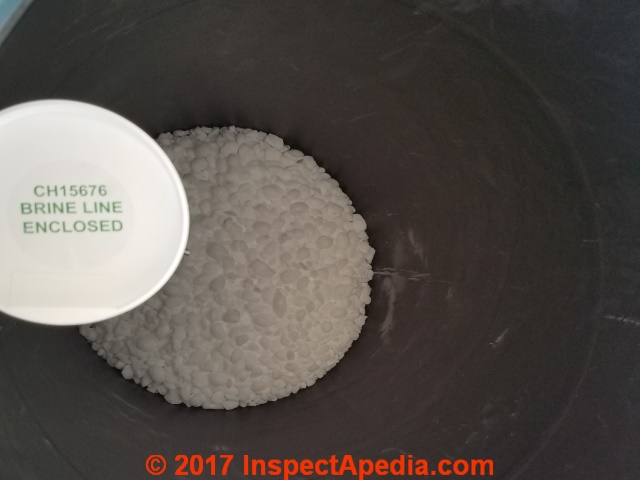
Below for the scientifically-curious reader we show close-up photographs of Purolite® water softener resin beads. You can see that the resin particles vary in size but are about 0.4 to 1mm in diameter.
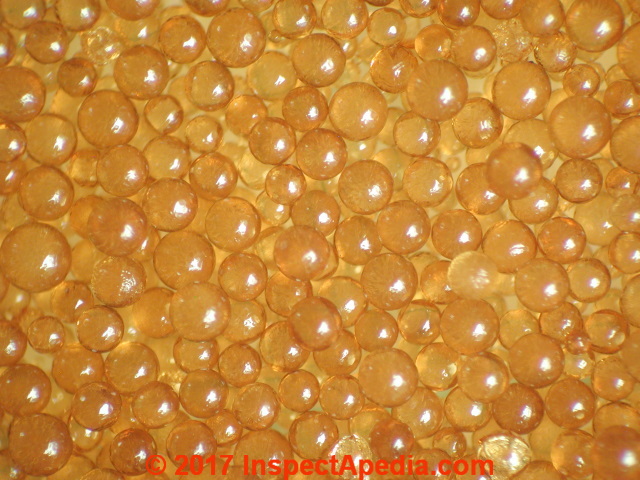
Watch out: Spilling these water softener resin beads on a walking surface will make it about as slippery as wet algae, with a very low static coefficient of friction (SCOF). What that means for normal people is if you step in this stuff you will fall on your you-know-what.
As we were working on a high (flat) rooftop in San Miguel de Allende, and as I didn't want to have to visit the mothers of the other workers to explain why they fell off of the rooftop, we took great care to sweep up any spillage immediately and very thoroughly.
More about the SCOF and about these resin beads is also
at SLIPPERY STAIRS, WALKS, ROOFS
More about adjusting the salt consumption of water softeners is at
- WATER SOFTENER SALT CHOICES
- WATER SOFTENER SALT DOSE SETTING
- REDUCE IMPACT of SOFTENER on SEPTIC
- SALT / SOFT WATER IMPACT on SEPTIC, PLUMBING, HEATERS
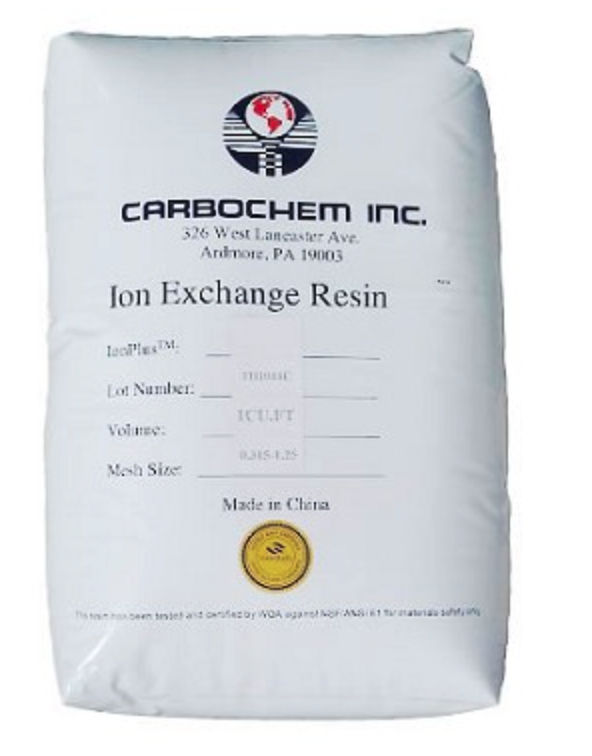
Shown above: mixed bed ion exchange water softener or water treatment resin from CarboChem - cited
at WATER SOFTENER RESIN PROPERTIES & SOURCES
Commonsense Precautions to Observe when Handling Water Softener Resin
Here is the Purolite® MSDS for Water Softener Resin Beads, [PDF] used for ion exchange, adsorbent, and/or Catalyst, Purolite® C100, Purolite 150 Monument Road Bala Cynwyd, PA 19004 USA Tel:+1 610 668 9090, Manufacturer: Purolite S.R.L. Str.Aleea Uzinei nr.11, 505700 Victoria, Judetul Brasov, Romania, and Purolite (China) Co. Limited Qianlong Economic Development Zone, Qianyuan Town, Deqing County, Huzhou City, Zhejiang, China 313216.
The MSDS for these water softener resin beads indicates that "The mixture does not meet the criteria for classification." and also suggests Observe good industrial hygiene practices. Use personal protective equipment as required. and also Wash hands after handling. Get medical advice/attention if you feel unwell.
Inhalation - Move into fresh air and keep at rest. Get medical attention if any discomfort continues.
Skin contact - Wash off immediately with soap and plenty of water. If irritation persists get medical attention.
Eye contact - -Immediately flush with plenty of water for at least 15 minutes. If easy to do, remove contact lenses. If eye irritation persists, get medical advice/attention.
Ingestion - Rinse mouth thoroughly. Never give liquid to an unconscious person. Do not induce vomiting. If vomiting occurs, the head should be kept low so that stomach vomit doesn't enter the lungs. Get medical attention if any discomfort continues.
Most important symptoms and effects, both acute and delayed - Eye contact: Contact may cause irritation with redness, tearing, pain, and/or blurred vision.
General information - If you feel unwell, seek medical advice (show the label where possible). Ensure that medical personnel are aware of the material(s) involved, and take precautions to protect themselves.
Install the Water Softener Control Head When Resin Tank is Filled
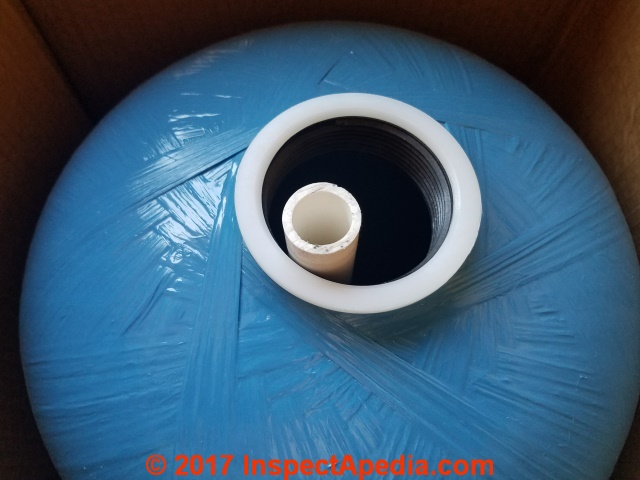
Below: an under-side view of the Fleck water softener control valve head.
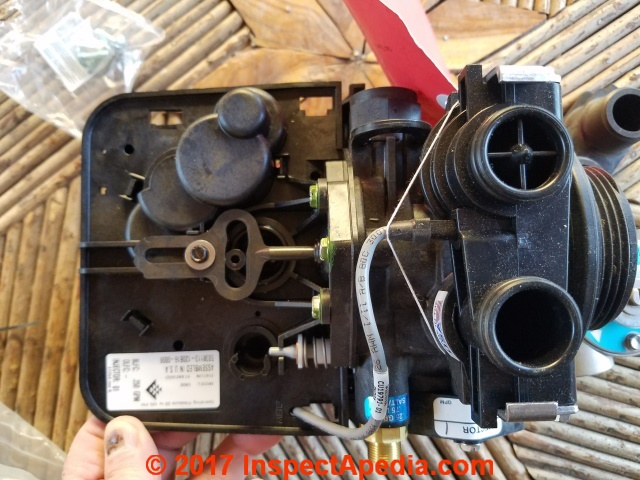
When the resin tank has had its gravel and resin installed, the control head is re-connected to the tank.
Watch out: when replacing the softener control head by re-connecting it to the water softener body, Fleck warns [with minor edits for clarity]
DO NOT exceed 15 ft-lbs (foot pounds) of torque when installing the water softener control head to the resin tank body.
Exceeding this torque limit may damage the threads and cause water softener failure (and leaks).
Spin the valve onto the tank making sure that the threads are not cross-threaded, then rotate the valve freely without using force until it comes to a stop. (This position is considered "zero").
Then rotate the valve clockwise from "zero" to between 1/4 turn and 1/2 turn. STOP THERE.
At WATER SOFTENER RESIN LOSS we give additional details about the procedure for assembling the control head to the resin tank body.
Adjust the Water Softener Controls After Refilling Resin Tank
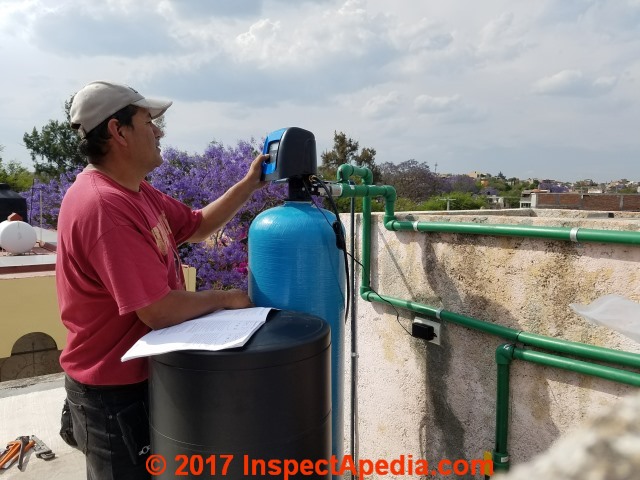
Below: the Fleck or Pentair water softener control head has been installed and is connected to the building water supply piping.
The bypass valve on the water softener is set to SERVICE. As this is a new water softener installation (with new resin in the resin tank), the installer will need to set the water softener program or controls.
Also see WATER SOFTENER ADJUSTMENT & CONTROLS.
Watch out: At a new water softener installation or after sanitizing a water softener brine tank, you may need to run a regeneration cycle with an empty brine tank to be sure that you've flushed out debris in the system.
Failure to adequately wash gravel installed in the base of a water softener resin tank or failure to flush out debris that is generated normally by plumbing work on a building can cause downstream sediment or charcoal filters to clog up very rapidly.
Also see WATER SOFTENER CLEANING & SANITIZING
Before the first water softener regen cycle the softener must be programmed with proper salt dose and regeneration frequency.
The specific parameters that must be set on a water softener control or timer will vary significantly among water softener models. Simple models simply set a salt dose and regen frequency while more sophisticated water softener controllers will want to be told the hardness of the water softener and the size or capacity of the resin tank.
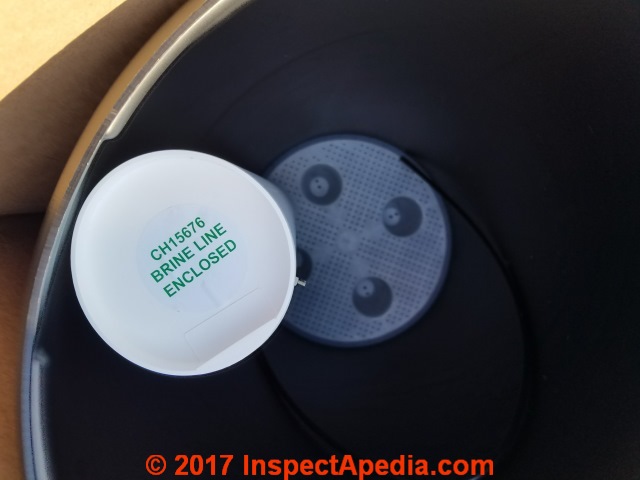
Place Salt into the Water Softener Brine Tank
Below: A view into the empty salt or brine tank of the new water softener. You can see the covered-over brine tank float tube in the left side of the picture and the white salt screen at the bottom of the brine tank.
The salt screen permits any soil mixed in with your salt to settle below the screen.
Our second photo (below) shows our initial installation of salt pellets into the brine tank.
One 80 lb bag of salt (32.6 kilos) was enough to put the water softener into operation; later we filled the salt tank to near its top with salt pellets.

Also see SALT DOSE SETTING, WATER SOFTENER and if you're having trouble with the brine tank see
Below: the Pentair Water Systems - Fleck water softener control valve head display showing the remaining water capacity before the unit will need to run a regeneration cycle.
The softening capacity in liters (or gallons) depends on the supply water hardness, the resin tank size, and the volume of water usage.
Our water softener was labeled Pentair, from Water Quality Systems, 5730 North Glen Park Road, Milwaukee WI 53209 USA, Tel: 262-238-4400, Waterpurification.pentair.com.

However the control head and manual label the equipment as by Fleck water softeners, adding to the usual confusion about identifying water softener brands and finding their manuals.
WATER CONDITIONER / SOFTENER MANUALS provides free manuals and contact information for nearly all water softener or water conditioner brands.
Run First Softener Regeneration Cycle
Once the water softener is programmed, the brine tank full and you've checked to confirm that it is in SERVICE mode
See FLECK or PENTAIR WATER SOFTENER BYPASS VALVE and that there are no plumbing leaks, run a first cycle or manual regeneration cycle.
Summary of 13 Steps To Replace the Water Softener Tank Resin
- Put the building water supply on bypass
to assure that water will remain available while the water softener is offline.
Watch out: I would not begin the disassembly of a water softener tank for resin replacement without first being sure I could leave the building with a working water supply - by installing bypass controls on water piping at the softener location if necessary
Watch out: I would also want to have on hand any replacement parts I'm likely to need such as the softener tank bottom water distributor and riser tube, O-rings, gaskets and seals.
| Having those parts ready not only speeds the softener resin replacement job itself, avoiding delays waiting for parts, it also reduces the risk that you think the job is done only to find that your re-charged water softener is leaking now that it has been re-assembled. - Disconnect the water softener
from any electrical power supply - Remove the controls and softener head:
the control valve or head needs to be removed from the water softener treatment tank. - Flush out / vacuum out the old water softener resin.
Smaller water softener tanks may be tipped over and flushed out, or you may need to use a wet-dry shop vac to remove the resin from the tank.
Watch out: Check the level of resin in the water softener tank before you remove the old resin.
You'll probably see that it fills the softener tank to about 1/3 from the tank top - a detail you'll use in calculating the amount of replacement water softener resin required.
Notice that some water softeners may include a sanitary gravel bed on the tank bottom that also needs to be cleaned or replaced. - Clean and disinfect the softener's water treatment tank.
See our bleach dilution and disinfection advice
at DISINFECTING BUILDINGS with BLEACH
or for more detail and more extensive disinfection methods,
at WELL CHLORINATION & DISINFECTION - Replace the water softener internal water distributor and riser tube
(that's why I said to first check with your softener manufacturer for parts supply and to have these on hand) - Pour the new resin into the softener treatment tank
up to the same level that you found resin before emptying the tank, or as your manufacturer directs for your softener model and size. You can measure the tank size to estimate the necessary volume.Vcyl = pi x r2 x h
where pi = 3.1416,
r = the radius of the circle formed by the cylinder (inside of the softener treatment tank), and is simply 1/2 of the tank's inside diameter
h = the height of the cylinder of space inside the softenerWatch out! be sure to write the radius and height in the same units of measure - we use inches.
Note: the water softener resin tank is not filled with resin right to the top of the tank. Entering water needs space to mix with and interact (exchange ions with) the resin beads.
Taller water softener tanks (over 40") are filled to about 60% while shorter water softener tanks may be filled to about 80% of their internal volume capacity. - Reassemble the water conditioner treatment tank,
including the new O-rings and seals that fit your tank as we suggested earlier. - Run the water softener through an extra regeneration cycle
- Test and compare the water hardness levels
before and after the water has passed through the water softener. - Check / set the water conditioner control settings:
check that you have set the proper regeneration cycle frequency and salt dose for the hardness of your water and the typical daily water volume used.
See WATER SOFTENER ADJUSTMENT & CONTROLS - Restore the water softener to operation
- Check for leaks
Sources of water softener tank resin to replace original material
Moved to WATER SOFTENER RESIN PROPERTIES & SOURCES
Reader Comments, Questions & Answers About The Article Above
Below you will find questions and answers previously posted on this page at its page bottom reader comment box.
Reader Q&A - also see RECOMMENDED ARTICLES & FAQs
On 2023-01-24 by InspectApedia Publisher (mod)
@JbbM,
Thank you for a helpful question. I don't know for sure. Tell me the brand and model of your water softener and let's look at the installation instructions to see what the manufacturer specifies.
On 2023-01-24 by JbbM
I emptied my resin tank and there was no gravel. The screen on the tube looks exactly like the one in your picture. I never had a problem with resin in the water. Do I need to add gravel?
On 2022-08-14 by InspectApedia-911 (mod)
@Sherad,
In that water softener I can't see a typical float control that is usually present to manage the water level or thus, in effect, the brine dose used during softener regeneration.
The company says
Your softener doesn't show any visible signs or make any noise during the water softening
process. Water will only enter or leave the brine tank during regeneration. Salt is NOT used in the
water softening process - only during regeneration. The only time you will see or hear your
softener working is during the regeneration process. Its important that you have yours softener
regularly serviced. We recommend a period of between 24-36 months for each service.
Help?
If you require any additional information regarding your particular water softener, please contact
our technical support team via email. They can be reached at tech@emwc.uk.com
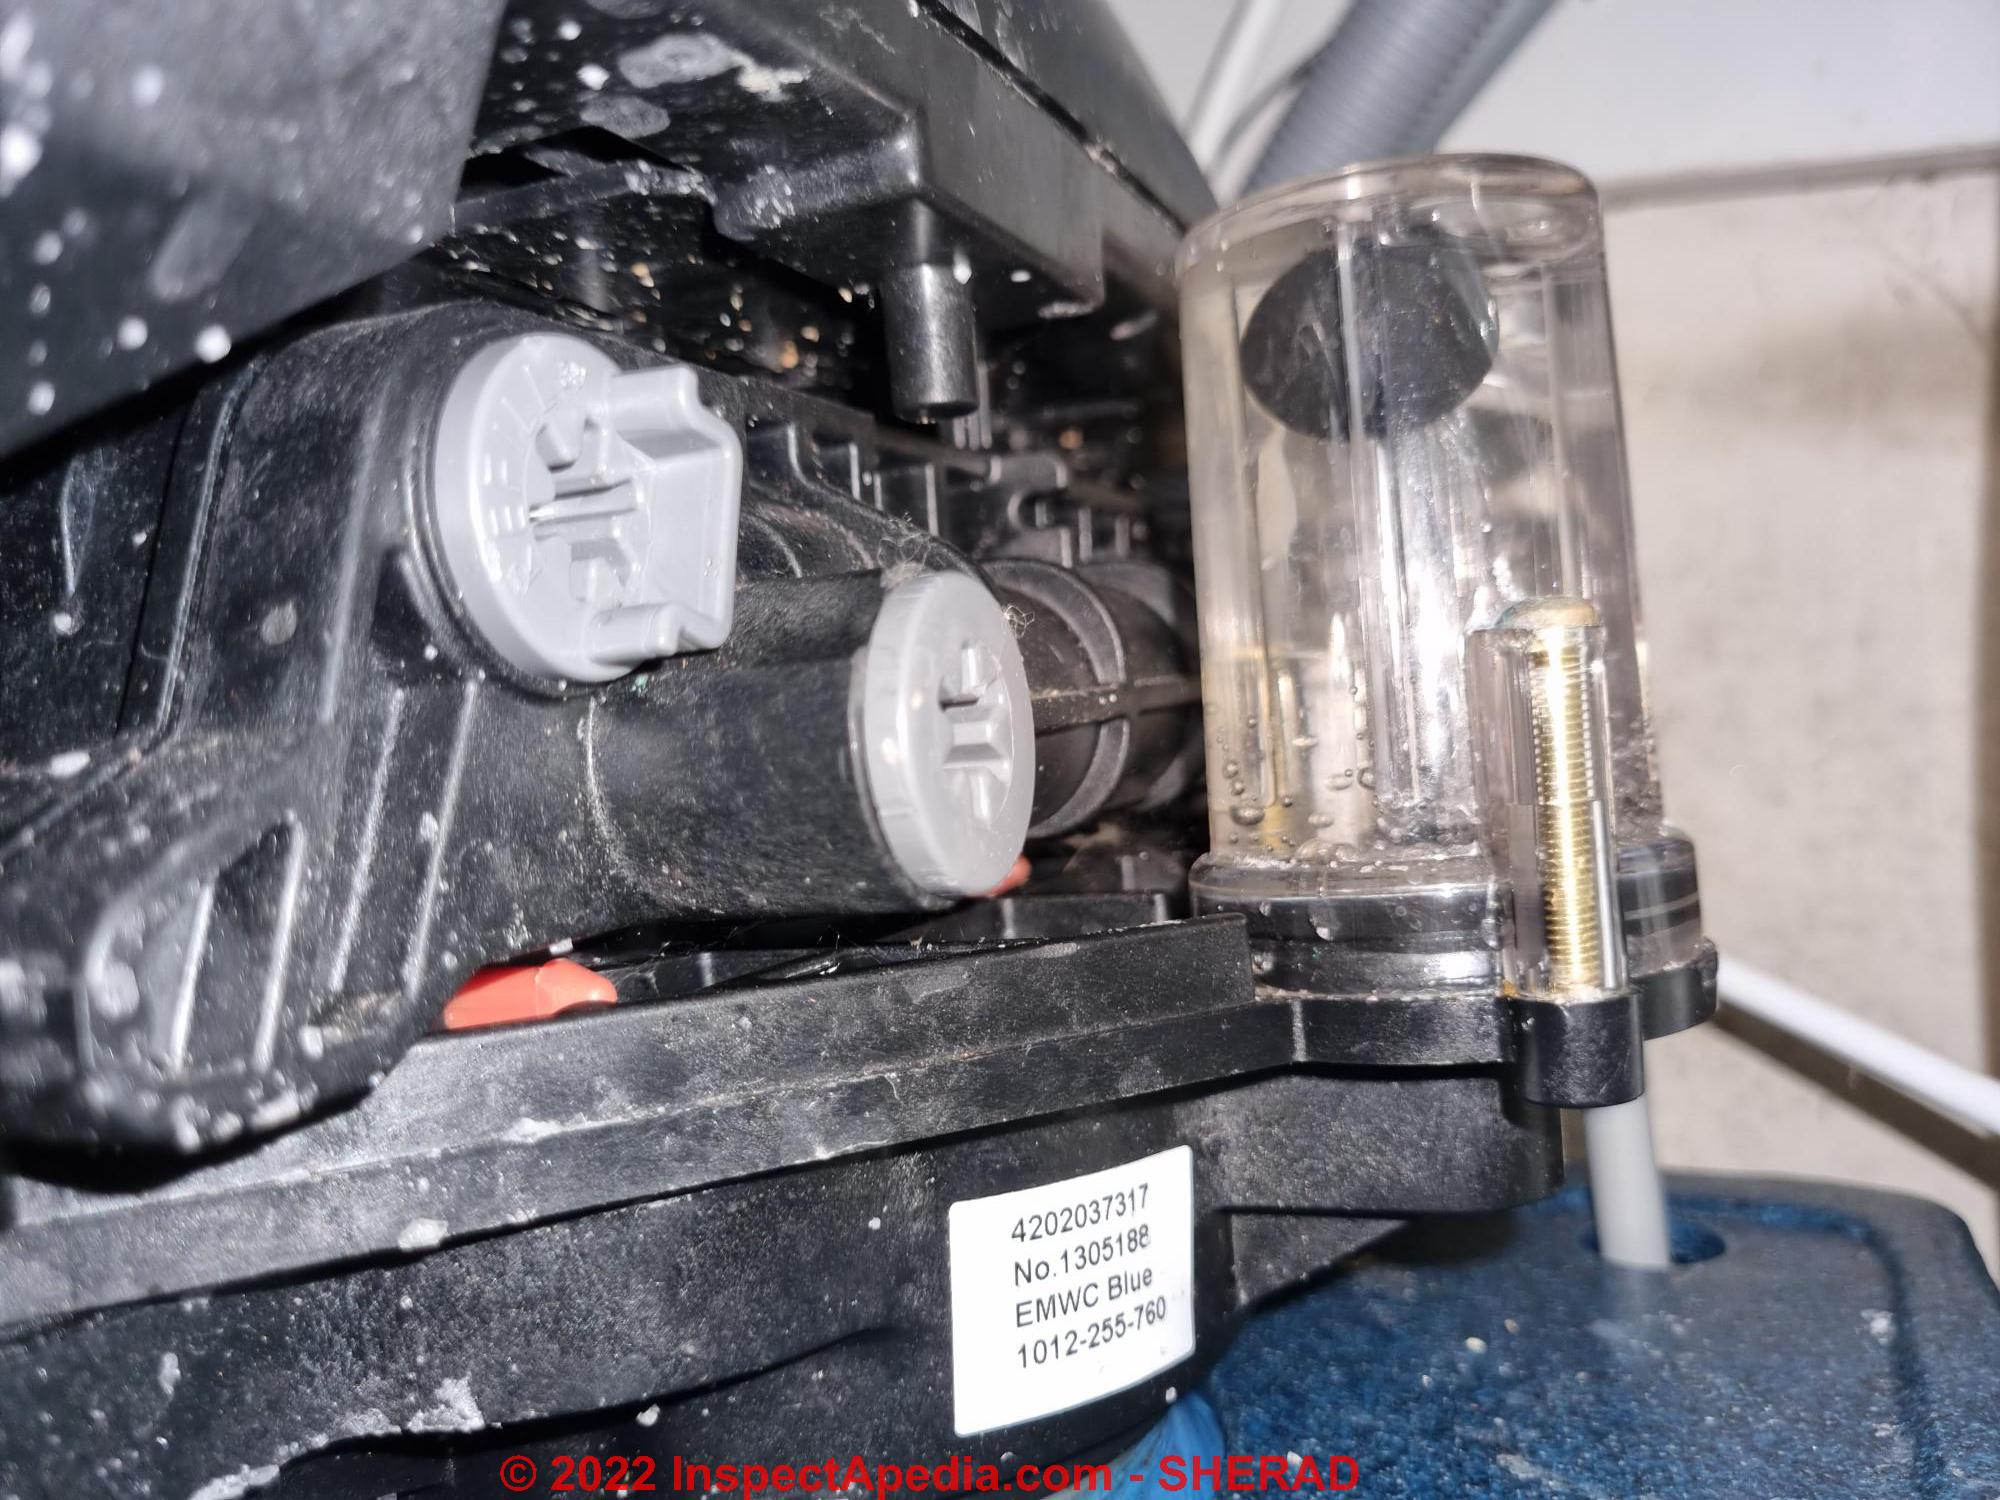
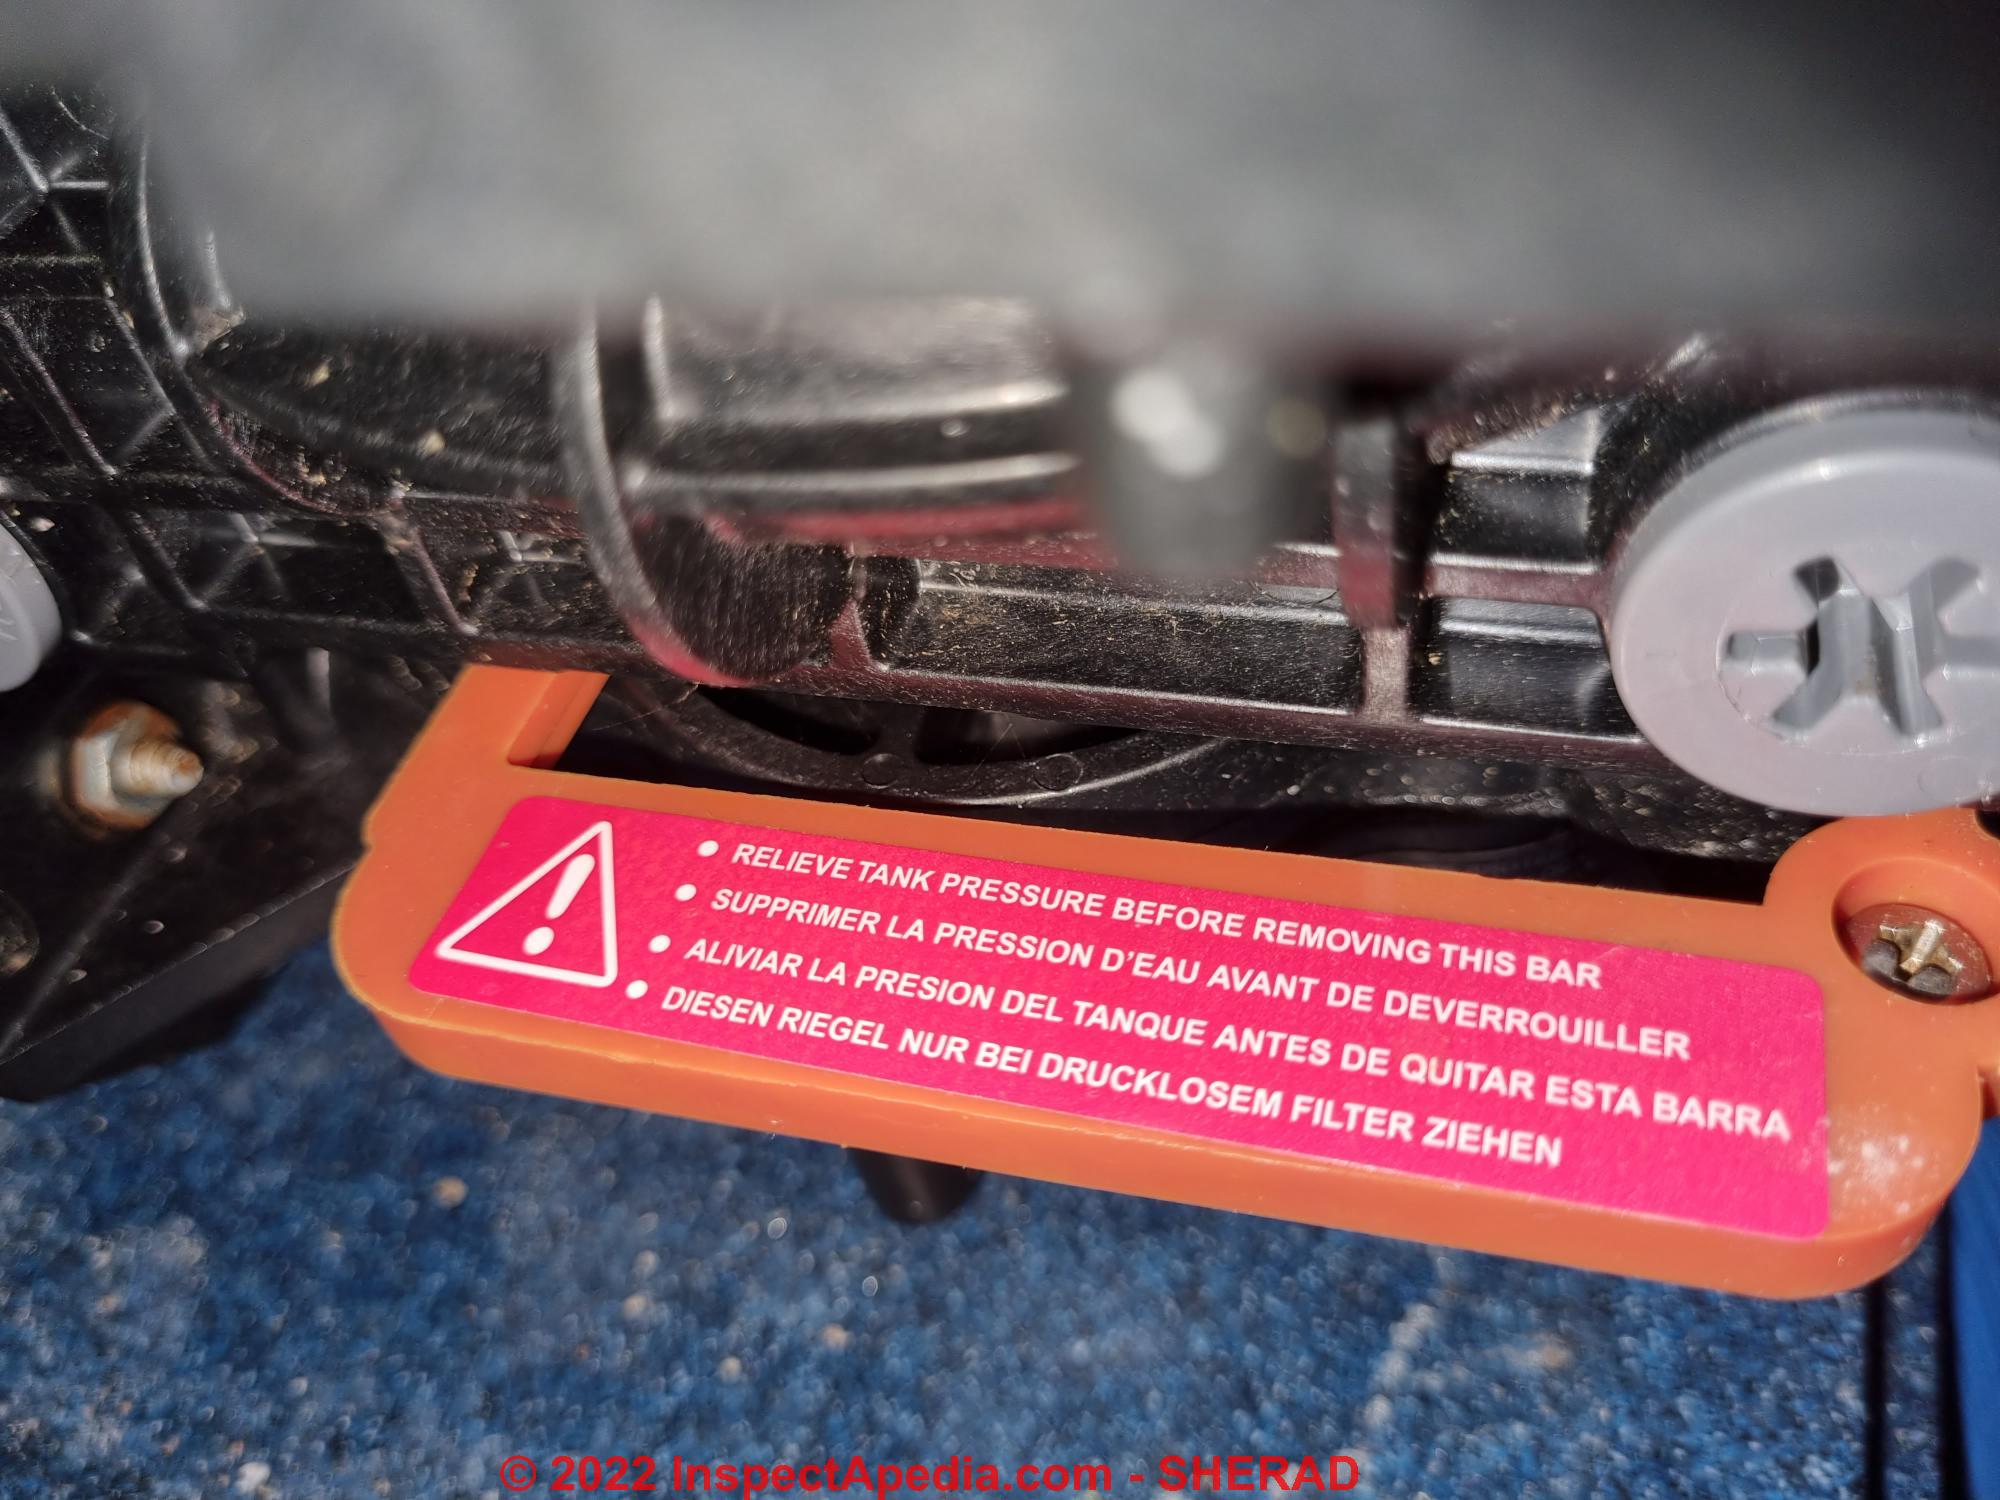
On 2022-08-14 by Sherad
@InspectApedia-911, I looked the brine tank which is full of water collected after the regeneration cycle and in the centre is the resin tank and at the rear right is a GREY tube (which is seen in the image) which comes down in the brink tank.
It has a mesh at the end and this was clear as I took out the grey tubing after unscrewing it from the black controller on top of the tak.
So I cant see any float as such in the brine tank except a transparent collection reservoir as seen in the picture which has a round black ball which does seem to move when the regeneration cycle runs
 ...
... 
...
 ...
... 
On 2022-08-14 by InspectApedia-911 (mod) - is float system moving up and down freely
@Sherad,
If you don't have it, here are the EMC10 WATER SOFTENER INSTRUCTIONS [PDF]
On 2022-08-12 by InspectApedia-911 (mod)
@Sherad,
Have you simply looked in the brine tank to see if the float system that opens and closes the water valve is moving up and down freely?
On 2022-08-11 by Sherad
 Hi I would appreciate if you can help me and give me some friendly advice. I have a water softener EMC10.
It regenerates but the brine tank which is the outer tank in which the Resin tank is there, gets filled with water after some though some water goes through waste pipe down the drain and some through overflow pipe (this is not choked).
I have tried adding resin cleaner in brine tank and have run several manual regeneration cycles with no effect. What can be the cause?
The model can be seen at www [dot][ eastmidlandswater [dot] com/water-softener-ems10-blue-meter-controlled-eco-water-softener/423
Also if I have to open the resin tank, how to decompress the tank before opening it? Shall I switch water input and output off? Your any advice will be highly appreciated. Regards.
On 2020-10-11 by danjoefriedman (mod) - proper "resin bead volume" or "dose" factors
Brad
If water is entering the resin tank it may indeed push some resin beads out of the top. 3/4 cu.ft. isn't likely to be too much; more often when there's a bead-loss problem it's because a top or bottom strainer basket is damaged.
The total level of resin + gravel in a tank is usually around 50% of the height of taller tanks (around 4 ft) and around 80% of shorter tanks (40" or less).
The exactly correct volume of new resin beads in a water softener resin tank will be given by the manufacturer in the IO manual for the specific softener model.
That "resin bead volume" or "dose" depends on
- tank diameter
- tank height
- the volume of gravel bedding in the tank
and ranges from about 1/2 cu.ft. to 2 1/2 cu.ft.
On 2020-10-11 by Brad
When checking for leaks on or around the resin tank on my Ecowater Ess 1000 rx24, I removed the control head from the cylinder. After a few moments I realized that the resin beads were expanding out of the top of the cylinder. Is this normal?
I had replaced the resin in the tank about a year ago.......I put in the recommended amount of resin (3/4 cu. ft.). Is it possible to put too much resin in the tank? I have looked but haven't found anywhere else where this issue is mentioned.
On 2015-03-31 by DanJoeFriedman (mod) - never brine being taken from the brine tank
Brad
Is the float valve moving freely?
Is there a kink into the connecting hose between the control head and the brine tank?
Is the control head itself defective?
On 2015-03-27 by brad
i have an autotrol 255 about 14 years old. it seems that at all stages of the regeneration therer is a slight flow of water INTO the brine tank, there is never brine being taken from the brine tank. Ive inspected/cleaned the injector and filter and inspected the flapper valves.
What are other possible causes? Im stumped!
Reader Question: life of Culligan Mark 10 water softener resin
(Feb 17, 2013) Eric said:
I have a Culligan Mark 10 system and the Culligan folks came out to inspect what I think is a failing valve. Sure enough they concluded that the valve is failing, but they did their typical sales thing and offered to: replace the valve with modern technology and keep the resin tank in place, re-resin the tank, and flush the brine tank.
What is the life of resin? The Culligan guy said "15-20 years maximum". The system has now been unplugged for 3 weeks while we consider these options - does it take much to just start this back up if I go buy my own valve and install it?
Reply:
Eirc,
If your water softener has been out of service for some time or is old, it would be appropriate to sanitize the unit -
see WATER SOFTENER CLEANING & SANITIZING for that procedure.
The life of water softener resins is indeed limited and I agree with your Culligan representative. But you might want to take a look at
WATER SOFTENER RESINS & CLEANING COMPOUNDS in the article above.
Historical Water Softener Resin Research & Patents
While research and patents on cleaners, fabric softeners, soaps and resin soaps have an older history, among U.S. Patents we did not find the term "water softener" and "resin" or similar products in common use before Holloway's 1908 patent disclosure. It would appear that modern water softener resins evolved in the 1950s.
- Aylsworth, Jonas W. "Condensation product of phenols and formaldehyde and process of making same." U.S. Patent 1,197,171, issued September 5, 1916.
Excerpt:
My invention relates to condensation products of phenols and formaldehyde and to methods of preparing the same. - Bodamer, George W. "Permselective films of cationexchange resins." U.S. Patent 2,681,320, issued June 15, 1954.
Excerpt: An object of this invention is to provide films of bonded particles of cation-exchange resins, which films are permselective and are particularly adapted for use in commercial electrolytic processes and in the deionization of fluids.
An object is to provide ion-exchange films which are permselective as to particles carrying a positive electric charge and which, therefore, permit the passage of cations through the films while at the same time preventing passage through the films of undesirable amounts of anions. - Edwin, Rolker. "Method of forming a phenolic condensation product." U.S. Patent 1,532,952, issued April 7, 1925.
- Holloway, George T. "Process for the preparation of common salt for domestic and other uses." U.S. Patent 902,403, issued October 27, 1908.
Excerpt:
This invention realtes to the preparation of common salt so that its tendency to cake on exposure shall be precluded. This caking is, as is well known, due to the presence of the chloride and other deliquescent salts ofcalcium and magnesium, and the present invention consists in coating the prepared anulesfor cyrstals of common saltwith ely powdered carbonate of soda for the purpose of converting the deli uescent chlorid or other com ound" of ca ciuin or magnesium at or near t e surface ofthe.
crys- I long been known to add sodium carbonate to the brine-before the common salt is crystal- It is however found that the comparatively pure salt thus roduced still solid state, but to cakes together on keeping. urthermore it is known togrindcommon-salt with carbon- I to the same extent on keeping. - Ratcliffe, Emmett James, and Matthews Henry Alfred. "Ion-exchange processes for the treatment of water." U.S. Patent 2,617,766, issued November 11, 1952.
Excerpt:
In Great Britain December 8, 1949 to ion-exchange processes for the treatment of water in which the rawwater is passed in succession through a unit (the cation unit) containing a cation exchange material, such for example as sulphonated coal or sulphonated phenol-formaldehyde resins, and a unit (the anion unit)
containing an anion exchange material, such for example as an amino-aldehyde resin, and in which the active materials are intended to be regenerated from time to time, when exhausted or substantially so,
by running through each of the units a solution of a suitable regenerant chemical (an acid, for example, for the cation unit and an alkali, for example, for the anion unit) while the supply of regeneration.
Analytical tests still had to be carried out in order to determine which unit had exhausted and if this proved to be the cation unit the waterin the anion unit, not being completely decationised;
had to be discharged to waste Still later,- however, instruments for measuring differential conductivity values between partially decationised water and completely decationised water were adopted so that an indication could be secured of the exhaustion of the cationunit, the instrument for measuring, the conductivity of the water.
leaving the anion unit then serving to? indicate exhaustion of the'anion unit only. - Waatti, Kurt J., and Daniel R. Border. "Surfactant and alkali metal citrate composition for recharging a water softener." U.S. Patent 4,540,715, issued September 10, 1985.
Abstract excerpt:
Salt composition and method for regenerating spent water softener cation exchange resins, to remove or prevent the accumulation of iron in its various forms, insolubles, and oily deposits.
The dry composition comprises from about 10 ppm to about 400 ppm of an alkylated diphenyl oxide disulfonate surfactant, from about 500 ppm to about 8000 ppm of sodium citrate, and as the remainder of the composition sodium chloride. - Widner, George Henry. "Method of producing water-softening material." U.S. Patent 1,294,007, issued February 11, 1919.
Abstract:
This invention relates to a method of producing a water softening material. It is known that certain substances occurring in nature as days are capablewhen properly treated of softening water by base exchange.
In other words, this material has the capacity, when the water to be softened is passed through a bed of such material, of taking up the calcium and magnesium, the presence of which in the water renders the Water hard.
After a certain amount of water has been softened it becomes necessary to regenerate the material and this is accomplished by passing a neutral solution of an alkali metal, p-referabl sodium orpotassium chlopable of again softening Water by taking up the calcium and magnesium therein. - Zaid, Najib H. "Composition for regenerating cation exchange resin." U.S. Patent 4,839,086, issued June 13, 1989.A
Abstract:
The invention is concerned with the improved compositions for the treatment and regeneration of ion exchange resin beds typically used in water softening systems for domestic or industrial applications.
The compositions of the invention include those designed for addition to sodium chloride to yield a final regenerating medium for exchange resins, along with finished compositions including a preponderant proportion of sodium chloride.
In pertinent part, the compositions of the invention include respective quantitites of citric acid and a salt of citric acid such as sodium or potassium citrate. In particularly preferred form, the compositions include a minor amount of an anti-caking agent selected from the group consisting of alkyl substituted napthalene sulfonates.
The compositions in accordance with the invention are characterized by relatively low pH levels and the ability to minimize the oxidation of ferrous iron to the insoluble ferric form.
Question: is water softener resin dangerous
Resin broke through to our pipes and came out our faucets. Is this dangerous to our health in any way?
Reply:
Deana,
Naturally it's not good to drink particles or debris of any sort. Presuming you are talking only about a conventional water softener that uses a resin tank and salt (that is not a treatment system that includes more dangerous chemicals) the drinking water that you were consuming before was passing through that very resin.
However the resin risks clogging pipes and valves and faucets and needs to be flushed out.
Question: water softener is clogging my washing machine screen with yellow stuff
7/19/2014 (4 hours ago) james lavalley email is jel122643@gmail.com said:
I have a performa water sofner. It keeps pluging up my washing machine screen with a yellow substance and makes the washer not fill. Please help
Reply:
James
This sounds as if the water softener is sending debris from the brine tank OR more likely the actual resin from the softener out with the house water supply. You could try emptying and sanitizing the brine tank (articles here describe how to do that).
But I suspect it's a resin problem - which means it's time to call your local water conditioner company to take a look at the equipment. If the water softener discharge tube basket is broken then it may be allowing resin to escape from the water softener.
...
Continue reading at WATER SOFTENER RESIN LOSS - causes and cures, or select a topic from the closely-related articles below, or see the complete ARTICLE INDEX.
Or see these
Recommended Articles
- WATER CONDITIONER / SOFTENER MANUALS
- WATER SOFTENERS & CONDITIONERS - topic home
- WATER SOFTENER ADJUSTMENT & CONTROLS
- WATER SOFTENER CLEANING & SANITIZING
- WATER SOFTENER RESIN LOSS
- WATER SOFTENER RESIN PROPERTIES & SOURCES
- WATER SOFTENER RESIN REPLACEMENT
Suggested citation for this web page
WATER SOFTENER RESIN REPLACEMENT at InspectApedia.com - online encyclopedia of building & environmental inspection, testing, diagnosis, repair, & problem prevention advice.
Or see this
INDEX to RELATED ARTICLES: ARTICLE INDEX to WATER TREATMENT SYSTEMS
Or use the SEARCH BOX found below to Ask a Question or Search InspectApedia
Ask a Question or Search InspectApedia
Try the search box just below, or if you prefer, post a question or comment in the Comments box below and we will respond promptly.
Search the InspectApedia website
Note: appearance of your Comment below may be delayed: if your comment contains an image, photograph, web link, or text that looks to the software as if it might be a web link, your posting will appear after it has been approved by a moderator. Apologies for the delay.
Only one image can be added per comment but you can post as many comments, and therefore images, as you like.
You will not receive a notification when a response to your question has been posted.
Please bookmark this page to make it easy for you to check back for our response.
Our Comment Box is provided by Countable Web Productions countable.ca
Citations & References
In addition to any citations in the article above, a full list is available on request.
- [1] North Dakota Standards for Water Softeners, North Dakota General Authority Law, Chapter 62-04-08, Water Softener Units http://www.legis.nd.gov/information/acdata/pdf/62-04-08.pdf. "The objective of this chapter is to provide a standard of quality, capacity, and performance for water softener units. Water softener performance is to be based upon referee tests procedures described in section 62-04-08-09."
- [2] Culligan Mark 10 Water Softener 1994-1998 Installation and Operating Instructions (covering models manufactured after 1995) (1-96) 01881948.pdf available from www.culligan.com
- [4] "Commercial Water Softener Installation and Operating Instructions", IBC Filtration & Water Treatment Products (Australia) for commercial, industrial and residential application www.ibcwater.com.au (07) 3219 2233
- [5] "Non electric water softener, Installation and Operating Instructions", IBC Filtration & Water Treatment Products (Australia), op.cit.
- [6] "Water Softener Twin Tank Installation and Operating Instructions", IBC Filtration & Water Treatment Products (Australia), op.cit.
- [8] Thanks to reader Gail Sanchez for discussing water softener backups and floods after an electrical outage - August 2010
- [10] General Electric Corporation, Operation Manual, 740/760 [Water Conditioner or Water Softener] Control, 255 and Performa Series Valves, (268, 268 FA), General Electric Corp. 2007
- [11] Ecodyne Industrial, 1270 Frontenac Road, Naperville, IL 60563 Tel: 1 800-228-9326 (USA Only) Tel: +1 630-961-5043 Fax: 1 800-671-8846, Customer Service: 1 800-228-9326, Email: customers@ecodyneind.com, Website: http://www.ecodyneind.com/
- In addition to citations & references found in this article, see the research citations given at the end of the related articles found at our suggested
CONTINUE READING or RECOMMENDED ARTICLES.
- Carson, Dunlop & Associates Ltd., 120 Carlton Street Suite 407, Toronto ON M5A 4K2. Tel: (416) 964-9415 1-800-268-7070 Email: info@carsondunlop.com. Alan Carson is a past president of ASHI, the American Society of Home Inspectors.
Thanks to Alan Carson and Bob Dunlop, for permission for InspectAPedia to use text excerpts from The HOME REFERENCE BOOK - the Encyclopedia of Homes and to use illustrations from The ILLUSTRATED HOME .
Carson Dunlop Associates provides extensive home inspection education and report writing material. In gratitude we provide links to tsome Carson Dunlop Associates products and services.
 | HOME | ABOUT | ASK a QUESTION | CONTACT | CONTENT USE POLICY | DESCRIPTION | POLICIES | PRIVACY | |
| © 2024 - 1985 Publisher InspectApedia.com - Daniel Friedman | |||||||||