
InspectAPedia® FREE Encyclopedia of Building & Environmental Construction, Diagnosis, Maintenance & Repair |
Question? Just ask us! InspectAPedia
|
 Wood Shake Roof Installation Details - Photo Guide
- POST a QUESTION or COMMENT about specifications for installation of wood shakes on roofs
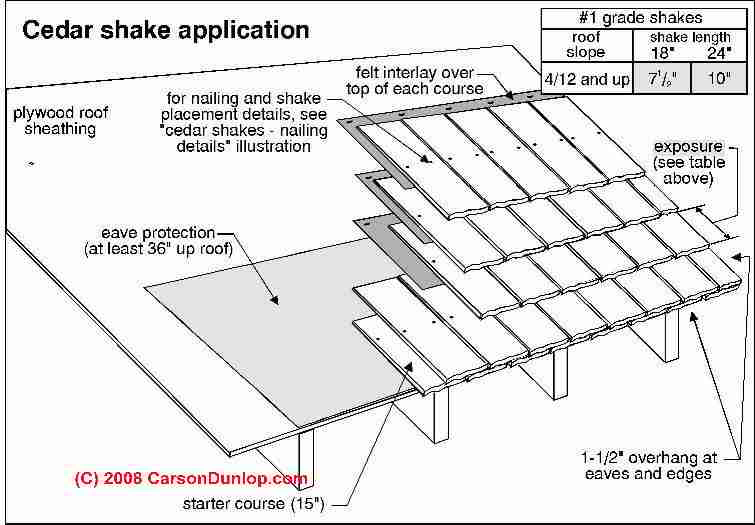
Wood shake roof installation details: here we define wood or cedar shake roofing materials & we discuss wood shake roofing installation details and good practices. Sketch at page top is courtesy of Carson Dunlop Associates, a Toronto home inspection, education & report writing tool company [ carsondunlop.com ].
Also see WOOD ROOF INSTALLATION SPECS and see our checklist of wood shingle installation specs at WOOD ROOF INSPECTION GUIDE.
InspectAPedia tolerates no conflicts of interest. We have no relationship with advertisers, products, or services discussed at this website.
Types of Wood Cedar Shake Roof Application Pattern Details
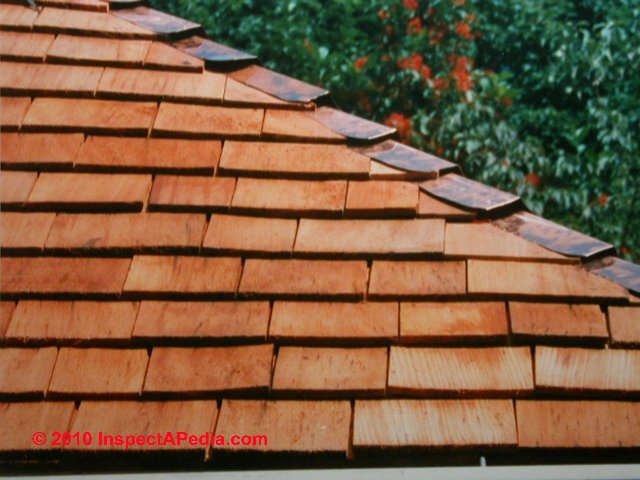
 Unlike their thinner brothers, wood shakes are typically 18"to 24" in length, and up to 14" in width (more than 8" is at extra risk of future splitting).
[Click to enlarge any image]
The roofing shake thickness ranges from 1/2" to 1 1/4" where measured at the shingle butt. The maximum exposure for wood shakes is 7 1/2" (for an 18" long wood shake) or 10" (for a 24" long wood shake), and head lap is 3" or 4" respectively.
A good quality, properly-installed wood shake roof has a life expectancy of 20-40 years. Carson Dunlop Associates' sketch shows the typical cedar shake application pattern and spacing.
- Taper-sawn wood shakes are sawn on both sides - like a thick wood shingle
- Taper split wood shakes are cut from opposing ends of a wooden block, having a shake butt that is at least 1/2" in thickness and typically are 24" in length. Uncommon, costly.
- Hand split, re-sawn wood shakes are similar to straight split shakes (below) but are thicker. A thick split of wood that is rough-split on both sides is re-sawn in half through its thickness to produce two thick shakes, each with a smooth back.
- Straight split wood shakes (also called barn shakes ) are split from the same end of a block of cedar (or other wood) and are not tapered. Straight split wood shakes are not usually used on homes.
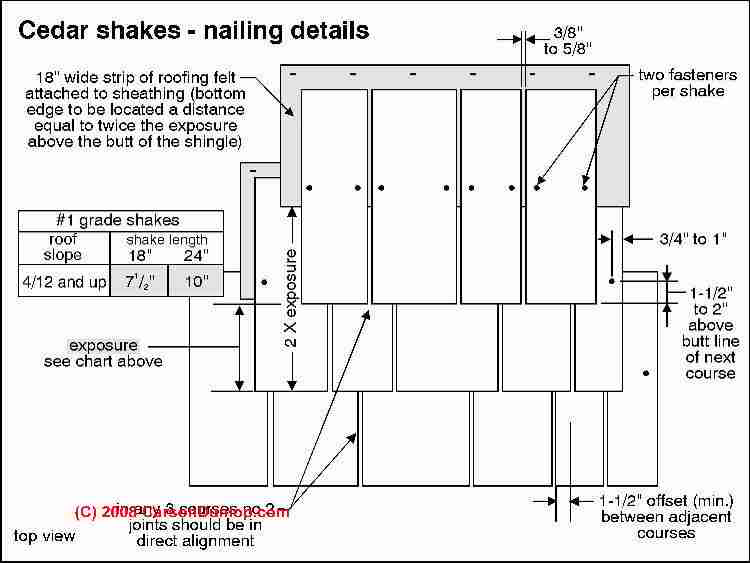
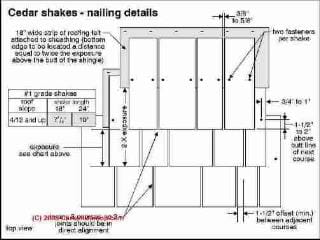
Here Carson Dunlop Associates' sketch shows typical cedar shake nailing details & pattern and exposures.
Notice that for this example cedar shake roof a felt interlay is installed between every course of shakes.
More details useful for determining the condition of a wood roof are
at WOOD ROOF INSPECTION GUIDE.
As we also discuss there,
Wood shake exposures
for wood shake roofs: the maximum weather exposure for wood shakes or wood shingles depends on the shingle size and the slope or pitch of the roof.
Allowable wood shake exposure may also vary by the shake grade - something that you might infer by visual inspection of the shakes, matching against wood shake grade definitions, or if a wood hake identification label can be located.
| Roof Slope or Pitch | ||
| 18" | 24" | |
| 4/12 & steeper roofs | 7 1/2" | 10" (Note) |
Notes to the table above
- Note: 24" x 3/8" handsplit wood shakes are limited to 7 1/2" weather exposure, or 5" exposure where the Uniform Building Code is in application.
- Shingle exposure rules for wood shingles (as opposed to shakes) are detailed
at WOOD ROOF INSTALLATION SPECS.
Wood shingle or shake keyways or gaps
 Wood shake keyways: the gap or space between adjacent wood shingles should be between 1/4" and 3/8" in width.
For wood shakes the keyway should be 3/8" to 5/8" in width.
The Shingle Bureau points out that the gap observed between shingles or shakes on a wood roof will vary depending on ambient moisture conditions as moist wood shingles or shakes swell (which is why we need a gap, to avoid buckling and splitting).
Wood shingle keyways or gaps are illustrated at the top of this page.
Wood shake joints & gap alignment:
the gaps or keyways described just above for any pair of abutting wood shakes should have a side-lap offset of no less than 1 1/2" from the joints or keyways in adjacent shake courses (horizontal rows of wood shakes across the roof), and in any three wood shake courses no two joints should be in direct alignment (gaps should not be over gaps in any three shake courses).
For added details about proper wood shake roof installation,
the most authoritative source of wood shingle and wood shake information is from the Western Red Cedar Shingle & Shake Bureau (now the Cedar and Shake Shingle Bureau, since not only western red cedar is used for roof shingles).
Wood Shake Roof Installation Specifications - Best Practices
As detailed in Best Practices Guide to Residential Construction (Steve Bliss, J Wiley & Sons) (printed text) chapter on BEST ROOFING PRACTICES,
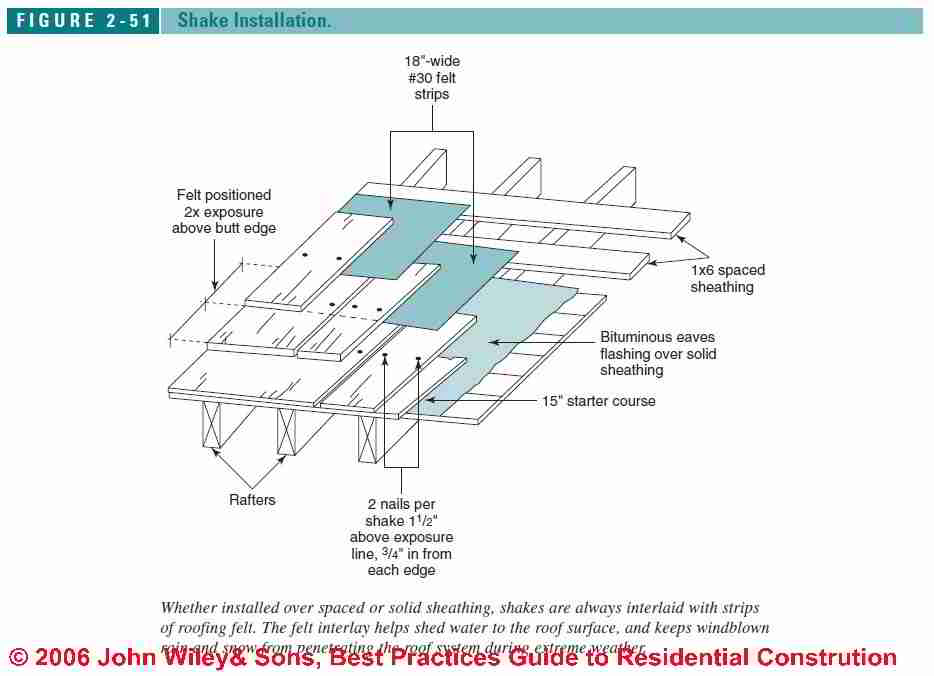
Whether installed over spaced or solid sheathing, shakes should always be interlaid with 18-inch-wide strips of No. 30 roofing felt. The felt strips acts as baffles to keep windblown snow and other debris from penetrating the roof system during extreme weather. The felt “interlayment” also helps shed water to the surface of the roof.
It is important to locate each felt strip above the butt of the shake it is placed on by a distance equal to twice the weather exposure (Figure 2-51 shown below).
 [Click any image or table for an enlarged, detailed view.]
Placed higher, the felt strips will be ineffective. Placed too low, they will be visible in the keyways and will wick up water, leading to premature failure of the shakes. In addition, follow these guidelines:
- For the starter course, use either a single layer of shakes
or two layers separated by a strip of felt interlayment
(installed up from the eaves by a distance equal to the
weather exposure).
Fifteen-inch shakes are available for the bottom layer of a double starter course - Each shake gets two nails about 3/4 inch in from each end and 1 1/2 inches above the butt line of the overlaying shake.
- The first course should overhang the fascia by 1 1/2 inches.
- All courses should overhang the rake trim by about 1 inch.
- Leave a gap between adjacent shakes of 3/8 to 5/8 inch for expansion when wet.
- Offset joints in successive courses by at least 1 1/2 inches
-- Adapted with permission from Best Practices Guide to Residential Construction (Steve Bliss, J Wiley & Sons) .
Reader Comments, Questions & Answers About The Article Above
Below you will find questions and answers previously posted on this page at its page bottom reader comment box.
Reader Q&A - also see RECOMMENDED ARTICLES & FAQs
On 2020-05-24 - by (mod) - When replacing wood shingles around the valley how many shingles are affected?
Anon
Thanks for a fair question but not one for which there is a single "right" answer.
The number of shingles to be "affected" when replacing wood shingles around a valley will vary but will certainly include:
1. all of the damaged shingles
2. if the valley is being replaced, all of the shingles that cover the valley material itself, possibly plus additional shingles to get sufficient working space to remove old and install new valley liner as well as valley itself.
3. shingles named in 1 and 2 above, for the entire length of the valley being replaced.
On 2020-05-24 by Anonymous
When replacing wood shingles around the valley how many shingles are affected
On 2018-02-20 - by (mod) - adequate nailing for wood shakes in a high-wind zone (Kansas)
TJ
Slate roof repairs have a similar problem as you cannot lift up a wood shingle, shake, nor a slate to nail below it.
See if this slate repair procedure using slate hooks would help you out.
SLATE ROOF REPAIRS
On 2018-02-20 by T.J. Stuebs
We have a client who has had some wind damage to some shake shingles in the field. Of course the insurance carrier says to break a shake out and slide another into place.
My question is : Although two nails (driven in at an angle below the existing shake) could hold the shake in place, can that shake have the ability to meet mandated uplift wind codes in Overland Park, Kansas? tj.stuebs@jrcousa.com Thank you for your opinion in advance.
Question: why is the roofing felt cut to 18" wide strips?
(Feb 27, 2015) Drue said:
Why cut the 36" roll of felt down to 18" strips in this application ?
Reply:
The roofer is interlayering a course of felt between each wood shake course.
...
Continue reading at WOOD ROOF SHEATHING, UNDERLAYMENT or select a topic from the closely-related articles below, or see the complete ARTICLE INDEX.
Or see these
Recommended Articles
- ALGAE, FUNGUS, LICHENS, MOSS on ROOFS
- SIDING WOOD SHINGLE INSTALLATION
- WOOD SHAKE & SHINGLE ROOFING - home
- WOOD ROOF COATINGS & FIRE RATINGS
- WOOD ROOF FLASHING DETAILS
- WOOD ROOF HIP & RIDGE DETAILS
- WOOD ROOF INSPECTION GUIDE
- WOOD ROOF INSTALLATION SPECS
- WOOD ROOF LIFE EXPECTANCY
- WOOD ROOF MAINTENANCE
- WOOD ROOF MOSS & LICHENS
- WOOD ROOF SHAKES INSTALLATION
- WOOD ROOF SHEATHING, UNDERLAYMENT
- WOOD ROOF SHINGLE PROPERTIES
- WOOD ROOF WEAR / INSTALLATION DEFECTS
- WOOD SHINGLES, RE-ROOFING WITH
Suggested citation for this web page
WOOD ROOF SHAKES INSTALLATION at InspectApedia.com - online encyclopedia of building & environmental inspection, testing, diagnosis, repair, & problem prevention advice.
Or see this
INDEX to RELATED ARTICLES: ARTICLE INDEX to BUILDING ROOFING
Or use the SEARCH BOX found below to Ask a Question or Search InspectApedia
Ask a Question or Search InspectApedia
Try the search box just below, or if you prefer, post a question or comment in the Comments box below and we will respond promptly.
Search the InspectApedia website
Note: appearance of your Comment below may be delayed: if your comment contains an image, photograph, web link, or text that looks to the software as if it might be a web link, your posting will appear after it has been approved by a moderator. Apologies for the delay.
Only one image can be added per comment but you can post as many comments, and therefore images, as you like.
You will not receive a notification when a response to your question has been posted.
Please bookmark this page to make it easy for you to check back for our response.
Our Comment Box is provided by Countable Web Productions countable.ca
Citations & References
In addition to any citations in the article above, a full list is available on request.
- Mark Cramer Inspection Services Mark Cramer, Tampa Florida, Mr. Cramer is a past president of ASHI, the American Society of Home Inspectors and is a Florida home inspector and home inspection educator. Mr. Cramer serves on the ASHI Home Inspection Standards. Contact Mark Cramer at: 727-595-4211 mark@BestTampaInspector.com
- John Cranor [Website: /www.house-whisperer.com ] is an ASHI member and a home inspector (The House Whisperer) is located in Glen Allen, VA 23060. He is also a contributor to InspectApedia.com in several technical areas such as plumbing and appliances (dryer vents). Contact Mr. Cranor at 804-873-8534 or by Email: johncranor@verizon.net
- "Choosing Roofing," Jefferson Kolle, January 1995, No. 92, Fine Homebuilding, Taunton Press, 63 S. Main St., PO Box 5506, Newton CT 06470 - 800-888-8286 - see http://www.taunton.com/FineHomebuilding/ for the magazine's website and for subscription information.
- Building Pathology, Deterioration, Diagnostics, and Intervention, Samuel Y. Harris, P.E., AIA, Esq., ISBN 0-471-33172-4, John Wiley & Sons, 2001 [General building science-DF] ISBN-10: 0471331724 ISBN-13: 978-0471331728
- Building Pathology: Principles and Practice, David Watt, Wiley-Blackwell; 2 edition (March 7, 2008) ISBN-10: 1405161035 ISBN-13: 978-1405161039
- Historic Preservation Technology: A Primer, Robert A. Young, Wiley (March 21, 2008) ISBN-10: 0471788368 ISBN-13: 978-0471788362
- Problems in Roofing Design, B. Harrison McCampbell, Butterworth Heineman, 1991 ISBN 0-7506-9162-X (available used)
- Cedar Shake & Shingle Bureau, CSSB, U.S.: Sumas, WA 98295-1178, Tel: 604-820-7700, In Canada:
Cedar Shake and Shingle Bureau #2 - 7101 Horne Street, Mission, BC V2V 7A2 Tel: (604) 820-7700, E-mail: info@cedarbureau.com , website: http://www.cedarbureau.org/
CCSB offers wood shingle installation instructions in the form of a manual - cedarbureau.org/installation/wall_manual/introduction.htm - "Treatment of Cedar Shakes and Shingles," David Flickinger, RRO, p. 74, Professional Roofing, NRCA, October 1999, Rosemont IL.
- Our recommended books about building & mechanical systems design, inspection, problem diagnosis, and repair, and about indoor environment and IAQ testing, diagnosis, and cleanup are at the InspectAPedia Bookstore. Also see our Book Reviews - InspectAPedia.
- Best Practices Guide to Residential Construction, by Steven Bliss. John Wiley & Sons, 2006. ISBN-10: 0471648361, ISBN-13: 978-0471648369, Hardcover: 320 pages, available from Amazon.com and also Wiley.com. See our book review of this publication.
- The Journal of Light Construction has generously given reprint permission to InspectAPedia.com for this article. All rights and contents are ©Journal of Light Construction and may not be reproduced in any form.
- Architectural elements: the technological revolution: Galvanized iron roof plates and corrugated sheets; cast iron facades, columns, door and window caps, ... (American historical catalog collection), Diana S Waite, available used out of Amazon.
- Building Pathology, Deterioration, Diagnostics, and Intervention, Samuel Y. Harris, P.E., AIA, Esq., ISBN 0-471-33172-4, John Wiley & Sons, 2001 [General building science-DF] ISBN-10: 0471331724 ISBN-13: 978-0471331728
- Building Pathology: Principles and Practice, David Watt, Wiley-Blackwell; 2 edition (March 7, 2008) ISBN-10: 1405161035 ISBN-13: 978-1405161039
- Historic Preservation Technology: A Primer, Robert A. Young, Wiley (March 21, 2008) ISBN-10: 0471788368 ISBN-13: 978-0471788362
- Wood Shingle Roofs, Care and Maintenance of wood shingle and shake roofs, (EC), Stanley S. Niemiec (out of print)
- In addition to citations & references found in this article, see the research citations given at the end of the related articles found at our suggested
CONTINUE READING or RECOMMENDED ARTICLES.
- Carson, Dunlop & Associates Ltd., 120 Carlton Street Suite 407, Toronto ON M5A 4K2. Tel: (416) 964-9415 1-800-268-7070 Email: info@carsondunlop.com. Alan Carson is a past president of ASHI, the American Society of Home Inspectors.
Thanks to Alan Carson and Bob Dunlop, for permission for InspectAPedia to use text excerpts from The HOME REFERENCE BOOK - the Encyclopedia of Homes and to use illustrations from The ILLUSTRATED HOME .
Carson Dunlop Associates provides extensive home inspection education and report writing material. In gratitude we provide links to tsome Carson Dunlop Associates products and services.
 | HOME | ABOUT | ASK a QUESTION | CONTACT | CONTENT USE POLICY | DESCRIPTION | POLICIES | PRIVACY | |
| © 2024 - 1985 Publisher InspectApedia.com - Daniel Friedman | |||||||||