
InspectAPedia® FREE Encyclopedia of Building & Environmental Construction, Diagnosis, Maintenance & Repair |
Question? Just ask us! InspectAPedia
|
 Indoor Indicators of Septic System Failures
What to Problems to Look for Indoors During a Septic Loading & Dye Test
- POST a QUESTION or COMMENT about this article topic.
Septic inspection & test procedure indoors: this article describes what to do and where to look inside the building during a Septic Loading and Dye Test procedure.
InspectAPedia tolerates no conflicts of interest. We have no relationship with advertisers, products, or services discussed at this website.
Septic System Inspection & Test Indoors: What to Watch For Inside the Building
What should you look for inside the building before, during, and after a septic system inspection and test?
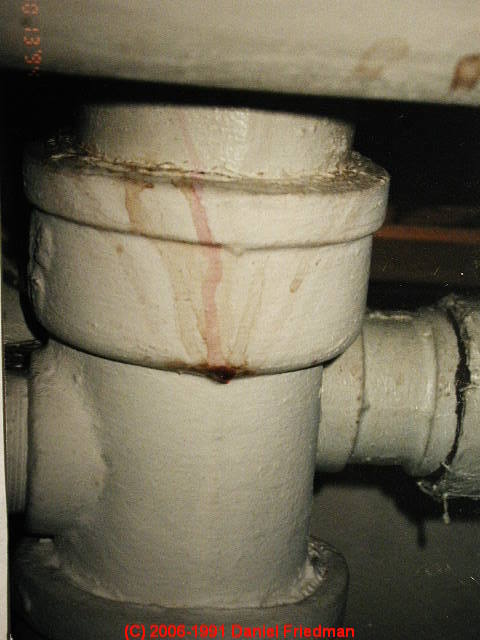
Check for in-building drain leaks: At the start of your septic dye test, inspect the fixture drain and (if a basement
or crawl space expose the drain piping) check for other leaks in the building.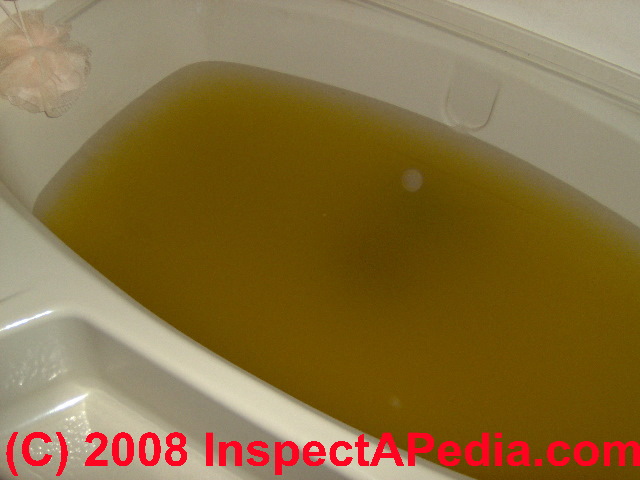 Once, with
permission of the owner, we began a dye test from the second floor of a building only
to hear screams of horror from the occupants of the floor below as red dye erupted
from their ceiling.
Once, with
permission of the owner, we began a dye test from the second floor of a building only
to hear screams of horror from the occupants of the floor below as red dye erupted
from their ceiling.
Always be sure that there are no leaky traps or drains before
you leave water running in a building.
Watch for sewer line backup in the building - indicating system blockage.
Check all
fixture drains before leaving water on.
Check floors below running fixtures for
signs of current or previous leaks.
Don't risk flooding or damaging the
building by leaking or overflowing fixtures. If leaks prevent testing, document
this information.
Check fixtures periodically during the test period, to assure
no leaks or overflows.
Find the main building drain sewer line or waste line: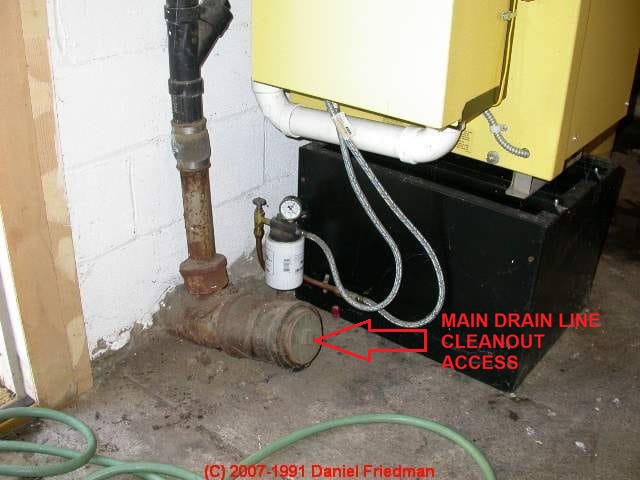 If you didn't do this before, locate the sewer pipe exit point in the building.
Confirm that the tub/sink
drain for the fixture being used to load the system is in fact draining into
the sewer line.
It is important to take this step early in the test cycle, and
to check all building areas to be sure that you are not inadvertently spilling
water (and dye) anywhere inside.
- Confirm test water runs in septic drain line: Feel and listen to sewer pipes to assure that water is running through them to the sewer system.
- If the passage of water into the septic drain line from a sink or bath tub cannot be established or if only toilets drain into the septic system
it may be necessary to use a garden hose to provide water into the toilet to
test the system, or to warn the owner/client that the test is inconclusive for
this reason as well as other limitations.
(Beware of unsanitary cross connections; don't leave the hose in place when finished.) - Trace all sewer piping (note visible components, report areas where
there was no view or no access). Note locations of kitchen, laundry, bathrooms.
If there is more than one exiting sewer pipe, introduce a different colored dye, and begin an additional test of measured flow at the appropriate fixtures. Record bathrooms that may have been added since original construction (permit may have been required.) - Check lowest plumbing fixtures for backup:
Check for bathroom fixtures at house level lower than exit point of main sewer
line. Confirm presence and operation of appropriate sewage ejector pump or
other permitted destination for such waste lines.
Watch for septic backup and overflow from fixtures low in the building - during your test if the main waste line is blocked, or perhaps you will see evidence of prior backups and overflows.
...
Continue reading at OUTSIDE SEPTIC DYE TEST STEPS or select a topic from the closely-related articles below, or see the complete ARTICLE INDEX.
Suggested citation for this web page
SEPTIC FAILURE INDOOR INDICATORS at InspectApedia.com - online encyclopedia of building & environmental inspection, testing, diagnosis, repair, & problem prevention advice.
Or see this
INDEX to RELATED ARTICLES: ARTICLE INDEX to SEPTIC SYSTEMS
Or use the SEARCH BOX found below to Ask a Question or Search InspectApedia
Ask a Question or Search InspectApedia
Try the search box just below, or if you prefer, post a question or comment in the Comments box below and we will respond promptly.
Search the InspectApedia website
Note: appearance of your Comment below may be delayed: if your comment contains an image, photograph, web link, or text that looks to the software as if it might be a web link, your posting will appear after it has been approved by a moderator. Apologies for the delay.
Only one image can be added per comment but you can post as many comments, and therefore images, as you like.
You will not receive a notification when a response to your question has been posted.
Please bookmark this page to make it easy for you to check back for our response.
Our Comment Box is provided by Countable Web Productions countable.ca
Citations & References
In addition to any citations in the article above, a full list is available on request.
- New York State Department of Health, APPENDIX 75-A WASTEWATER TREATMENT STANDARDS - INDIVIDUAL HOUSEHOLD SYSTEMS , [PDF] New York State Department of Health, 3 February 2010, retrieved 3/1/2010, original source: https://www.health.ny.gov/regulations/nycrr/title_10/part_75/appendix_75-a.htm
- SEPTIC TANK/SOIL-ABSORPTION SYSTEMS: HOW TO OPERATE & MAINTAIN [PDF] - , Equipment Tips, U.S. Department of Agriculture, 8271 1302, 7100 Engineering, 2300 Recreation, September 1982, web search 08/28/2010, original source: http://www.fs.fed.us/t-d/pubs/pdfimage/82711302.pdf.
- Pennsylvania State Wastewater Treatment Fact Sheet SW-161, Septic System Failure: Diagnosis and Treatment
- Pennsylvania State Wastewater Treatment Fact Sheet SW-162, The Soil Media and the Percolation Test
- Pennsylvania State Wastewater Treatment Fact Sheet SW-l64, Mound Systems for Wastewater Treatment
- Pennsylvania State Wastewater Treatment Fact Sheet SW-165, Septic Tank-Soil Absorption Systems
- Document Sources used for this web page include but are not limited to: Agricultural Fact Sheet #SW-161 "Septic Tank Pumping," by Paul D. Robillard and Kelli S. Martin. Penn State College of Agriculture - Cooperative Extension, edited and annotated by Dan Friedman (Thanks: to Bob Mackey for proofreading the original source material.)
- Advanced Onsite Wastewater Systems Technologies, Anish R. Jantrania, Mark A. Gross. Anish Jantrania, Ph.D., P.E., M.B.A., is a Consulting Engineer, in Mechanicsville VA, 804-550-0389 (2006). Outstanding technical reference especially on alternative septic system design alternatives. Written for designers and engineers, this book is not at all easy going for homeowners but is a text I recommend for professionals--DF.
- Onsite Wastewater Disposal, R. J. Perkins; Quoting from Amazon: This practical book, co-published with the National Environmental Health Association, describes the step-by-step procedures needed to avoid common pitfalls in septic system technology. Valuable in matching the septic system to the site-specific conditions, this useful book will help you install a reliable system in both suitable and difficult environments. Septic tank installers, planners, state and local regulators, civil and sanitary engineers, consulting engineers, architects, homeowners, academics, and land developers will find this publication valuable.
- Onsite Wastewater Treatment Systems, Bennette D. Burks, Mary Margaret Minnis, Hogarth House 1994 - one of the best septic system books around, suffering a bit from small fonts and a weak index. While it contains some material more technical than needed by homeowners, Burks/Minnis book on onsite wastewater treatment systems a very useful reference for both property owners and septic system designers.
- Septic Tank/Soil-Absorption Systems: How to Operate & Maintain, Equipment Tips, U.S. Department of Agriculture, 8271 1302, 7100 Engineering, 2300 Recreation, September 1982, web search 08/28/2010, original source: http://www.fs.fed.us/t-d/pubs/pdfimage/82711302.pdf
- SEPTIC SOIL & PERC TESTS soil perc testing guide and instructions
- Percolation Testing Manual, CNMI Division of Environmental Quality, PO Box 501304, Saipan, MP 96950
- Planting Over Septic System Component", Daniel Friedman (author/editor, InspectAPedia.com), The Innovator, Winter/Spring 2008, BCOSSA, British Columbia OnSite Sewage Association, 201-3542 Blansard St., Victoria BC V8X 1W3 Canada
- Septic System Owner's Manual, Lloyd Kahn, Blair Allen, Julie Jones, Shelter Publications, 2000 $14.95 U.S. - easy to understand, well illustrated, one of the best practical references around on septic design basics including some advanced systems; a little short on safety and maintenance. Both new and used (low priced copies are available, and we think the authors are working on an updated edition--DF. Quoting from one of several Amazon reviews: The basics of septic systems, from underground systems and failures to what the owner can do to promote and maintain a healthy system, is revealed in an excellent guide essential for any who reside on a septic system. Rural residents receive a primer on not only the basics; but how to conduct period inspections and what to do when things go wrong. History also figures into the fine coverage.
- US EPA ONSITE WASTEWATER TREATMENT SYSTEMS MANUAL Top Reference: US EPA's Design Manual for Onsite Wastewater Treatment and Disposal, 1980, available from the US EPA, the US GPO Superintendent of Documents (Pueblo CO), and from the National Small Flows Clearinghouse. Original source http://www.epa.gov/ORD/NRMRL/Pubs/625R00008/625R00008.htm
- Water Wells and Septic Systems Handbook, R. Dodge Woodson. This book is in the upper price range, but is worth the cost for serious septic installers and designers.
Quoting Amazon: Each year, thousands upon thousands of Americans install water wells and septic systems on their properties. But with a maze of codes governing their use along with a host of design requirements that ensure their functionality where can someone turn for comprehensive, one-stop guidance? Enter the Water Wells and Septic Systems Handbook from McGraw-Hill.
Written in language any property owner can understand yet detailed enough for professionals and technical students this easy-to-use volume delivers the latest techniques and code requirements for designing, building, rehabilitating, and maintaining private water wells and septic systems. Bolstered by a wealth of informative charts, tables, and illustrations, this book delivers:
* Current construction, maintenance, and repair methods
* New International Private Sewage Disposal Code
* Up-to-date standards from the American Water Works Association - Wells and Septic System, Alth, Max and Charlet, Rev. by S. Blackwell Duncan, $ 18.95; Tab Books 1992. We have found this text very useful for conventional well and septic systems design and maintenance --DF. Quoting an Amazon description:Here's all the information you need to build a well or septic system yourself - and save a lot of time, money, and frustration. S. Blackwell Duncan has thoroughly revised and updated this second edition of Wells and Septic Systems to conform to current codes and requirements. He also has expanded this national bestseller to include new material on well and septic installation, water storage and distribution, water treatment, ecological considerations, and septic systems for problem building sites.
- In addition to citations & references found in this article, see the research citations given at the end of the related articles found at our suggested
CONTINUE READING or RECOMMENDED ARTICLES.
- Carson, Dunlop & Associates Ltd., 120 Carlton Street Suite 407, Toronto ON M5A 4K2. Tel: (416) 964-9415 1-800-268-7070 Email: info@carsondunlop.com. Alan Carson is a past president of ASHI, the American Society of Home Inspectors.
Thanks to Alan Carson and Bob Dunlop, for permission for InspectAPedia to use text excerpts from The HOME REFERENCE BOOK - the Encyclopedia of Homes and to use illustrations from The ILLUSTRATED HOME .
Carson Dunlop Associates provides extensive home inspection education and report writing material. In gratitude we provide links to tsome Carson Dunlop Associates products and services.
 | HOME | ABOUT | ASK a QUESTION | CONTACT | CONTENT USE POLICY | DESCRIPTION | POLICIES | PRIVACY | |
| © 2024 - 1985 Publisher InspectApedia.com - Daniel Friedman | |||||||||