
InspectAPedia® FREE Encyclopedia of Building & Environmental Construction, Diagnosis, Maintenance & Repair |
Question? Just ask us! InspectAPedia
|
 Use a Drywell for Graywater or Roof Drainage or Stormwater Disposal
- POST a QUESTION or COMMENT about drywells, seepage pits, and graywater disposal
Drywell or seepage pit construction & uses: this document explains what a drywell (or seepage pit) is, describes how drywells are used, gives safety and maintenance advice for drywells, and defines the criteria for drywell failure.
What are Septic Drywells, What Drywell Maintenance is Needed? How do Drywells Fail?
We warn readers that while installation of a drywell to receive graywater at a property may be a good idea, the use of drywells for this purpose may be a warning about the capacity and remaining life of the septic system.
InspectAPedia tolerates no conflicts of interest. We have no relationship with advertisers, products, or services discussed at this website.
Drywells Compared With Seepage pits: dispose of Septic Effluent vs Gray Water
 We use the terms "drywell" and "seepage pit" differently as follows:
Drywells as Graywater Disposal Facilities
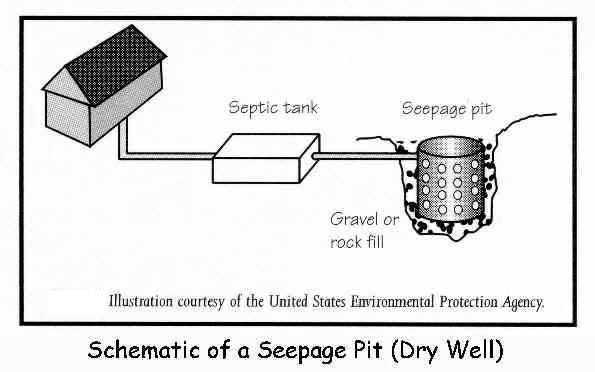
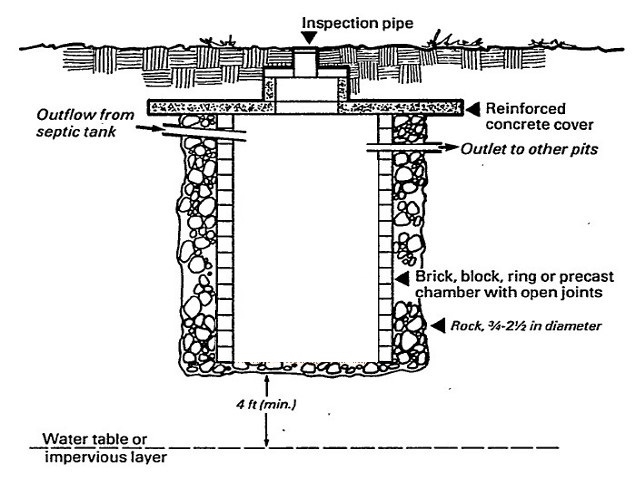
A drywell or seepage pit, sometimes called a leaching pit, leaching pool, or incorrectly a cesspool, is a covered pit with an open-jointed or perforated lining through which septic tank effluent seeps into the surrounding soil.
In other words this is one of the oldest and simplest methods of disposing of gray water or in some cases septic effluent - a simple pit or hole in the ground, open to soil at its sides and bottoms, intended to receive and dispose of gray water (water from building non-sewage drains such as laundry, showers, sinks).
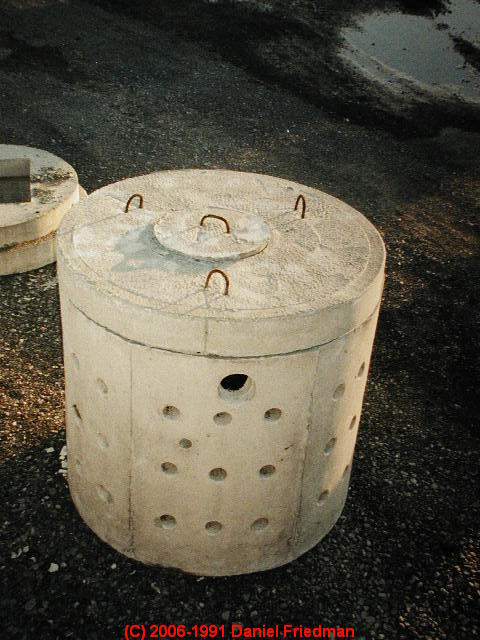
A drywell, or "seepage pit" is used at some building sites to receive "gray water" from a laundry, sink, or shower. The pit may be site-built of stone or dry-laid concrete block, rubble-filled, or constructed of (safer) pre-cast concrete.
Modern drywells may also be sold as pre-designed units constructed of fiberglass or plastic. A drywell design may be similar to that of a cesspool, but only gray-water and not sewage is discharged into a drywell.
The hole or absorption pit is typically 6-8 feet deep and 4-10 feet square (or round) depending on the amount of drainage to be handled and the percolation rate of the soil.
Some drywells were filled with large rubble. A top of concrete or stone slab is used to keep surface water and children out of the opening, and is usually covered and graded to be invisible in the yard.
Older covers of wood or steel may be very unsafe and present a child or adult hazard, possibly including the risk of fatality. Mark off, prevent access to, and investigate such systems immediately.
What's the difference between a seepage pit or drywell and a cesspool?
The term "drywell" or "seepage pit" might be used by some people to describe a simple pit for disposing of septic effluent.
Note that I said effluent not sewage. By contrast, a cesspool holds both solid waste and septic effluent. I use the term "seepage pit" to refer to a pit used to dispose of septic effluent which originated as blackwater, the solids having been retained in the septic tank.
I use the term "drywell" to refer to a pit used to dispose of graywater (greywater) which originated in sinks, laundry facilities, or showers. While their uses and implications of their presence at a property are quite different, the actual construction details of a seepage pit or a drywell are about the same. Let's sum up the use of these terms being rather particular:
Definition of Drywell: a hole in the ground intended to receive graywater from sinks, showers, or even roof or surface runoff. It may be site-built using stone or concrete block, or it may be constructed of pre-cast concrete buried in a pit and surrounded by gravel to increase its capacity.
Definition of Seepage pit: a hole in the ground intended to receive septic effluent such as the outlet from a septic tank.
Seepage pits may be permitted where site space or soil conditions do not permit a conventional leach field.
However even if effluent is successfully "disposed-of" it is probably not being adequately treated if it's coming out of a conventional septic tank. A Seepage pit might be constructed just as the drywell above but it is likely to require different (larger) site clearance requirements.
Definition of Cesspool: a hole in the ground intended to receive sewage or blackwater from a building. The cesspool may also receive graywater, or in order to reduce the loading of the cesspool, some buildings may direct their graywater to a separate drywell. The cesspool might be constructed just as the two systems above but may have different site clearance requirements.
Why are drywells installed?
A drywell is used at a property typically for these reasons
To relieve the liquid load on an onsite waste disposal septic system leach field, particularly in an area where the leach field is in trouble, at or near the end of its life, or has very limited capacity to dispose of effluent
To receive gray water from a building plumbing fixture (laundry or sink) which has been installed at a location so remote from the main house drain (to the septic system) that it is more convenient to construct a separate, nearby outside facility to receive this graywater than to route an indoor or outdoor buried rain to the existing septic system.
(Readers are invited to send additional suggestions)
Tips for Extending Drywell Life
Some experts recommend installing a filter on water entering the drywell. Particularly for a drywell used to receive water from a clothes washing machine, installing a lint filter between the washing machine and the drywell can extend the life of the drywell by reducing the moment of soil-clogging particles of lint and debris into the system.
Intermittent dosing systems such as are used for some alternative septic system designs, can also be adapted to graywater systems. In simple terms, this means that multiple drywells are used, and graywater is routed intermittently among them, giving the unused drywell time to recover.
A simple valve system on the graywater drain line can serve to route greywater (graywater) to alternating drywells.
Cesspools for more in-depth information about those systems.
Using Drywells & Catch Basins for Basement Waterproofing
Reader Question: The drywell at my new home stays full of water and my house floods: who is responsible for the repair?
I bought a new construction home in Staten Island, NY. Unfortunately my garage and side apartment have flooded twice last month due to the heavy rainfall.
The gutter downspouts and sump pump are being led to the drywell however it is overflowing at all times and is not taking on any new water.
Even the catch basin is filled with water and will never completely drain into the drywell. to temporarily try to resolve this issue I have removed all downspouts and sump pumps out of drywell and are now draining onto my property which inevitably is flooding but better outside my home than in my home.
It is new construction and I am basically looking for a little advice on whether this is a structural defect and builder should be responsible for this or is it going to fall on me and how can this be properly fixed. - M.N. Staten Island, NY
Reply: For your site the drywell may have never been a workable solution to handling runoff; real estate attorney should review your contract of sale and advise about the new home warranty law
Was the Drywell a Usable Solution for your Building Site?
we express the view that in some areas of high water table and wet soils, a drywell is not likely to be a useful means of collecting and disposing of surface or roof runoff in wet weather. That's because in those areas the "drywell" is in fact wet, or flooded, or at least partially flooded seasonally if not all year long.
From your description it sounds as if one or more of these problems underlies the flooding problem in your new home
The site is one that has a high water table, keeping the drywell flooded - this seems most likely from your description.
The drywell was improperly constructed, too small, or lacking proper site preparation, for example by setting a pre-cast drywell into a pit without adequate pit size or adequate gravel
Groundwater, surface runoff, or roof runoff directed into the drywell are of much larger volume than anticipated.
Who is Responsible for Groundwater, Roof Runoff, or Flooding in a New Home
 This question is an ugly morass that is unfortunately all too common in new construction projects, and it is one that needs assistance from an attorney expert in real estate law and familiar with local building codes in your neighborhood.
Our photo ( left) shows a combination that is a near guarantee of a flooded basement: the builder constructed the deck before final site grading, leaving in-slope grade and a virtual pool under the deck and draining towards the home. And gutter improprieties send water running down the house wall during rain.
In general one would expect that proper construction of a new home would include taking whatever means were necessary to protect the home interior from water entry.
And one would wish that initial site investigation (for questions such as where is the water table?) and building code approval would have reviewed any special water or drainage requirements that the builder needed to meet.
Some new home construction contracts excuse the builder from certain home waterproofing steps, explicitly or implicitly leaving those responsibilities up to the homeowner. And unfortunately some new homeowners are unaware that those additional steps are not optional if the home is to be protected from flooding.
When the home floods at the first rain, or when it floods three years later after footing drains have become clogged with silt, the owner and builder end up in a finger-pointing contest that might have originated in the these two basic questions, even if other site water problems are absent:
- No gutter system? A common example of ambiguity that leads to home flooding that we encounter is the omission from the construction contract of any provision for roof drainage management: gutters and leaders.
The builder leaves that "detail" up to the homeowner and may even excuse themselves from responsibility for future home flooding if that detail is not addressed by the owner. And it's fair to say that it is a homeowner responsibility to keep the gutters and downspouts clean and working. - Poor final site work? A second common source of new house flooding that crops up is a new home contract that is unclear about what constitutes rough grading versus final landscaping. The builder accepts responsibility for "rough grading" and explicitly leaves "landscaping" to the new owner.
But the new owner and the builder may have different ideas about what those terms mean. A builder might leave the ground around the building very uneven, with local low areas or even in-slope grade that drains towards the building, while the buyer thought that they'd have a properly sloped and graded lawn that just needed a sprinkling of grass seed to be complete.
When a new home site combines both problems 1 and 2 above, there is a very high risk of basement or crawl space water entry and ultimately flooding. Just how quickly flooding appears depends further on other site conditions:
- Area water table level
- Local groundwater
- Degree to which surface runoff is directed onto this particular building site
- Adequacy of foundation drainage or even, as we find at some homes, its complete omission
- The overall terrain shape: is the home in a low spot or depression or at the bottom of a hill? Is the entire area dead flat with no place to send runoff? Is there a storm drain system into which surface and subsurface runoff may be directed?
Some possible solutions to the Flooded Drywell Problem

Your question does not include information about your neighborhood and site nor specifics about the home. But it may be useful to start by asking:
- Does an inspection of the drywell show that it is properly constructed?
- Is there a storm drain system into which the flooding drywell can be pumped? If so, is that pumping permitted in your municipality?
- Exactly where and how is water entering to flood the home?
- Is there a working roof drainage system that directs roof spillage well away from the home? Gutters and downspouts might be installed but not working properly, or a mistake like using perforated downspout extensions might be sending water back to the foundation.
- Do other homes in the immediate neighborhood also have flooding problems? If not, what's different in the dry homes?
- Interior basement de-watering system (photo at left) ? This last resort, if not properly installed, could still leave excessive interior moisture and contribute to a mold contamination problem.
For details about diagnosing and curing building flooding and water entry,
see WATER ENTRY in BUILDINGS
Question: what sort of system do I need to dispose of wastewater from a Laundromat?
I would like to ask you a few questions about opening a Laundromat and the proper septic and leave field dimensions needed.
We don't have sewage here. Our small town is based on old school cesspool and septic.
Can use a big enough septic tank and proper leach field to run a coin operated laundry mat? The laundry mat will be 40x50 with 20-24 washers.
We have a 14 acre lot. How much property do I need to designate for leach and what size septic tank(s).
Your help will be appreciated. - Anonymous by private email 2017/12/09
Reply:
You will want to discuss your plan with your local building or health department.
I'm not sure but this link might help you if where you live in Hawaii is in Maui county - https://www.mauicounty.gov/121/Planning-Department
It is unlikely that a conventional septic tank and drainfield can support the volume of wastewater generated by a laundromat. In addition, because laundry wastewater is highly contaminated with detergents, phosphates, and other chemicals, a conventional soil absorption system is probably inadequate and risks contaminating your local environment.
For example, see SEPTIC DRAINFIELD SIZE
There you'll see that to dispose of 900 gallons per day, with the best soil percolation rate of 1-5 minutes per inch, you would need almost 400 feet of drainfield trench.
Watch out: Even then, a conventional septic tank and drainfield are not designed to handle high levels of detergents, VOCs, phosphates and other contaminants in laundry wastewater.
Nor is it likely that you can simply dispose of laundry water and detergents directly into the ground (such as via a drywell or seepage pit).
More likely you'll need some sort of on-site mini-wastewater treatment plant.
There are, in fact, specially-designed wastewater treatment and wastewater recycling plants designed specifically to handle laundry wastewater.
Examples of Turnkey Onsite Laundry Wastewater Treatment Systems
There are many laundry wastewater treatment and recycling system designs and manufacturers.
It may be that none of these is quite what you need, and I'm certainly not suggesting you think about purchasing one of these systems before further and more-expert consulting, but a review of these laundry wastewater handling systems and their capacities and costs should be helpful for your own planning.
Beckart and probably all of the vendors I list below will offer initial consulting to help you understand your requirements, how you might handle, process, recycle or dispose of the wastewater your laundromat will generate, and what designs and costs might be suitable for your situation.
The best bet for you might be a modular approach system such as the moving bed biofilm reactor (MBBR) sold by biporocessH20 that can be tailored to your anticipated laundry load and thus wastewater volume.
- AZU Water Laundry Wastewater Treatment Plant - https://www.azuwater.com/solution/laundry-wastewater-treatment-plant/ (Italy, Germany, Croatia)
- Beckart Environmental, "Industrial Laundry Wastewater Treatment Solutions for Facilities Worldwide", Tel: 1-262-656-7680, Website: http://www.beckart.com/industrial-laundry-wastewater-treatment.php
- BioprocessH2O, 45 Highpoint Avenue Portsmouth, RI 02871 USA, Tel: 401-375-96676, Moving Bed Biofilm Reactor (MBBR) http://www.bioprocessh2o.com/mbbr?gclid=Cj0KCQiAsK7RBRDzARIsAM2pTZ9Vrb48oI4Pl5ltvBmZazrxJE21w_lv3tQVDVhwjaEzaPPcfqo6TUQaAkwrEALw_wcB
This company offers a free downloadable e-book that might be useful to you:
Does Your Process Water Meet Your Company’s Needs? [PDF] discusses Moving Bed Biofilm Reactor (MBBR) - M.W. Watermark, LLC., Laundry Wastewater Recycling Technology, 4660 136th Ave, Holland, MI 49424-9452 USA, Tel: (616) 399-8850 Website: http://www.mwwatermark.com/
Website excerpt:
... we manufacture top-quality clarifiers, filter presses, and filter press parts that have been engineered to treat wastewater with varying degrees of lint, sand and grit, emulsified oils and greases, volatile organic compounds (VOC’s), and any other unwanted waste found in industrial laundries.
... Clarifiers and filter presses are two commonly used mechanisms for treating industrial laundry wastewater and can help you save money. Often, when recycled water is reused, it is preheated. Energy costs could be reduced as much as 50% because the industrial washer does not have to work as hard to heat up the recycled water.
Water and sewage bills will also see a reduction with our system, which recycles about 85% of the washing machine’s total water intake. Our clients see approximately 80% reduction in water and sewage costs. - Veolia - http://www.veoliawatertech.com/news-resources/datasheets/laundry-water-treatment.htm
Watch out: Do not enter into a contract to buy any such system before you have
- checked with your local authorities about what regulations apply, and what sorts of treatment systems they will accept
- probably have checked with a septic design engineer who can help you work out your requirements by looking at the anticipated daily wastewater volume that will be produced by your equipment operating at peak, the size of your site, and local regulations
Below I give what is probably two ends of the spectrum of what you need to consider. Your laundromat wastewater will surely be much larget than an individual one-family home would generate but it is also probably smaller than the industrial laundry wastewater handling discussed by the second EPA publication I'll provide.
Residential Laundry Water Management - U.S. EPA
WATER EFFICIENCY MANAGEMENT GUIDE RESIDENTIAL KITCHEN AND LAUNDRY [PDF], retrieved 2017/12/09, original source: https://www.epa.gov/sites/production/files/2017-10/documents/ws-commercialbuildings-waterscore-residential-kitchen-laundry-guide.pdf
This document is focused on reducing water usage volume - a step that in turn reduces wastewater volume that your laundromat will have to handle.
Industrial Laundries Wastewater Discharges - U.S. EPA
The US EPA was developing guidelines for just situations like yours but has stepped back from regulating laundry discharge. Here's that information. Be sure to download and take a look at the PDF file I'll cite below.
Really?: it is likely that the total wastewater volume from your laundromat serving a small community will be much smaller, thus it is more-likley that a suitable laundry wastewater treatment system can be designed and built affordably.
EPA published a proposed rule in 1997 comprising pretreatmentHelppretreatmentThe reduction of the amount of pollutants, the elimination of pollutants, or the alteration of the nature of pollutant properties in wastewater before or in lieu of discharging, or otherwise introducing, such pollutants into a POTW. [paraphrased from 40 CFR 403.3(s)] standards for industrial laundries.
It withdrew the proposal in 1999. The Agency determined that indirect discharges from industrial laundries did not warrant national regulation because:
- the cost to remove the small amount of pollutants required by the proposal would not have been affordable by the industry
- POTWs were generally not experiencing problems from industrial laundry discharges
- to the extent that isolated problem discharges occur, existing pretreatment authority allows local POTWs to respond to problems effectively (see Pretreatment Program).
The Technical Development Document, published concurrently with the withdrawal notice, provides technology performance data that can be used by control authorities to develop local limits Helplocal limits Specific discharge limits developed and enforced by POTWs upon industrial or commercial facilities (IUs) to implement the general and specific discharge prohibitions listed in 40 CFR 403.5(a)(1) and (b). [40 CFR 403.5(c)] for individual laundry facilities on a best professional judgement (BPJ) basis. - retrieved 2017/12/09, original source: https://www.epa.gov/eg/industrial-laundries-wastewater-discharges
Technical Development Document for the Final Action Regarding PRETREATMENT STANDARDS FOR THE INDUSTRIAL LAUNDRIES POINT SOURCE CATEGORY (Revised March 2000) [PDF] retrieved 2017/12/09, original source: https://www.epa.gov/sites/production/files/2015-11/documents/industrial_laundries_tdd_2000.pdf
This US EPA document might also be of some help though it's old: Treatment of Laundromat Wastes, US EPA (1973) but I'm having trouble finding a copy.
Drywell Construction Codes
- NEW JERSEY DRY WELL REGULATIONS 9.3 (stormwater) [PDF]
- NEW JERSEY DRYWELL STANDARD 9.3 [PDF] retrieved 2017/05/30, original source: http://www.nj.gov/dep/stormwater/bmp_manual/NJ_SWBMP_9.3%20print.pdf
- See a complete list at GREYWATER CODES & REGULATIONS
Reader Comments, Questions & Answers About The Article Above
Below you will find questions and answers previously posted on this page at its page bottom reader comment box.
Reader Q&A - also see RECOMMENDED ARTICLES & FAQs
On 2021-08-29 by Old Home - plan to fill in old abandoned drywell
 @inspectapedia.com.moderator, Thanks again! Problem solved!
I had a couple more pics I had trouble posting but you got the idea. No way of knowing now if holes in the bottom was done.
I will fill to the top. Depending on what I find with the septic tank I may even have it removed. Future plans "may" include an addition and I don't need those lucking under new structure. I will post the plumbing questions about bad Iron pipes, etc in the correct area.
On 2021-08-29 by inspectapedia.com.moderator (mod)
@Old Home,
Thanks for those added photos; I suspect that when this drywell or whatever it was was abandoned, the worker tossed in rubble and sand but didn't try to punch drain holes in the bottom of the concrete "tank";
It's possible that the original fill settled - explaining why you see some space at the top.
I'd fill this in to the top to minimize water and potential mosquito or similar issues.
Yes about plumbing questions it's best to search the site to find a most-appropriate page for such postings as that may invite useful comment from other readers on that topic.
You can post one image per comment, but of course as many comments and thus photos as you need.
Files in typical image formats such as .bmp .jpg .gif .img .tiff will post.
Other file formats like .pdf or documents won't post.
@Old Home,
and other readers
This discussion continues at
CAST IRON DRAIN PIPING
On 2021-08-29 by Anonymous
@Old Home, Sorry it would only let me post one pic at a time
@inspectapedia.com.moderator, Thanks. I will include a few photos of the tank and one of the new found plumbing nightmare. First, tank wise I am convinced it probably was a grey water tank and overflowed the the septic.
It appears sometime in the past over 20 yrs ago the kitchen and washer DID drain into the 5x5 tank. Pictures show a crude attempt at transitioning from the 2" cast pipe to the 4" clay pipe by pouring concrete around the two.
Well mostly anyway, I can see a saddle impression in the concrete where the 2" used to sit. I should be surprised but given the history of things i have found in the past, I'm not.
It's now abandoned and properly filled so unless you have ideas otherwise I'm moving on to the pending plumbing issues. Can or should i post them here or move the the Plumbing tab?
On 2021-08-29 by inspectapedia.com.moderator (mod)
@Old Home,
We look forward to reading what you find and to seeing some photos of the "tank" and piping. That will be helpful to other readers and might also permit more-useful comment.
A drywell, or "seepage pit" is used at some building sites to receive "gray water" from a laundry, sink, or shower.
The pit may be site-built of stone or dry-laid concrete block, rubble-filled, or constructed of (safer) pre-cast concrete. Design may be similar to that of a cesspool, described above, but only gray-water and not sewage is discharged into a drywell.
- Safety: the same concerns for collapse hazards apply as were described above for cesspools.
- Limited septic system capacity is implied by the presence of a drywell. Wet soil conditions or limited space
for a functioning drain field (for the septic system) often leads property owners to reduce the liquid load on
the septic system by routing gray water to a separate drywell.
Where such a system is installed owners/buyers should be alert for these conditions and should expect to face extra costs for system maintenance and repair as well as limited septic system capacity. - An exception to the warning above: at a large building where a sink or laundry are added in an area distant from piping connected to the septic system, an owner may add a remote drywell as an alternative to inconvenient and costly routing of a drain line from the laundry to the existing septic system.
DRYWELL DESIGN & USES in many areas are a misnomer since during wet weather as water tables rise, the "drywell" is not very dry and in fact may fill up with water and simply stop working.
In wet areas of the Northeastern U.S., for example, I disagree with the practice of "solving" a roof drainage disposal problem at a flat site by building a "drywell" since in my experience these fail rather soon and in some cases even fill up and work backwards, sending water back to a building footing drain or roof drainage system where water then leaks into the building!
On 2021-08-29 by Old Home
@inspectapedia.com.moderator, Thank you very much for your quick response.
This property is basically flat and high ground. Nothing is uphill close by, in fact the city sewer line is over 100 away and down a slow gentle slope maybe 3-5 feet lower than the house. Since the 5x5 tank was filled I don't know if it ever had bottom plumbing or is solid.
Found no evidence of a prior pump or any irrigation plumbing. Could it have been a temp hold tank of rain/grey water that gravity flowed on to the septic once it reached the level of the 4" clay pipe close to the top?
Still have no idea of the function the two 4" clay pipes pointing toward the house. I have found no other tanks or evidence there ever was any other than the septic tank. The septic outline suggests its a rectangle maybe 4x10 or 12 and about 12-18 down. Since I am on the city sewer I've never had a need to open it or inspect it so I don't know if was backfilled as well.
I am going to dig further to see what is between my broken 2" cast iron pipe (washer drain) and the 5x5 tank in question to see if they even connected in the past. It's not a great distance between them so I may have additional info once I expose it all. I take pictures for future reference and to document repairs and updates to old systems, especially buried pipes and lines.
On 2021-08-28 by inspectapedia.com.moderator (mod) - identify old drywell & cast iron drains in poor condition
@Old Home,
1. What is/was that 5x5 tank? drywell?
- IF the concrete "tank" has openings in its sides and bottom then it could have worked as a local drywell, for uses we describe on this page.
- IF the "tank" is solid then it was designed to be a container -
possibilities include as a pumping chamber for sewage being sent to an uphill tank or disposal system or for sending graywater somewhere, like to an irrigation system or a true drywell elsewhere
From your description this may have been a pumping chamber (as it's solid) that previously received graywater for movement to somewhere else for disposal.
The fact that it was filled with debris and sand tells us someone intended to abandon it safely; with leaks and standing water it becomes a health hazard.
3. The two pipes (houseside) in the 5x5 tanks are way too big (4 inch) to connect to anything in the house. What are they? They go nowhere out side the tank.
So now are there multiple ft tanks? All solid, containing water?
5. Have you ever heard of a system designed this way?
Yes as I describe above: small tank-receptacles might receive graywater or even sewage, then equipped with the proper type of pump they move it onwards to an uphill or more-distant disposal system, even to a sewer line.
On 2021-08-28 by Old Home
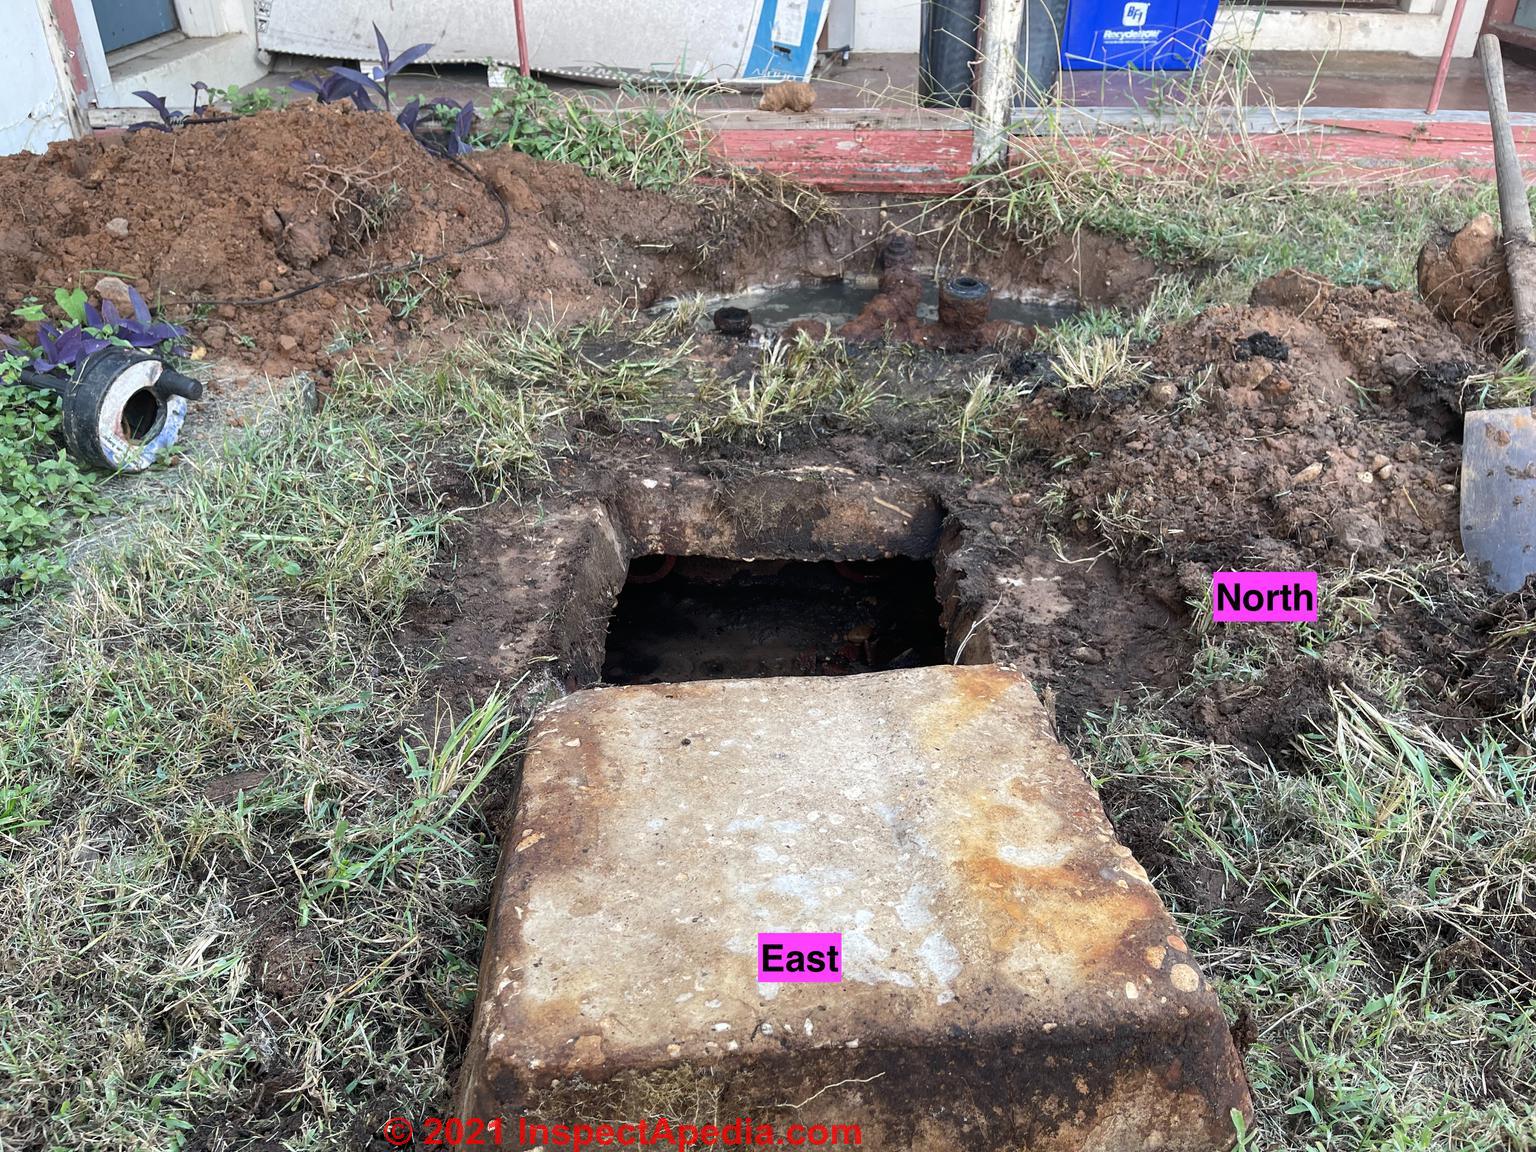
Seeking information. I have a home built in the late 40s early 50s. I have a small (maybe 5x5 square) concrete tank close to the house. Figured it was a cistern or holding tank but has no way to extract the water. It is in an area that had high water run off from the roof so it could have collected plenty of water in its day. The square cover has a small area chipped out on one corner so it became a mosquito breeding ground.
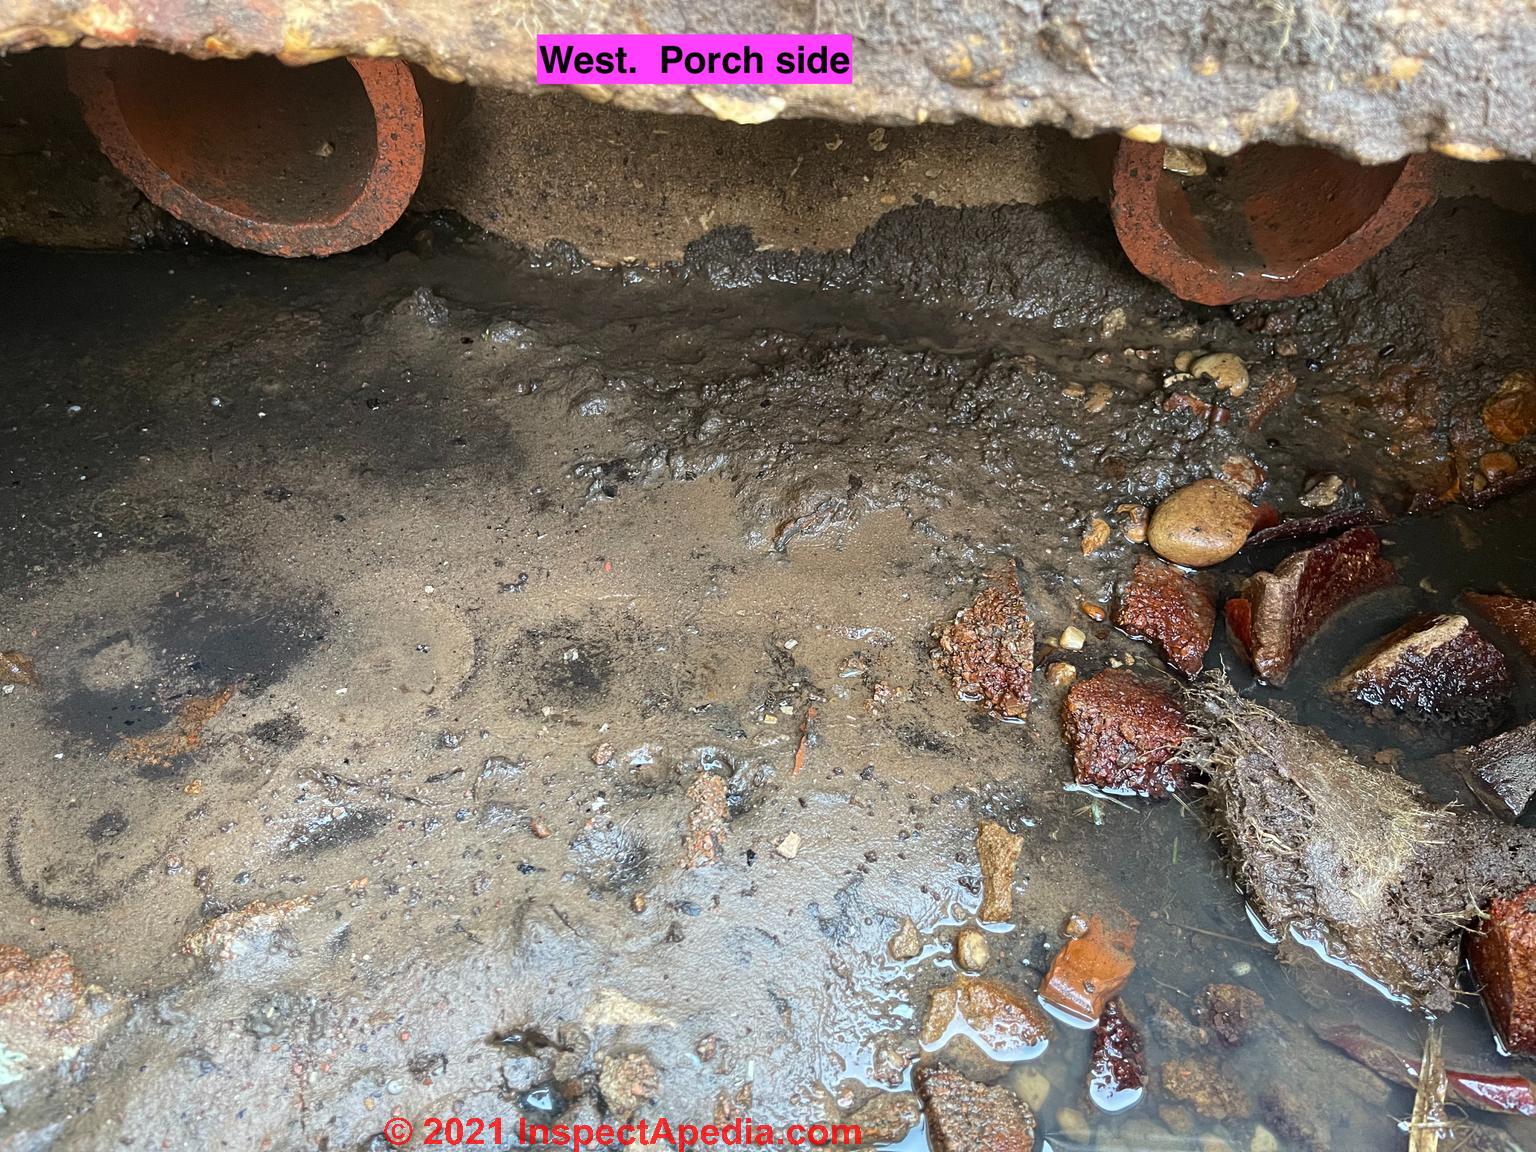
So it has water in it and now I'm curious. I pull the cover and someone had filled it with concrete brick debris and sand to a few inches below the the three 4" clay pipes right below the top. It had no visible waste in it and no septic smells.
Not dry but no standing water at that time. Two pipes point towards the house and one towards an old abandoned septic tank (can see its outline in the grass when it's very dry out). I know the house was put on city services at some point and the septic abandoned. How do I know? That's another story but I am sure. Or so I thought until one day I see soapy water bubbling (washing machine) from the ground between the house and the 5x5 tank.
I dig and find an old cleanout cap rusted and popped off of some cast 2" pipe. So I dig more thinking it went to that tank. NO! Goes right past it towards my city sewer pipes. Now I have about 50' of old cast pipe to replace. Joys of an old home. My laundry and kitchen are far away from the bathrooms and its just 2" pipe they must carry only grey water to the sewer. My questions are:
1. What is/was that 5x5 tank? drywell?
2. At one time did it maybe collect the grey water from the washer and sink? I see no evidence of a 2" to 4" pipe transition.
3. The two pipes (houseside) in the 5x5 tanks are way too big (4 inch) to connect to anything in the house. What are they? They go nowhere out side the tank.
4. Maybe it overflowed to the old septic tank at one time out the third pipe?
5. Have you ever heard of a system designed this way?
My plan is to replace as much cast and clay pipe as possible, backfill all the tanks and ensure all waste water goes to the city connection. I have zero idea where a leach field would have been on the property. But I am now curious and can't figure out that one 5X5 tank. Also plumbing in the 50s can be a head scratcher trying to figure out why something was done the way it is. Hope I explained it adequately.
On 2021-05-26
by (mod)
- what is the correct depth of wastewater I should see in the "drywell" or "seepage pit" or "cesspool"?
 @Stan,
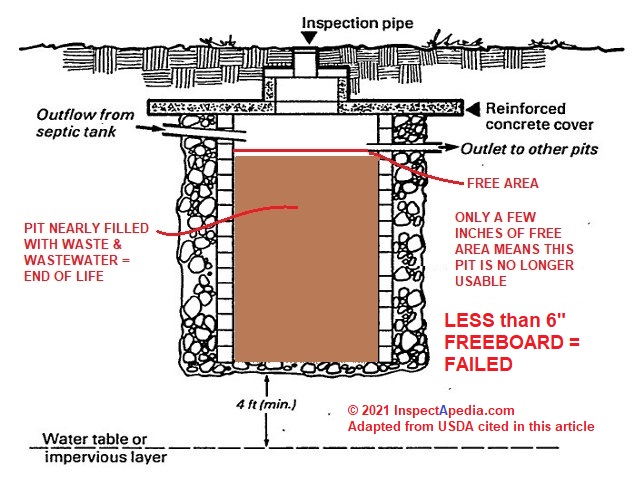
Once the wastewater level is near the bottom of the inlet into your seepage pit that pit is no longer working - and will need replacement or a new pit will be installed downstream from the present one;
Take a look at CESSPOOL FAILURE CRITERIA where you'll see that the standard definition is:
Failed seepage pit is defined as less than 6" of freeboard (space between top of the wastewater and bottom of the seepage pit outlet pipe or if there is no outlet, bottom of the inlet pipe)
for a discussion of at what depth the system is considered "in failure" that applies to all three types of pits: drywell (graywater only), seepage pits (septic tank effluent disposal), and cesspools (sewage disposal)
More details are at SEEPAGE PITS
On 2021-05-26 by Stan
What dept of gray water should be in a 2 drywell septic system ? our waste water runs to septic than Lucius runs to / dry wells ....
[re-posted by moderator to overcome a bad link handling by Comments Box]
On 2020-09-18 by Anonymous
This is an unusual septic design Clarissa, perhaps one that evolved over time as early components failed.
Anyway, if you have a SAFE way to see inside the septic tank(s) and pumping chamber, you should see water flow into the tank and system when a toilet is flushed; that'll tell you that it's working.
On 2020-09-18 by Clarissa
I have a really old septic system. The front yard has two 500 gallon Concrete tanks. Then a pipe from those goes to what I think is a dry well or seepage pit under my driveway per heath department drawings. Then a pipe I figure from that pot goes to a sump pump tank in my side yard.
Then that tank pumps water to a distribution tank that has leach lines in it going to the back yard under ground.
My question is the sump pump tank has always had water in it and actively pumping water when needed. This year it has been pretty dry and around aug I took in the tank and barely any water is in there. I prob check that tank weekly since
I have lived there and it has always had normal amount of water. Now it has maybe 2 inches. Not enough to reach the float on the pump.A professional said that my seepage pit or dry well is working and absorbing all the grey water. Does that make sense?
Would it all of a sudden start absorbing all the water.. I have no backups with the septic. And no ponding around anything...
On 2020-03-26 - by (mod) -
Thank you for the interesting rice-cooker-septic-tank analysis, Samson.
Readers should keep in mind that both drywells and cesspools (see links above) do not, unfortunately, ever adequately treat septic wastewater or pathogens because of the depth into the soil at which effluent is dispersed.
It's important to distinguish successful "disposal" [i.e. we got rid of our wastewater]
from successful "treatment" [i.e. our wastewater was adequately treated by soil or other bacteria so that we are not discharging pathogens, germs, viruses, into the local environment and possibly into our own drinking water]
On 2020-03-26 by Samson
We can take the whole electric rice cooker as the model of dry septic tank.
Rice cooking pot act as a sink the water or drainage. It has holes to drain the water . There is a empty space under this pot to drain the water. The water is absorbed by the surrounded earth.
Electric cooker is a place to keep the septic tank safe . We can remove the tank safely from it and keep it again to refill. It also has holes . Through the holes the water absorbs by the earth .
On 2018-05-08 - by (mod) -
Thank you for your very nice note. Means a lot.
I agree that the best approach is to completely fill in the old cesspool which of course will eliminate any falling in Hazard.
On 2018-05-08 by Raul
I appreciate you. It has 1 - 4" ceramic pipe and 2 - 2 1/2 steel pipe that enter into this cesspool. Reading the Safety advisories I feel pretty fortunate not to have suffered the "ugly death." While tilling on the property, as I was shoveling, my shovel dropped 2' and out of my hands. Curiosities of course wanted to dig in further.
But... After reading both the property owner and me agree to toss a penny for luck re-pack it, better cover and build a mock well over it. Thanks for being there you may have saved a life.
SINCERELY,
RAUL RUIZ JR
...
Continue reading at DRYWELL SAFETY CONCERNS or select a topic from the closely-related articles below, or see the complete ARTICLE INDEX.
Or see DRYWELL DESIGN & USE FAQs - questions & answers about drywells posted originally here.
Or see these
Recommended Articles
- CESSPOOLS
- CESSPOOL FAILURE CRITERIA
- CESSPOOL AGE ESTIMATES
- CESSPOOL SAFETY WARNINGS
- CISTERNS, WATER STORAGE
- DRYWELL DESIGN & USES
- DRYWELL SAFETY CONCERNS
- DRYWELLS ARE THEY ACTUALLY DRY?
- DRYWELL / SEEPAGE PIT SPECIFICATIONS
- DRYWELL / SEEPAGE PIT CONSTRUCTION DETAILS
- DRYWELL / SEEPAGE PIT COLLAPSE or FAILURE
- GREYWATER SYSTEMS
- SEEPAGE PITS
- SEPTIC TANKS - home
Suggested citation for this web page
DRYWELL DESIGN & USES at InspectApedia.com - online encyclopedia of building & environmental inspection, testing, diagnosis, repair, & problem prevention advice.
Or see this
INDEX to RELATED ARTICLES: ARTICLE INDEX to SEPTIC SYSTEMS
Or use the SEARCH BOX found below to Ask a Question or Search InspectApedia
Ask a Question or Search InspectApedia
Try the search box just below, or if you prefer, post a question or comment in the Comments box below and we will respond promptly.
Search the InspectApedia website
Note: appearance of your Comment below may be delayed: if your comment contains an image, photograph, web link, or text that looks to the software as if it might be a web link, your posting will appear after it has been approved by a moderator. Apologies for the delay.
Only one image can be added per comment but you can post as many comments, and therefore images, as you like.
You will not receive a notification when a response to your question has been posted.
Please bookmark this page to make it easy for you to check back for our response.
Our Comment Box is provided by Countable Web Productions countable.ca
Citations & References
In addition to any citations in the article above, a full list is available on request.
- New York State Department of Health, APPENDIX 75-A WASTEWATER TREATMENT STANDARDS - INDIVIDUAL HOUSEHOLD SYSTEMS , [PDF] New York State Department of Health, 3 February 2010, retrieved 3/1/2010, original source: https://www.health.ny.gov/regulations/nycrr/title_10/part_75/appendix_75-a.htm
- Biomat Formation in the Septic System Drainfield Absorption System - what leads to drain field clogging and expensive drainfield repairs
- TOILETS, DON'T FLUSH LIST these things into a septic system: a list of what's ok and what's not ok to put into septic tanks and building drains
- [1] Pennsylvania State Fact Sheets relating to domestic wastewater treatment systems include
- Pennsylvania State Wastewater Treatment Fact Sheet SW-161, Septic System Failure: Diagnosis and Treatment
- Pennsylvania State Wastewater Treatment Fact Sheet SW-162, The Soil Media and the Percolation Test
- Pennsylvania State Wastewater Treatment Fact Sheet SW-l64, Mound Systems for Wastewater Treatment
- Pennsylvania State Wastewater Treatment Fact Sheet SW-165, Septic Tank-Soil Absorption Systems
- Document Sources used for this web page include but are not limited to: Agricultural Fact Sheet #SW-161 "Septic Tank Pumping," by Paul D. Robillard and Kelli S. Martin. Penn State College of Agriculture - Cooperative Extension, edited and annotated by Dan Friedman (Thanks: to Bob Mackey for proofreading the original source material.)
- Septic Tank/Soil-Absorption Systems: How to Operate & Maintain [PDF ] - , Equipment Tips, U.S. Department of Agriculture, 8271 1302, 7100 Engineering, 2300 Recreation, September 1982, web search 08/28/2010, original source: http://www.fs.fed.us/t-d/pubs/pdfimage/82711302.pdf.
- [3] "How to Maintain Your Septic System", Alaska Department of Environmental Conservation, Division of Water, retrieved 8/8/12, original source: http://dec.alaska.gov/water/wwdp/onsite/maintain_septic.htm [copy on file as Alaska_Septic_Care.pdf]
- [4] Installers Manual for Conventional Onsite Domestic Wastewater Treatment and Disposal Systems", Alaska Department of Environmental Conservation, Division of Water, retrieved 1/15/2001, original source: [copy on file as Alaska_Certified_Installer's_Manual.pdf]
- [5] Percolation Testing Manual, CNMI Division of Environmental Quality, PO Box 501304, Saipan, MP 96950
- Septic System Owner's Manual, Lloyd Kahn, Blair Allen, Julie Jones, Shelter Publications, 2000 $14.95 U.S. - easy to understand, well illustrated, one of the best practical references around on septic design basics including some advanced systems; a little short on safety and maintenance. Both new and used (low priced copies are available, and we think the authors are working on an updated edition--DF. Quoting from one of several Amazon reviews: The basics of septic systems, from underground systems and failures to what the owner can do to promote and maintain a healthy system, is revealed in an excellent guide essential for any who reside on a septic system. Rural residents receive a primer on not only the basics; but how to conduct period inspections and what to do when things go wrong. History also figures into the fine coverage.
- US EPA ONSITE WASTEWATER TREATMENT SYSTEMS MANUAL [online copy, free] Top Reference: US EPA's Design Manual for Onsite Wastewater Treatment and Disposal, 1980, available from the US EPA, the US GPO Superintendent of Documents (Pueblo CO), and from the National Small Flows Clearinghouse. Original source http://www.epa.gov/ORD/NRMRL/Pubs/625R00008/625R00008.htm Onsite wastewater treatment and disposal systems, Richard J Otis, published by the US EPA. Although it's more than 20 years old, this book remains a useful reference for septic system designers. U.S. Environmental Protection Agency, Office of Water Program Operations; Office of Research and Development, Municipal Environmental Research Laboratory; (1980)
- "International Private Sewage Disposal Code," 1995, BOCA-708-799-2300, ICBO-310-699-0541, SBCCI 205-591-1853, available from those code associations.
- "Manual of Policy, Procedures, and Guidelines for Onsite Sewage Systems," Ontario Reg. 374/81, Part VII of the Environmental Protection Act (Canada), ISBN 0-7743-7303-2, Ministry of the Environment,135 St. Clair Ave. West, Toronto Ontario M4V 1P5 Canada $24. CDN.
- Manual of Septic Tank Practice, US Public Health Service's 1959.
- Onsite Wastewater Disposal, R. J. Perkins; Quoting from Amazon: This practical book, co-published with the National Environmental Health Association, describes the step-by-step procedures needed to avoid common pitfalls in septic system technology. Valuable in matching the septic system to the site-specific conditions, this useful book will help you install a reliable system in both suitable and difficult environments. Septic tank installers, planners, state and local regulators, civil and sanitary engineers, consulting engineers, architects, homeowners, academics, and land developers will find this publication valuable.
- Onsite Wastewater Treatment Systems, Bennette D. Burks, Mary Margaret Minnis, Hogarth House 1994 - one of the best septic system books around, suffering a bit from small fonts and a weak index. While it contains some material more technical than needed by homeowners, Burks/Minnis book on onsite wastewater treatment systems a very useful reference for both property owners and septic system designers.
- Septic Tank/Soil-Absorption Systems: How to Operate & Maintain, Equipment Tips, U.S. Department of Agriculture, 8271 1302, 7100 Engineering, 2300 Recreation, September 1982, web search 08/28/2010, original source: http://www.fs.fed.us/t-d/pubs/pdfimage/82711302.pdf
- Planting Over Septic System Component", Daniel Friedman (author/editor, InspectAPedia.com), The Innovator, Winter/Spring 2008, BCOSSA, British Columbia OnSite Sewage Association, 201-3542 Blansard St., Victoria BC V8X 1W3 Canada
- Save the Septic System - Do Not Flush These Items Down the Toilet, Daniel Friedman, InspectAPedia.com - PDF document, printable
- Septic System Owner's Manual, Lloyd Kahn, Blair Allen, Julie Jones, Shelter Publications, 2000 $14.95 U.S. - easy to understand, well illustrated, one of the best practical references around on septic design basics including some advanced systems; a little short on safety and maintenance. Both new and used (low priced copies are available, and we think the authors are working on an updated edition--DF. Quoting from one of several Amazon reviews: The basics of septic systems, from underground systems and failures to what the owner can do to promote and maintain a healthy system, is revealed in an excellent guide essential for any who reside on a septic system. Rural residents receive a primer on not only the basics; but how to conduct period inspections and what to do when things go wrong. History also figures into the fine coverage.
- US EPA ONSITE WASTEWATER TREATMENT SYSTEMS MANUAL Top Reference: US EPA's Design Manual for Onsite Wastewater Treatment and Disposal, 1980, available from the US EPA, the US GPO Superintendent of Documents (Pueblo CO), and from the National Small Flows Clearinghouse. Original source http://www.epa.gov/ORD/NRMRL/Pubs/625R00008/625R00008.htm
- Water Wells and Septic Systems Handbook, R. Dodge Woodson. This book is in the upper price range, but is worth the cost for serious septic installers and designers.
Quoting Amazon: Each year, thousands upon thousands of Americans install water wells and septic systems on their properties. But with a maze of codes governing their use along with a host of design requirements that ensure their functionality where can someone turn for comprehensive, one-stop guidance? Enter the Water Wells and Septic Systems Handbook from McGraw-Hill.
Written in language any property owner can understand yet detailed enough for professionals and technical students this easy-to-use volume delivers the latest techniques and code requirements for designing, building, rehabilitating, and maintaining private water wells and septic systems. Bolstered by a wealth of informative charts, tables, and illustrations, this book delivers:
* Current construction, maintenance, and repair methods
* New International Private Sewage Disposal Code
* Up-to-date standards from the American Water Works Association
- Wells and Septic System, Alth, Max and Charlet, Rev. by S. Blackwell Duncan, $ 18.95; Tab Books 1992. We have found this text very useful for conventional well and septic systems design and maintenance --DF. Quoting an Amazon description:Here's all the information you need to build a well or septic system yourself - and save a lot of time, money, and frustration. S. Blackwell Duncan has thoroughly revised and updated this second edition of Wells and Septic Systems to conform to current codes and requirements. He also has expanded this national bestseller to include new material on well and septic installation, water storage and distribution, water treatment, ecological considerations, and septic systems for problem building sites.
- Advanced Onsite Wastewater Systems Technologies, Anish R. Jantrania, Mark A. Gross. Anish Jantrania, Ph.D., P.E., M.B.A., is a Consulting Engineer, in Mechanicsville VA, 804-550-0389 (2006). Outstanding technical reference especially on alternative septic system design alternatives. Written for designers and engineers, this book is not at all easy going for homeowners but is a text I recommend for professionals--DF.
- In addition to citations & references found in this article, see the research citations given at the end of the related articles found at our suggested
CONTINUE READING or RECOMMENDED ARTICLES.
- Carson, Dunlop & Associates Ltd., 120 Carlton Street Suite 407, Toronto ON M5A 4K2. Tel: (416) 964-9415 1-800-268-7070 Email: info@carsondunlop.com. Alan Carson is a past president of ASHI, the American Society of Home Inspectors.
Thanks to Alan Carson and Bob Dunlop, for permission for InspectAPedia to use text excerpts from The HOME REFERENCE BOOK - the Encyclopedia of Homes and to use illustrations from The ILLUSTRATED HOME .
Carson Dunlop Associates provides extensive home inspection education and report writing material. In gratitude we provide links to tsome Carson Dunlop Associates products and services.
 | HOME | ABOUT | ASK a QUESTION | CONTACT | CONTENT USE POLICY | DESCRIPTION | POLICIES | PRIVACY | |
| © 2024 - 1985 Publisher InspectApedia.com - Daniel Friedman | |||||||||