
InspectAPedia® FREE Encyclopedia of Building & Environmental Construction, Diagnosis, Maintenance & Repair |
Question? Just ask us! InspectAPedia
|
 Add Air to a Water Pressure Tank by Tire Pump or a Compressed Air Source
- POST a QUESTION or COMMENT on how to add air to a water-logged water pressure tank - how to decide which air recharge pressure to use: air volume control, adding air at an air valve, or draining the water tank.
How to add air to the water pressure tank by pumping at the air inlet valve:
This article describes how to add air to a building water pressure tank, and how to detect and correct air and water leaks in a building water supply system where a private well is the water source.
InspectAPedia tolerates no conflicts of interest. We have no relationship with advertisers, products, or services discussed at this website.
Method 2: Pumping air in to the Water Tank using the Schrader Valve
 Here we explain how to use a simple hand pump (or a cylinder charged with air) to get the air charge back into a water tank.
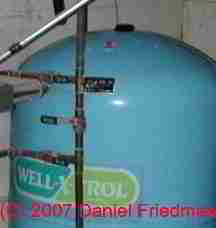
The procedure we describe below will work to add air to either type of water tank: a bladder-type captive-air tank (photo below) or a steel bladderless water pressure tank. Our photo at left shows an air inlet valve found on the tee located at the water tank base.
This water tank air addition procedure is for water tanks that do not use an internal bladder.
While it is often necessary to correct the air charge in a bladderless water tank, bladder type water tanks do not normally lose air and do not normally need to have the air pressure in tank increased unless there is a leak in the tank itself or a defect in the water-containing bladder in the tank.
Bladder type or "captive air" water tanks (shown in the photo below) do not normally need to have makeup air added.
If you are experiencing water pump short cycling problems with bladder-type water tanks and the problem is not in the pump control or water piping, the problem may be traced to a failure of the water tank's internal bladder itself.
If the water-containing rubber bladder in a "captive air" water tank is defective (it can become stuck to itself and remain collapsed), the result can be a rapid on-off short cycling of the water pump. We test water pressure tanks to see if they're empty or nearly empty of water by seeing if we can rock or move the tank. If the water tank is heavy with water it does not move easily.
 Be careful not to jiggle and break a pipe! Bladder type or captive-air water pressure tanks and their repairs are described just above and in more detail
at WATER TANK TYPES .
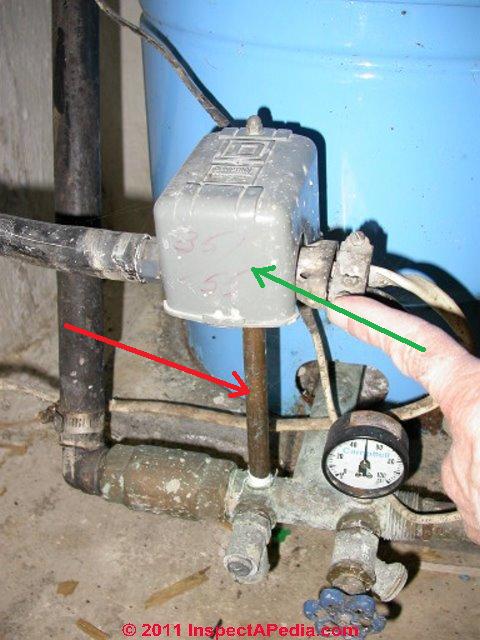
On most water tanks, both captive air bladder type and bladderless steel tanks, there is a fitting that looks like a tire valve located on the top of the tank, possibly at the tank bottom, or on the water outlet piping which is usually at the bottom of the tank.
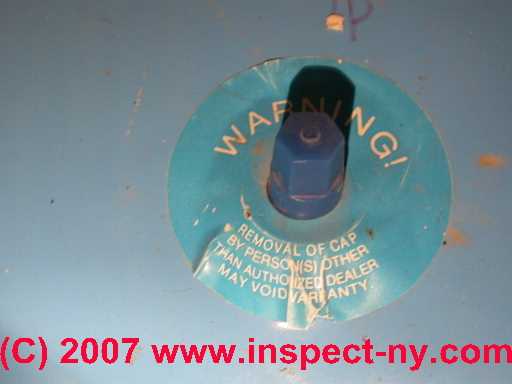
In the photograph shown at left, the blue cap at the top of an internal bladder-type water tank marks the location of the air valve for this water tank.
This valve can be really almost anywhere near the water tank on a pipe through which pumped air would rise into the water tank, as it is used to add air pressure to the system. Look for a little valve stem that looks just like a tire valve. In fact it is a tire valve.
These air inlet valves are technically called "Schrader valves" in case you have to buy a new one. The stem is about 3/16" diameter, and maybe 1.5" to 2" long. It might have a valve cap on it that looks just like what's on your car.
That's because in fact it is the same device as used on automobile and truck tires.
 Watch out: on some water pressure tanks what looks like an ordinary, simple, basic air inlet valve might be a snifter valve instead. The snifter valve stem looks like any other air inlet valve. It is different and it probably won't let you pump air into the water tank.
Snifter valves, used only on submersible well pump systems, are a type of automatic air volume control system that attempts to add a bit of air into the water pressure tank during each well pump on-cycle. We provide details about snifter valves
at AIR VOLUME CONTROLS, WATER TANK
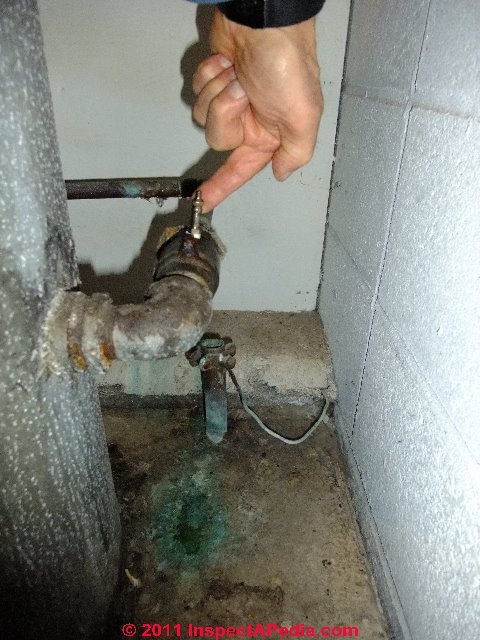
Our photo (left, Rasmussen Well Drilling, Inc. , Two Harbors MN & DJ Friedman) ) illustrates a snifter valve air inlet mounted on a bronze check valve.
How to detect that a snifter valve is installed on a well water system:
If the air inlet valve you find is mounted on a check valve (usually located on the well piping just ahead of the water pressure tank inlet port) and your well system uses a submersible pump and a bladderless water tank, you may not be successful at adding air to the water pressure tank through this valve - the check valve may prevent air from passing into the water tank.
If the snifter valve is not working (often the valve clogs with rust or debris either at the air valve or at the bleeder drain on the well piping) you'll have to add air to the water pressure tank by draining the tank or by mounting an air valve directly onto a tapping on the water tank.
Also see snifter valve explanation and definition
at AIR VOLUME CONTROLS, WATER TANK
Step by Step Guide to Adding Air to a Water Pressure Tank Using the Air Inlet Valve
1. Stop running water in the home and turn off the well pump
Turn off electrical power to the water pump or well pump.
 2. Find the location of the air inlet valve on your water system. You may need to close the water valve between the tank and the building.
If the air valve is mounted right on the water tank itself, then you do not have to turn off water supply shut off valves for this procedure.
If the air inlet valve is mounted on a tank tee at the water tank bottom then the process will go better if you close off the main water supply valve between the water tank outlet piping and the building it supplies.
If the air inlet valve is mounted on a check valve located on well piping itself then you probably have a combination snifter valve and check valve that means that particular air valve won't send air into the water tank, but it will admit air into the well piping itself.
The next time the well pump cycles on, that air will be pushed up into the water tank. Snifter valves and check valves are discussed
at AIR VOLUME CONTROLS, WATER TANK ,
You do not have to drain the water tank to use this procedure.
3. You can leave the water tank at whatever point in the pump on-off cycle, and tank pressure, that happens to be present.
You do not need to drain water from the tank to follow this procedure.
4. Find the air inlet valve on your water tank and remove the cap.
Check the condition of the valve. It should not be leaking water.
If the water tank air inlet valve is leaky you may be able to stop the leak by briefly pressing down the center pin in the valve to flush the valve seat. Otherwise you'll need to replace the valve stem core (it's a tire valve stem easily purchased at any auto supply store). Details on fixing a leaky air valve are
at WATER TANK AIR VALVE REPAIRS .
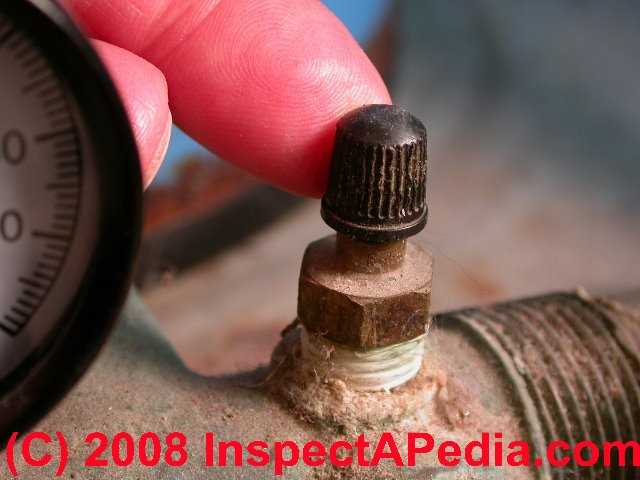
Our photo (left) shows a schrader valve located on the outlet tee at the bottom of a water tank.
5. Pump air into the water pressure tank while watching the water tank pressure gauge.
We recommend starting by adding just 5-10 psi of air into the tank.
If you have a bicycle pump you can simply clip the pump business-end onto this valve and pump air into the tank without going through any other rigmarole. But be prepared for having to make quite a few pump strokes. An alternative is to use a portable air compressor such as those sold at auto supply stores for re-inflating auto tires. We have also used a portable air tank that we re-filled from a nearby gas station or from a more powerful construction-type air compressor.
Watch out: don't over pressurize the water tank. If you exceed the water tank safe operating pressure it may burst, causing serious injury or even death.
If you watch the pressure gauge on the water tank and keep the pressure at or below the pressure gauge cut-out pressure (typically 40 or 50 psi) or below 70 psi if your tank was totally waterlogged at the start of the procedure and the pump had just shut off, you should be ok.
Watch out: some water pressure gauges don't work, or may be slow to respond to changes in pressure. The gauge inlet port that senses water pressure may be clogged with debris. If your water pressure gauge does not change steadily as water (or air) is entering or leaving the water tank try tapping gently on the gauge. If it still doesn't work,
see WATER PRESSURE GAUGES
and WATER PRESSURE GAUGE ACCURACY - or replace the gauge with a new one.
WATER TANK AIR HOW MUCH TO ADD describes in more detail how much air to add to the system.
6. Turn the well pump electrical power back on.
If the pressure in the water tank is below the pump cut-in pressure, the pump will start to run immediately. If pressure in the water tank is above the cut-in pressure, nothing will happen until you run some water (and pressure) out of the water pressure tank.
7. Turn on a nearby, convenient plumbing fixture (such as a kitchen sink or laundry sink).
If at step 2 you closed the main water valve between water tank and building, open that valve before trying to run water.
Run water in the house until the well pump cycles on. Turn water back off at the fixture and let the pump continue to run until it reaches its cut-off point. At that point your water tank as well as building piping will be at the cut-off pressure.
Turn water back on at a convenient location and run it, noticing how long the water runs or how much water runs before the pump turns back on. We look for a 20-30 second draw-down time before the well pump turns back on when running a typical kitchen faucet.
7. Evaluate the results. Add more air if necessary.
If the draw down cycle (time before the pump turns back on) is still too small in quantity (just a gallon or two is too small) or in time (just a few seconds is certainly too little time), then you will want to add more air to the system.
8. What if you add too much air?
As long as you haven't subjected the water tank to unusually high (dangerous) pressures, if you happen to over-charge the water tank with air, excess air will normally exit the tank through the house water supply piping and fixtures when they are next run.
Because other problems (a leak in well piping for example) can also result in air discharge at plumbing fixtures, we provide more details
at AIR DISCHARGE at FAUCETS, FIXTURES .
Fixing a leaky water tank air inlet valve: Tips for water tanks with air inlet valves that leak
 If you've messed with this
valve when there was no pressure on the water tank (maybe you pressed the little pin
in the top of the valve) you might get water
or air leaking out of the Schrader valve when you try to re-pressurize the tank.
If you've messed with this
valve when there was no pressure on the water tank (maybe you pressed the little pin
in the top of the valve) you might get water
or air leaking out of the Schrader valve when you try to re-pressurize the tank.
Details about how to repair a leaky air inlet valve on a water tank are found
at WATER TANK AIR VALVE REPAIRS . For your convenience we repeat a few highlights just below.
Usually you can stop this water or air leak by simply pressing the little valve-stem pin down and releasing it a couple of times. This action may successfully remove debris that may have been on the valve seat.
The valve stem end that you press looks like a little wire sticking up in the center of the Schrader valve.
If all else fails, run over to your car and borrow one of its tire valve caps and just screw it down tightly over the leaky Schrader valve.
This will work fine to stop a water or air leak until you get around to having a plumber or handy-man put a new valve stem into the misbehaving little valve.
Tools to Replace an Air Valve Stem or Air Valve Core
Actually, the internal moving parts of this valve can be replaced just as they can be on a car tire. One can buy valve stem cores (and the tool to replace them) at any auto parts store.
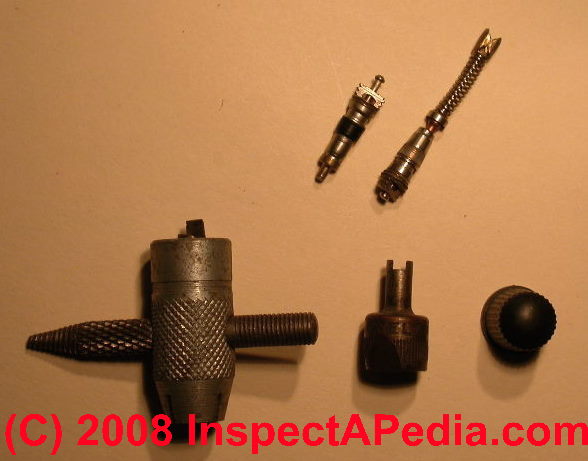 The special
tool, sometimes simply a special valve stem cap, has a protruding tip with a slot
in it, used to unscrew and remove the old valve (located down inside the valve stem itself and ending
with the little pin that you see when you look into the top of the valve stem)
and to screw in a new valve stem core.
The special
tool, sometimes simply a special valve stem cap, has a protruding tip with a slot
in it, used to unscrew and remove the old valve (located down inside the valve stem itself and ending
with the little pin that you see when you look into the top of the valve stem)
and to screw in a new valve stem core.
The internal water tank air valve stem part (valve stem core) that is replaced can be purchased with different spring strengths for different pressure ranges, but in fact, given that the pressure range of a typical water tank is 20-70 psi (like a car tire) almost any common tire valve stem core would work fine as a replacement if your valve stem won't stop leaking.
An explanation of what water tank air valves are, what they look like, how to find them, is
at WATER TANK AIR INLET VALVE .
To use the water tank air valve to put air into a water pressure tank, see details
at WATER TANK AIR ADD AT AIR VALVE
and also WATER TANK AIR HOW MUCH TO ADD .
To fix a bad water tank air valve see details at WATER TANK AIR VALVE REPAIRS .
Reader Comments, Questions & Answers About The Article Above
Below you will find questions and answers previously posted on this page at its page bottom reader comment box.
Reader Q&A - also see RECOMMENDED ARTICLES & FAQs
On 2023-03-07 by InspectApedia Editor
@Dan L,
Thank you.
We've worked hard on this material for decades, so are really grateful when a reader finds it useful and trustworthy.
And no, we didn't get the gauge photo.
On 2023-03-07 by Dan
@InspectApedia Editor , thanks for yet another thorough response.
Did the photo of the gauge on the pump ever come through?
dan
On 2023-03-06 by InspectApedia Editor - water source doesn't impact the proper setting of the air pre-charge pressure in a water pressure tank
@Anonymous, @Dan,
No, the water source does not have any impact on choosing the proper setting of the air pre-charge pressure in a water pressure tank.
The air in a water pressure tank is acting as a "spring" to push water out of the tank when you open a faucet. Without the pressure tank an ordinary water pump would cycle on and off so rapidly that the pump and controls would be damaged. The "air spring" gives some water draw down, perhaps 30 seconds or more, before the pump has to turn-on.
We set the air pre-charge in the tank just below the pressure switch CUT-IN pressure so that as pressure falls in the system, the switch will cause the pump to turn on when it should.
If we set the air pre-charge more than 2 psi below the CUT-IN pressure then we're reducing the effectiveness of the pressure tank by shortening the draw-down cycle time or water volume.
If we set the air pre-charge above the CUT-IN pressure, then we'll turn on water, the tank will become emptied of water, but because pressure never drops to the CUT-IN pressure the pump simply won't turn-on.
If we set the air pre-charge pressure too close to the pump CUT-IN pressure then the pump switch and pump may behave erratically, perhaps cycling on and off rapidly and the equipment could be damaged.
On 2023-03-06 by Anonymous
@Mak Church, here's the gauge to the pump.
BTW, not sure it makes a difference, but the pump in question is for cistern not a well.
Thanks,
dan
On 2023-03-05 by InspectApedia Editor - how does a water pump pressure control switch work
@Dan,
Sure Dan, thank you so much for asking - we're here to be useful, not to just throw stuff over the wall at you.
A private pump and well and water pressure tank system uses a pressure control switch that turns the pump on and off in response to a pressure drop in the water system.
To see what a water pump pressure control switch looks like and how the work, see WATER PUMP PRESSURE SWITCH REPAIRS
So when you turn on a tap (open a faucet) and water starts to run, the pressure in the system falls.
From the factory, a typical pressure control switch is set to "30/50 psi" or "20/40 psi" - that means that when the switch senses that water pressure in the system has fallen down to 30 psi (for the first switch) or 20 psi for the second switch example, a relay in the switch will close and turn on the pump.
This is called the water pump CUT-IN or CUT-ON PRESSURE
The pump will keep running until water pressure climbs back up to 50 psi (first example) or 40 psi (second example).
This is called the pump's CUT OUT or CUT OFF PRESSURE
Most people use the factory settings on their pressure control switch, but the switch is in fact adjustable within some range.
SO, if we knew nothing else about your specific water system's CUT-IN pressure and CUT-OUT pressure, we could find it out by watching the water pressure gauge. Have someone turn on water and take note of the pressure reading you see when the pump motor turns on. This works if you can SEE the pump - it's above ground (so will be a "jet pump").
Or if your motor is down in the well, of course, you can't see it. This is a submersible well pump (because it's "submerged" in the water in the well). But all is not lost. When the pressure control switch for a submersible well pump turns ON, you'll hear a distinct CLICK at the switch.
For a pressure tank that doesn't use an internal bladder, air in the tank gets absorbed into water so is ultimately "consumed"; if an automatic device isn't present or isn't working to add air to the tank automagically, then we do it manually by turning off the pump and draining out all of the water from the tank.
Then with the water valve at the tank closed, we add air to the water tank until the pressure is 2 psi below the pump CUT-IN pressure.
Don't hesitate to ask follow-up questions as needed.
On 2023-03-04 by Mak Church (mod)
@Dan L,
We've only received the image that you included with your original post. Please try again to share your photo of your gauge using the Add Image button.
On 2023-03-04 by Dan
@InspectApedia (Editor), I sent a comment with an image but am not certain is uploaded.
It was a picture of the gauge which is at 80 psi. Before I starting adding air to the tank I want to make sure that is a normal reading.
On 2023-03-04 by Dan
@InspectApedia (Editor),
Just now following up on this.
You said, “ Set the air pre charge to 2 psi below the pressure switch cut-in pressure.” Unfortunately, you might as well have been speaking Russian to me.
Please expound.
Thank you,
Dan
On 2022-12-24 by InspectApedia (Editor) - Set the air pre charge to 2 psi below the pressure switch cut-in pressure
@Dan L,
Yes.
Watch your gauge. Set the air pre charge to 2 psi below the pressure switch cut-in pressure.
You don't normally need to add air to a water tank that uses an internal bladder.
On 2022-12-23 by Dan L
Is this where I add air to the tank?
On 2023-02-25 by InspectApedia Editor
@Chris,
Thank you for taking the time to send us this message.
We've worked hard on this material for decades, so are really grateful when a reader finds it useful and trustworthy.
We also welcome your photos, questions, criticism or suggestions.
On 2023-02-25 by Chris
Did what you instructed and it worked perfectly, saved me from spending thousands on a new tank, thank you
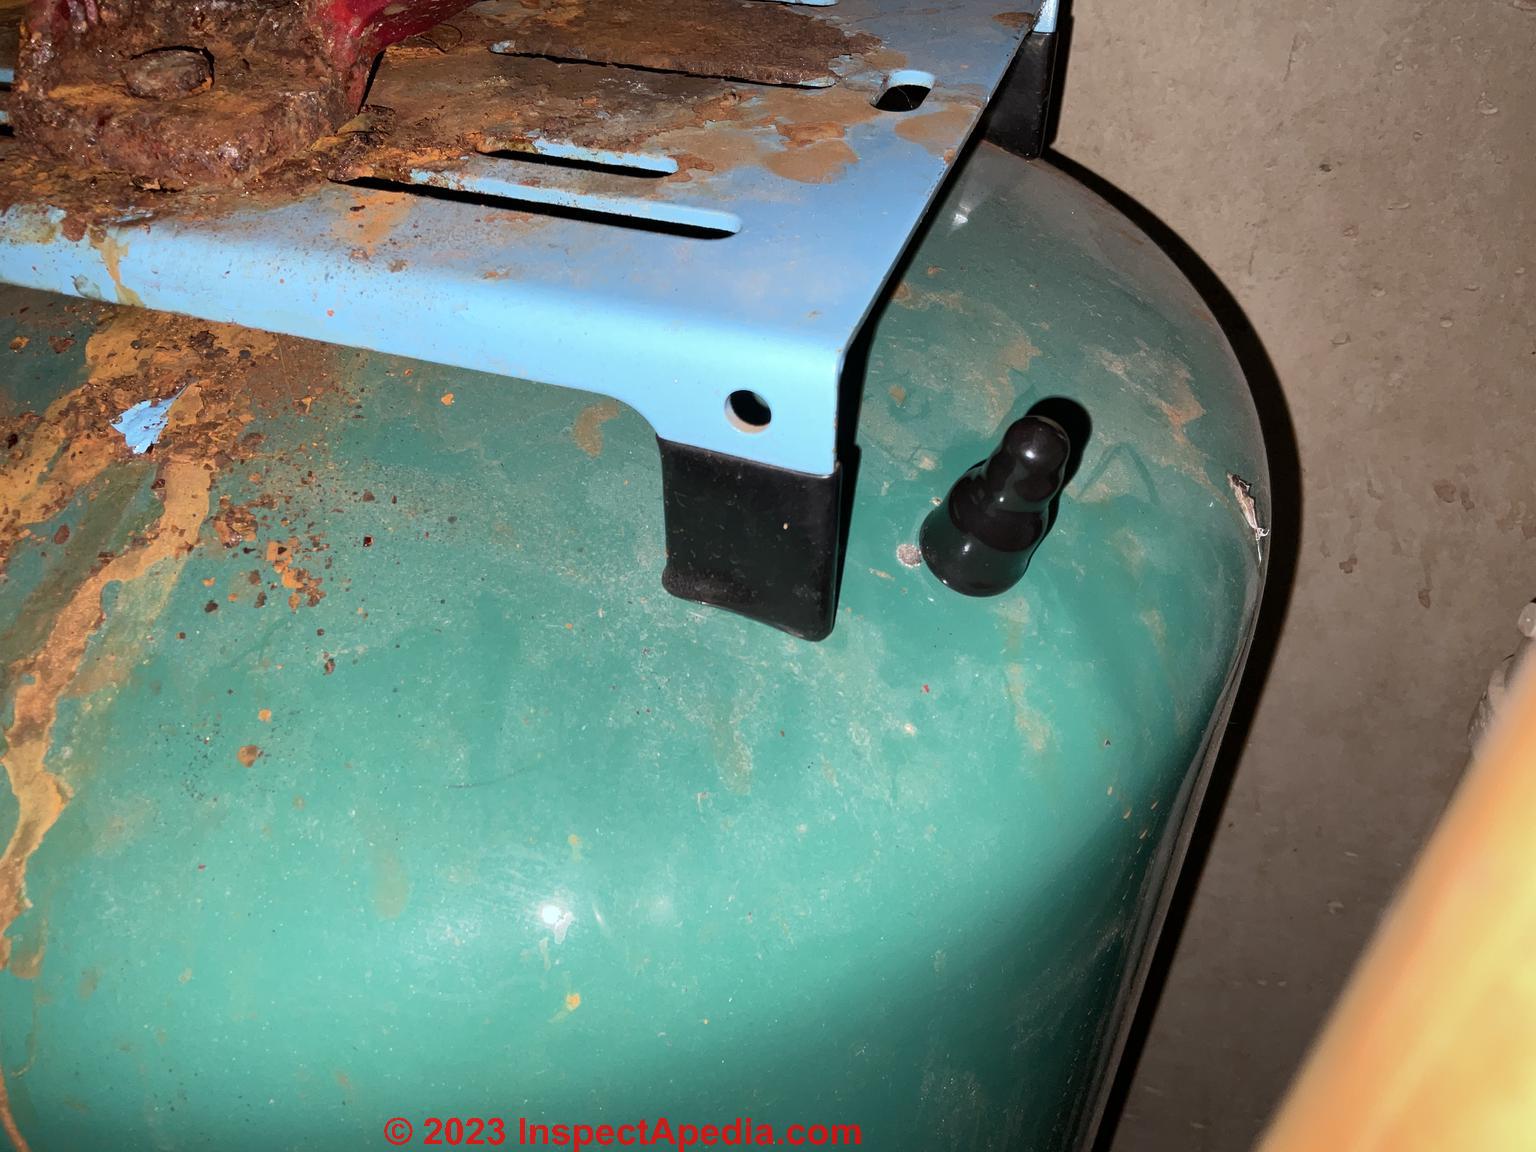
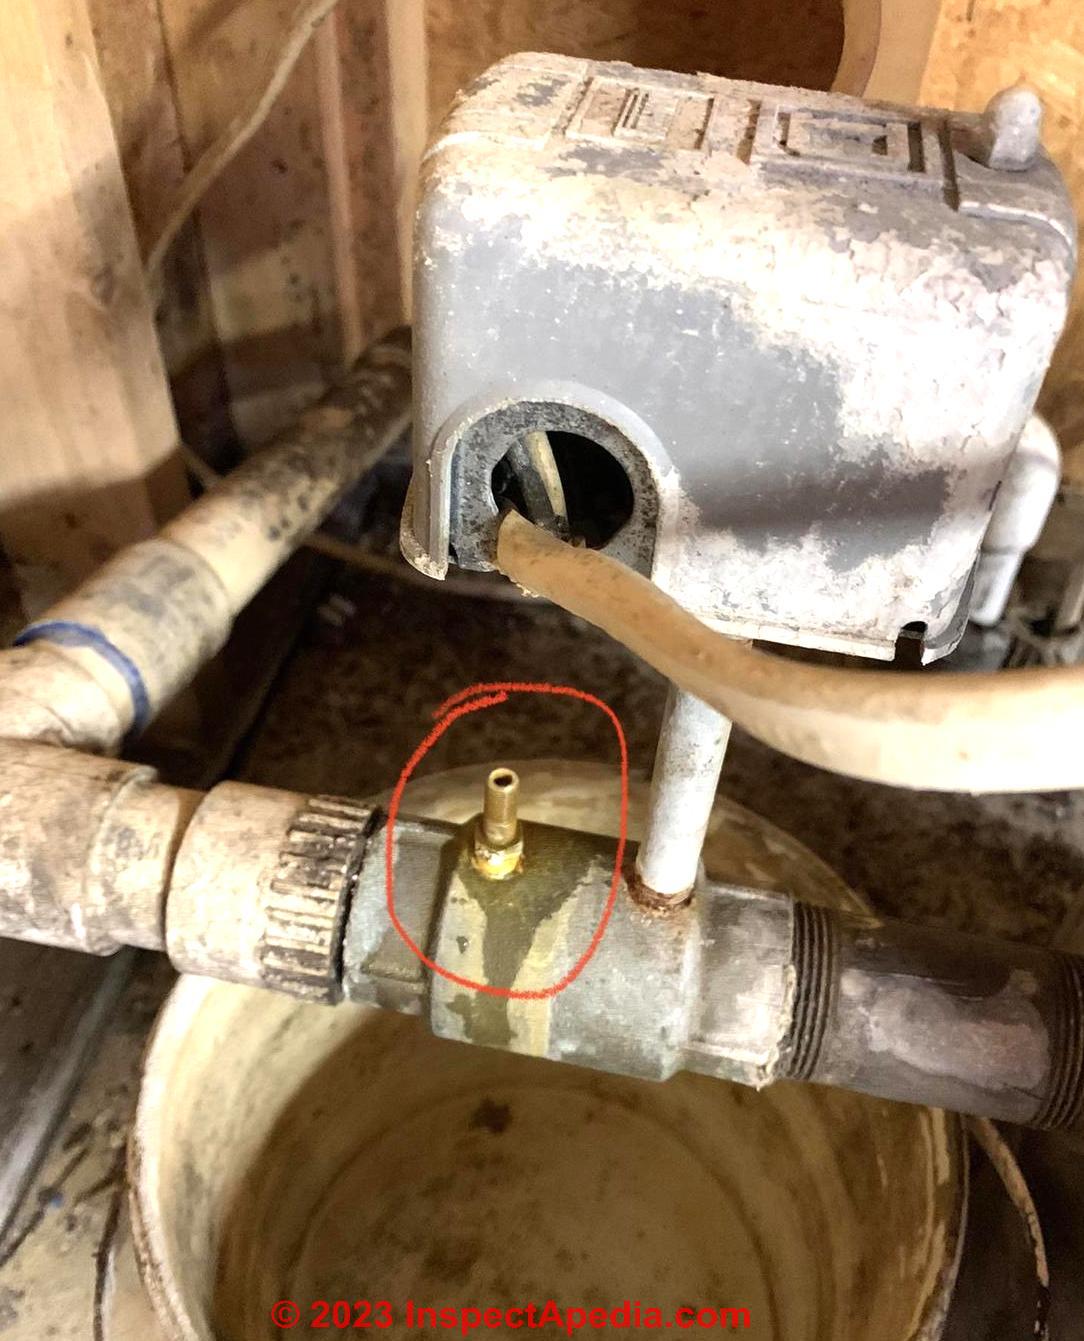
On 2023-01-19 by InspectApedia Publisher - air inlet and drainback valve components
@Anna,
That valve, circled in your photo, on a deep well installation (submersible pump is IN the well), would be an air inlet that works with a second component - a drainback valve in the well
See details at
DRAIN BACK & SNIFTER VALVE SYSTEM COMPONENTS
The problem with putting a cap on that valve stem (to stop its dribbling leak) is that it can no longer admit air into your system when needed.
So the better repair is to replace the valve stem core with one of the proper spring tension - the replacement LOOKS just like a regular tire valve stem core replacement but one of those would be mistaken because those are designed for much higher pressures. Instead you'd need to get the proper snifter or air admittance valve from a plumbing supplier.
Alternatively just replace the whole assembly with a new one from your plumbing or well supplier.
Also
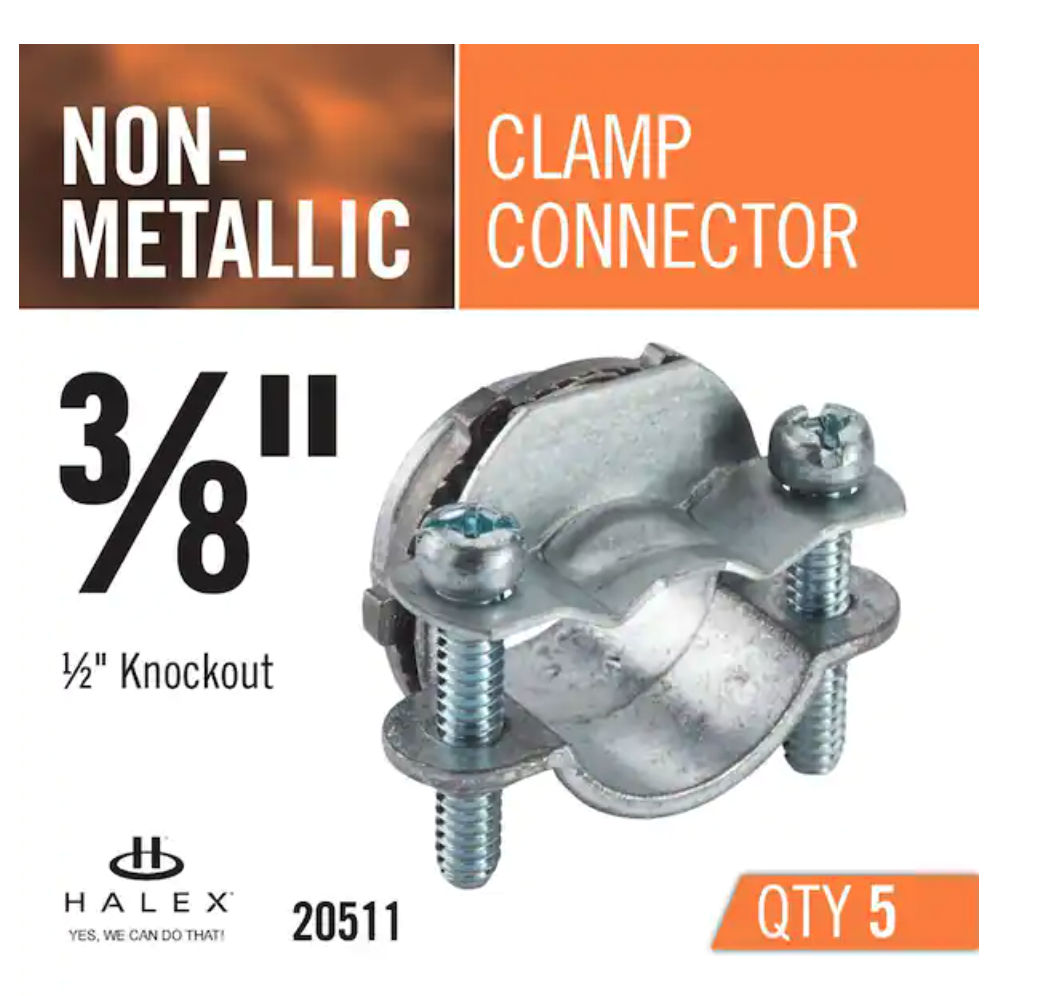
Watch out: I notice in your photo
- a missing strain relief where electrical wiring enters the pump pressure control switch, risking abrading the wire, cutting its insulation, causing a short circuit or dangerous electrical shock. It's a trivial part to add and is worth doing when you have an electrician on site.
Shown is a Halex-brand NM (Non-metallic) wire cable clamp connector - widely sold at electrical & building suppliers.
On 2023-01-19 by Anna
Do I have a snifter valve or an air inlet valve? Whenever the pump is on, it dribbles water. If it is an air inlet valve, should it have a cap on it?
On 2022-03-12 by Inspectapedia Com Moderator - why can't I add air pressure to the tank?
@Vic S,
It's possible that the tank bladder has stuck to itself, though usually when that happens, using a brief initial supply pressure of 20 to 50 psi will un-stick the bladder.
Please post a photo (one per comment but more than one comment and thus photo if needed) showing me the pressure tank and the air valve that you were accessing.
On 2022-03-10 by Vic S
Checked the air in my water pressure tank and using two different air gauges had no reading what so ever so decided to fill the tank with no success. Tried removing and checking the stem and it seemed fine, so tried to fill the tank without the stem but couldn't feel any air escaping, don't know what's going on and the compressor is working fine.
Do you have any idea why I can't add air pressure to the tank? Could a failed bladder be the culprit? Thanks in advance for your help.
On 2022-02-18 by Inspectapedia Com Moderator
@David B,
That's great. Thank you so much for taking the time to write a nice note. We've worked hard on this material for many years to make it trusted and accurate so we are especially grateful with a reader finds it useful.
On 2022-02-18 by David B
thanks very much for the advice! It helped me learn that I had a water-logged pressure tank and was able to solve the problem easily with a bike pump and just a little patience with running faucet trials.
On 2021-03-04 by danjoefriedman (mod) - turned well pump off then back on still no water
@Becky, it's possible that your pump has lost prime, if the pump is one that is above ground such as a one line or two line jet pump if that's the case in the article index found above, you will see articles on how to prime the pump. If that gets your water, you also want to look at replacing the foot valve or check valve that leaked and caused the loss of prime.
On 2021-03-04 by Becky
Had a leak at the connection from the pipe that brings water in from the well to the tank. Shut the water off from the well, replaced the elbow connection, turned water back on but no water coming into the house. Turned well pump off then back on still no water. Any suggestions?
On 2020-06-21 by Inspectapedia Com Moderator - Why Would Water Flow Fall to a Trickle, Then Recover
@susandemuria1@gmail.com
When water flow rate (that you describe as pressure and volume) starts off at an acceptable level when you first open a faucet, and then falls to a trickle after 30 seconds to a minute, that strongly suggests that the initial water pressure that you are seeing is being delivered by the water pressure tank itself - compressed air in the tank acts as a spring to push water out of the tank and through building water pipes to your faucet.
When water pressure in the whole system (tank, pipes, at the pump) falls to the pressure control switch CUT IN pressure (typically around 20 psi or 30 psi) the switch should turn on the pump, so you'll continue to see acceptable water flow rate at the faucet ...
BUT
If the pump doesn't turn on when it should (the switch may be debris clogged) then the water pressure will continue to drop, down to nearly nothing, as the "spring power" of that air in the pressure tank becomes depleted.
Sometimes a clogged pressure switch simply is sluggish - it takes it some time to detect that the pressure has dropped (because it's pressure sensing orifice is clogged) - so there will be a delay in turning on the pump.
At that point, if water pressure returns, but not to a very good flow rate, we are probably seeing a water well that itself has a very poor flow rate (of water from the surrounding soil or rock into the well). Even if the pump is undamaged, it can't deliver more water than is flowing in to the well.
How to detect when a submersible pump is turning on or off:
1. watch the pressure gauge - wherever it is sitting, it ought to jump and begin to move when the pump turns on
2. listen to the pressure control switch - it will "click" when the relay in the switch closes (to turn on the pump) or opens (to turn off the pump)
3. listen to the pressure tank itself - you may hear water entering the tank
4. a trained service technician or electrician who knows how to do electrical tests without killing themselves or a bystander, can also monitor the pump curcuit and switch using a multimeter or volt meter to confirm when power is being sent to the pump
About adding air to the pressure tank
If your water pressure tank uses an internal bladder, such as a WellXtrol tank, other than at the time of original installation you should never need to add air. So either you've set the tank pressure improperly or the tank's internal bladder has burst.
I don't understand your sentence:
"The gauge read near sixty psi, and when I added air from a tank that had 90 psi in it, the gauge did not move."
but I'm pretty sure that if the tank was at 60 psi you certainly should not have been trying to add air at that point. The risk is over-pressurizing the tank, causing it to burst, which can injure or even kill someone nearby.
If you put too much pressure in the pressure tank, then the pump won't turn on when it should or may not turn on at all.
Bottom line:
1. We need to get back to a proper starting point for your water pressure tank -
See details at WATER TANK AIR ADD AT AIR VALVE
and at WATER TANK AIR HOW MUCH TO ADD
if you follow those instructions the tank will be back at a proper starting point pressure
2. If that doesn't fix the pump operation and improve water flow rate to be more consistent let us know - and I'll suggest replacing the pressure control switch.
On 2020-06-21 by susandemuria1@gmail.com
the water pressure and volume is never great, but while running the water in say, the kitchen sink, it will over the period of maybe one half to one minute, be reduced to a trickle. it seems to be a pressure issue. if I continue to run the water, the pressure will eventually increase but again to what I consider unacceptable pressure and volume.
The pump is in the well so I can not hear it kick on or off. I have a 20 year old WellXtrol tank which appears to be in very good condition. I am located in Missouri where there is a fair amount of moisture in the atmosphere, but there is no condensation on the outside of the tank and no line for me to ascertain the water level in the tank.
The tank is very heavy and when I tap on the side of the tank it seems by sound that the water level is at the seem where I believe the Diaphragm to be. As suggested, I added air to the tank. The gauge read near sixty psi, and when I added air from a tank that had 90 psi in it, the gauge did not move.
I tapped on the gauge with a screwdriver to be certain that it was not frozen, and it moved appropriately . My intention was to add 5 to 10 psi , but as I said, the gauge did not move and like wise the gauge on the air tank that I was using as the source did not drop either.
I had my wife turn on the water again in the kitchen and the pressure was as it usually is and within a half minute the tank pressure dropped to 50 psi and the water flow and volume dropped with it . I continued to run the water, waiting to see that the pump was activated and that the tank pressure went back up. It Did Not.
A short time later, the water pressure was back to is normal subpar level. The Square D pressure control was replaced about 6 months ago and seems to be set correctly, as it was set by the plumber who replaced it. The pump seems to work as there is always water, just not much pressure. The pipes in the house are all seemingly in very good condition
On 2019-11-11 by danjoefriedman (mod)
Please check out the links at "Continue Reading" just above which have is their title The Very words of your question
On 2019-11-07 by Stephen Kapaldo
How much air pressure does it need?
On 2017-11-25 by danjoefriedman (mod)
Jeff
In the ARTICLE INDEX above you will see articles giving two different approaches to priming a well pump. Or you can use the search box to search for the phrase
How to prime the pump
Question: water drips out of the air valve at the bottom of the tank
I have an oil burner hot water system my expansion is dripping water out the air valve stem at the bottom of the tank should I repair or replace - mike s 10/12/12
Reply:
Mike, an air valve stem is replaceable, I would try that first.
Check also for abnormal system pressure ( an unsafe condition). But if the internal bladder of the tank has burst - another explanation for finding water at the air pressure adjustment valve, then most likely you need to replace the tank. You'll know this condition because the tank will become waterlogged, heavy, and ultimately the boiler TP valve will drip (another unsafe condition).
See details at AIR BLEED VALVE LEAK REPAIR
...
Continue reading at WATER TANK AIR ADD BY DRAINING or select a topic from the closely-related articles below, or see the complete ARTICLE INDEX .
Or see WATER TANK AIR ADD at VALVE FAQs - questions & answers about the article on this page.
Or see these
Recommended Articles
- AIR VOLUME CONTROLS, WATER TANK used on bladderless water pressure tanks
- WATER TANK AIR, HOW TO ADD
- WATER TANK AIR HOW MUCH TO ADD
- WATER TANK BLADDERS & CAPTIVE AIR
- WATER TANK DIAGNOSIS & REPAIR - home
Suggested citation for this web page
WATER TANK AIR ADD AT AIR VALVE at InspectApedia.com - online encyclopedia of building & environmental inspection, testing, diagnosis, repair, & problem prevention advice.
Or see this
INDEX to RELATED ARTICLES: ARTICLE INDEX to WATER SUPPLY, PUMPS TANKS WELLS & SPRINGS
Or use the SEARCH BOX found below to Ask a Question or Search InspectApedia
Ask a Question or Search InspectApedia
Try the search box just below, or if you prefer, post a question or comment in the Comments box below and we will respond promptly.
Search the InspectApedia website
Note: appearance of your Comment below may be delayed: if your comment contains an image, photograph, web link, or text that looks to the software as if it might be a web link, your posting will appear after it has been approved by a moderator. Apologies for the delay.
Only one image can be added per comment but you can post as many comments, and therefore images, as you like.
You will not receive a notification when a response to your question has been posted.
Please bookmark this page to make it easy for you to check back for our response.
Our Comment Box is provided by Countable Web Productions countable.ca
Citations & References
In addition to any citations in the article above, a full list is available on request.
- Rasmussen Well Drilling, Inc. , 1793 Hwy 61, Two Harbors MN. Jeremy Rasmussen provides third generation well drilling and plumbing services on the North Shore of Lake Superior. Photos by DJF. Tel 218-834-3387. Email: rasmussenwell@frontier.com
Quoting: We serve the north Shore – Lake, Cook, St. Louis, Carlton and Pine counties, including Duluth, Grand Marais, Clouqet, Carlton, Finland, Isabella, Silver Bay, Grand Portage, Saginaw, and everywhere in Northeastern Minnesota. - Flexcon, SMART TANK INSTALLATION INSTRUCTIONS [PDF], Flexcon Industries, 300 Pond St., Randolph MA 02368, www.flexconind.com, Tel: 800-527-0030 - web search 07/24/2010, original source: http://www.flexconind.com/pdf/st_install.pdf
- Grove Electric, Typical Shallow Well One Line Jet Pump Installation [PDF], Grove Electric, G&G Electric & Plumbing, 1900 NE 78th St., Suite 101, Vancouver WA 98665 www.grovelectric.com - web search -7/15/2010 original source: http://www.groverelectric.com/howto/38_Typical%20Jet%20Pump%20Installation.pdf
- Grove Electric, Typical Deep Well Two Line Jet Pump Installation [PDF], Grove Electric, G&G Electric & Plumbing, 1900 NE 78th St., Suite 101, Vancouver WA 98665 www.grovelectric.com - web search -7/15/2010 original source: http://www.groverelectric.com/howto/38_Typical%20Jet%20Pump%20Installation.pdf
- Penn State, Water Fact Sheet #3, USING LOW-YIELD WELLS [PDF], Penn State College of Agricultural Sciences, Cooperative Extension, School of Forest Resources, web search 07/24/2010, original source: http://pubs.cas.psu.edu/FreePubs/pdfs/XH0002.pdf
- In addition to citations & references found in this article, see the research citations given at the end of the related articles found at our suggested
CONTINUE READING or RECOMMENDED ARTICLES.
- Carson, Dunlop & Associates Ltd., 120 Carlton Street Suite 407, Toronto ON M5A 4K2. Tel: (416) 964-9415 1-800-268-7070 Email: info@carsondunlop.com. Alan Carson is a past president of ASHI, the American Society of Home Inspectors.
Thanks to Alan Carson and Bob Dunlop, for permission for InspectAPedia to use text excerpts from The HOME REFERENCE BOOK - the Encyclopedia of Homes and to use illustrations from The ILLUSTRATED HOME .
Carson Dunlop Associates provides extensive home inspection education and report writing material. In gratitude we provide links to tsome Carson Dunlop Associates products and services.
 | HOME | ABOUT | ASK a QUESTION | CONTACT | CONTENT USE POLICY | DESCRIPTION | POLICIES | PRIVACY | |
| © 2024 - 1985 Publisher InspectApedia.com - Daniel Friedman | |||||||||