
InspectAPedia® FREE Encyclopedia of Building & Environmental Construction, Diagnosis, Maintenance & Repair |
Question? Just ask us! InspectAPedia
|
 How to Add Air to a Water Pressure Tank by Draining
Using Gravity & a Garden Hose
- POST a QUESTION or COMMENT on the procedure for adding air to a water pressure tank by draining the tank using a garden hose.
Add air to water pressure tank:
This article describes how to restore lost air in a building water pressure tank using a garden hose and gravity in a building water supply system where a private well is the water source.
This procedure is used as a simple means to correct water pump short cycling when the cause is a water-logged water tank.
InspectAPedia tolerates no conflicts of interest. We have no relationship with advertisers, products, or services discussed at this website.
Method 3 for adding air to the water tank: Use Gravity to drain the tank and then to let air in
 Here we explain a most basic way to get the proper air charge back into the water pressure tank and thus to stop well pump short cycling. This article also provides a second procedure for cases in which the water pressure tank is already working normally but wants fine-tuning of its air pressure - at ALTERNATIVE PROCEDURE for WATER TANK AIR PRESSUREin this article (below).
Rocking the water pressure tank: (Gently) If the water-containing rubber bladder in a "captive air" water tank is defective (it can become stuck to itself and remain collapsed), the result can be a rapid on-off short cycling of the water pump.
We test water pressure tanks to see if they're empty or nearly empty of water by seeing if we can rock or move the tank. If the tank is heavy with water it does not move easily. Be careful not to jiggle and break a pipe! Bladder type or captive-air water pressure tanks and their repairs are described just above and in more detail at WATER TANK TYPES.
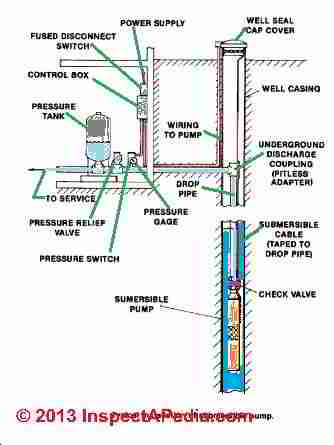
Readers of this document should also see WATER PUMP REPAIR GUIDE an specific case which offers an example of diagnosis of loss of water pressure, loss of water, and analyzes the actual repair cost. The illustration at page top is courtesy of Carson Dunlop, Inc. in Toronto.
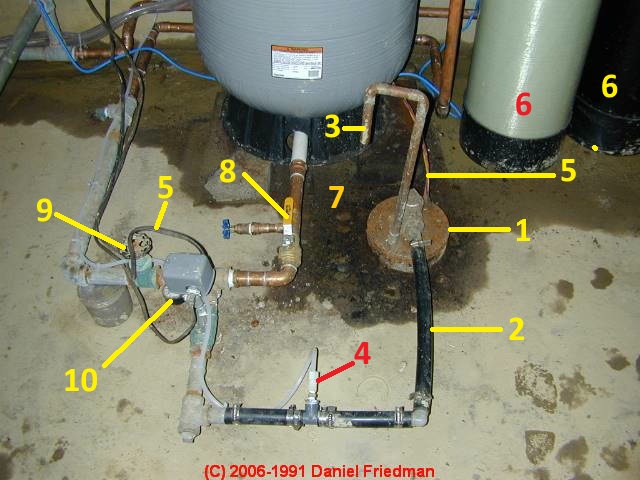
The photograph shows a typical water tank with controls located near the tank bottom. Clicking on this photo shows an enlargement of the blue-handled drain valve that might be used to drain all of the water out of this tank in the "gravity procedure" we discuss below. In this particular photograph, you can see lots of water system components that can be identified:
[Click to enlarge any image]
- The well casing top - the rusty round disk on the floor to the front right of the gray water tank, with a black plastic supply pipe leaving the well casing. The upside down "U" shaped little copper pipe also leaving the well casing top is an air vent to let air into the well during the pumping cycle.
- The piping from well casing to water tank which in this case goes from black plastic at the well to galvanized pipe to the pump control switch (gray box) to copper into the bottom of the water tank.
- The water pump pressure control switch the gray box with wires to and from it, connected on the piping between the well and the bottom of the water tank.
- The water tank and water system blue handled drain valve, the round blue-handled valve attached on the
left side of the water pipe entering the bottom of the water tank.
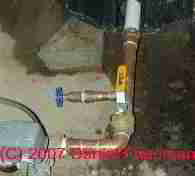
Here is a close up photo of that valve along with a yellow-handled shutoff valve - The water system yellow-handled shutoff valve.
Here is a close up photo showing both drain valve and shutoff valve. - Water supply piping into the home in this case is at the right of the gray box containing the water pump pressure control switch.
- The bottom of a water treatment device, probably a chlorinator can be seen at the right of this photo
The black-bottomed round container and next to it a solid black container may be a combination water softener and chlorinator or just a chlorination system. We suspect this because we see a small diameter plastic tube connected on a tee in the black plastic line leaving the well casing top. This is typical of a chlorine injection system used on bacteria-contaminated wells. - Water leaks may be present as the floor is wet around this equipment.
On your water supply system these components may not all be present and they may at slightly different locations.
Here is a step by step method to add air to a water tank to stop short cycling of the pump.
 You'll need a garden hose. That's about it, but read all of these instructions
through before starting this project
You'll need a garden hose. That's about it, but read all of these instructions
through before starting this project
The procedure just below is most suitable for a bladderless steel water pressure tank.
- Use the bathroom if you need to, while you can still flush. Then run and save some water into a container for drinking or other purposes (see "Warning, Loss of Pump Prime" below) before starting this procedure, just in case you get into trouble. A few gallons is more than enough for most situations.
- Turn off electric power to the water pump. In this photo the thoughtful prior owner has
marked the electrical switch above and to the left of the water tank with the word "WELL" so we figure this is probably
the electrical switch to turn off the water pump.
Turn this switch off now. Do this at the electric panel if there is not a special switch for the pump located nearer the water pressure tank. - Note about the main and other water shutoff valves: you don't have to open or
close any other shutoff valves at the tank to follow this procedure. This is
great since these shutoffs, seldom used, often don't work anyway.
But if the drain valve at the bottom of (or near the bottom of) the water tank is old, stuck, damaged, or otherwise inoperable, you may want to revert to methods #1 or #2 above until you can ask a plumber to replace the drain at the bottom of the pressure tank. - Attach a garden hose to the tank drain. The water tank drain valve is usually
located at or near the front bottom of the water tank itself, and it looks just like an outdoor or
laundry faucet except you have to bend over and fiddle around to get the
hose attached since it's down near the floor.
The tank drain will always be located at the bottom of the tank. Don't get mixed up with some higher faucet somewhere else or this method won't work. If there is a floor drain near the tank you can simply drain the tank to that drain, but watch out! Often these drains are clogged. Don't have a basement flood; have a garden hose handy to drain to outside if needed.

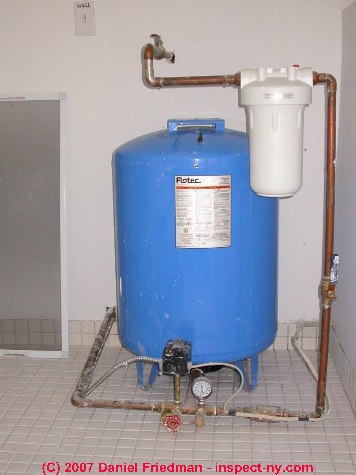
In the above photo, the long handle marked "water" is the water shutoff between the water tank and the rest of the building. When this valve is at right angles to the direction of the water pipe, that shutoff is "off".
We leave it open (parallel to the pipe, as you see it here) for this procedure so that air can get into the tank from a nearby open faucet in the building. In this photo the round black handled valve marks the water tank drain to which you will attach a garden hose.
The small brass fitting to the right of the black drain valve is a pressure relief valve needed on any pressurized tank.
The water pressure gauge is also visible in the center of this photo as is the blue base of our water tank in the background. On your water system these components may be located differently.
Run the other end of the garden hose outside and to a location where the end of the hose will be lower than the tank drain. After all eventually we're going to be relying on gravity and water does not run uphill.
- Open the water tank drain faucet. Shortly you should see water running out of the other end of the hose.
- Let air into the tank. Eventually water will
virtually stop running out of the hose. But if all of the fixtures in the building are
turned off there may be no easy path for air to flow backwards through the plumbing and
into the water tank. So water may still remain in the pressure tank. If you push (gently!) on the water tank you may discover that it still is heavy - containing water.
(Don't wiggle the tank all over the place or you might cause a pipe to leak.) Now water is barely running out of the hose because no air can get into the tank. It's like holding a full soda bottle upside down - air has to work to get in past the water gurgling out. In this case air would have to bubble all the way in up through the garden hose. We'll meet our maker before this will ever happen.
So here are some ways to get air into the tank, arranged in order of preference:- Use that Schrader Valve: Once no pressure is left in
the tank, since you have a Schrader valve on the tank you can just press the
little valve pin in the center of the valve. You might get a little squirt of water.
This means the tank is still under pressure.
Wait a few minutes then try again. Once there is no pressure in the tank the valve stem will stay pressed down and you'll hear air hissing and bubbling into the tank. Isn't this just the neatest thing? You could speed things along with a bicycle pump but it's not necessary. - No Schrader valve? or in a hurry? open a plug which might be found on the water tank top or center of the side
of the water tank.
This works fastest but has several risks: it's hard to get this plug out and in doing so you might jiggle the tank so much you cause a pipe leak nearby. And if you don't have pipe sealant or Teflon tape you may have trouble getting the plug back in and absolutely tight. If the plug leaks you're worse off than before we started. I'd hold this idea in reserve for systems without a Schrader valve. - No Schrader and No Plug? Open other plumbing fixtures in the building: at a nearby sink, for example.
This step can speed things along, depending on
how pipes are routed. Opening a nearby fixture valve gives an easy path for
air to enter the tank.
Remember to close these fixtures up before turning the water back on. If you forget to close open fixtures you'll either hear them running when the pump is turned back on, or you'll notice that the pump just runs and runs when it's turned on.
Also, as a general warning, if you find any building water control valves hard to operate, leave them alone or you may cause a leak, or you may open the valve and be unable to close it later. Older, unused valves are often best left alone until you have a plumber and spare parts readily at-hand.
- Use that Schrader Valve: Once no pressure is left in
the tank, since you have a Schrader valve on the tank you can just press the
little valve pin in the center of the valve. You might get a little squirt of water.
This means the tank is still under pressure.
- When to stop letting air into the tank - gravity
method: Using this "gravity method" you simply let ALL of the
water out of the tank. Once air is hissing and bubbling into the tank and
water is gurgling out of the garden hose you're nearly home free. Just let it
run until nothing is happening.
You can't make a mistake since any excess air will be automatically purged later when you run various fixtures. - Close the tank drain and remove the garden hose. Also close any other valves or fixtures you may have opened
in the building.
Warning about loss of pump prime: in a few instances, draining the water tank can also drain water out of the pump itself - if the pump is inside the building. Some (indoor) water pumps, if drained dry, won't be able to lift water back into the system.
Such pumps need to be re-primed. This is a use for that water we told you to run and set aside before beginning your project. Pumps that need to be primed will have a fitting (or a simple pipe plug) atop the water pump housing itself that is opened, and into which pump priming water is poured until this chamber is filled - usually a quart is about enough to refill the pump. This is never a problem with submersible (in-the-well) water pumps. - Turn electric power to the well water pump back on.
- Check for leaks: Walk calmly back to the water pressure tank and listen and watch for leaks.
- Water Leaks Found: Is water squirting all over the place?
- It is? Remain calm. It's just water. Humans are mostly made out of water anyway. If the leak is significant, turn off electric power to the water pump, using the switch at the pump ONLY if you're not also standing on a wet floor. If the floor is wet, go to the electric panel and turn the pump off there.
- Water tank drain valve leak: If it's leaking from the tank drain try closing it off more tightly. If it won't stop leaking there you need to turn off the electric power once again and go out to buy a garden hose end-cap to screw over the tank drain so you can use the system while waiting for a plumber to replace the drain valve washer or parts. Don't' forget to get a hose washer to fit inside the garden-hose cap or the cap will leak too.
- Water tank Schrader valve water leak: If water is leaking from the Schrader Valve try just pressing the valve tip down and releasing it a couple of times. This will usually re-seat the valve stem and leaking will stop. If this doesn't work, borrow a valve stem cap from your car and screw it over the Schrader valve end to stop the leak. This will let you use the system until a plumber can replace the valve stem core or replace the valve.
- Other water leaks: if water is leaking from somewhere else you did something we didn't anticipate and you'll need to shut off the system and call me or call a plumber.
- Air leaks in the plumbing system: Is air hissing out of somewhere?
- Remain calm. We can fix this too. After all, humans breathe air. It's not so bad.
- Schrader valve air leak: if air is leaking out of this valve follow the Schrader valve water leak procedure just above. You might have to jiggle the valve stem a few times or wait a full minute then try again. This almost always works. If not use a tire valve cap to close off the leak as described above.
- Air volume control air leak: If air is hissing
out from the air volume control you can almost always stop it by pressing a
finger a time or two for a few seconds or more atop the leaking hole.
You can find the hole buy simply feeling for where air is squirting out. The back pressure created when you press your finger over the leak will often clean and re-seat the little valve in this device. If this doesn't work you might try just letting the tank fill up with water to see what happens.
No big flood is going to occur. If water keeps on leaking out of the tank you'll need to shut off the electric power and call a plumber to replace the valve. (A rare requirement.) I hate these AVC's anyway as they so often are worthless. On my systems if the AVC gives me trouble we take it off and throw it away, screwing a plug into wherever it was mounted. So there! - Air leaks at plumbing fixtures in the building: using this method we've put a lot of air into the pressure tank. When the pump
first comes on some air will be pushed up into the building piping.
Don't worry, it won't hurt a thing. But when you first run water at various fixtures some air may come squirting out with the water. This problem will correct itself as soon as you've run a minute or so of water at the offending fixture. Don't worry, it's normal. - If air is leaking out of somewhere else I'd love to hear about it, as we can't imagine what you did. You may try waiting a few minutes to see if it stops. In worst case you'll have some water spillage and you'll need to call a plumber.
- That's it. You've finished restoring lost air from the building water supply pressure tank!
3-Alt: Alternative procedure for fine-tuning bladder-type water tank air pressure
This alternative method for fine-tuning the air pressure setting in a water pressure tank was suggested by reader Mark Caruso. CONTACT
us to suggest changes and additions to this water tank procedure.
Watch out: The water tank air pressure adjustment described below is only suitable if your water tank is already working normally and if there is no evidence of a waterlogged pressure tank, significant water pressure tank air loss, or
Note that adjusting the water tank air pressure is not a substitute for adjusting the water tank pressure control switch discussed
at WATER PRESSURE CONTROL SWITCH ADJUSTMENTS.
The pressure control switch sets the cut in and cut out pressures of the water supply system. The proper volume of air in the pressure tank avoids short cycling of the water pump as we discuss beginning
at SHORT CYCLING WATER PUMP.
Mr. Caruso's alternate idea for fine-tuning a non-waterlogged water pressure tank air charge includes these four simple steps:
- Close off all plumbing fixtures that are using water in the building.
- Turn on the water pump and let the system run until the water pump turns off (the system water pressure has reached the "cut out" pressure set on the pump control switch).
- Open one or more plumbing fixtures to drain the water pressure in the system; during this draining, monitor the air pressure;
note the air pressure at which the water pump restarts – this calibration tells you approximately the current pump cut-in pressure setting as measured with your water tank pressure gauge. We say "approximately because pressure gauges are not precise and sometimes give very inaccurate readings.
See WATER PRESSURE GAUGE ACCURACY. - Use this calibration setting minus 2 psi to charge the water tank air bladder following the procedure described
at WATER TANK BLADDER PRESSURE ADJUSTMENT
Bladder type or "captive air" water tanks do not normally need to have makeup air added, and water pressure or short cycling problems with bladder-type water tanks are usually traced to a failure of the bladder itself - a component that may be replaceable.
See WATER TANK BLADDERS & CAPTIVE AIR.
Reader Comments & Q&A
On 2019-01-19 by Anonymous
Thank you very much for the guide. I've found it extremely helpful. Easily the most helpful guide online.
On 2018-07-06 - by (mod) -
Glad this helped you out, Carbon. Indeed for your tank the drain down is a pretty easy procedure and avoids having to be too precise. Happily any excess air will simply get pushed out of faucets.
On 2018-07-05 by Carbon
You guys have just made my life so much easier. I've building air pressure in my tank up to 28 psi for years because I thought that was the correct procedure. Turns out I have a bladderless tank so I've been spending way too much time an effort on this task. Thanks!!!!
On 2017-04-12 - by (mod) -
Thank you for the nice comment T.B. We work hard to provide accurate unbiased information for our readers so I'm really pleased when you find it useful. We also welcome criticism and content suggestions.
Daniel
On 2017-04-10 by T Bingham
To the creators and maintainers of Inspectapedia. Your resource and instruction made possible the repair and function of my well Pump/pressure tank
possible, Thank You!
On 2016-09-24 by Marc
I'd like to try this, but I have an in-house jet pump and I'm not sure how to re-prime it afterwards. I'm pretty sure all the fittings are rusted in place anyway. The tank inlet is higher than the pump outlet; is there a good chance it will hold its prime while I drain the tank?
Question: hissing sound coming from my well
There is a hissing sound coming from my well, and the submersible pump is brand new, and the power is turned off to the well pump. What is causing this? - Candace Hanscom 11/25/11
Reply:
Candace, hissing may be air being vented inside the well from a snifter valve. We explain the snifter valve
at WATER TANK AIR VOLUME CONTROLS - or you can search InspectAPedia for "How to Find & Repair the Water Tank Air Volume Control Device" to read more about that device.
Question: my bladderless water tank becomes waterlogged quickly after draining
I have a bladderless tank which rapidly becomes waterlogged after draining. I drain it completely using a hose (the tank is placed very high) - that is, until no more water comes out (and I have opened house faucets to let air in). Immediately after this, the short-cycling is much better (pump running 15 seconds not 1 second) but within a day short cycling starts again. I suspect I have water trapped in the tank but I'm reluctant to remove the top plug from the tank in case I damage things. No Schrader on the tank. Paul Adams 5/14/12
Reply:
Paul,
If all piping connections to your water tank come off of the bottom of the tank it can be quite difficult to fully drain all water out of the tank at it's bottom. For example if draining the tank through a garden hose, air movement back up the hose, or from other house piping can be agonizingly slow. One needs patience and hours, or a way to allow or even to push air into the tank so that it cn drain fully.
If the tank remains heavy it still contains quite a bit of water.
Options for the case you describe are to open a tap at the tank top, being prepared to clen up and reseal that connection, or to drain via the tank drain valve right at the tank, not through a hose, or to push air into the tnk using a pump or can of compressed air connected to a schrader valve found on or added to the tank
If the high or top plug on your tank is removed, using an appropriately sized adapter bushing, yo could install an air valve there.
You should be seeing a longer drawdown cycle.
...
Continue reading at WATER TANK AIR HOW MUCH TO ADD or select a topic from the closely-related articles below, or see the complete ARTICLE INDEX.
Or see these
Recommended Articles
- AIR VOLUME CONTROLS, WATER TANK
- WATER TANK AIR ADD BY DRAINING
- WATER TANK AIR, HOW TO ADD other methods for replacing a lost air charge in a water pressure tank.
- WATER TANK AIR HOW MUCH TO ADD
- WATER TANK DIAGNOSIS & REPAIR - home
Suggested citation for this web page
WATER TANK AIR ADD BY DRAINING at InspectApedia.com - online encyclopedia of building & environmental inspection, testing, diagnosis, repair, & problem prevention advice.
Or see this
INDEX to RELATED ARTICLES: ARTICLE INDEX to WATER SUPPLY, PUMPS TANKS WELLS & SPRINGS
Or use the SEARCH BOX found below to Ask a Question or Search InspectApedia
Ask a Question or Search InspectApedia
Try the search box just below, or if you prefer, post a question or comment in the Comments box below and we will respond promptly.
Search the InspectApedia website
Note: appearance of your Comment below may be delayed: if your comment contains an image, photograph, web link, or text that looks to the software as if it might be a web link, your posting will appear after it has been approved by a moderator. Apologies for the delay.
Only one image can be added per comment but you can post as many comments, and therefore images, as you like.
You will not receive a notification when a response to your question has been posted.
Please bookmark this page to make it easy for you to check back for our response.
Our Comment Box is provided by Countable Web Productions countable.ca
Citations & References
In addition to any citations in the article above, a full list is available on request.
- Thanks to reader Mark Caruso for discussing alternative methods for fine tuning the water pressure tank air pressure setting - July 2010
- Our recommended books about building & mechanical systems design, inspection, problem diagnosis, and repair, and about indoor environment and IAQ testing, diagnosis, and cleanup are at the InspectAPedia Bookstore. Also see our Book Reviews - InspectAPedia.
- In addition to citations & references found in this article, see the research citations given at the end of the related articles found at our suggested
CONTINUE READING or RECOMMENDED ARTICLES.
- Carson, Dunlop & Associates Ltd., 120 Carlton Street Suite 407, Toronto ON M5A 4K2. Tel: (416) 964-9415 1-800-268-7070 Email: info@carsondunlop.com. Alan Carson is a past president of ASHI, the American Society of Home Inspectors.
Thanks to Alan Carson and Bob Dunlop, for permission for InspectAPedia to use text excerpts from The HOME REFERENCE BOOK - the Encyclopedia of Homes and to use illustrations from The ILLUSTRATED HOME .
Carson Dunlop Associates provides extensive home inspection education and report writing material. In gratitude we provide links to tsome Carson Dunlop Associates products and services.
 | HOME | ABOUT | ASK a QUESTION | CONTACT | CONTENT USE POLICY | DESCRIPTION | POLICIES | PRIVACY | |
| © 2024 - 1985 Publisher InspectApedia.com - Daniel Friedman | |||||||||