
InspectAPedia® FREE Encyclopedia of Building & Environmental Construction, Diagnosis, Maintenance & Repair |
Question? Just ask us! InspectAPedia
|
 How to Install or Replace a Water Pump Pressure Control Switch
10 easy steps to install a water pump control switch
- POST a QUESTION or COMMENT about the steps in replacing a well pump pressure control switch
Water pump switch installation or replacement:
How to Replace a Water Pressure Control Switch that Sticks "ON" or "OFF" or is irregular.
Well pump & water tank pressure control switch repair or replacement procedures & wiring.
This article describes how to replace a water pressure control switch which is not working properly or perhaps is not working at all. We describe and illustrate how to find the pump switch, then we detail how to identify, remove, and replace the water pump pressure control switch for both above-ground pump and submersible well pump systems.
InspectAPedia tolerates no conflicts of interest. We have no relationship with advertisers, products, or services discussed at this website.
Water Pump Presssure Control Switch Replacement Procedure
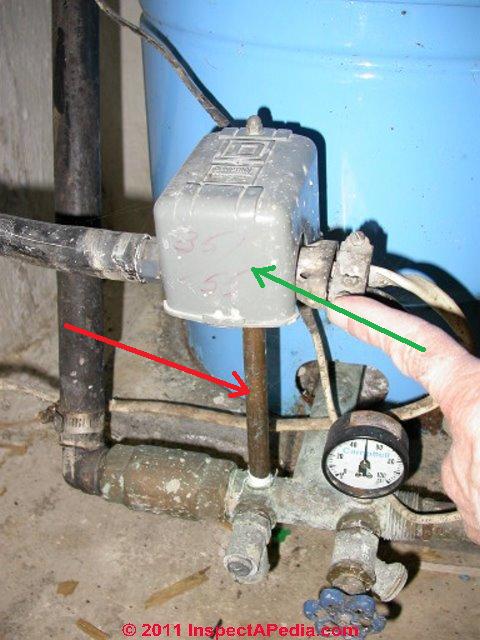
 In the sketch at page top the water pump pressure control switch is indicated by the green arrow; we show this switch in more details in photographs provided below.
[Click to enlarge any image]
How to Remove and Replace a Water Pump Pressure Control Switch
This article explains the detailed steps to install a new water pump pressure control switch, or the steps to follow to remove and replace an existing pump pressure control switch.
These pump switch instasllation tips will make removing and replacing the water pump control switch easier, and which will reduce the water spillage (or spray) into the room during this operation.
Really? Yeah. if you're like me you are replacing the entire pressure control switch assembly and its mounting tubing or the tubing that conducts water pressure to the pressure-sensing diaphragm on the switch base.
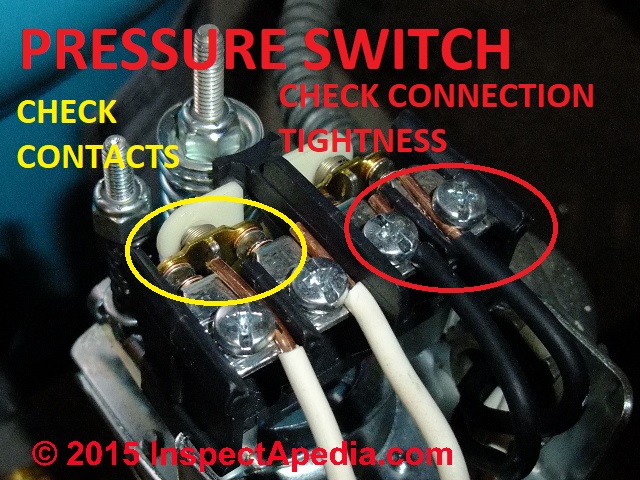
However if you're like a few of our more adventurous readers and you want to replace just burned pressure switch contacts or a diaphragm with a hole in it, see this separate article:
WATER PUMP PRESSURE SWITCH REPAIRS
- Turn off electrical power to the water pump. If you simply unscrew the pump control without first turning off the pump and taking pressure off of the water tank and pump, you will have a fountain of water squirting all over the place.
See WATER PUMP ELECTRICAL SWITCHES
If you make this mistake and if you can't easily simply screw the old parts right back in to stop the leak, (you'll only do it once) don't panic - it's just water. Just turn off the pump and open a nearby valve to take water pressure off of the system.
If the pressure control switch is mounted high, say on top of a well pump which is itself on top of a water tank, all you need to do is take pressure off the water tank – don’t need to drain it fully.
- Disconnect electrical wiring from the water pump control
Find the water pump pressure control switch:
first of course we need to find the pressure control switch. If you can't find the control,
see WATER PUMP PRESSURE SWITCH LOCATION.
The pump switch will be usually be located on the pump itself (above ground water pumps) or on a tee at the water pressure tank outlet.
If your pressure tank and pump controls are not inside the building they may be located in a basement crawl area or outside in a well pit.
(WELL PITS).
On a building water pump-operated water supply system there is virtually always a pressure control switch somewhere; on some irrigation systems or other special designs the pump may operate only with an "off-on" switch and there may be no pressure tank and pressure control switch.
Take a photo of your wiring connections before you touch anything, then you might as well as label the wires and perhaps make a little sketch showing which wires connected to which of the two or four terminals on the switch.
Watch out: you can be killed by electrocution. Be sure that electrical power has been turned off, confirm that power is off using a neon tester or VOM. If you are not skilled and trained in this work, hire an electrician or plumber to do these tasks.
Mark the electrical wires and their proper connection points
on the water pressure control switch. If you're proceeding on your own, mark and label each wire and each terminal that it was connected to so that you can replace the wiring correctly later.
- Remove water pressure from the water tank
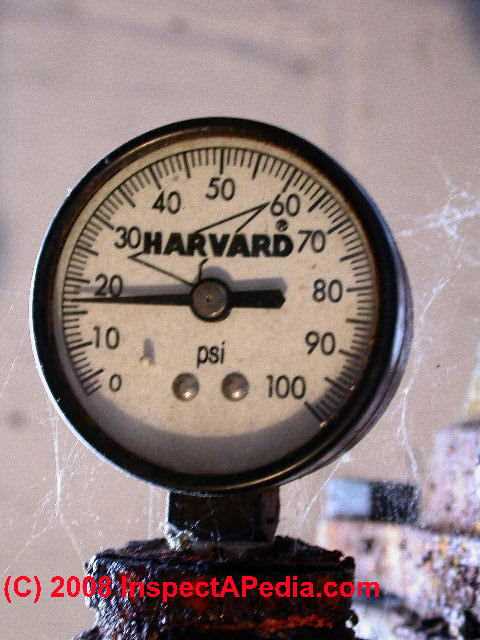
(see that gauge in my photo: if there's water pressure on your system you'll have it squirting all over the place if you don't remove pressure before opening any plumbing fittings: remove water pressure from the water tank and pump by opening a nearby faucet or tub, or by connecting a garden hose to the water tank drain and running the hose outside.
You might not need to drain all of the water out of the water tank:
- Water tank full drain down method #1:
If the pump pressure control switch is mounted at the bottom of the water tank
– you can drain the water tank completely, but watch out for losing pump prime on some older types of pumps
– take some water into reserve containers in case re priming of an old jet pump is needed at the end of this repair.
This will not be a concern the well pump is a submersible one down in the well since such pumps are self-priming. - Water tank partial drain down method #2:
you can take the water pressure off of the water tank, down to say 5 or 10 psi, and speed up the repair process by following these steps:
- Enlist the aid of an accomplice whose role we'll explain in a minute
- Have all water pump control repair parts you might need close at hand and prepared for use
- a new little riser pipe
- a pipe plug of the same thread and diameter as the pump control mounting pipe you’re removing
- Pipe dope or teflon tape
- All new parts you intend to replace
- Water tank full drain down method #1:
- Unscrew the old parts
Block leaking water with a finger or a pipe plug.
As you remove them and water begins to flow out of the opening where the control was mounted, the accomplice simply puts his/her finger over the hole and keeps it there while you do your control checkout or prepare the replacement to screw in – it’s easy to hold back 5 psi with a finger over a small hole.
If you don’t have an assistant, remove the old parts, and through the flowing water out of the threaded opening, screw in the pipe plug you bought for that purpose (cheap assistant) to close the leak, then go on to investigate the control or prepare and re-install the new one. - Replace the pump pressure control parts
with the new ones or the repaired ones you've got at hand.
we like to prepare the new replacement parts with pipe dope or teflon tape before taking apart the old ones - that makes it quicker and neater in reassembling the pump pressure control switch with minimum water spillage.
- Reconnect the electrical wiring
to the water pump control just as the previous control was wired.
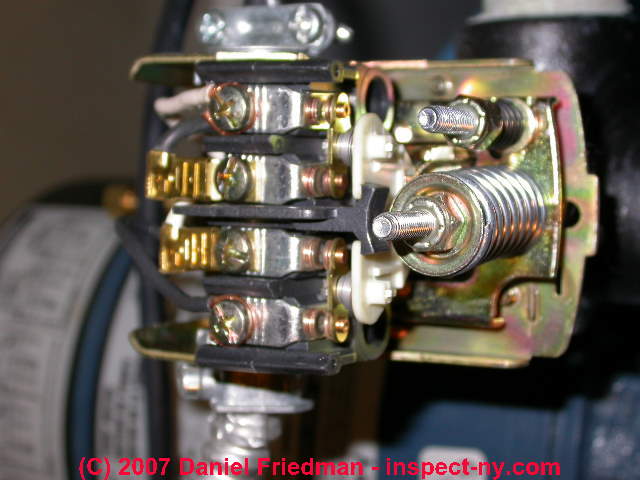
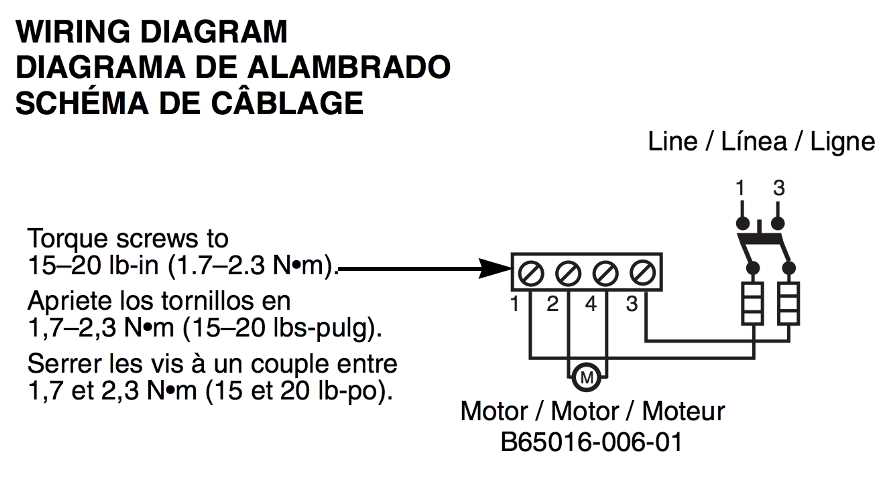
For a 120V circuit, there will be four electrical wires, two line-in wires (hot and neutral wires) from the power source are connected to two screws which may be indicated as "Line" by markings on the switch, and two line-out wires (hot and neutral wires) bringing power out of the control and on to the water pump.
Watch out: also, as the manufacturer (Schneider Electric for Square D Pumptrol wiring connections),
Electrical equipment should be serviced only by qualified electrical maintenance personnel. No responsibility is assumed by Square D [ nor by InspectApedia.com ] for any consequences arising out of the use of this material. - Pumptrol Pressure Switch Installation & Wiring Instructions (2010), retrieved 1 April 2015, Schneider Electric USA 8001 Knightdale Blvd. Knightdale, NC 27545 1-888-SquareD (1-888-778-2733) www.us.SquareD.com
Below is a simple wiring diagram example using a Square D Pumptrol installation schematic and a photo of a typical pump wiring hook-up.
Watch out: If your pump pressure control switch is controlling a higher capacity submersible well pump, the electrical wires leaving the control may feed a separate heavy duty pump relay switch rather than going directly to the water pump. Well pump relay control panels are discussed separately
at WATER PUMP RELAY SWITCH.
[Click to enlarge any image]
- Turn off any faucets you opened earlier
to remove pressure from the water system. - Turn the water pump electrical power back on

- Watch the water tank pressure gauge,
and when you have about 20 psi in the system (our gauge reading shown here is a bit too high) turn the water pump power back off and check the system for leaks.
Wipe dry any wet parts, especially around the bottom of the pump control and where the pump control mounting pipe or fitting mounts into the water pump or water tank fitting.
Inspect your plumbing connections closely for water seeping out - if you have leaks go back to step 1 or 2 and re-make your connections with better preparation of the threads with pipe dope or teflon tape.
If you need to adjust the operating pressure range of the pressure switch see "How to Adjust Water Pump Pressure" given just below. - When you confirm that there are no water leaks, turn your pump power back on
and the system should operate normally.
IF the well pump is still not turning on and off properly you probably have another or a different problem.
See the other water pressure and water pump control diagnostic articles listed
at WATER PUMP PRESSURE CONTROL REPAIR - home
- How to Adjust Water Pump Pressure:
The procedure for inspecting and adjusting the water pressure control switch is discussed in detail
at WATER PRESSURE CONTROL SWITCH ADJUSTMENTS.
If you wish, still more excruciatingly-exact details about adjusting a pressure control switch, including which way to turn the larger range nut and the smaller differential nut are found
at WATER PRESSURE CONTROL SWITCH ADJUSTMENTS
At WATER TANK BLADDER PRESSURE ADJUSTMENT we discuss fine tuning the pump pressure control switch to work perfectly with the exact air pressure pre-charge in a bladder type well tank.
Reader Question: how do I replace the well pump pressure control switch shown in this photo?
Regarding your text stating that
"Other pressure control switches may be bolted right to the pump motor and may use a flexible plastic or copper tube to transmit water pressure to the switch....."If this pipe (usually ¼” or 1/8” IPT diameter) is clogged...."
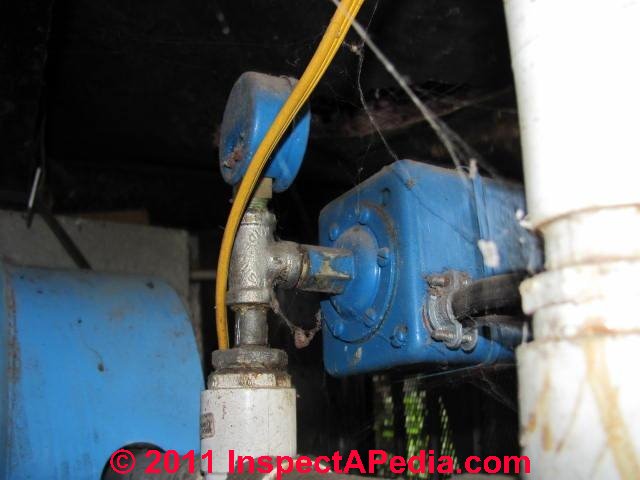
There is no such tubing [visible] on my system (see the photo at left), yet switches I looked at, at HomeDepot.com mention "1/4 in. pressure connection".
Am I going to run into a problem if I don't have this tubing? Can I still use such a switch? Here is a picture of back of the pressure control switch.
Reply: You'll be fine with a new pressure control switch, a close nipple (iron pipe thread) of brass or galvanized steel, and some teflon pipe tape or pipe sealant.
It looks like your switch a 1/4" rather than 1/8" diameter iron pipe though I'm not quite sure from just the photo. Larger diameter gauge and pressure switch mounting pipe means less likely for the pipe itself to clog with sediment, rust, debris. But the principle is the same.
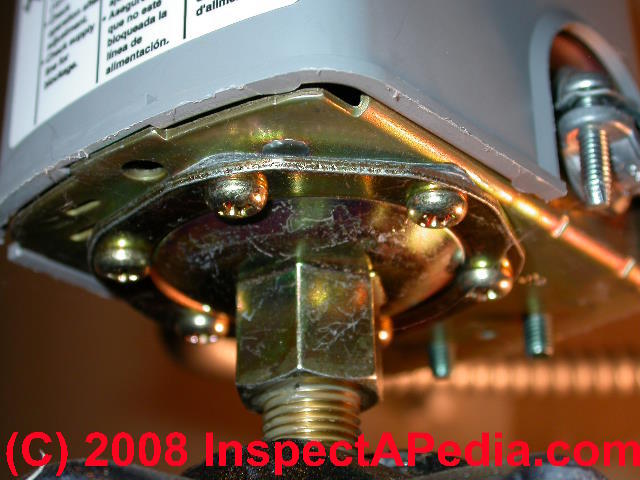
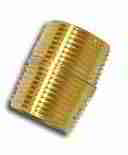
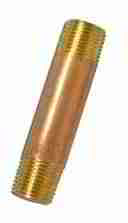
The reason you don't see a "tube' or mounting pipe is that your pressure switch connecting base (red arrow in photo above) is screwed directly into that galvanized iron tee (green arrow), almost certainly using a "close nipple". See our brass close-nipple photo at left and see the white marking line in photo above showing where that part is hidden.
A close nipple is nothing more than a very short section of threaded pipe. (photo at left). For comparison, here is a photo of a standard pipe nipple, also made of brass in this case.
You can see another close nipple in your photo above - between the galvanized pipe tee and the metal to plastic bushing that adapts the whole setup to fit into that white plastic fitting (between the green and yellow arrows in our annotated photo).
When you unscrew the pressure control switch from the pipe tee shown in your photo, the close nipple will either come out with and remain attached to the switch bottom or it will remain screwed into the tee.
If the close nipple remains screwed into the tee and does not move at all, you may be able to screw the new switch right onto it.
Watch out. If the close pipe nipple moves in the tee but you try just leaving it in place you may have a leak when you repressurize the system.
To change out the pressure switch shown in the photo above,
you'd turn off power, remove wiring from the switch, drain pressure off of the water pressure tank to reduce the spillage when you remove the switch, then carefully unscrew the switch (attach a wrench to the fitting on the bottom of the switch) from the pipe
. I'd probably use a small pipe wrench or Vise-Grip™ tool to remove the old close nipple from whichever side of the fittings it remained, and I'd install a new one to be sure my installation didn't leak.
Your plumbing supplier can supply you with both a threaded pipe nipple of the proper diameter and a new pressure switch (whose bottom typically includes a mounting fitting sporting a female NPT threaded fitting intended to screw onto a pipe, tube, or close nipple).
(Some pressure switches might be supplied with a male threaded bottom fitting instead of female - check the parts before you leave the supplier so you have what you need to make the new connection.)
Watch out: because your whole setup of switch and gauge are mounted in a larger diameter PVC plastic pipe fitting (yellow arrow in photo above), if the switch is hard to unscrew you risk breaking that plastic part - which would mean more work to repair the system.
Avoid this problem by using two wrenches, one holding the metal pipe tee into which the switch base is screwed, and the other turning the switch base against the tee. That will avoid stressing and breaking the plastic.
Use a bit of teflon tape or pipe dope when mounting the new switch but don't blob pipe dope or tape into the switch bottom where it might block the sensing switch diaphragm orifice.
Is a Pressure Control Switch Required in Water Pump Installations?
Reader Question: the switch that turns my pump on and off broke off: can I just wire the pump directly?
Hi I have a sta rite well pump that I had to pull up to replace the foot valve in but after replacing it and putting the pump back in my switch that turns it on and off broke and the pump wouldn't turn on.
So my father in law has the same pump but doesn't have a switch it's just wired in with the 4 screw diagram in this tutorial so my question is how would I wire this so it will come on and just just by pass the switch and let the breaker control on\off? Thanx for any help - R.V. 10/17/2013
Reply: Yes. Where to find Pentair's Sta-Rite well pump installation guides & wiring instructions:
I'll be glad to help,R.V., but to do so I need to know which pump you have installed (there are several Sta Rite models); we'll review the manufacturer's installation and wiring instructions.
A more general answer is that every pump-operated water system will have some kind of control that turns the pump on and off. If the water system uses a pressure tank then there should be a pressure control switch close to the tank. Some other types of water pumps such as constant-pressure tankless systems may use a pump that contains its own built-in pressure switch.
See WATER PUMP PRESSURE SWITCH LOCATION for details.
Since I'm not sure what's going on at your pump or what you meant by "this tutorial", and not knowing just what broke, I describe two possible cases:
- If you are talking about the pump power on-off switch, it should be trivial to wire the pump through an external 120V (or if needed 240V) wall mounted electrical switch. In fact there should already be such a switch installed at or near the pump;
- If you are talking about having broken off a pressure control switch, you need to buy and install a new one.
Watch out: in general we would not want to wire up a well water pump to simply be "always on" nor would we wire a home water pump to run without a pressure control switch for several reasons:
- It's dangerous - risking an electrical overheat, melted wires, short circuit, fire or shock.
- It's dangerous - risking bursting a water pressure tank if excessive pressures are created in the system, particularly if the pump is a powerful model or a typical submersible unit;
- We risk a burst pipe, leaks, building damage
- We risk damaging the pump
- We are probably violating the manufacturer's instructions and thus the pump warranty too.
Certainly a review of typical installation instructions for a Sta-Rite deep-well jet pump makes amply clear that the company expects the pump to be powered and controlled through a pressure control switch.
In an emergency I would not hesitate to wire a pump to be turned on and off manually provided that a competent person were standing by the power switch to turn the pump on and off as needed; I would never leave such an emergency hookup in the "ON" Position for the reasons cited above.
Send me some sharp photos of the pump, its identifying labels, and also photos from a distance so I can see how the pump is hooked up and wired presently. When I have seen which pump you have, we can figure this out together.
If you want to contact the company directly, Sta Rite well pumps are provided by Pentair under the brand Sta-Rite - their website is at http://www.sta-rite.com/ and their page on water pumps and systems is at http://www.sta-rite.com/
- See WATER PUMP PRESSURE SWITCH MANUALS for pressure control switch installation instructions from various manufacturers
- Sta-Rite / Pentair USA 293 Wright Street Delavan, WI 53115 Tel: 888-782-7483 Orders Fax: 800-426-9446
- Sta-Rite / Pentair Canada 490 Pinebush Road, Unit 4 Cambridge, Ontario, Canada, N1T 0A5 Phone:300-363-7867 Fax:888-606-5484
Water Pump Pressure Control Switch Location
Where on the plumbing system should the pressure control switch be located & mounted? The answer has moved to a new page at WATER PUMP PRESSURE SWITCH LOCATION.
...
Reader Comments, Questions & Answers About The Article Above
Below you will find questions and answers previously posted on this page at its page bottom reader comment box.
Reader Q&A - also see RECOMMENDED ARTICLES & FAQs
On 2020-06-23 by Linda - how do I reconnect pump control wires?
Husband pulled all wires did not number them. What do I do
On 2020-06-25 - by (mod) -
Watch out: if you or he are / is not familiar with proper, safe electrical wiring you (or he) could be shocked or killed.
Identify the pump brand and model.
Pick up the IO manual for the pump
Check the wiring diagram in the manual
Identify the hot and neutral wires bringing power to the pump
DO NOT just hook up wires willy-nilly as that could result in shock or fire or worse.
On 2019-01-13 by amy - pump blows circuit breaker
My well comes on but blows circuit. I've checked contacts & cleaned. Still same problem. Got a new pressure switch. Same problem. So now looking for clog. Is there something I'm missing. Obviously I am. Thank you
On 2019-01-13 - by (mod) -
Amy
When pump operation trips a circuit breaker or blows a fuse I suspect
- a failing pump motor, perhaps a bad bearing or impeller or damaged winding
- shorted pump wiring anywhere in the circuit
Your electrician can measure the current draw when the pump tries to run - that's a useful diagnostic.
On 2018-07-19 by Anonymous - no water after I replaced the control switch
I replaced the switch and now have No water being pumped. I heard water comming to the tank for a short time but quit. Now-No water being pumped.
On 2018-11-21 - by (mod) -
We need to start with the statement of what the problem is. For example if the pump runs but doesn't deliver water that's a completely different direction of thought than the pump not turning on at all.
For a shortcut to finding out where the "no water" problem lies, start by checking out the diagnostics at NO WATER PRESSURE
If the pressure switch doesn't respond to changes in water pressure by turning the pump on or off when it should, that's a good reason to replace a switch.
But if the switch closes (to try to turn on the pump ) when pressure in the system drops to or below the CUT IN pressure (typically 20 psi or 30 psi) then the switch is working and we need to check
- for power to the pump
- that the pump is running
- that there's water in the well
- that well piping is connected
This diagnostic table is helpful: TABLE 1: PUMP WON'T RUN, WON'T STOP, or CYCLES
You can find those articles in the ARTICLE INDEX given just above.
Question: add a switch to protect water pump from damage?
(Apr 25, 2012) Ernie Parsons said:
I live in the North (Nunavut) and our water is supplied by truck and held in a 700 gal. tank. Sometimes when it storms and the trucks fall behind schedule and we run out of water. The problem is when this happens the pump continues to run and if we don't catch it quickly it heats up and ruins the impeller centre or the bearing. My question: is there a shut off I can install on the pump or water line that will shut the pump off when the tank is empty.
Reply:
Certainly, Ernie. Take a look at the controls described
Question: what's the right air charge for a bladderless water pressure tank?
(June 14, 2012) Mack said:
Replacing pressure switch on bladder-less tank. After I drain tank and replace switch, should I add some pressure to the the tank a few pounds below cut in (28 for a 30)as one would do with bladder tank or is this unnecessary? Thanks
Reply:
Mack, for a bladderless water tank if you empty the tank completely of water then most likely you won't have to add more pressure for the tank to work just fine when the pump is turned back on.
Question: pump won't come on
Aug 21, 2012) Dawn said:
When I turn on the watering system the pump does not come on but the relay switch box clicks and it clicks when I turn it off as well. I was told it could be this. New to this so I just wanted your opinion
(Jan 15, 2013) Stacy V. said:
I replaced the switch and rewired everything correct. I can't get any spark or anything. I have power coming to the switch, but still nothing??? HELP!!! I have no water...
Reply:
Dawn and Stacey V:
take a look at WATER PUMP DIAGNOSTIC TABLE and let us know if that doesn't solve the problem you describe.
...
Continue reading at WATER PRESSURE CONTROL SWITCH ADJUSTMENTS or select a topic from the closely-related articles below, or see the complete ARTICLE INDEX.
Or see WATER PUMP PRESSURE SWITCH INSTALL / REPLACE FAQs - questions and answers posted originally on this page.
Or see these
Recommended Articles
- WATER PUMP PRESSURE CONTROL SWITCH - home
- PUMP PRESSURE SWITCH STANDARD (PSI) SETTINGS
- WATER PRESSURE CONTROL SWITCH ADJUSTMENTS
- WATER PUMP PRESSURE SWITCH REPAIRS
- WATER PUMP PRESSURE SWITCH REPAIR KIT
- WATER PUMP PRESSURE SWITCH INSTALL / REPLACE
- WATER PUMP PRESSURE SWITCH LOCATION
- WATER PUMP PRESSURE SWITCH MANUALS
- WATER PUMP PRESSURE SWITCH SAFETY
Suggested citation for this web page
WATER PUMP PRESSURE SWITCH INSTALL / REPLACE at InspectApedia.com - online encyclopedia of building & environmental inspection, testing, diagnosis, repair, & problem prevention advice.
Or see this
INDEX to RELATED ARTICLES: ARTICLE INDEX to WATER SUPPLY, PUMPS TANKS WELLS
Or use the SEARCH BOX found below to Ask a Question or Search InspectApedia
Ask a Question or Search InspectApedia
Try the search box just below, or if you prefer, post a question or comment in the Comments box below and we will respond promptly.
Search the InspectApedia website
Note: appearance of your Comment below may be delayed: if your comment contains an image, photograph, web link, or text that looks to the software as if it might be a web link, your posting will appear after it has been approved by a moderator. Apologies for the delay.
Only one image can be added per comment but you can post as many comments, and therefore images, as you like.
You will not receive a notification when a response to your question has been posted.
Please bookmark this page to make it easy for you to check back for our response.
Our Comment Box is provided by Countable Web Productions countable.ca
Citations & References
In addition to any citations in the article above, a full list is available on request.
- Access Water Energy, PO Box 2061, Moorabbin, VIC 3189, Australia, Tel: 1300 797 758, email: sales@accesswater.com.au Website: http://www.accesswater.com.au/
Moorabbin Office: Kingston Trade Centre, 100 Cochranes Rd, Moorabbin, VIC 3189
Australian supplier of: Greywater systems, Solar power to grid packages, Edwards solar systems, Vulcan compact solar systems, water & solar system pumps & controls, and a wide rage of above ground & under ground water storage tanks: concrete, steel, plastic, modular, and bladder storage tanks. - Grove Electric, Typical Shallow Well One Line Jet Pump Installation [PDF], Grove Electric, G&G Electric & Plumbing, 1900 NE 78th St., Suite 101, Vancouver WA 98665 www.grovelectric.com - web search -7/15/2010 original source: http://www.groverelectric.com/howto/38_Typical%20Jet%20Pump%20Installation.pdf
- Grove Electric, Typical Deep Well Two Line Jet Pump Installation [PDF], Grove Electric, G&G Electric & Plumbing, 1900 NE 78th St., Suite 101, Vancouver WA 98665 www.grovelectric.com - web search -7/15/2010 original source: http://www.groverelectric.com/howto/38_Typical%20Jet%20Pump%20Installation.pdf
- Pentair Sta Rite well pumps: Sta-Rite website is at http://www.sta-rite.com/
Sta-Rite / Pentair USA 293 Wright Street Delavan, WI 53115 Tel: 888-782-7483 Orders Fax: 800-426-9446 - Sta-Rite / Pentair Canada 490 Pinebush Road, Unit 4 Cambridge, Ontario, Canada, N1T 0A5 Phone:300-363-7867 Fax:888-606-5484
- In addition to citations & references found in this article, see the research citations given at the end of the related articles found at our suggested
CONTINUE READING or RECOMMENDED ARTICLES.
- Carson, Dunlop & Associates Ltd., 120 Carlton Street Suite 407, Toronto ON M5A 4K2. Tel: (416) 964-9415 1-800-268-7070 Email: info@carsondunlop.com. Alan Carson is a past president of ASHI, the American Society of Home Inspectors.
Thanks to Alan Carson and Bob Dunlop, for permission for InspectAPedia to use text excerpts from The HOME REFERENCE BOOK - the Encyclopedia of Homes and to use illustrations from The ILLUSTRATED HOME .
Carson Dunlop Associates provides extensive home inspection education and report writing material. In gratitude we provide links to tsome Carson Dunlop Associates products and services.
 | HOME | ABOUT | ASK a QUESTION | CONTACT | CONTENT USE POLICY | DESCRIPTION | POLICIES | PRIVACY | |
| © 2024 - 1985 Publisher InspectApedia.com - Daniel Friedman | |||||||||