
InspectAPedia® FREE Encyclopedia of Building & Environmental Construction, Diagnosis, Maintenance & Repair |
Question? Just ask us! InspectAPedia
|
 How to Repair or Replace the Air Valve on a Water Tank
- POST a QUESTION or COMMENT about the cause and repair of air or water leaks at air inlet valves on or near water pressure tanks
Water tank air inlet valve repair or replacement:
This article describes how to repair or replace leaky sater tank air valves or Schrader valves which are used for adding air to a water pressure tank such as the water tank air valve. Replacing a leaky air pressure adjustment valve on your water tank can avoid a costly tank replacement and can permit you to set the proper air pressure pre-charge in the water tank.
InspectAPedia tolerates no conflicts of interest. We have no relationship with advertisers, products, or services discussed at this website.
How to Fix a Leak at the Water Tank Air Charging Valve
 Sometimes when we remove the cap from a water tank air valve, or more likely when we try pumping air into the water tank at the water tank's air valve, we're troubled by water (or air) leaking back out at us from the valve - making us sorry we touched it in the first place.
If the air valve or "tire valve" or Schrader valve on your water tank is leaking water or air there are a few wonderfully easy steps you can take.
[Click to enlarge any image]
Step 0 - first Find the Air Inlet Valve on you water system
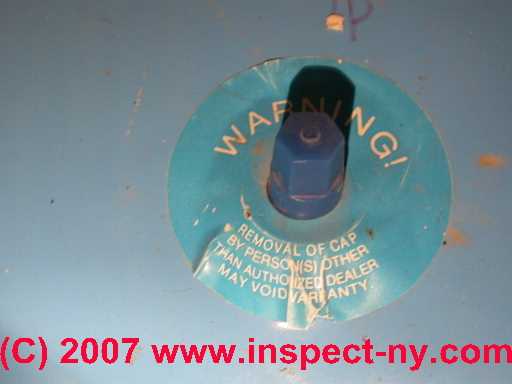
The air inlet valve location on an internal bladder type water pressure tank is illustrated in our photos just below. At left the air valve is under that red cap; at right is a similar tank whose air inlet valve is covered by a blue plastic cap. The air inlet valve will be located near the top of this type of water pressure tank.
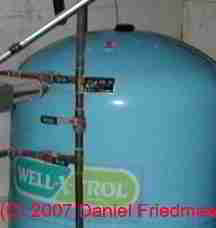
Watch out: except for an initial adjustment at the time of installation, you should not find it necessary to add air at this valve. However on occasion this valve can leak, losing the air charge in the water pressure tank. If this is the problem, the repair is simple as we'll explain below.
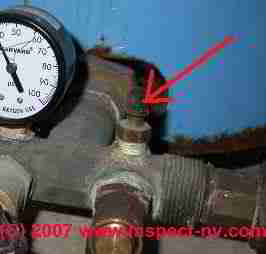
The air inlet valve on a bladderless water pressure tank may be at any of several locations: near the tank top, on the tank side, on a tee at the bottom of the water tank, or on well piping nearby.
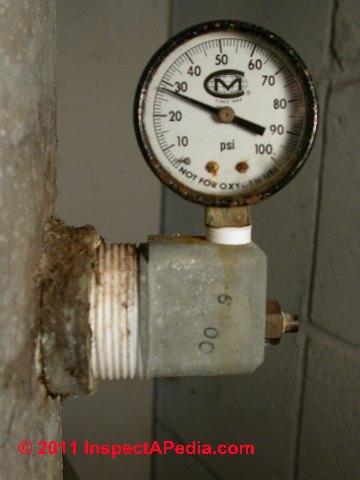
At left is an air inlet valve located on the tank tee near the bottom of (what was) a bladderless water pressure tank.
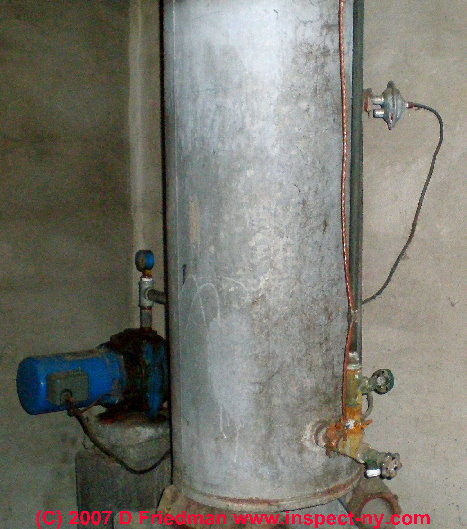
At below left we point to an air valve on an older galvanized steel water tank system. At below right there is an air volume control installed at the upper right side of the water tank but this system may not have an air inlet valve.
Watch out: watch out for old air valves in a location like the one shown at left. That installation previously served a bladderless water pressure tank.
If you see an air inlet valve in this location (shown at left) and the pressure tank uses an internal bladder, you should beware of pumping air into the tank at this valve - doing so may be mixing air into the tank bladder intended to hold only water - and you'll foul up the water tank operation.
In fact with an internal bladder type water pressure tank, except for a little adjustment at tank installation, one should never need to be adding air (unless the bladder is torn or ruptrued, in which case adding air is not the right fix anyway). - Thanks to reader Jay (8/2012) for suggesting this clarification.
Watch out: on some submersible pump well systems the air inlet valve is a special model intended to automatically allow air to enter the valve. Those air valves may look like any other schrader "tire" valve stem and internal valve assembly as those here, but the spring pressure and operating properties are different.
If you mix up parts the air inlet on a well served by a snifter valve may not work properly. Details about snifter valves and their air inlets and outlets are
at WATER TANK AIR VOLUME CONTROLS
with additional photos and explanation
at WATER TANK AIR ADD AT AIR VALVE.
Other water tank air inlet valve locations
- An air inlet valve may be installed in a tapping screwed into the side or top of the bladderless water pressure tank
- Integral as part of an air volume control devicer - in this case there may be an air inlet device but it is not a schrader valve - photo at left. If this tank is served by a submersible pump, don't forget to look for a snifter valve on the well piping for this system and a remote air inlet on the well piping above ground.
- On the well pump itself: on some one line or two line jet pumps an air inlet may be installed on a pump fitting.
- Depending on exactly where this valve is mounted it may not be a good location as you may find that you are pumping air into the pump body (instead of the water tank) and losing pump prime as a result.
- I wouldn't use an air valve in this location without advice from the plumber who installed it.
How to Check the Air Inlet Valve for Leaks & How to Replace the Valve Stem if Needed
We describe how to clean an air valve on a water tank to get it to stop leaking (water or air), how to make a simple emergency repair to force it to stop leaking, and how to replace a leaky valve stem core in a water tank air valve.

Step 1: Clear dirt on the valve stem internal parts on the water tank air valve:
The little tip that you see showing in the center of the water tank air valve stem is the part of the valve stem core that is depressed to open the air valve and permit air into the water pressure tank when you connect a tire pump or a can of compressed air.
Try just gently depressing the little pin exposed in the center of the valve stem. This pushes down a spring-loaded valve-stem core part that will let water or air flow OUT of the valve. Basically you are opening the valve.
You can use a pen tip or any small instrument. Here we're using a dental pick from our forensic lab but any small item that won't itself break off in the valve should work.
Don't bend or force the pin as you don't want to make things worse. Often by flushing out the seat of the valve stem core in this matter you'll remove some debris that was keeping the valve from closing fully in the first place - it may be the only repair step you need to stop leaks at a water tank air valve.
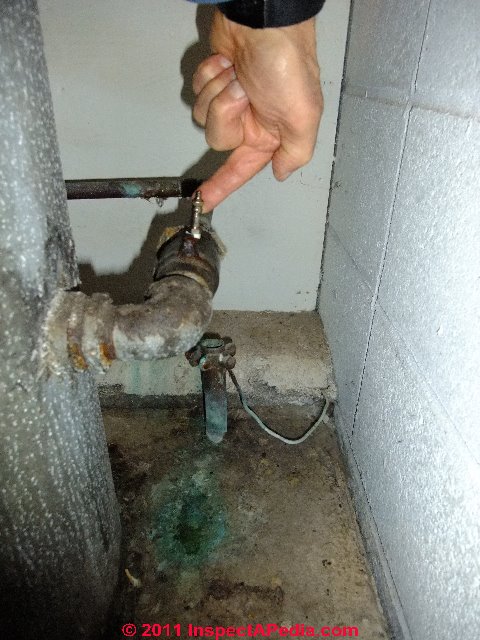
If your water tank is a "captive air" or bladder type tank you should feel air coming out of this valve when it's opened, but not water. If water comes out the water tank's bladder is ruptured and the tank bladder or whole tank need replacement. If your water tank is not a type that uses an internal bladder to keep water and air separated, OR if the air valve is located not on the water tank itself but at a plumbing fitting near the bottom of the water tank [PHOTO], you may find some water coming out of this valve. That's ok for now.
For an air valve located on top of any water tank, when the tank has been properly air-charged you should not see water coming out at the air valve.
See WATER TANK AIR, HOW TO ADD
Step 2: How to install a cap to stop a leaky water tank air valve: Just screw on a valve stem cap tightly.
If your water tank's air valve is leaking and there is no valve cap, run out your car and borrow a cap off of one of your tires or off of a nearby bicycle or motorcycle (you can replace the borrowed valve stem cap later today.)
Screw the cap tightly onto the air valve stem at your water tank.
This will usually stop any water leak and will slow way down an air leak at the water pressure tank's air inlet valve.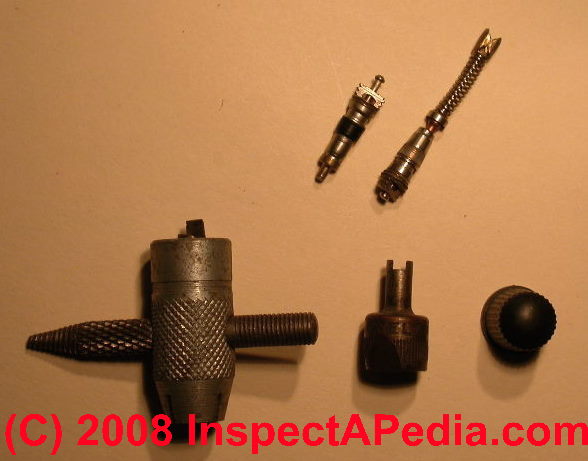
Step 3: Get the necessary parts and tool to replace a leaky water tank air valve:At your nearest auto parts supply store you can pick up the following inexpensive items you'll need to replace a leaky air valve on a water tank. Our photo shows from bottom left moving clockwise:
- A valve stem core removal/replacement tool - this is a little tool that will let you unscrew the old valve stem core and screw in a new one. Buy a good tool - it's still cheap and the better tool is more likely to be able to extract an old crusty valve stem core.
- A new valve stem core - (we show two types in this photo). This is a tiny valve part that screws into the center of your air valve stem. You'll want the short type valve stem core since it's most likely to fit your water tank without a problem.
The diameter and threads will be standard on all U.S. made water tanks and similar equipment using a Schrader valve design. Some bicycle tires and tires in other countries use a metric diameter and metric threaded valve stem and valve stem core which won't fit a U.S. made water tank air valve. - A new water tank air valve cap - this is just a tire valve stem cap. Plastic doesn't corrode, metal is stronger and probably seals better. In our photo we show both a black plastic valve stem cap and a metal valve stem cap. The metal tire valve cap at bottom center in our photo includes a handy feature - it can also be used as a tool to screw a valve stem core in or out.
Step 4: Replace the leaky water tank air valve core, using the parts at the step above and by following these simple steps:

- Turn off the water pump at its electrical switch
- Remove water pressure from the water tank by running water in the building until the tank pressure gauge is close to or at zero - you don't have to empty the water tank, just get most of the pressure off so you're not going to be squirted with water or air when you repair the valve
- Use the air valve stem core replacement tool and parts described above remove the valve stem cap and then to unscrew the old valve stem core and screw in the new one.
If you can't get the valve stem cap off it's OK to use a small pair of pliers to gently unscrew the cap (counterclockwise to loosen the cap).
If you can't unscrew the old valve stem core, try placing one drop of Liquid Wrench or a similar product into the valve stem on the threads that surround the core. Don't use excessive force - cross-threading the valve stem means the new core may not seal well and you'll be back to the emergency repair of just installing a tire valve cap on the valve stem. - Close any plumbing fixtures you opened to take pressure off of the water tank
- Turn the water pump back on and let it re-pressurize the water tank
- Check for leaks
Step 4 alternative: replace the entire leaky water tank valve assembly
It is also possible to replace the entire Schrader Valve assembly. If your old valve is badly damaged or leaks at its base where the valve screws into the water piping, or if you can't just screw in a new valve core this is what you'll need to do. In our photo above our pliers are loosening the black plastic valve stem cap.
Schrader valves whose body bottom is threaded and are screwed into a water tank or water pipe can be replaced entirely. Schrader valves that are welded to the top of a water tank cannot be replaced - just their valve stem core.
But alternatively you could use a small wrench to unscrew and replace the entire valve assembly Notice the white teflon tape we wrapped around the threaded part of the water tank air bleed valve assembly when we installed it in the first place. As we described above, you'll need to remove water pressure from the system to make a complete valve assembly replacement. First be sure you have on hand, in addition to the tools described above:
- Tool to loosen and then reinstall the valve assembly - it's a screw-in part.
- Pipe dope or teflon tape to seal the threads on the water tank air new valve assembly
- A new replacement water tank air valve - be sure the diameter of the threaded portion of your new valve matches the threads on the old one.
Step 5: Check for leaks at the water tank air valve - chances are very good that the air valve is no longer leaking. If it is still leaking you may be able to remove the stem core, clean the valve threads, and try again.
If that doesn't work you need a new water tank or a plumber who can change the entire valve assembly (unlikely).
Reader Comments, Questions & Answers About The Article Above
Below you will find questions and answers previously posted on this page at its page bottom reader comment box.
Reader Q&A - also see RECOMMENDED ARTICLES & FAQs
On 2020-07-30 by (mod)
Diep, if the water tank air valve is leaking around the rubber mount on the tank itself it's likely that the whole valve assembly needs to be replaced; Let's start with the brand and model of your water tank so that we can be sure that on your particular tank that valve can indeed be removed and replaced. If so, and assuming that there is no threaded valve base that you can simply un-screw, then it's typically a matter of combining brute force to pull out the old valve and some dish soap lubricant to get the new air valve base popped into palce.
On 2020-07-30 by Diep
I have a Flotec FP7120 pre charged pressure tank for well water lawn irrigation . The air valve on the top of the tank is suddenly licking. The leaking is at the base of the valve between the rubber of the air valve and the metal of the tank ( the air valve is the same as the car tire valve ) Please help me, let me know what I should do to fix it . Thank you very much . Diep .
On 2017-03-06 - by (mod) -
Ray,
Usually the air valve is a force-fit rubber grommet - perhaps more easily installed using soapy water.
On 2017-03-06 by ray
i have a 30 gallon pressure tank. losing air at air valve on top of the tank. changed the stem but didn!t help. air is escaping around the rubber gromett going into the tank. does the gromett just pull out to where i can replace it like on a car tire, or is it screwed in or attached to the bladder inside. thanking you in advance for your help.
On 2016-08-29 - by (mod) -
That may be OK, Carl.
On 2016-08-28 by Carl
I just installed a new avc on my tank and it still fills past the half point.
On 2016-01-14 - by (mod) -
Good going, and thanks for the feedback, as it will help others. Absolutely correct: the basic design of Schrader valves is rather standard. What varies is the rubber exterior and base diameter and mouting groove - if you matched that of the original you're good to go.
Also varying is the valve core or stem. On some water system operations such as snifter valves used to control air volume in bladderless water tanks (not your type) the valve core has to open at a much lower pressure. So we don't just plug in a tire valve in those cases. Youc case worked out fine. Kudos.
On 2016-01-13 by Anonymous
I bought a standard rubber tire valve stem this past weekend at our local department store, drained the tank and took the lower access panel off exposing the bladder, slid it to one side to get at the air valve, removed the old valve then compared it to the new one I just purchased, other than the old one being somewhat shorter in length they were almost identical, I installed the new one using soap to lubricate, put everything back together then aired the tank, all is good so far, no leaks. problem solved as far as I can see so a tire valve will work.
On 2016-01-05 - by (mod) -
If the valve does not fit perfectly the tank will leak. You can of course try a DIY version if you're prepared for a possible leak.
On 2016-01-05 by Anonymous
What is the difference, do you know? I was thinking the diameter possibly, I read where one fellow used a utility knife I'm thinking and trimmed one down to fit, personally this isn't my style of work or anything I'd put my name on, I was just hoping to locate something through another means that might be able to stretch into that hole since it is rubber but not to the point it's too tight and could tear. I worked in the tire business for years and swear this stem looks like a standard tire type but knowing that business I realize tire stems differ in size. I was also thinking of trying a steel type that has grommets and was designed to fit multiple size rims which might work here. the hole appears to be on a flat surface so I would think I should be able to find something to work. in the end if nothing else I can try ordering one but as it is right now we're dealing with a pump cycling more often than it should and I don't need that to replace right now as well.
On 2016-01-05 - by (mod) -
Anon
The auto parts store valve looks identical but it's not: the valve stem is specifically made to mount on your water tank.
On 2016-01-05 by Anonymous
I have a Sta-Rite or Prosource (which is preferred I guess since everything I've found references to both)air tank that has a rubber air valve like a car tire would, this valve is dry rotten and requires replacement, my problem is finding out what size I need to get, I've searched high and low to determine what the tank hole size is without any luck thus far. The tank model is PS42-T02 is there anything you can offer in help with this? The part number offered by the manufacture lists a valve with cap # U212-160B which I will need to order, I think this can be cross referenced with something I could locate easier via a local auto parts store if I could confirm it's diameter.
Question:
My water tank has a rubber valve and when I press pin in middle no air comes out and when i try to put air in with pump no air goes in . i replaced new pin in valve still nothing what should i do. points are cycling - Anon 5/8/11
Reply:
Anon: I can only guess with so little information, but sometimes the bladder in a water pressure tank bursts in such as way that it collapses blocking water into the tank or air into the tank. If your tan k is a bladder type and you press the center pin in the air valve, water (or in some designs air) would come out if there was pressure in the tank and the valve itself is not blocked.
The well pump short cycling that you refer to suggests that the tank has lost its air charge and is water logged. If it's a bladder type tank you may need a new bladder in the tank or a whole new tank assembly.
FIrst check that that valve is really blocked. Auto supply stores sell a tool that will remove and replace the pin in the center of the Schrader valve - it's about the same as the air valve on a tire.
Question:
yowser dude that valve is in a location that will not work with a "captive air pressure tank with this set up it would be mixing air with the water in all modern tanks since at least the 1970s the tanks have the water on one side of a diaphagm [or bladder] and the air on the outside of it either by crimping a diapragm to the actual side of the tank as in well-x- troll brands of tanks or by having a bladder directly attached to the water inlet[inside of the tank] and the airvale will be welded or threaded to the top side of the actual tank putting it on the external plumbing does nothing for the tank
heck even if it was an old galvanized tank it "could" work where you have it but would still not be correct because it would be a large PITA to aircharge in because you would have to pump air in then laet water out then pump more air in then let more waer out several times ,in short it would take alot of uneccessary time to charge the tank that way - Jay 8/13/12
Reply:
Thanks so much Jay, you are quite right. The plumbing shown in those photos was from an old installation whose original tank was a unit that did not use an internal bladder. And quite so, on an internal bladder type water pressure tank the schrade valve will be somewhere on or near the tank top, not at the tee on the water line.
I have adjusted the article text to make that distinction clear - as I agree that we don't want to treat a bladder type tank incorrectly.
I have also added a warning to watch out for old air valves in a location that served a prior tank - and not to use those to charge the new tank. In fact with an internal bladder type water pressure tank, except for a little adjustment at tank installation, one should never be adding air.
The only point where we don't agree, is that with a bladderless tank you don't really have to keep cycling through draining the tank to add air. As long as the incoming air is at a pressure higher than the tank pressure (easy to do, just turn off the pump and run water until pressure in the system drops), then air will have no trouble entering the water tank. It'll be compressed of course, depending on the pressure. But as long as you drain off pressure at the start of the operation, one air pumping-in cycle should be enough.
BTW, this particular water tank repair article (above) where our discussion is (for now) posted is not about air charging, it's about how to replace a leaky valve stem - a process that would be the same on all types of water pressure tanks that had an air inlet valve, regardless of its location.
Question:
(Aug 13, 2014) Anonymous said:
I have a fairly new Myers MPD 20 tank, about 8 years. It is now leaking at the valve unit itself where it fits to the tank. Is there any solution short of buying an expensive new tank? Can it be repaired or replaced. It is not a big leak but over time it floods the flooring.
thanks. Donatus.
Reply:
If the tank tapping for the air valve is badly corroded your options are to tap out to a larger size, epoxy a repairfitting (which may be unreliable) , or replace the tank
...
Continue reading at WATER TANK AIR, HOW TO ADD or select a topic from the closely-related articles below, or see the complete ARTICLE INDEX.
An explanation of what water tank air valves are, what they look like, how to find them, is at WATER TANK AIR INLET VALVE.
To use the water tank air valve to put air into a water pressure tank, see details at WATER TANK AIR ADD AT AIR VALVE
Suggested citation for this web page
WATER TANK AIR VALVE REPAIRS at InspectApedia.com - online encyclopedia of building & environmental inspection, testing, diagnosis, repair, & problem prevention advice.
Or see this
INDEX to RELATED ARTICLES: ARTICLE INDEX to WATER SUPPLY, PUMPS TANKS WELLS & SPRINGS
Or use the SEARCH BOX found below to Ask a Question or Search InspectApedia
Ask a Question or Search InspectApedia
Try the search box just below, or if you prefer, post a question or comment in the Comments box below and we will respond promptly.
Search the InspectApedia website
Note: appearance of your Comment below may be delayed: if your comment contains an image, photograph, web link, or text that looks to the software as if it might be a web link, your posting will appear after it has been approved by a moderator. Apologies for the delay.
Only one image can be added per comment but you can post as many comments, and therefore images, as you like.
You will not receive a notification when a response to your question has been posted.
Please bookmark this page to make it easy for you to check back for our response.
Our Comment Box is provided by Countable Web Productions countable.ca
Citations & References
In addition to any citations in the article above, a full list is available on request.
- Access Water Energy, PO Box 2061, Moorabbin, VIC 3189, Australia, Tel: 1300 797 758, email: sales@accesswater.com.au Website: http://www.accesswater.com.au/
Moorabbin Office: Kingston Trade Centre, 100 Cochranes Rd, Moorabbin, VIC 3189
Australian supplier of: Greywater systems, Solar power to grid packages, Edwards solar systems, Vulcan compact solar systems, water & solar system pumps & controls, and a wide rage of above ground & under ground water storage tanks: concrete, steel, plastic, modular, and bladder storage tanks. - Our recommended books about building & mechanical systems design, inspection, problem diagnosis, and repair, and about indoor environment and IAQ testing, diagnosis, and cleanup are at the InspectAPedia Bookstore. Also see our Book Reviews - InspectAPedia.
- In addition to citations & references found in this article, see the research citations given at the end of the related articles found at our suggested
CONTINUE READING or RECOMMENDED ARTICLES.
- Carson, Dunlop & Associates Ltd., 120 Carlton Street Suite 407, Toronto ON M5A 4K2. Tel: (416) 964-9415 1-800-268-7070 Email: info@carsondunlop.com. Alan Carson is a past president of ASHI, the American Society of Home Inspectors.
Thanks to Alan Carson and Bob Dunlop, for permission for InspectAPedia to use text excerpts from The HOME REFERENCE BOOK - the Encyclopedia of Homes and to use illustrations from The ILLUSTRATED HOME .
Carson Dunlop Associates provides extensive home inspection education and report writing material. In gratitude we provide links to tsome Carson Dunlop Associates products and services.
 | HOME | ABOUT | ASK a QUESTION | CONTACT | CONTENT USE POLICY | DESCRIPTION | POLICIES | PRIVACY | |
| © 2024 - 1985 Publisher InspectApedia.com - Daniel Friedman | |||||||||