
InspectAPedia® FREE Encyclopedia of Building & Environmental Construction, Diagnosis, Maintenance & Repair |
Question? Just ask us! InspectAPedia
|
 Well Chlorination Procedure
When and how to shock a drinking water well
- POST a QUESTION or COMMENT about well shocking or well sterilization procedures: how to deal with bacterial contamination in drinking water wells
How to shock or disinfect a well:
This article explains how to shock a well, when, why, and exactly how to chlorinate a drinking water well. We provide a table explaining the quantity of bleach needed to disinfect a well, and a table comparing the 3 Common Well Water Disinfectants: Chloramine, Chlorine and Chlorine Dioxide.
We include a detailed description of the well shocking procedure using household bleach to sterilize well water and water equipment. The purpose of shock disinfection of a well system is to destroy bacterial contamination present in the well system at the time of disinfection and is not intended to kill bacteria that might be introduced at a later time.
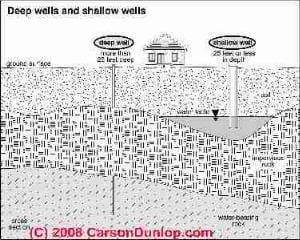
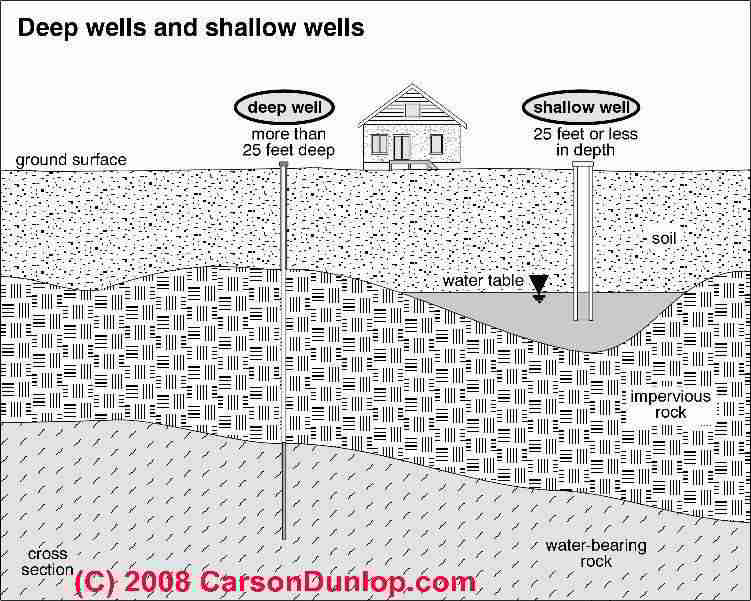
Page top sketch illustrating both deep and shallow water well construction and depths is provided courtesy of Carson Dunlop Associates, a Toronto home inspection, education & report writing tool company [ carsondunlop.com ].
InspectAPedia tolerates no conflicts of interest. We have no relationship with advertisers, products, or services discussed at this website.
When and How to Shock or Chlorinate a Well
 Procedure for Shocking a Well to (temporarily or maybe longer) "Correct" Bacterial Contamination in Well Water

This article includes adapted information from the New York Dutchess County Health Department's environmental laboratory, along with other expert sources and with annotations, expansion & annotation.
You will find this well shock procedure advice consistent with the well shocking or well chlorination procedures recommended by most health authorities.
[Click to enlarge any image]
Article Series Contents
- CHLORINE SAFETY WARNINGS
- PROCEDURE & QUANTITY of BLEACH NEEDED to SHOCK A WELL
- QUANTITY of BLEACH for WATER TANKS & SOFTENER
The purpose of shock disinfection of a well system is to destroy bacterial contamination present in the well system at the time of disinfection and is not intended to kill bacteria that might be introduced at a later time.
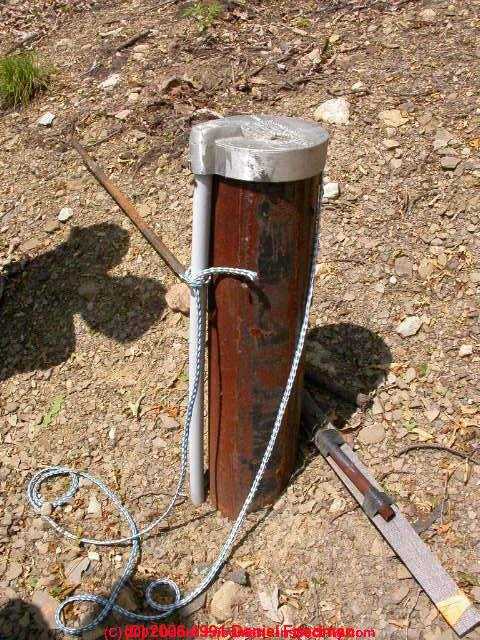
Our photo shows an owner who has lifted the loose, poorly-sealed well piping and cap right off of the steel well casing. This well needed repairs and it needed to be sterilized using the well chlorination procedure we discuss here.
Therefore it is vital that the well be constructed so that no new contamination may enter the well following completion of the shock disinfection. In order to achieve a satisfactory disinfection of the system, the bacteria must be brought in contact with a chlorine solution of sufficient strength and remain in contact with that solution for a sufficient time to achieve a complete kill of all bacteria and other microorganisms.
Details of the Well Chlorination Procedure - Exactly How to Shock a Well, Where to Put Chlorine, How Much Chlorine to Use to Shock the Well
 If drinking water has been tested and has not passed standards for safe drinking, or any time the building water supply system has been opened for repairs (such as replacing a submersible well pump or a jet pump foot valve), the well should be disinfected following these procedures, and should be re-tested as described below.
Our photo shows a standard modern 6" steel well casing - it's easy to spot at a property.
If you don't know where the well is located you'll have to find it before this well chlorination procedure can be best performed.
See WELLS CISTERNS & SPRINGS for articles that describe different types of water wells, what they look like, where they're found, and their operating characteristics.
It's possible to get chlorine into the well by sending it through the building piping and pump but that step won't sterilize the interior and sides of the well casing - so the procedure below is a better one.
- Pour Clorox™ Bleach (or an equivalent brand of household bleach) or hypochlorite granules down into the well.
Some people use swimming pool chlorine tablets which have the advantage that they sink to and sterilize water at the well bottom, and the disadvantage that it takes longer to flush out the chlorine.
Watch out: also see CHLORINE SAFETY WARNINGS. - How much bleach to use when shocking a well:
Health department officials can give more precise guidance about the amount of disinfectant needed based on the depth of the well. Common well shocking guidelines for the amount of household bleach needed are given in the table just below.
For a separate well disinfection quantity table for difficult cases such as well & equipment disinfection after area flooding
see WELL DISINFECTANT TABLE, POST FLOODING.
Quantity of Chlorine or Household Bleach Needed to Shock a Well |
|
| Well Depth in Feet (6-inch diameter well casing) | Volume of standard household bleach needed |
| Well depth 100' | 3 cups Clorox or 2 oz. of granules. |
| Well depth 200' | 6 cups Clorox or 4 oz. of granules |
| Well depth 300' | 9 cups Clorox or 6 oz. of granules |
| Well depth 400' | 12 cups Clorox or 9 oz. of granules |
| Well depth 500' | 1 gallon Clorox or 12 oz. of granules. |
| Household Bleach Quantity per Gallon | 1/2 oz bleach / gallon 1 |
| Household Bleach Quantity per 10 gallons | 5 oz bleach / 10 gallons 1 |
Notes to the table above
This procedure is for larger diameter wells and well casings into which a bleach solution can be pumped or poured. If your well is a driven point or sand point well you need a different procedrue given
at WELL CHLORINATION DRIVEN SAND POINT
1. Checking the math: Using a standard of 3 US Cups of Bleach / 100' of 6" well casing = 0.02 cups per foot where 1 foot of 6" casing is about 1.5 gallons, so 0.02 Cups / 1.5 gallons, or 0.013 cups/gallon - that's a concentration of (0.013cups x 8 oz/cup) or 0.1 liquid ounce of bleach per gallon or 1 ounce of bleach for every 10 gallons of water to be made into a well disinfectant solution.
Typical health sources recommend 1 ½ ounces of bleach per each 10 gallons of water volume in pipes or tanks being sanitized. A reasonable concentration (assuming an 8-24 hour exposure or wait time) is 1/10 to 2/10 ounces of bleach per gallon.
For a table of volumes of water in wells or pipes of various diameters
see WELL DYNAMIC HEAD & STATIC HEAD DEFINITION
Watch out:The pH of the water affects the amount of disinfectant bleach needed.
See details at WELL DISINFECTANT pH ADJUSTMENT
2. Treat the water not the air:
Watch out: NOTE to be accurate in reaching the necessary concentration of chlorine in your well, treat the "depths" listed above as if they were the height of the actual column of water in your well (assuming a standard casing which is 1.5 gallons per foot of height).
So if your well is 400 feet deep, but if 100 feet of it is air, your water depth is actually 300 ft. The actual quantity of water in a well bore when the well is at rest is defined as the static head.
Actual well water volume:
See WELL DYNAMIC HEAD & STATIC HEAD DEFINITION for a table of well water volumes per foot or per meter of depth.
3. Other warnings for well shockers
Watch out: don't forget to flush first then sanitize everything: all of the well piping, pumps, tanks, in the system. Remember to drain water tanks and pressure tanks of bleach solution when flushing the disinfectant after the wait period.
Choices of well disinfectants are detailed
More about how to measure the actual depth of a well is
at DEPTH of a WELL, HOW TO MEASURE.
Watch out: for inadequate well disinfection: use enough bleach to reach the necessary concentration in the well and let the disinfectant remain in the well long enough (8-24 hours) - otherwise you may fail to adequately disinfect the well.
Watch out: for excessive well disinfection: don't significantly "overdose" the well with bleach or chlorine or you may find that you have to waste a lot of water and time flushing out the chlorine bleach at the end of the disinfection period.
Watch out: for difficult-to-sanitize wells or if the water well has been contaminated by area flooding extra steps and extra safety precautions needed.
Details are at WELL DISINFECTION after a FLOOD
If you need to disinfect in-building water equipment such as a water tank or water heater or water softener,
see WATER TREATMENT EQUIPMENT DISINFECTION
Steps in Shocking A Well
- Prepare the well, plumbing system, equipment:
fix any leaks, inoperative controls, or obvious nearby contaminant sources. Take any charcoal-filter type water treatment equipment offline. - Introduce the chlorine solution into the top of the well.
Remove the cap at the upper terminal of the well casing and pour the chlorine solution down the inside of the casing.
If the well casing terminates through the floor of a pump house, then the casing is required to have a well seal at the upper terminal [i.e. at the top of the casing].
This well seal can be loosened and the chlorine solution introduced into the well at that point. In a large diameter well [such as a public supply company's well], the chlorine solution should be poured or splashed around the wall of the well so that all inside surfaces of the well are brought into contact with the strong chlorine solution.. - Using a garden hose, spray water down into the well pipe to wash the chlorine solution down
to the bottom of the well. Ten gallons of water should be enough. [Running more chlorinated water down the casing sides won't hurt nor risk running the well dry since you're recycling the well water through the plumbing and back to the well.]
This step in the well shock procedure, by recycling chlorinated water out of the building plumbing and back into the well both cleans the well casing, piping, wiring, and also avoids wasting water.
Watch out: shock hazard: if on opening the well casing you see exposed electrical wires or flimsy electrical connections you should have a qualified electrician or repair person make sound, water-tight splices and coverings before attempting to wash down the well casing interior.
Watch out: disinfecting or shocking a well may also be ineffective if the well casing and sides are coated with mineral deposits or biofilm that form in some water wells. Mechanical cleaning may be necessary to obtain a successful outcome. More aggressive water well disinfection procedures are described
at WELL DISINFECTION after a FLOOD - Turn on all cold water household taps
until you can smell the Clorox coming out of every plumbing fixture water supply, including the faucet farthest from the well.
Watch out: notice that we did not include the water heater system and hot water tank in this step. However you may wish to also turn off and then drain the water heater to eliminate any possibly contaminated water from that tank before restoring your water system to operation.
If you elect to shock (sterilize) the water heater tank interior we recommend that that step be performed with the water heater turned off (don't heat a water-bleach mix) and that the heater be left OFF until the tank has been drained and flushed and then re-filled.
Watch out: Also heating water that contains a high level of chlorine might produce potentially dangerous chlorine gas coming out of a hot water faucet. - Turn off the water and do not use it for 8 to 24 hours.
Seal the top of the well. Do not run laundry with this chlorinated water or it may bleach clothing unexpectedly. [The BC ME recommends 6-12 hours or longer if possible - Ed.] - Flush out the Clorox™ (or other brand) bleach solution: at the end of the standing period, operate the well pump
(run the water) water until you can no longer smell the Clorox.
Watch out: Do not run Clorox™ into the septic system - run water outside through an outside faucet or hose. There should be a hose connection at the at the bottom of the water pressure tank.
When you no longer smell chlorine at the hose draining the water pressure tank, close off the drain and open all faucets in the house to flush out house piping for fifteen minutes or until you no longer smell or taste chlorine [whichever is longer].
Watch out: if you do not first drain the water pressure tank of chlorinated water it can take a much longer time to flush the bleach smell out of the water supply. And if you have put chlorinated water into the water heater tank, that tank too will best be flushed out.
(Be sure the water heater is turned OFF before draining the heater tank or you can damage that system.
Watch out: if you forget to take any charcoal-filter equipment offline before introducing a disinfectant you may find it almost impossible to get the bleach odor out of the system later. You may have to replace activated charcoal or charcoal filters in your water treatment equipment if chlorine or bleach odor remains a problem.
You will want to replace such equipment in any event if it was contaminated by floodwaters or other sources.
Details are at WATER TREATMENT EQUIPMENT DISINFECTION.
Watch out: If your well has a limited flow rate or poor recovery rate there is a risk that you may simply run out of water during the flush-out step.
Watch out: if you used a low-odor or "odorless" bleach product to shock the well you may have trouble knowing if you've flushed out all of the bleach product. Leaving bleach in drinking water can be dangerous and of course it could cause some surprises in the laundry too.
We recommend using chlorine test strips to check for residual chlorine after flushing bleach out of a well water system. - thanks to reader Mike O'Brien for this note, 5/13/2011.
Details are at CHLORINE in WATER, HOW TO TEST FOR and
at CHLORINE SOURCES in WATER - Re-test the well water
after all the Clorox or chlorine is out of the system and the water has been used for 5-7 days (typical health department guideline) or 7-10 days (my suggestion) after the disinfection.
The longer you wait until the well water retest the more valid will be the results, because you are giving time for a remaining bacterial contaminating colony to reproduce. We elaborate on this point
at "WHEN to RE-TEST YOUR WELL WATER your well water" below.
Reader Question/complaint: My well ran out of water during the well-shock and flush-out procedure
You need to WARN people = re water discharge/well shocking. i ran my well out of water and made the situation WORSE. Tell people not to run the water outside only for a half hour or so at a time!!!! NOT until Chlorox smell is gone - can take forever o get rid of Chlorox smell.... well needs to recharge. Now, listening to you folks, I have an even BIGGER problem. - M.P.
Reply: Indeed the well flush-out procedure can disclose another problem with poor well flow rate or poor well recovery rate
Thank you for the note complaining about discovering that your well could run dry during an attempt to flush out the chlorine odor from a bleach-shock of the well. We were of course sorry to read that your well shock process disclosed a second fault - a well with a poor recovery rate.
We have reviewed our well water article on the topic to be sure that there are warnings about running out of water during well testing or well shocking.
Details start at
WELL CHLORINATION SHOCKING PROCEDURE
In the main article explaining how to shock and flush out a well following a failed bacteria test you will see several Watch Out: warnings that include discussion about problems that can arise during the bleach flush-out process. Here we'll add some more detailed suggestions that can help address the worry of running out of well water during well shocking and flushing.
Indeed while it has not come up during well shocking this problem has been discovered by building inspectors more than once during a septic loading and dye test to test for septic system failure - as that water test volume is run, typically 250 gallons or so, the inspectors discovered that the well itself was inadequate when the well flow diminished or stopped entirely.
It sounds as if you have run into the same problem of a poor or inadequate well flow rate.
Low flow rate wells usually recover but watch out for pump damage
As long as no one makes the mistake of leaving a well pump running when it is dry of water, the system is not damaged, and the well will recover, usually in a few hours; but once discovering that your well has a poor flow rate, indeed you will want to take steps to address the problem, either by adding water storage capacity or by increasing the well yield, or in the worst case, drilling a better well.
Steps to protect from running out of well water during shocking and flushing out a well
- Recycle well casing flush-water:
One of the steps in shocking a well, using a garden hose connected to the building to use chlorinated water to wash-down the well casing sides during the initial steps in the well shock procedure will reduce the water consumed, but during the flush-out period a low-yield well may still run out. - Empty the water pressure tank
(and water heater tank if that was shocked):
A second step that may be able to reduce the water wasted trying to flush out the bleach odor from the building water supply after shocking a well (thus also reducing the chances of running out of water) is to completely empty the water pressure tank and the water heater tank, refilling them with fresh water from the well as soon as incoming well water at a close-by tap is low or has no bleach odor. - Install equipment to protect the well pump:
A third step to protect a well and pump from "running out of water" is the installation of special low water controls in the well that will recycle water in the pump and reduce or stop well water flowing into the structure should water level in the well drop too low.
See WELL PIPING TAIL PIECE for details. - Don't leave water running unattended.
On occasion when a well has a limited recovery rate, an inspector, home owner, or water tester may "forget" to keep track of how long water has been run, simply leaving faucets open without watching for a diminished or stopped water flow.
Any time you are running water to test or service a building that uses a private pump and well system for its water supply, you should continuously monitor the water running out of one or more fixtures. If you see the water flow rate significantly diminish or stop you should immediately turn off the well pump to protect it from damage.
Then try waiting half an hour or more before turning the pump back on. That procedure will also give insight into how quickly a low-flow-rate well will recover. - Increase well yield:
There are several approaches to dealing with low-flow wells, including storing more water on site and increasing well yield.
See WATER QUANTITY IMPROVEMENT for details.
But in all cases if the well runs "dry" during well flush-out after a well shocking procedure or during a septic loading and dye test, as long as you haven't done something unusual like just leaving water on for hours unattended, you've discovered a double fault if your water well runs dry during well-shock-bleach flushout: contaminated well water and a low yield or low flow-rate well.
Reader Report: trouble flushing chlorine bleach out of the well after shocking
Question: we left bleach in the well after installing a new pump then pumped it out after 2 hours
(July 9, 2015) Alan said:
My well company installed a new pump and poured bleach and pumped it after 2 hours. The water test (2 days later) showed. bacteria. He told me to put 3 gallon of chlorox in and repeat. He said to leave it the 4 days that I was on vacation. My well is 210 feet with a 75 foot water table (6 inch pipe).
Although I bought 'regular' unscented Walmart chlorox, I see it is 8.5% and I believe the standard is more like 5.5%. So I have a massive dose of strong bleach that has been down there 4 days before pumping and I can't get rid of the chlorine smell although it is lessened. I have emptied my hot water tank and well tank. I have run the outside tap a lot and also the inside taps.
Although there is an odor of chlorine, For the inside taps, I think the bleach is much lower than the level that would damage to septic tank bugs. I think the 3 gallons of strong bleach spread out into the rock over the 4 days I was on vacation, and it is slowly seeping back into the well.... any ideas or can it only be healed with time ?
Reply:5 mistakes to avoid when shocking & then flushing out a well
Two hours? What the heck is that. No well disinfection can be done with just a 2 hour exposure. Sounds as if someone was in a hurry.
One needs to use the right dose (based on the water volume in the well's static head), to flush out all of the piping and let all of it sit with disinfectant, wash down well casing sides, and other steps the experts have described and we summarize in the article above.
But your guess about the bleached well water is an interesting one. I don't really know but I suppose it's possible. You may need to re-flush the well several times. Take care not to run the well dry and thus burn up your pump.
(July 10, 2015) alan said:
Thanks Dan..I am draining my tanks again today and running the outside tap for 30 mins at a time with 30 minute gaps. I will do one gallon of 5.5% next time--or a half gallon of this 8.5% Walmart chlorox. I first flushed on Sunday and still wifey is going to the laundromat as she can't stand the bleach smell and her Ma is highly allergic to it.
Reply:
Alan
I'm assuming the bleach was poured in as liquid. If some dope (like me) dumped pool tablets into the well they sit at the bottom and it can take much longer to get the chlorine out.
Also if concentrated bleach was poured into the well it may reside on dry areas of piping and casing - better hook up an outdoor hose and wash down the well casing sides and top recirculting diluted bleach-water as part of the cleanup.
11 July 2015 alan said:
yes Dan I used liquid and then poured 5 gallons of clean water down after it. I didn't run the hose back down the well to recirculate to mix it up and that could have been a mistake as some bleach could have stuck to the inside of the pipe and slowly dripped down day by day.
I drained the hot tank again today and then back flushed it by turning on the pressure and leaving the bottom of tank hose-to-drain connected.
Back flushing under pressure threw out a lot of black debris (rust) and I speculate that the chlorine could have been reacting with these metal fragments to cause bleach smell. I am sure this helped a lot but women's sense of smell is TEN times that of men (scientific fact) so I will get the verdict when she gets home..
So my 4 mistakes were too highly concentrated bleach (8.5%), too much bleach (3 gallons,)not washing down the inside of the well pipe with the hose (used 5 gallon bucket), not back flushing the two tanks under pressure to remove rusty particles which later combined with the bleach.
Reply:
That's a nice inventory of snafus. Don't feel bad, you're not the snafu leader.
I'd try well casing washdown and then more flushout.
Alan said:
ps I should add number 5 mistake: Leaving it 4 days while I was on vacation - giving the bleach a chance to permeate the rock. (and eat the well casing no doubt).
I will leave it 12 hours max next time. Good news Saturday - wife sniffed my towel wash and declared that she will try her wash today - that is progress ! I flushed this well last Sunday when we got back from the 4 day vacation, so we have lived in a faint mist of chlorine ever since then. 'Back flushing' the hot tank under 60psi pressure yesterday made the biggest difference.
Question/complaint: My well ran out of water during the well-shock and flush-out procedure
you need to WARN people = re water discharge/well shocking. i ran my well out of water and made the situation WORSE. Tell people not to run the water outside only for a half hour or so at a time!!!! NOT until Chlorox smell is gone - can take forever o get rid of Chlorox smell.... well needs to recharge. Now, listening to you folks, I have an even BIGGER problem. - M.P.
Reply: Indeed the well flush-out procedure can disclose another problem with poor well flow rate or poor well recovery rate
Thank you for the note complaining about discovering that your well could run dry during an attempt to flush out the chlorine odor from a bleach-shock of the well. We were of course sorry to read that your well shock process disclosed a second fault - a well with a poor recovery rate.
We have reviewed our well water article on the topic to be sure that there are warnings about running out of water during well testing or well shocking.
See WELL CHLORINATION SHOCKING PROCEDURE
In the main article explaining how to shock and flush out a well following a failed bacteria test you will see several Watch Out: warnings that include discussion about problems that can arise during the bleach flush-out process. Here we'll add some more detailed suggestions that can help address the worry of running out of well water during well shocking and flushing.
Indeed while it has not come up during well shocking this problem has been discovered by building inspectors more than once during a septic loading and dye test to test for septic system failure - as that water test volume is run, typically 250 gallons or so, the inspectors discovered that the well itself was inadequate when the well flow diminished or stopped entirely. It sounds as if you have run into the same problem of a poor or inadequate well flow rate.
Low flow rate wells usually recover but watch out for pump damage
As long as no one makes the mistake of leaving a well pump running when it is dry of water, the system is not damaged, and the well will recover, usually in a few hours; but once discovering that your well has a poor flow rate, indeed you will want to take steps to address the problem, either by adding water storage capacity or by increasing the well yield, or in the worst case, drilling a better well.
Chlorine & Hydrogen sulfide (H2S) Safety Warnings for Water Treatment Equipment & Well Disinfection
Watch out: when working with chlorine, people should be in a well-ventilated place. The powder or strong liquid should not come in contact with skin or clothing. Solutions are best handled in wood or crockery containers because metals are corroded by strong chlorine solutions.
Watch out: if using chlorine disinfectants in equipment that heats water such water heaters, be sure your heater has been turned OFF and has cooled down to at least room temperature before trying to run chlorine through it. Heating water that contains a high level of chlorine might produce potentially dangerous chlorine gas coming out of a hot water faucet.
Watch out: Leaving too much chlorine in any water system can be dangerous: drinking concentrated chlorinated water could be sickening or even fatal, and less seriously, doing laundry with chlorinated water may bleach clothing by accident.
Watch out: for difficult well or equipment sterilization cases such as after area flooding or where there is a persistent bacteria source, pH adjustment of the disinfection solution may be necessary for the disinfectant to be effective.
See WELL DISINFECTANT pH ADJUSTMENT
Watch out: if the well source water contains hydrogen sulfide (H2S), when preparing a well disinfection solution you must allow the water to aerate so the H2S dissipates, otherwise the acid formed will cause an immediate release of H2S gas from the water, which poses a serious health risk.
For details about exposure to various toxic and irritating gases see
- CHLORINE HAZARDS in WATER
- GAS EXPOSURE LIMITS & STANDARDS
- OTHER ODORS BLAMED on SEPTIC / SEWER
- TOXIC GAS EXPOSURE EFFECTS
How Long Will It Take for Chlorinated Water in a Shocked Well to Reach the House?
Reader question:
In a well 700ft deep - how long until the chlorine smell will be get to the house? - B.S.
Reply: We Must Calculate How Much Water is in the Well and House Water Pipes, the Pump Rate, the Piping Distance:
A competent onsite inspection by an expert usually finds additional clues that help accurately diagnose a well water problem problem. That said, here is how we figure out how quickly the chlorinated well water should appear in the house:
The answer to your question includes the following factors and the simple calculations we present below.
Provided that you used the proper concentration of bleach or chlorine to get the well water level to contain the proper amount of chlorine (as per the text
at WELL CHLORINATION SHOCKING PROCEDURE
or per your local health department), the water will definitely smell like "bleach" or "chlorine" at a faucet as soon as well water has run through the well piping, to the building, through building plumbing, and out the mouth of the faucet.
The real answer to your question depends not on the depth of the well (700 feet in your case) so much as the diameter and length of well piping between the well bottom and the water faucet where you are sniffing.
We can presume that the chlorine you poured into the well mixes quickly with the water already in the well (the static head), and that the mixing is further agitated if you washed down the well casing sides with chlorinated water as we advise.
A second factor is the water flow rate of your well pump in gallons per minute. For this calculation we will assume your well pump delivers a conservative 10 gallons per minute of water flow through the system piping when the pump is running. (The true answer is more difficult to calculate because when the pump is not running the water pressure in the piping depends on the water pressure tank and is not constant.)
But we can make make some assumptions based on common values to get in the right ballpark of the time needed for chlorine to show up at the tap of a shocked well.
If for simplicity we assume that all of the piping between the well bottom and the faucet has an average diameter of one inch, then the formula for how much water there is in a foot of pipe is the formula for the volume of a cylinder:
The formula for calculating the volume of a cylinder is:
pi * radius2 * height (pi is 3.1416) - We discuss this calculation in more detail
In the formula above, the radius (which is half of the pipe diameter) should be squared. That is, divide the diameter in half to obtain the radius, and multiply r x r to obtain r2.
So for a 12" length (one foot), of one-inch inside diameter water pipe the volume of water is (keeping all measurements in inches)
3.1416 x (1/2)2 x 12 = 18.8 cubic inches of water per foot.
We convert cubic inches to gallons by dividing the cubic inches by 231 (a constant) or we can multiply the cubic inches by 0.004329 (another constant).
18.8 / 231 = 0.81385, so 18.8 cubic inches of water is 0.081385 gallons.
So your theoretical one-inch water pipe contains about 0.08 gallons per linear foot.
You didn't say how far the well is from the house nor how many feet of piping are between the house point of water entry and the faucet, so we'll make some assumptions and you can plug in your own numbers.
Assuming 200 feet distance from well bottom to point of entry of water in the home, and another 50 feet of water piping through the home before water gets to the faucet where you've placed your nose [Watch out: don't get chlorinated water in your eye. ] then
250 feet of pipe contains (0.08 gallons per foot x 150) = 20 gallons.
So we have about 20 gallons of water in the 250 feet. Actually your volume will be less because probably piping in your house is smaller in diameter and probably there is less distance of piping between point of water entry in the house and the faucet.
If your well pump is pumping at 10 gallons per minute, it would take about 20 (gallons) / 10 (gallons per minute) = 2 minutes or less for chlorinated water to show up at the faucet [in a simple and perfect world, which it is not.]
It's a little more complicated.
Some of the incoming water from the well may be diverted into the water pressure tank where it is diluted and in that sense "delayed", and if you are running hot water, some of the incoming water is being diverted and run through your hot water tank where it is significantly diluted.
So if you only ran hot water (the worst case) it could take five minutes or even longer for some diluted but still chlorine-smelling water to appear at the hot water faucet. The cold water faucet output should smell like bleach sooner.
Conclusions:
It's reasonable to expect to smell the chlorinated water at a faucet in a typical one family home within 4 to 10 minutes after shocking the well.
If you run the water for 15 or 20 minutes and you still don't smell the bleach, either you need a more careful look at the distance and size of water piping or a closer look at how accurately you calculated the amount of bleach you poured into the well.
Watch Out: >Don't forget that when you are running the chlorinated well-shocked water through the building piping and fixtures, you want to run it at every fixture so that everything is being sterilized.
Don't forget to thoroughly flush out the chlorinated water 24 hours later.
CONTACT us with suggestions or comments.
Well Sanitizing, Shocking, Chlorination References
- ADOE, Water Well Management Level 2 Training Module. Prairie Farm Rehabilitation Administration of Agriculture and Agri-Food Canada, Alberta Environment, Alberta Water Well Drilling Association and Alberta Agriculture, Food and Rural Development
- ADOE, Water Wells that last for Generations. Alberta Agriculture, Food and Rural Development; Alberta Environment; Prairie Farm Rehabilitation Administration of Agriculture and Agri-Food Canada
- AWDA, Water Well Management Level 2 Training Module. Prairie Farm Rehabilitation Administration of Agriculture and Agri-Food Canada, Alberta Environment, Alberta Water Well Drilling Association and Alberta Agriculture, Food and Rural Development
- ATSDR Agency for Toxic Substances Disease Registry, Toxic Substances Portal: CHLORINE TOXICITY, [PDF] November 2010, retrieved 8/27/2013, original source: www.atsdr.cdc.gov
- Canadian BC Ministry of Environment, "Water Stewardship Information Series: WHEN STANDARD WATER WELL CHLORINATION PROCEDURES are INEFFECTIVE [PDF] Fact Sheet developed for Well Drillers, Health Authority Staff and others involved in well recovery efforts after a flood [PDF] Agriculture and Agri-Food, Canada, retrieved 4/8/2013 original source: http://www.env.gov.bc.ca/wsd/plan_protect_sustain/ groundwater/wells/factsheets/PFRA_well_recovery.pdf
- CDC WATER DISINFECTION WITH CHLORINE AND CHLORAMINE [PDF] U.S. CDC, retrieved 2022/1016, original source: https://www.cdc.gov/healthywater/drinking/public/water_disinfection.html#:~:text=What are safe levels of,considered safe in drinking water .
Excerpt:
Chlorine levels up to 4 milligrams per liter (mg/L or 4 parts per million (ppm)) are considered safe in drinking waterexternal icon. At this level, harmful health effects are unlikely to occur. - [1] US EPA, "Water: Basic Information about Regulated Drinking Water Contaminants", retrieved 8/27/2013, original source http://water.epa.gov/drink/contaminants/basicinformation/disinfectants.cfm
Sorry the EPA has removed this document from circulation and the current (2022/10/16) EPA website offers hundreds of web pages but little specific detail such as was provided previously. - [1a] DRINKING WATER FROM HOUSEHOLD WELLS [PDF] U.S. EPA, Original source last retrieved 2/13/2013, original source: http://www.epa.gov/privatewells/pdfs/household_wells.pdf
- Mancl, Karen, "Bacteria in Drinking Water" - "Chlorine," Karen Mancl, water quality specialist, Agricultural Engineering, Ohio State University Extension. Mancl explains factors affecting the effectiveness of chlorine in water as a means to destroy bacteria and other microorganisms. OSU reports as follows:
Chlorine kills bacteria, including disease-causing organisms and the nuisance organism, iron bacteria.
However, low levels of chlorine, normally used to disinfect water, are not an effective treatment for giardia cysts.
A chlorine level of over 10 mg/L [1.3353e-6 ounces of bleach per US gallon ? sic. Ed.] must be maintained for at least 30 minutes to kill giardia cysts. -- http://ohioline.osu.edu/b795/index.html is the front page of this bulletin. - Saha, Uttam, Leticia Sonon, Pamela Turner, David Kissel, Jourge Atiles, Paul Vendrell, DISINFECTING YOUR WELL WATER: SHOCK CHLORINATION [PDF] University of Georgia Cooperative Extension, retrieved 2019/07/18 original source: http://aesl.ces.uga.edu/publications/watercirc/ShockChlorination.pdf
- Schnieders, John,m Chemical Cleaning, Disinfection and Decontamination of Water Wells. . Published by Johnson Screens Inc. St. Paul, MN
- U. Nebraska, “Shock Chlorination of Domestic Water Supplies,” Cooperative Extension Service, University of Nebraska-Lincoln.
- U. Georgia, “Shock Chlorination of Home Wells, Springs and Cisterns,” University of Georgia Cooperative Extension
- US EPA, CHLORINE DIOXIDE (Alternative Water Disinfectants Manual) [PDF] U.S. Environmental Protection Agency
- US EPA, "Water: Basic Information about Regulated Drinking Water Contaminants", retrieved 8/27/2013, original source http://water.epa.gov/drink/contaminants/basicinformation/disinfectants.cfm
- US EPA, DRINKING WATER from HOUSEHOLD WELLS - PDF, U.S. EPA, Original source last retrieved 2/13/2013, original source: http://www.epa.gov/privatewells/pdfs/household_wells.pdf
- Virginia Household Water Quality Program: Shock Chlorination: Disinfecting Private Household Water Supply Systems. Virginia Cooperative Extension, Virginia Polytechnic Institute and State University.
- WDNR. 2008. Well Chlorination in Arsenic Sensitive Areas. PUB-DG-069 2002 Wisconsin Department of Natural Resources. Available online at: http://dnr.wi.gov/org/water/dwg/wellchlorination.pdf
Common Well Water Disinfectants: Chloramine, Chlorine and Chlorine Dioxide
This topic has moved to a separate article found at WELL DISINFECTANT CHOICES.
Well Chlorination Procedure for Water Filters, Water Softeners, and Water Heaters
This topic has been moved to WATER TREATMENT EQUIPMENT DISINFECTION
Well Cleaning & Well Disinfection Procedures after Area Flooding
This topic has been moved to a separate article found at WELL DISINFECTANT TABLE, POST FLOODING
Article series contents
This article series on well water contamination, testing, & cures explains many common water contamination tests for bacteria and other contaminants in water samples. We describe what to do about contaminated water, listing common corrective measures when water test results are unsatisfactory.
We include water testing and water correction measures warnings for home owners and especially for home buyers when certain conditions are encountered, with advice about what to do when these circumstances are encountered.
Various treatment methods for contaminated water are reviewed and the pros and cons of each are discussed.
Reader Comments, Questions & Answers About The Article Above
Below you will find questions and answers previously posted on this page at its page bottom reader comment box.
Reader Q&A - also see RECOMMENDED ARTICLES & FAQs
On 2020-08-11 by Steve
I have a well that is 91 foot deep I only use it to fill my bass pond. It has a high concentration of iron and build up occurs on the pipe running to the pond I am able to clean that out physically what was wondering if the hose running from the pump to the surface could get clogged with iron bacteria and if shocking a well would kill any build up in that pipe thank you
On 2019-11-11 - by (mod) -
From your note one would infer that either the well shocking procedure has been incorrect or you have a persistent source of contamination.
On 2019-11-07 by pat
had well chlorinated twice still have coliform count
On 2019-09-05 by Brian
Thank you !
On 2019-09-04 - by (mod) -
Brian, unfortunatley, no. If the static head in your well - the height to which water reaches when the well is at rest, fully recovered - is just 35 feet, that means that the height of the column of water in the well is just 35 feet.
The quantity of bleach to be used should be calculated based on the volume of water to be treated - the static head .
IN other words you've got the picture slightly reversed: the total height (depth) of your well is 215 feet - presumably from the level of ground around the well to the bottom of the well.,
Most of that (215 - 35) is filled with air.
Using 1/2 oz of household bleach per gallon, you'd use 0.5 x 35 = about 18 ounces of bleach to shock your well.
On 2019-09-04 by Brian
Hi - thank you for providing such detailed knowledge on wells. I have few questions for you. Our well is 250feet dieep with a static water level of 35 feet.
Does this mean that the height of the water column in the well casing is 215feet ?
When calculating the amount of bleach to use for shock treatment should it be based on the total well height, or the total well height minus the static water level ?
ur pump is 33 years old, we are planning on replacing it proactively next month - is this a reasonable thing to do ? Thank you !
On 2019-07-18 - by (mod) -
Hunter
To have space for a detailed reply I repeat your question and reply to it at
WELL CHLORINATION DRIVEN SAND POINT
https://inspectapedia.com/water/Sand-Point-Well_Chlorination_Shocking_Procedure.php
Please have a look and let me know what questions remain or how we can be of further use.
Thank you for asking: notes on how to shock a sand point or driven point well were sorely needed since the usual well shocking procedures are not easily applied to a driven point well.
On 2019-07-18 by Hunter
What an awesome resource this is, really glad I found it. I have a question about the new water source I put in at our cabin here in Alaska. I did a sandpoint using 2" galvanized pipe and hit water at roughly 16 feet, went down to about 25 feet and stopped there.
I hooked up a short water line to it with a check valve in between the pump and pipe. I've got water about 8 feet in the pipe leaving 17 feet free of water.
I had it tested and it came back positive for total choliform but negative for arsenic and 1.1 for nitrates which is well within limits.
I did a well shock to it but it sounds like I didn't leave it in long enough (2 hours), had it retested with the same result.
These tests are expensive but i'd like to try this one more time, any suggestions on how I should shock this particular type of well? Thanks. Hunter
On 2018-10-08 - by (mod) -
Nicole
Because spring water sources are normally going to include surface runoff it is not possible to assure that the spring water is always safe and potable
. If that's going to be your primary water source you might want to plan on installing a water treatment system and you certainly would want to test the water frequently.
On 2018-10-08 by Nicole
Hi everyone!
I’m purchasing a home and after doing a water test, I’ve discovered high Coliform levels.
My first reaction was to have the spring well directly tested but it seems to be fine. I know the home has sat for approximately a year without water running so I’m guessing it’s coming from my pipes. Any thoughts on how to fix/manage this?
Thanks everyone
Question: how do I get rid of chlorine in well water after shocking the well?
We shocked the well, it was 425 ft deep so we used 1 1/2 gal of bleach, it did not smell right away like it said. ran water in house for about 20 min and nothing, let set over night and then ran hose to recycle water. then we started smelling so we let it set again.
When flushing out we ran directly from where water enters home to outside plus rand faucets to clear out. Still strong chlorine, when I test it is orange when chlorine tester only has yellow. We do get a lot of sediment from our well, ( brown Water) if used a lot. Any Idea how much longer it will be to clear out. Getting tired of having chlorine showers and smelling it all day long. - P.D., property manager, Harrisburg PA 8/27/2013
Reply:
IF (and this is not quite the case) your 425 ft. well were completely full of water and assuming it's a 6-inch casing, that's about 640 gallons of water in the well, plus additional water volume in the piping system.
According to CHLORINATION WELL SHOCKING PROCEDURE 1.5 gallons of household bleach was a stronger concentration than needed (1 gallon would treat about 500 ft. of water in a 6-inch well casing). Considering that if your well's total depth was just 425 ft. and that most likely the static head of water in that well was less than 425 feet total, the well was overdosed.
Overdosing with chlorine can indeed make for some extra trouble in flushing out the chlorine or bleach later.
Flushing out the well needs to run more than that volume, however, since you cannot by running water just draw out the static water that was treated with bleach; rather, water running into the well dilutes the bleached-water already therein;
You'll need to use water for several days to fully flush out the chlorine bleach; the exact volume and rate of flush-out also depends on the flow rate of the well.
Further, as you've run chlorinated water into a water pressure tank and water heater tank, those too need to be flushed, or simply drained and refilled - a step that can speed the flushout procedure. Try that and keep me posted.
Reader follow-up:
I believe [the chlorine concentration in our well water] is at 10ppm
Reply:
The maximum residual disinfectant level goal (MRDLG) and also the maximum residual disinfectant level (MRDL) set by the U.S. EPA for chlorine in drinking water is
4.0 mg/L or 4 ppm or 4.0 mg/L or 4 ppm as an annual average respectively. [1]
I would - shut off water to the building, drain the water heater tank and pump pressure tank, run water outside - straight from the well via an outdoor faucet - and check the chlorine level there. That will help sort out chlorine remaining in the well water supply from chlorine that may have been left in water tanks and piping in the building.
If bleach was introduced into the well by pouring it directly into the well casing, it might help the flush-out procedure if you used a garden hose to recirculate some of the well water back to the well, using it to wash down the casing sides and center piping before continuing with the actual flush-out of the well itself.
Keep me posted; send along photos of your well equipment, tanks &c as that may permit further comment.
Above on this page we cite expert sources on safe limits of chlorine and chloramine in drinking water.
...
Continue reading at WELL CLEANING PROCEDURES or select a topic from the closely-related articles below, or see the complete ARTICLE INDEX.
Or see WELL DISINFECTION FAQs - questions and answers posted originally on this page
Or see these
Recommended Articles
- CHEATING ON WATER TESTS
- DUG WELL SANITATION PROTECTION
- FAILED WATER TESTS - WHEN to RE-TEST
- FLOOD CONTAMINATED WELL RESTORE & PROTECT
- WATER TEST INTERPRETATION
- WATER TREATMENT EQUIPMENT CHOICES - home
- WATER WELL CONTAMINATION HAZARDS
- WATER WELL SAFETY & SANITATION, 6 STEPS-EPA
- WELL CHLORINATION & DISINFECTION
- WELL CHLORINATION DRIVEN SAND POINT
- WELL CLEANING PROCEDURES
- WELL CLEANING BY GLYCOLIC ACID - remove biofilms, scale, restore well flow
- WELL DYNAMIC HEAD & STATIC HEAD DEFINITION - table of well water volumes
- WELL DISINFECTANT CHOICES
- WELL DISINFECTANT pH ADJUSTMENT
- WELL DISINFECTION PROCEDURE, POST FLOODING
Suggested citation for this web page
WELL CHLORINATION & DISINFECTION at InspectApedia.com - online encyclopedia of building & environmental inspection, testing, diagnosis, repair, & problem prevention advice.
Or see this
INDEX to RELATED ARTICLES: ARTICLE INDEX to WATER TREATMENT SYSTEMS
Or use the SEARCH BOX found below to Ask a Question or Search InspectApedia
Ask a Question or Search InspectApedia
Try the search box just below, or if you prefer, post a question or comment in the Comments box below and we will respond promptly.
Search the InspectApedia website
Note: appearance of your Comment below may be delayed: if your comment contains an image, photograph, web link, or text that looks to the software as if it might be a web link, your posting will appear after it has been approved by a moderator. Apologies for the delay.
Only one image can be added per comment but you can post as many comments, and therefore images, as you like.
You will not receive a notification when a response to your question has been posted.
Please bookmark this page to make it easy for you to check back for our response.
Our Comment Box is provided by Countable Web Productions countable.ca
Citations & References
In addition to any citations in the article above, a full list is available on request.
- Water Quality Association P.O. Box 606 4151 Naperville Road Lisle, IL 60532 www.wqa.org
- National Sanitation Foundation P.O. Box 130140 789 N Dixboro Road Ann Arbor, MI 48113-0140 (734) 769-8010, (800) NSF-MARK www.nsf.org
- U.S. Environmental Protection Agency (to visit in person) Office of Water Resource Center 1200 Pennsylvania Avenue, NW Ariel Rios Building Washington, DC 20460 Phone: (202) 260-7786, email: center.water-resource@epa.gov
- The Safe Drinking Water Hotline (800) 426-4791 The hotline operates from 9:00 AM to 5:30 PM (EST) The hotline can be accessed on the Internet at www.epa.gov/safewater/drinklink.html
- Water Systems Council www.watersystemscouncil.org
- Our recommended books about building & mechanical systems design, inspection, problem diagnosis, and repair, and about indoor environment and IAQ testing, diagnosis, and cleanup are at the InspectAPedia Bookstore. Also see our Book Reviews - InspectAPedia.
- Handbook of Disinfectants and Antiseptics, Joseph M. Ascenzi (Editor), CRC, 1995, ISBN-10: 0824795245 ISBN-13: 978-0824795245 "The evaluation of chemical germicides predates the golden age of microbiology..." -
This well-focused, up-to-date reference details the current medical uses of antiseptics and disinfectants -- particularly in the control of hospital-acquired infections -- presenting methods for evaluating products to obtain regulatory approval and examining chemical, physical, and microbiological properties as well as the toxicology of the most widely used commercial chemicals. - Principles and Practice of Disinfection, Preservation and Sterilization (Hardcover)
by A. D. Russell (Editor), W. B. Hugo (Editor), G. A. J. Ayliffe (Editor), Blackwell Science, 2004. ISBN-10: 1405101997, ISBN-13: 978-1405101998. - In addition to citations & references found in this article, see the research citations given at the end of the related articles found at our suggested
CONTINUE READING or RECOMMENDED ARTICLES.
- Carson, Dunlop & Associates Ltd., 120 Carlton Street Suite 407, Toronto ON M5A 4K2. Tel: (416) 964-9415 1-800-268-7070 Email: info@carsondunlop.com. Alan Carson is a past president of ASHI, the American Society of Home Inspectors.
Thanks to Alan Carson and Bob Dunlop, for permission for InspectAPedia to use text excerpts from The HOME REFERENCE BOOK - the Encyclopedia of Homes and to use illustrations from The ILLUSTRATED HOME .
Carson Dunlop Associates provides extensive home inspection education and report writing material. In gratitude we provide links to tsome Carson Dunlop Associates products and services.
 | HOME | ABOUT | ASK a QUESTION | CONTACT | CONTENT USE POLICY | DESCRIPTION | POLICIES | PRIVACY | |
| © 2024 - 1985 Publisher InspectApedia.com - Daniel Friedman | |||||||||