
InspectAPedia® FREE Encyclopedia of Building & Environmental Construction, Diagnosis, Maintenance & Repair |
Question? Just ask us! InspectAPedia
|
 Security or Motion Sensing Light
How to
Install, Wire, Repair
Security Lights
- POST a QUESTION or COMMENT about exterior lighting installation, troubleshooting, repair, & electrical codes
How to install or replace an outdoor floodlight, security light, or motion-sensor light.
Here is a photo-illustrated step-by-step guide to replacing an outdoor floodlight with a motion-sensor activated security light.
We describe each step from removing an old light fixture through selection of an electrical box, preparing the existing electrical wiring, connecting the new light fixture to the existing wiring, installing the fixture to the electrical box, and testing and adjustment of the motion sensor light.
This article series discusses outdoor lighting installation, troubleshooting and repair procedures. This series also explains how to install recessed lights in an exterior soffit or roof overhang. We provide lighting installation suggestions about the type of light fixture to use, light fixture support, clearances, fire safety, moisture resistance, switch location, and electrical code citations for exterior lighting on buildings.
InspectAPedia tolerates no conflicts of interest. We have no relationship with advertisers, products, or services discussed at this website.
How to Install or Replace Outdoor Floodlights & Security Lights
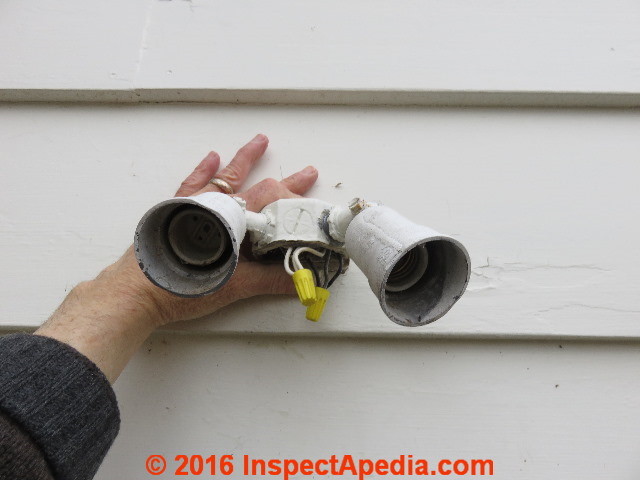
Photo: Mounting a repaired or new motion sensor light involves these steps.
[Click to enlarge any image]
Article Contents
- REMOVE OLD LIGHT- Remove the old light fixture & inspect it to see what you can learn; leave the existing wires for their new connections
- MOUNT NEW ELECTRICAL BOX- select & mount a wet-location electrical box to wire the new light
- PREPARE NEW LIGHT FIXTURE - drilling out cover mounting holes may be necessary
- PREPARE WIRE ENDS for CONNECTION - stripping, cleaning, twisting, removing any oxidation or kinks
- WIRING CONNECTIONS - make the necessary line, neutral & ground wire connections & splices
- MOUNT LIGHT FIXTURE to ELECTRICAL BOX - assure a good fit between the light base, gasket, and edges of the electrical box then secure the light in place. Seal the electrical box to the building wall to be sure that we're not sending rain behind the box and possibly into it at its rear wiring port.
- POSITION & AIM the FLOODLIGHT approximately where you want the bulbs to illuminate the area; you may need to make these final adjustments at night in order to see the illumination pattern accurately.
- SELECT LIGHT SETTINGS - Adjusting the motion sensor field of view, range or sensitivity, and lights-on-time. Test that the light is operating properly using the motion sensor's TEST switch setting.
Remove & Inspect the Old Outdoor Light
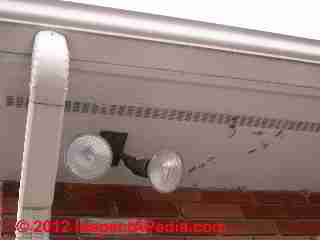
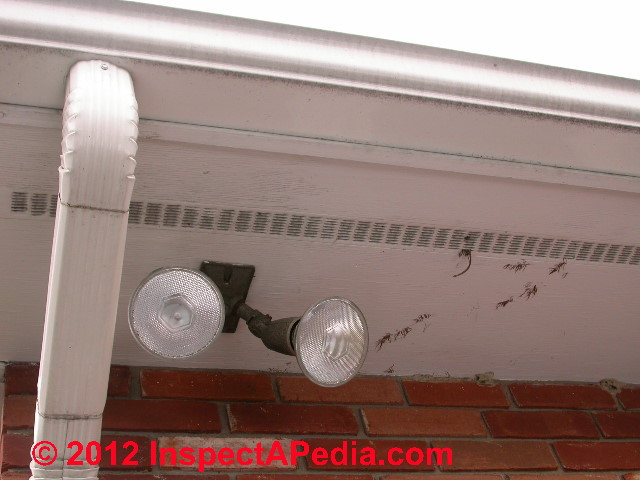
A neighbour asked for help in replacing some outdoor floodlights that were not working. We agreed to replace the manually-switched outdoor lights with motion-sensor floodlights in some locations and wall-mounted lights in others.
The old and new wall-mounted floodlight photos and text here illustrate coping with the problems that come up when removing old and installing new outdoor security lights.
Sometimes just getting the old fixture off of the wall can be a challenge: painted-over screws, rust-jammed locknuts, obsolete electrical boxes can add time, trouble and cost to what the electrician bid as a quick swap-in job.
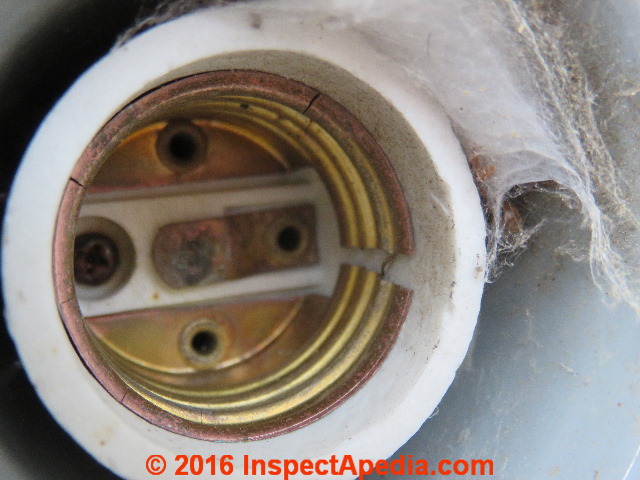
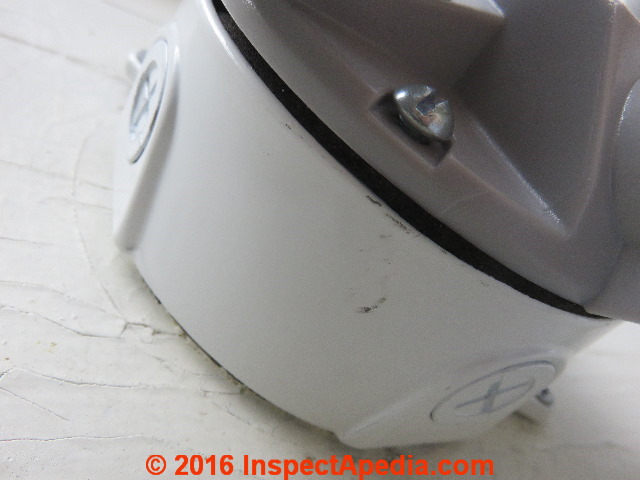
One of the floodlights in this wall-mounted fixture over a garage had stopped working. I tried replacing the bulb first to confirm that it wasn't something as dumb as having swapped in a bad floodlight bulb. Nope. I looked for a corroded or burned contact in the bulb socket base. Nope.
A closer look, though, revealed that the metal bulb socket was split. A trivial repair might have been to just replace the bad bulb socket assembly, re-attaching it to the existing electrical box. But other conditions (box too small, crowded, corroded, leaky, no room for an added motion sensor) at this light fixture argued for a complete replacement.
More details about troubleshooting an outdoor floodlight or security light that is not working are
at REPAIR AUTOMATIC OUTDOOR LIGHT FIXTURE.
Watch out: do not attempt electrical work unless you are qualified as there are both fire and fatal electrocution hazards at risk. In many jurisdictions electrical work can be performed only by a licensed electrician. New work and some electrical repair work may also require a building permit, inspections, and approvals. Check with your local building department.
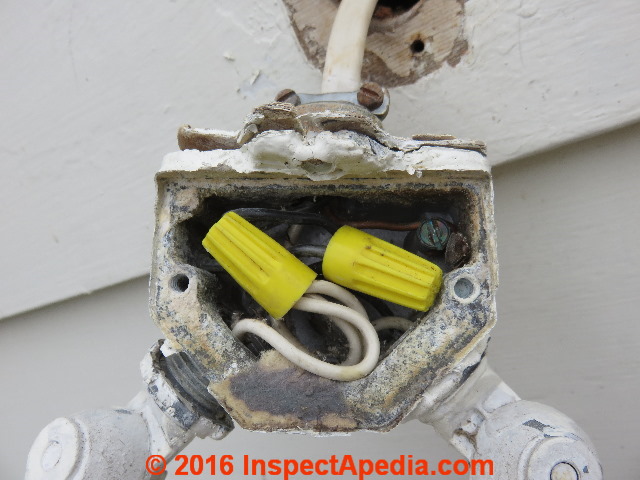
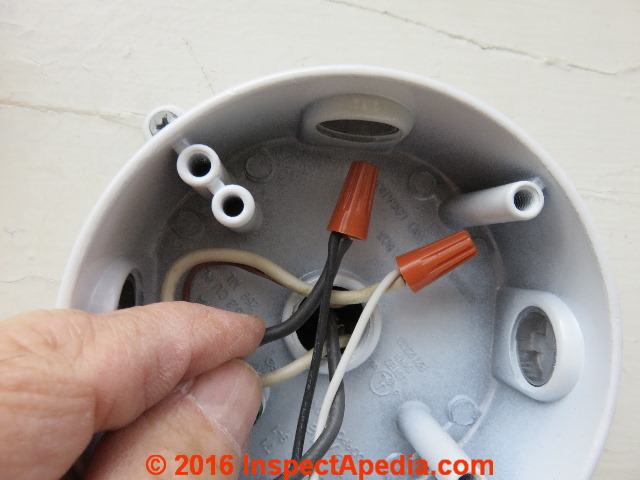
A look at the existing box found it corroded, paint-jammed, and under-sized as well as leaking. To remove and replace the bulb socket on the existing box would be time-consuming and we'd end up with a light that was still switched on and off only manually. The little electrical box didn't include a mount opening to add-on a motion sensor and the box interior was too small to jam in more wires and twist-on wire connectors anyway.
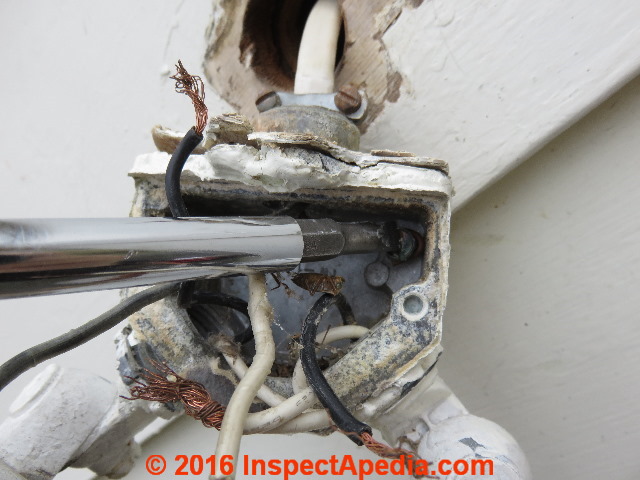
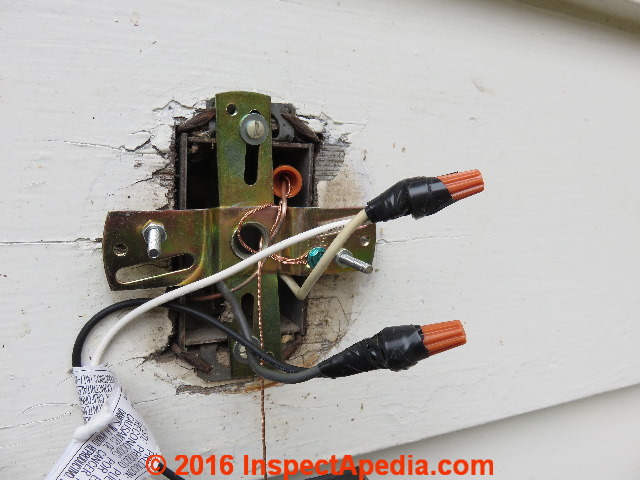
The ground wire needed to be disconnected from the ground screw.
Then the hooked ends of the solid conductor wires needed to be straightened so that it would be possible to pull the wires out of the electrical box without damaging the insulation.

When the wires were ready to be pulled out of the box we then loosened the strain relief clamp screws completely to give plenty of room to pull the wires out of the metal box.
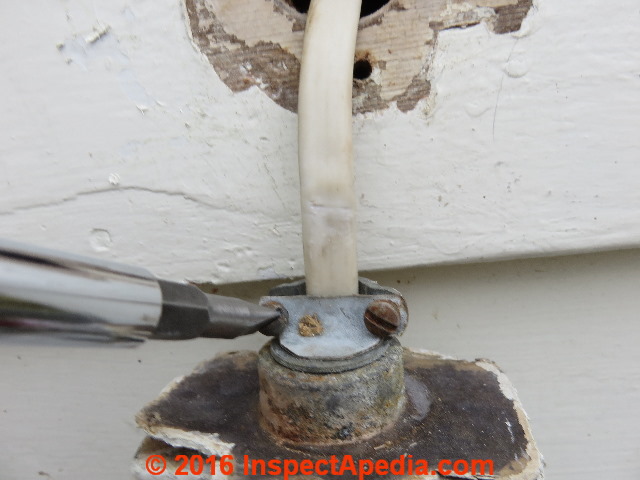
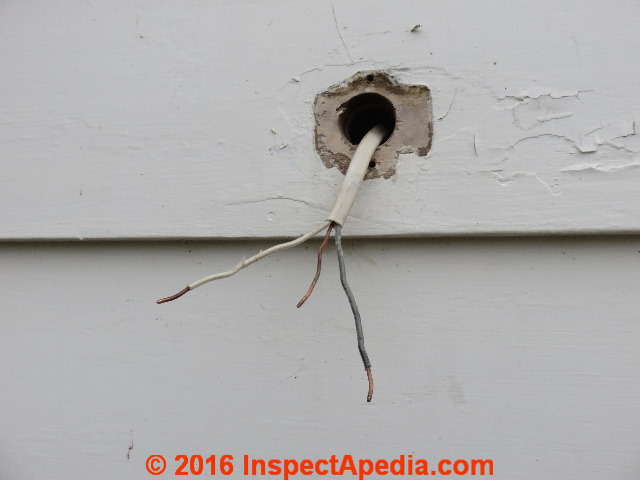
Watch out: give yourself plenty of room to pull the wires out lest you scrape or cut the wire insulation. Below we see the lighting circuit at the wall, ready for mounting of a weatherproof electrical box and then the connection of a new motion-sensor light.
Select & then Mount the Electrical Box for the New or Replacement Motion Sensor / Security Light
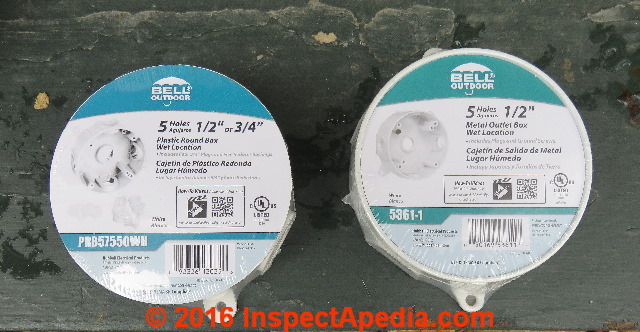
I prefer to use metal outlet boxes designed for use in a wet location, but plastic boxes are also sold for that purpose.
[Click to enlarge any image]
In the photo below I'm showing a suitable wet-location box against the building wall with the connecting wires protruding through the opening at the back side of the box.
Missing in some of these photographs is the strain relief that would clamp the wires to the box.

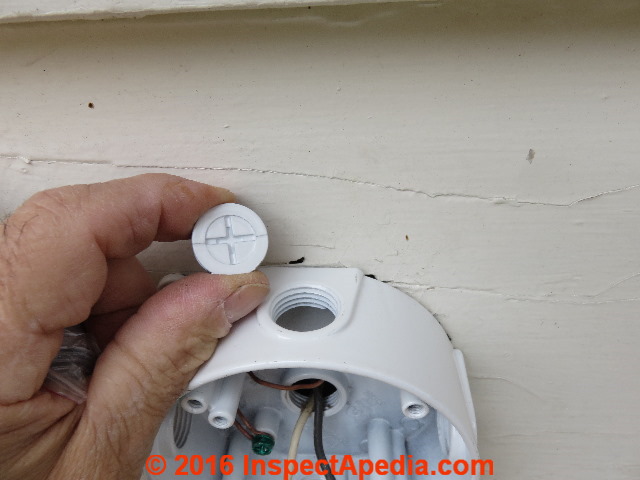
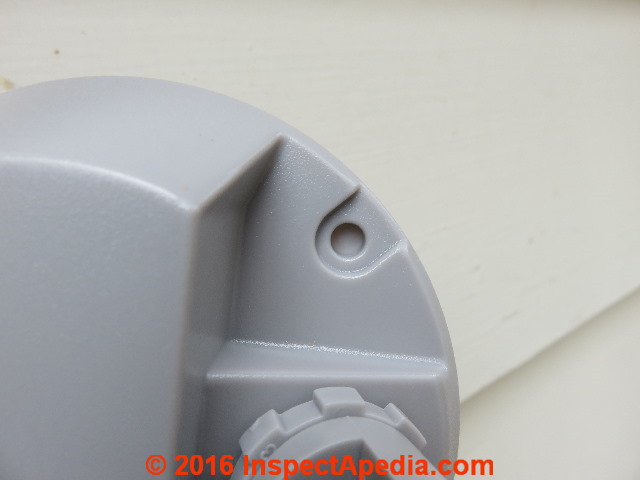
Below: you'll need to install the screw-covers into all of the un-used openings in the sides of the electrical box. As our light fixture is going to mount to the box face, all four of the box side openings need to be closed against the weather.
When the electrical box has been secured to the wall and its un-used openings closed, we're ready to mount the motion sensor light fixture.
Prepare the New Motion Sensor / Security Light Cover for Mounting
In addition to inspecting the new light fixture to identify and clean up the wires, check its intended mounting position against the mounting screw locations on the electrical box.
Watch out: When you've chosen which screw positions you're going to use on the electrical box (typically I use the 2 o'clock and 7 o'clock or the 5 and 11 o'clock positions) you need to take a look at the light fixture itself. Some wall-mounted motion sensor or security lights mount by screws passing through two holes in the light cover while other units use a cover center mounting screw that secures to a metal strap that must be installed in the electrical box.
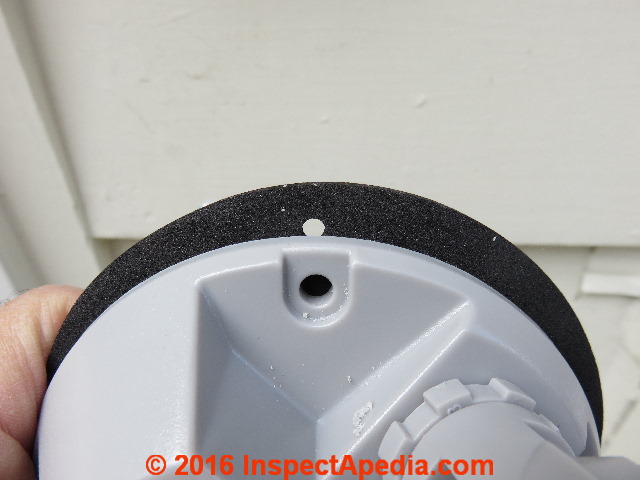
But this security light that I was installing (shown below) required drilling-out the screw openings that were to be used in the fixture cover.
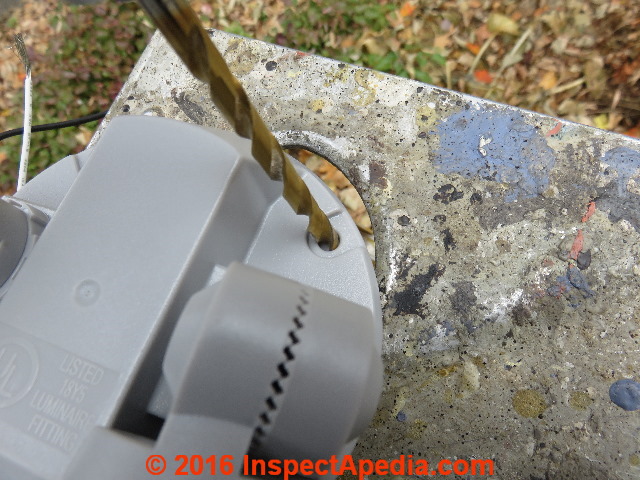
That's probably so as to avoid other un-necessary holes and possibly leaks in the light fixture cover. Select a drill bit that's about the diameter of the cover opening template - it will need to be just larger than the diameter of the actual mounting screws. Check this now as if you forget and have wired the fixture up before discovering you need to drill the cover you'll be sorry: standing on your ladder and drilling into the air.
Inspect & Prepare the Light Fixture Wires
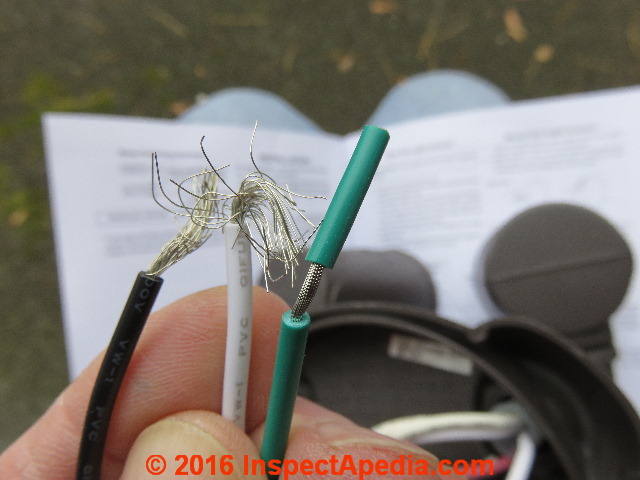
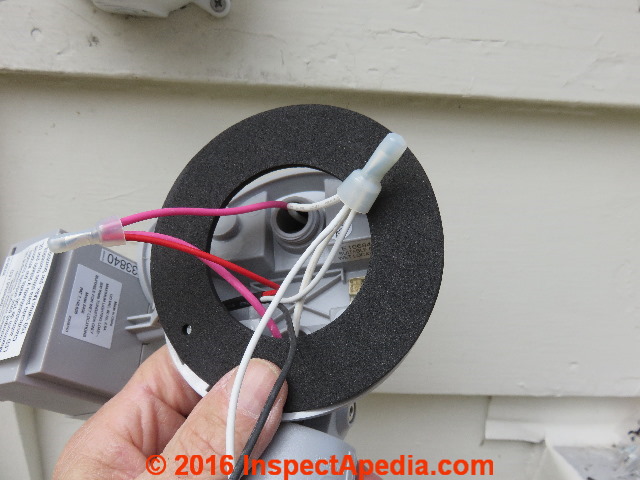
Below: here's what the wiring-side of the motion sensor light will look like when you remove it form the package. You'll want to find and clean-up the ends of the line (black), neutral (white) and ground (green) wires before trying to connect this fixture to the electrical box.
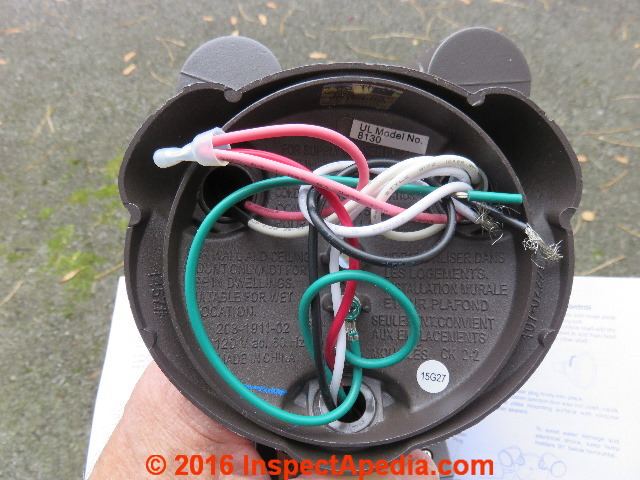
We're going to install a SecureHome motion sensor light control provided by HeathZenith.
Prepare the Existing Electrical Wires for Connecting to the New Light Fixture
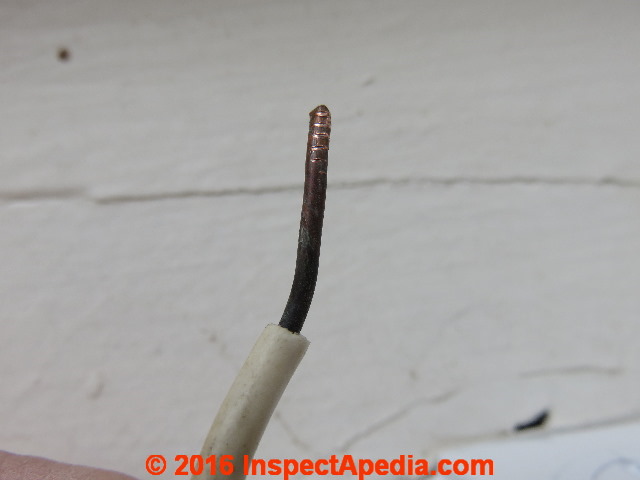
I noticed that some of my existing solid copper wire ends were dark in color, oxidized from decades of occupancy in a leaky electrical box. That risks a poor electrical connection and could be unsafe or could cause the fixture to work only intermittently.
 ...
... 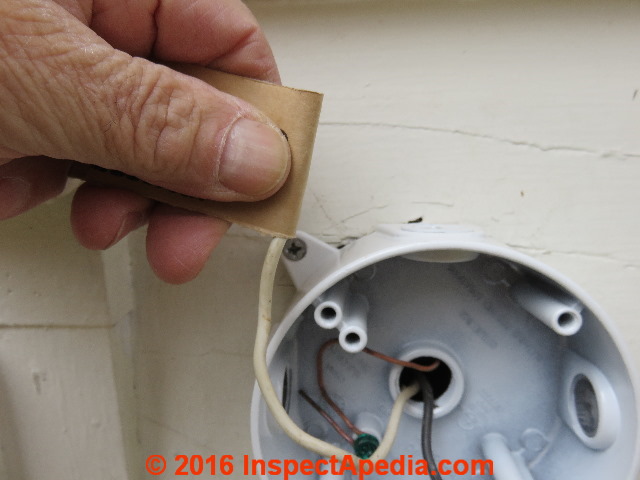
Below you can see the cleaned neutral wire conductor end.
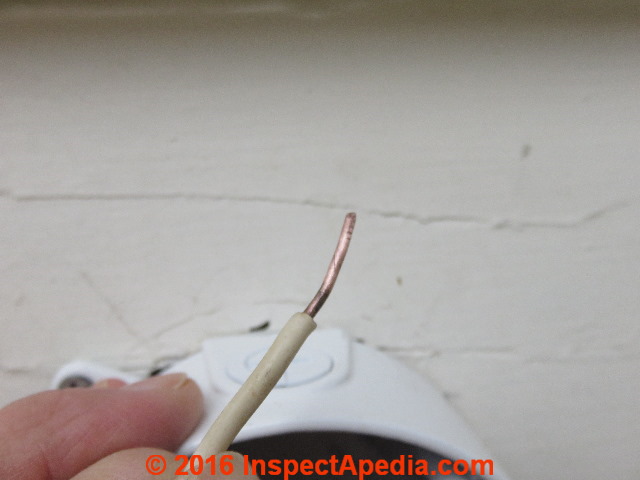
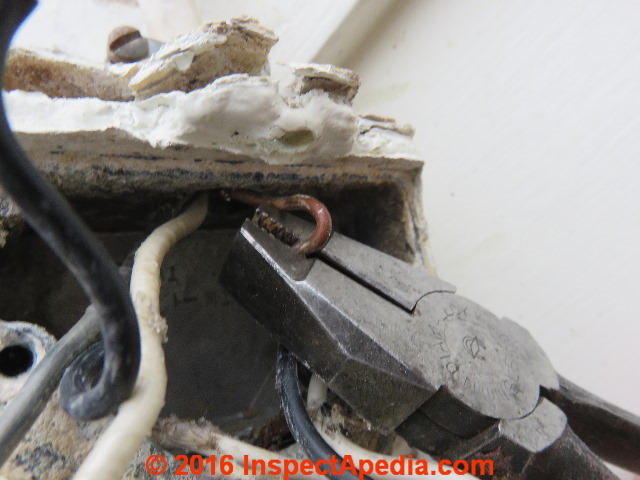
While it's true that a twist-on connector's internal spring may cut through the oxide, I want my current to flow wire-to-wire, not wire to connector spring to wire. So for best results, the solid-conductor electrical wires need to be straight and clean before they can be inserted into a twist-on connector.
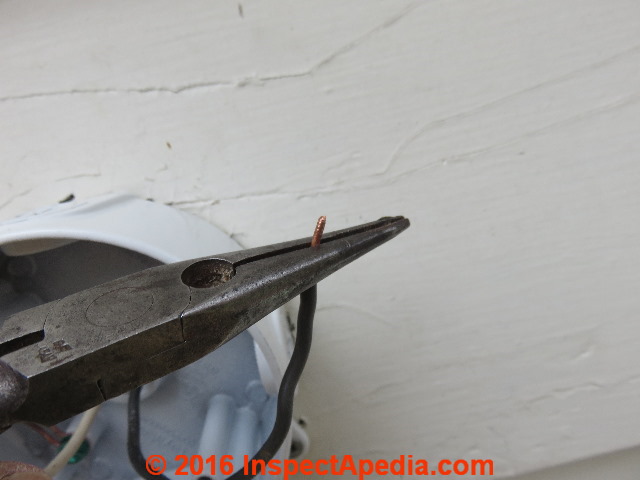
Above: some wire ends were bent and irregular in shape. Inside a twist-on connector that can make for a bad connection or even an impossible one. I use my pliers to straighten out kinked solid copper wire ends to prepare them. If the wire end is badly damaged I'll simply cut it off and strip back insulation to make a new stripped-wire end.
Make the Security Light Wire Connections in the Electrical Box
Wiring Diagram for a Typical Motion Sensor or Security Light
The installation instructions include this simple schematic illustration (adapted with added remarks) show how the motion sensor light assembly will mount to the weatherproof electrical box once that box is in place on the wall.
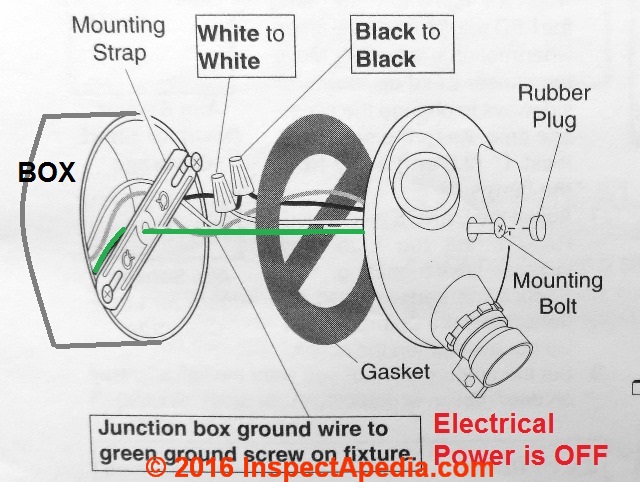
Watch out: don't forget to route the electrical wires through the inside of the gasket or you'll have to take everything apart and start over. Our green ground wire shown in the sketch above needs to be re-routed through the gasket opening.
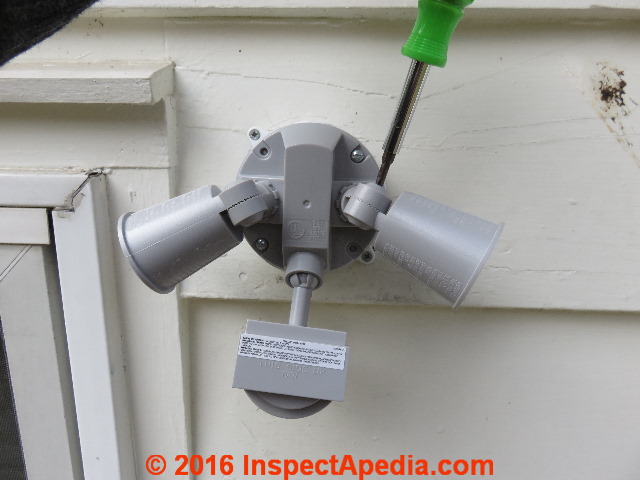
Three Hands: Hold that Motion Sensor Light & Don't Fall off the Ladder
How to Hold the light fixture, the wires, your tools and your place on the ladder when wiring up a wall or ceiling light fixture:
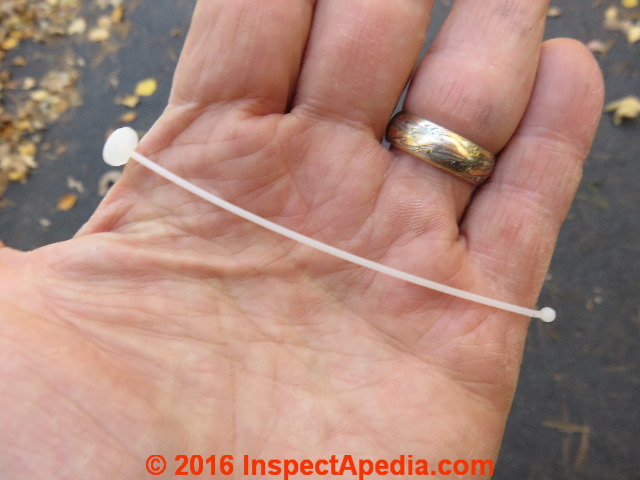
Some manufacturers provide a cute little plastic cable with the light fixture.
One end of the cable secures to the metal strap to which the light fixture is going to mount while the other secures to a center mounting screw opening on the light fixture itself.
That lets you hang the fixture from the plastic support while making your connections.
If you don't have three hands and are up on a ladder working alone, another approach is to connect the ground wires first, hang the fixture from that connection (green arrow in the photo above), make the other hot and neutral connections, check that the ground connection hasn't come loose, then mount the fixture.
Watch out: the outdoor light wiring shown above is improper and unsafe as there is no wet-location or weatherproof electrical box being used. Of course we corrected this fiasco and we also sealed the new fixture's electrical box to the building wall. .
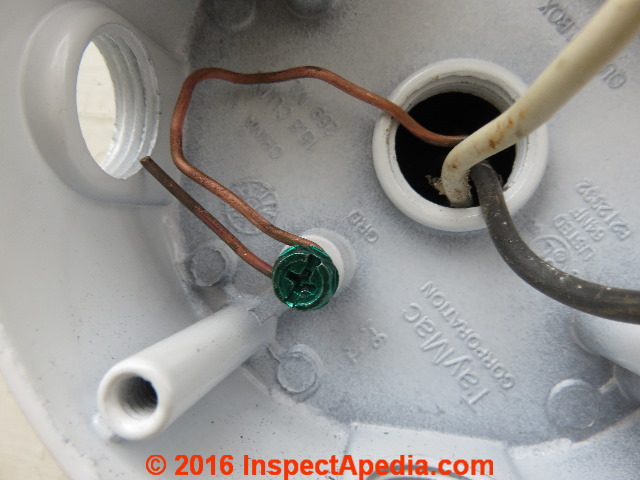
Ground Wire Connections at the Security Light
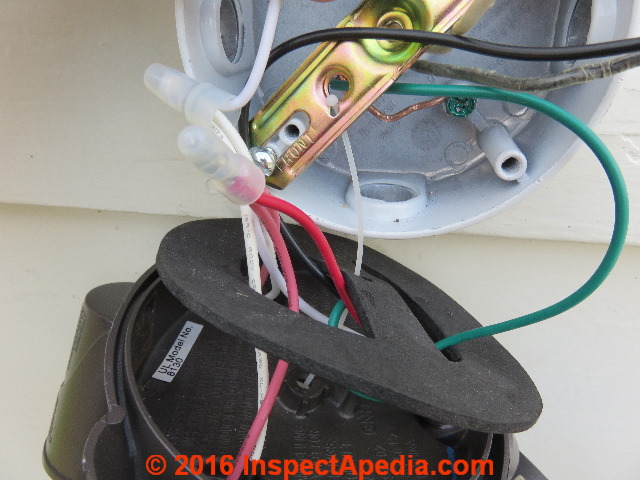
Below: the circuit grounding conductor, bare solid copper, is going to be connected to both the grounding screw in the metal electrical box AND by twist-on connector (not shown) it will connect to the light fixture's own ground wire.
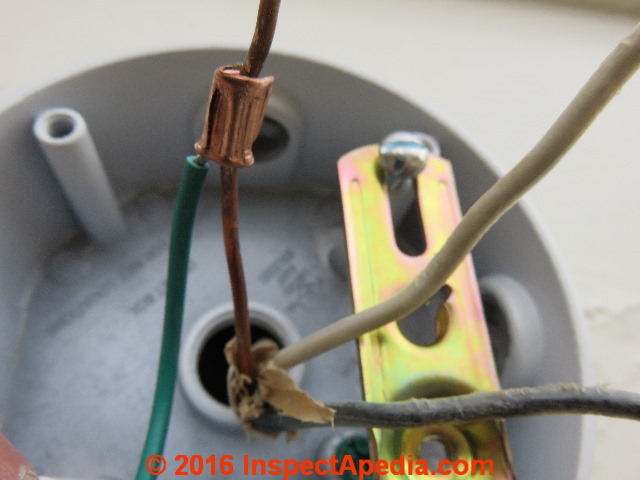
Just below in another example of ground connections at an outdoor light, the installer is using a crimp-type connector instead of a twist-on connector to join the circuit ground to the light fixture ground.

If you use this connector you need to use the proper crimping tool for reliable results and even so I'd tug on that multi-stranded wire to be certain that it's securely bound. The solid conductor ground in the photo also needs to be connected to the ground screw in the electrical box, and again.
Missing strain relief clamp?
Some electricians will comment that the strain relief for the entering wires is missing in the photos above. IF this outside electrical box is being mounted over a pre-existing in-wall-cavity electrical box that includes a strain relief for these wires your electrical inspector may accept this installation as shown.
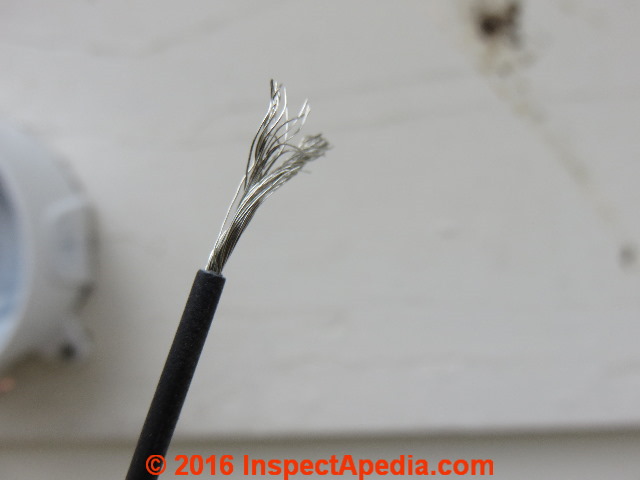
Mating multi-strand wires that are going to be inserted into the twist-on connector also need to be prepared by twisting the stripped wire ends clockwise. Why clockwise? So that when you twist the twist-on wire connector cap clockwise to tighten it you won't be un-raveling the multi-strand wire inside the cap.
If you're wondering why I keep saying "twist-on-connector" instead of the widely-used term "wire nut" it's because Wire Nut™ is a registered trademark for a specific brand of twist-on connectors - though like "Kleenex" for "Tissues" the term has become so widely-used as to be rather generic.

Line & Neutral Connections at the Motion Sensor Light
Below I'm joining the neutral wire of the light fixture to the lighting circuit neutral wire using a twist-on connector or wire-nut. I'm using the twist-on connector provided by the light-fixture manufacturer in this case.
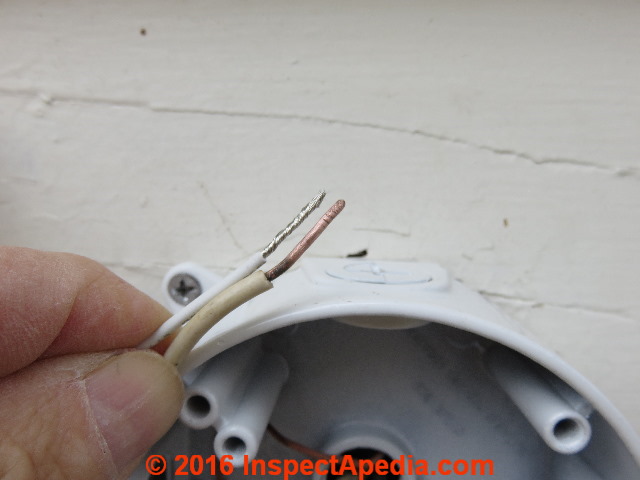
The two wires are stripped to equal length and not so stripped that bare wire will be exposed after the twist-on connector is in place. I hold the ends parallel, insert them into the connector, and twist it firmly clockwise.
Note for U.K. readers: you will rarely see "wire nuts" or twist-on connectors on electrical circuits in the U.K.
That's because most U.K. residential electrical circuits for lighting and receptacles are wired as a "ring circuit" rather than as a "radial/spur" circuit.
Fewer wire splices are required. And where splices are required on U.K. circuits often the electrician uses a dedicated electrical joint box in which the wire splices are made using a connector strip rather than individual splice connectors.
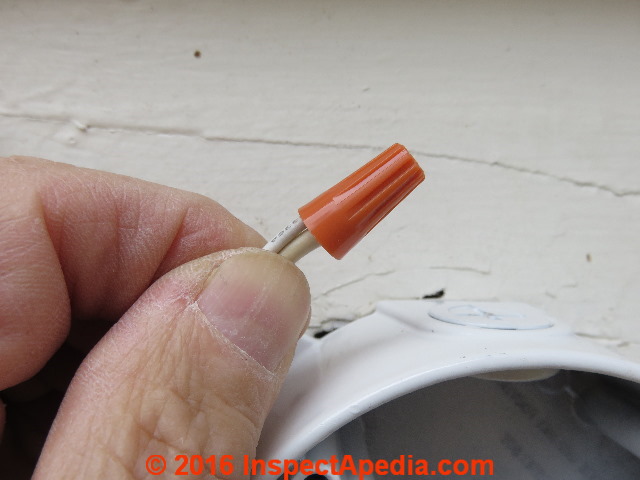
I might tug the wires or at least inspect my splice for good wire contact before then pushing the joined electrical wires into the electrical box.
I like to make only rounded gentle bends in electrical wires to reduce the chance of wire damage, and I place wires into an outdoor electrical box always with the wire nut tip facing "up" so that if water should leak into the box it'll drip off of the wire loops and not wet the wire connections themselves. In the original, too-small electrical box for the older floodlight you'd have no space for such fanciness.
Mount the Wired Motion Sensor Light to the Electrical Box
Watch out: as shown above, check again that all of your wires are passing from the motion sensor light fixture through the center of the fixture mounting gasket.
Otherwise you won't be able to mount the light fixture to the electrical box without pinching wires around the gasket and ruining the weather-tight seal - and probably you'll ruin the wires too.
Align the security light fixture mounting holes first with the gasket holes, and next with the appropriate mounting holes on the electrical box, then insert the screws and mount the light.
Watch out: before tightening the screws completely look and feel around all edges of the electrical box to be sure that the gasket is neatly in place.
If the gasket has gotten pushed inside the electrical box rather than being pinched between the fixture mounting plate and the electrical box edges then the box will leak, risking short circuits, unsafe conditions, light failure.
Adjust the Position or Aim of the Motion Sensor Light Floodlamps
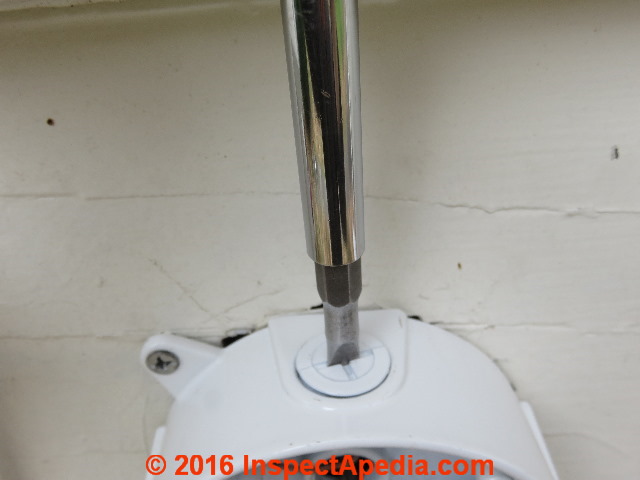
There are two different position-adjustment mechanisms on a typical floodlight or motion sensor light. Above I'm loosening the screw that allows the lamp socket to rotate away from the building.

A second adjustment allows adjustment of the angle of the lamp socket by loosening the larger-diameter lock nut around the lamp socket base. Tap this screw counter-clockwise to loosen it and clockwise (as in the photo) to tighten it once you've got the lamp socket aimed about where you think you want it.
Below is our new motion sensor light mounted, roughly-aimed, and ready for adjustment and testing.
You may need to fine-tune both of these lamp socket positions once again when you have seen just where the lights are aimed in darkness. Of course you'll need to install two outdoor-use rated floodlamp bulbs before the light will do anything interesting.
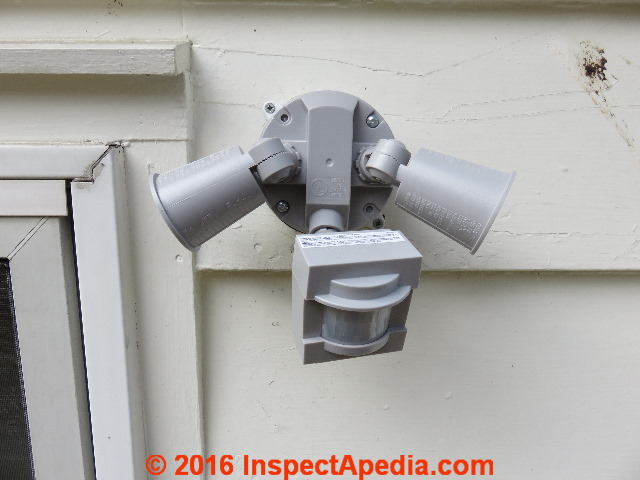
The position or aim of the motion sensor, shown between the two lamp sockets in proper orientation above, is also adjustable so that you can control the security light's motions sensor field of view of what it "sees".
Seal the Electrical Box at the Wall
For added durability and safety, after your wall-mounted security light has been installed, use a good grade exterior sealant or caulk to seal around the electrical box where it contacts the building wall. I leave a tiny opening in the 6-o'clock position so that should any water seep behind the electrical box it can safely drain out onto the building wall below.
Adjust the Motion Sensor Light Features: Range, On-Time, Light Level
 On the bottom of the motion sensor you'll find one or more adjustable controls that are security or motion sensor light model-dependent.
[Click to enlarge any image]
You may also find a "test" switch or a "test" position on the time-on switch. Use switch position to keep the light ON during light angle or aim adjustment.
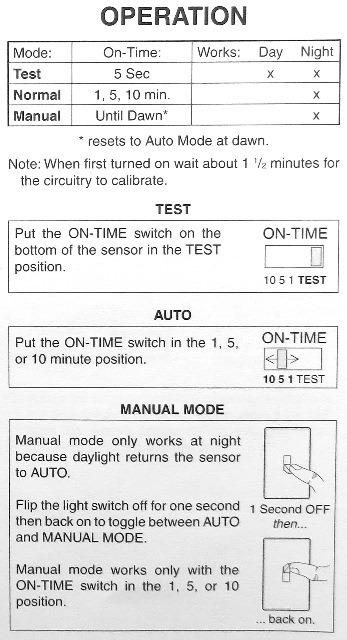
Shown here are instructions for HealthZenith's SecureHome™ motion sensor light control model # 5412. Your light model and features may, of course, differ.
Generally we can set these motion sensor light features, each of which is embossed into the plastic of the motion sensor and each of which will be detailed in the installation guide for your light.
- The motion sensor sensitivity or range
- The on-time when the security light senses motion. A slide switch on the sensor's base will typically show ON-TIME position settings of 1, 5, or 10 minutes as well as a TEST position that is used to check that the light is working even in daylight and thus it will allow you to check the sensor's response to nearby motion.
On this light fixture "TEST" will cause the light to turn on and remain on for 5 seconds to allow adjusting the sensor's position and range. - A dusk/dawn feature on some lights that leaves the light on at low intensity from dusk to dawn. When the light senses motion the light will switch to high intensity illumination.
- AUTO / MANUAL feature: Some sensors include a MANUAL switch that will turn the light on continuously until the next dawn. At night you can manually force this security light to remain "ON" by flipping the controlling light switch (wall-toggle-switch) off for one second, then back to on. The light will remain ON until the ensuing dawn. Then the light will reset to AUTO mode.
I want a driveway or garage entry security light to do several things, but these adjustments are somewhat subjective and are site-dependent.
- Turn on soon-enough when a walker or a vehicle is approaching the building but not so soon that the light is flashing on and off when traffic drives nearby without approaching the building - lest you annoy your neighbors.
- Stay on long-enough to illuminate the building entry for visitors but not so long as to annoy neighbors or lose effectiveness as a security indicator.
- Do not shine right into the eyes of the driver approaching a garage entry, blinding him and causing an argument about who is responsible for the ensuing damage
- Angle light properly to illuminate the desired areas such as an approach to the building entrances or areas where security lighting is particularly needed to discourage prowlers.
Source of the new motion-sensor light used in this discussion:
- Health®Zenith, SecureHome Motion Sensor Light Control, HeathCo LLC, PO Box 90045, Bowling Green KY 42102, USA. This light fixture is sold at building suppliers such as Home Depot & Loews as well as at your local electrical supplier or lighting supplier. HeathZenith Website: https://www.heath-zenith.com/ Customer Service Telephone: 1-800-858-8501
InspectAPedia is an independent publisher of building, environmental, and forensic inspection, diagnosis, and repair information provided free to the public - we have no business nor financial connection with any manufacturer or service provider discussed at our website.
...
Continue reading at LIGHTING, EXTERIOR GUIDE - topic home, or select a topic from the closely-related articles below, or see the complete ARTICLE INDEX.
Or see these
Recommended Articles
- BUILDING SAFETY HAZARDS GUIDE
- LIGHTING, EXTERIOR GUIDE - home
- ELECTRIC POWER LOSS / FLICKERING LIGHTS
- RECESSED SOFFIT or ROOF OVERHANG
- BULB & FIXTURE TYPES for SOFFITS
- REPAIR AUTOMATIC OUTDOOR LIGHT FIXTURE
- SECURITY / MOTION SENSOR LIGHT INSTALL
- SURFACE MOOUNT OUTDOOR LIGHT FIXTURES
- UNSAFE OUTDOOR LIGHT FIXTURES
- LIGHTING, INTERIOR GUIDE - home, lighting fixtures, bulbs, and indoor requirements.
- LIGHTING OVER STAIRS & AT EXITS
- NEST CAM INSTALLATION & USE - home
- NEST CAM LIGHTING RECOMMENDATIONS
- SECURITY SYSTEMS cameras, monitors for home security, intrusion, elder-safety, freeze or water damage monitoring
Suggested citation for this web page
SECURITY / MOTION SENSOR LIGHT INSTALL at InspectApedia.com - online encyclopedia of building & environmental inspection, testing, diagnosis, repair, & problem prevention advice.
Or see this
INDEX to RELATED ARTICLES: ARTICLE INDEX to BUILDING LIGHTING
Or use the SEARCH BOX found below to Ask a Question or Search InspectApedia
Ask a Question or Search InspectApedia
Try the search box just below, or if you prefer, post a question or comment in the Comments box below and we will respond promptly.
Search the InspectApedia website
Note: appearance of your Comment below may be delayed: if your comment contains an image, photograph, web link, or text that looks to the software as if it might be a web link, your posting will appear after it has been approved by a moderator. Apologies for the delay.
Only one image can be added per comment but you can post as many comments, and therefore images, as you like.
You will not receive a notification when a response to your question has been posted.
Please bookmark this page to make it easy for you to check back for our response.
Our Comment Box is provided by Countable Web Productions countable.ca
Citations & References
In addition to any citations in the article above, a full list is available on request.
- [1] Codes & Standards pertaining to fire-rating enclosures:
- ASTM E119-05a
- UL 263 (also see Canadian CUL specifications)
- UBC 7-1
- NFPA 251
- ANSI A2.1
- IP66
- [2] Steven Bliss served as editorial director and co-publisher of The Journal of Light Construction for 16 years and previously as building technology editor for Progressive Builder and Solar Age magazines. He worked in the building trades as a carpenter and design/build contractor for more than ten years and holds a masters degree from the Harvard Graduate School of Education. Excerpts from his recent book, Best Practices Guide to Residential Construction, Wiley (November 18, 2005) ISBN-10: 0471648361, ISBN-13: 978-0471648369, appear throughout this website, with permission and courtesy of Wiley & Sons. Best Practices Guide is available from the publisher, J. Wiley & Sons, and also at Amazon.com .
- [3] Carson Dunlop provides home inspection education including the ASHI-adopted a Home Inspection Home Study Course, and publications such as the Home Reference Book, the Home Reference eBook, and report writing materials including the Horizon report writer, and home inspection services. Alan Carson is a past president of ASHI, the American Society of Home Inspectors.
- [4] Paul Galow [Website galowconsulting.com ] - technical consultant on networking, LAN design, applications support. Galow Consulting Services [Website galowconsulting.com ] , 914-204-1749, email: paulgalow@galowconsulting.com
- [5] New Jersey State Energy Code, N.J.A.C. 5:23-3.18, Recessed Lighting Fixtures (RLFs), Uniform Construction Code Communicator, Vol. 16, No. 1, Spring 2004, p. 8, Division of Codes and Standards, POB 802, Trenton NJ 08625-0802. Web site for free downloads of the energy
compliance tools REScheck, New Jersey edition and
COMcheck-EZ is www.energycodes.gov.
Quoting:
N.J.A.C. 5:23-3.18 adopts by reference the 1995 edition of the Council of American Building Officials’ Model Energy Code (CABO MEC/1995) as New Jersey’s Energy Subcode of the Uniform Construction Code. Sections 502.3.4 and 602.3.3 of CABO MEC/1995, both entitled “Recessed Lighting Fixtures,” contain requirements for RLFs in relation to the Energy Subcode. The following are the three options for the installation of RLFs when installed in the building envelope. Only one must be followed to meet the requirements of the Energy Subcode:
1. Type IC rated, manufactured with no penetrations between the inside of the recessed fixture and ceiling cavity, and sealed or gasketed to prevent air leakage into the unconditioned space; or
2. Type IC rated or non-IC rated, installed inside a sealed box constructed from a minimum ½-inch-thick gypsum wall board or constructed from preformed polymeric vapor barrier, or other air-tight assembly manufactured for this purpose, while maintaining required clearances of not less than ½ inch from combustible material and not less than three inches from insulation material; or
3. Type IC rated, in accordance with ASTM E 283- 91 (Standard Method of Test for Rate of Air Leakage Through Exterior Windows, Curtain Walls, and Doors), with no more than 2.0 cfm air movement from the conditioned space to the ceiling cavity. The lighting fixture shall be tested at 75 Pa or 1.57 lbs/ft2 pressure difference and shall be labeled.
Sections 502.3.4 and 602.3.3 of CABO MEC/1995 are the responsibility of the building subcode official, who inspects RLFs to ensure that they are either insulation cover rated (IC rated), or installed in a sealed box that has the insulation at least three inches from the light fixture. It is the building subcode official’s responsibility to ensure compliance, both in the inspection plan review and inspection plan review stages, because RLFs pose a potential fire hazard if installed incorrectly with insulation. These fixtures also act as chimneys, transferring heat loss and moisture through the building envelope into attic spaces if not installed properly. The heat loss resulting from improperly insulated RLFs can be significant.
NOTE: Electrical subcode officials are responsible for the wiring methods of RLFs. - [6] "Out of Sight, Out of Mind - the dangers and requirements of recessed light fixtures", Kellie K. Speed, Electrical Contractor, Feb. 2009, Quoting:
When installing recessed fixtures, carefully consider the location of the units. The presence of combustible materials surrounding the luminaire is very important, and recessed lights can act as chimneys for heat loss and moisture transfer into attic spaces. Many residential fires have resulted from improperly installed or modified recessed light fixtures, but they can be easily avoided. In older homes that may have existing recessed lighting fixtures, homeowners sometimes cover these fixtures with insulation. As a result, the insulation traps the heat created by the bulb and either melts the insulation on the electrical wiring or ignites combustible materials, which is, of course, a fire hazard. It is vital to ensure the area surrounding the recessed fixture is insulated properly. In addition to fire, the interior of a property could be compromised if air leakage occurs, resulting in moisture, condensation and mold. Sealing the building properly reduces air movement in and out of the building. Uncontrolled air movement will negatively impact the heating and cooling systems, resulting in higher initial and ongoing maintenance costs. There certainly is a lot to consider when installing recessed lighting. For help, consult the National Electrical Code (NEC). Article 410 Parts M and N offer special provisions for recessed luminaires installed in walls or ceilings. Most of these Code requirements are designed to protect combustible building materials from temperatures greater than 90°C (194°F). - [7] National Electrical Code, (NEC). Article 410 Parts M and N: provisions for recessed luminaires installed in walls or ceilings.
- [8] "E-Series LED Recessed Light, Installation instructions for E6-E26-30-WH, retrofit installation or new construction installation, American Lighting, www.americanlighting.com
- [9] "Information Bulletin - Recessed Light Fittings", ACE Insurance Limited, CU1-3, Shed 24, Princes Wharf, Auckland 1010, website: http://www.aceinsurance.co.nz/,
Ace reported a "near miss" inner city apartment complex fire traced to recessed light fittings. Quoting:
An investigation into the cause of a fault on an apartment complex’s fire alarm system revealed the cause as a slow smouldering fire involving the heat detector wiring. Further investigation indicated the probable cause of the fire to be due to a nearby recessed incandescent light fitting which had overheated. The insulation on the electric wiring at the point of connection to the light fitting had been burnt away and the burning had continued for several metres along the electrical wiring to the switch and another interconnected light fitting within the same room. Thermal insulation material (fibreglass batts) was present in the roof space around the recessed light fittings. The recessed light fittings had been installed in the room for more than 15 years without any previous issues. Repairs to the roof had been carried out some 5 years previously which required contractors to access the roof space directly above the room.
Australian/New Zealand Wiring Rules (AS/NZS 3000:2007 provides minimum clearance for recessed light fittings but emphasizes that The importance of following relevant codes and standards and the recessed light manufacturer's installation requirements cannot be over-emphasized.Dimension Incandescent lamp Halogen lamp Clearance - luminaire to building element above 50 mm 200 mm Side clearance - luminaire to structural member 100 mm 200 mm Clearance -luminaire to thermal insulation 50 mm 200 mm Clearance - luminaire to supply transformer 50 mm 50 m - [10] E.Z. Barrier, fire-rated: Fire-rated Recessed Light Enclosure, E.Z. Barrier, 901 N 3rd St, Ste 130 Minneapolis, MN 55401 Ph. 612.436.0606 Fax 612.436.0608 sales@ezbarrier.com, Website: www.ezbarrier.com Product literature describes one-hour rated enclosure for recessed lights that save time over a site built fire-rated recessed light enclosure complies with the fire resistance codes listed in citation [1] above.
- [11] "Liteline Recessed Lighting, Luminaire Encastre, 6-in. Remodel IC/non-IC housing, air tight, Installation Instructions", Liteline Corporation, info@lifeline.com, web: lifeline.com, Tel: 866-730-7704
- [12] "Wiring Methods Utilizing Suspended Ceilings (Revised", State of Oregon, Building Codes Division, code interpretation, 10/1/2002, Gary A. Wilson, Chief Electrical Inspector & Doug Alexander, Structural Code Specialist. This interpretation specifies that in light duty systems certain light fixtures (such as recessed fluorescent lighting), the ceiling system shall not be used for the support of the lighting fixtures. Intermediate-duty ceilings may be used for supporting recessed lighting fixtures provided certain support detail specifications are followed. Heavy duty ceiling systems require that the recessed light fixture be secured to specifications included in the interpretation. Web search 4/29/12, original source: http://www.etnews.org/docs/wiring_methods_suspended_ceilings.pdf
- [13] "Recessed Light (Non-Insulating), Installation Instructions, CANARM Lighting & Fans, Tel: 800-265-1833 (English) or 800-567-2513 (French) or 800-267-4427 (USA) describe a recessed light fixture retrofit through a drywall ceiling.
- [14] "Downlights, Recessed Downlight Housings - Installation", Lucifer Lighting Company, 414 Live Oak St., San Antonnio TX 78202, Tel: 210-227-7329, www.luciferlighting.com
- [15] "Outdoor Recessed Light Kit Installation Instructions, apply to downlights / stair lights", Dekor, 2655 Santa Fe Unit 4H, Denver CO 80223, 2011, Customer Support: 800-258-0344, Website: www.DE-Kor.com. This document describes installation for a 12V DC constant current 3A transformer with a waterproof design IP66-rated, UL and CUL approved, and LED lighting fixtures that are waterproof and can be submerged in water. cf: OUTDOORRecessedLight Install1.pdf
- [16] "Recessed Lighting Tips", Arcadian Lighting, website: www.arcadianlighting.com Tel: 888-228-8856. [No mailing address provided]
- Our recommended books about building & mechanical systems design, inspection, problem diagnosis, and repair, and about indoor environment and IAQ testing, diagnosis, and cleanup are at the InspectAPedia Bookstore. Also see our Book Reviews - InspectAPedia.
- In addition to citations & references found in this article, see the research citations given at the end of the related articles found at our suggested
CONTINUE READING or RECOMMENDED ARTICLES.
- Carson, Dunlop & Associates Ltd., 120 Carlton Street Suite 407, Toronto ON M5A 4K2. Tel: (416) 964-9415 1-800-268-7070 Email: info@carsondunlop.com. Alan Carson is a past president of ASHI, the American Society of Home Inspectors.
Thanks to Alan Carson and Bob Dunlop, for permission for InspectAPedia to use text excerpts from The HOME REFERENCE BOOK - the Encyclopedia of Homes and to use illustrations from The ILLUSTRATED HOME .
Carson Dunlop Associates provides extensive home inspection education and report writing material. In gratitude we provide links to tsome Carson Dunlop Associates products and services.
 | HOME | ABOUT | ASK a QUESTION | CONTACT | CONTENT USE POLICY | DESCRIPTION | POLICIES | PRIVACY | |
| © 2024 - 1985 Publisher InspectApedia.com - Daniel Friedman | |||||||||