
InspectAPedia® FREE Encyclopedia of Building & Environmental Construction, Diagnosis, Maintenance & Repair |
Question? Just ask us! InspectAPedia
|
 Decking Installation Tips
Deck Design-Build Online Guide

- POST a QUESTION or COMMENT about deck construction
How to install deck boards: tips from the pros: here we explain how to handle crooked or twisted deck boards, thick 2x6 deck boards, tongue-and groove decking and other special problems that you may encounter when installing a deck floor or decking boards.
We also discuss how to best notch deck boards around obstructions like trees or access panels.
The article finishes by describing how to finish off the final trimming of the ends or edges of the deck boards, a step that leaves the floor edges and lines looking perfect. This article series describes construction details for decks and porches including methods for installing decking or deck b boards.
InspectAPedia tolerates no conflicts of interest. We have no relationship with advertisers, products, or services discussed at this website.
Decking Installation Tips: how to install twisted deck boards / floors, notch around obstructions & more
For the most part installing decking is a relatively easy and straightforward part of deck construction. If your decking hoards are all straight, your deck frame is a perfect rectangle, and a railing is not needed. But most deck builders are going to have to deal with unruly boards and obstacles that require special care.
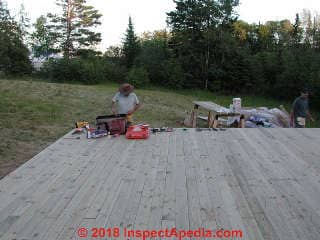
Our photo of the Two Harbors MN Summerblue Arts Camp stage floor decking installation (above left) illustrates using tongue-in-groove 2x6 deck flooring.
Working with these boards was hell: there was no choice of "best side" as asymmetric cutting of the tongue-and groove position means there is only one "up" side for each board.
To straighten each board before nailing we used a combination of clamps, temporary blocking and pry barr or as our photo shows, brute force.
Watch out: take care when forcing deck boards into position not to gouge up the edges of your boards, especially if you are using tongue-and-groove treated wood as we were in this project. Smashing up the tongue or grooves of a deck board can make it impossible to fit the next board snugly.
Decking forcing tip: Our trick when using a pry bar or hammer to force a T&G deck board into place was to use a short section of tongue-and-groove decking as a block against which to pry the actual deck board. This confined damage to our pry block and left the deck board edges intact.
How to Force Deck Boards into Position
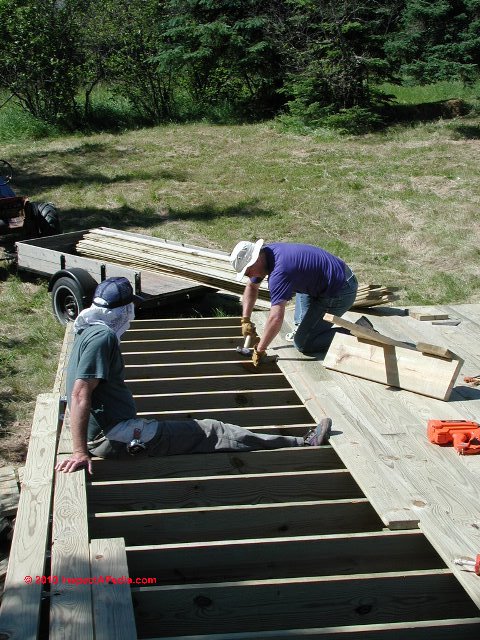
 If you are installing wood decking, chances are very good that many of your boards will be bowed, some more than others. (One of the advantages of composite decking is that you are not likely to face this problem.)
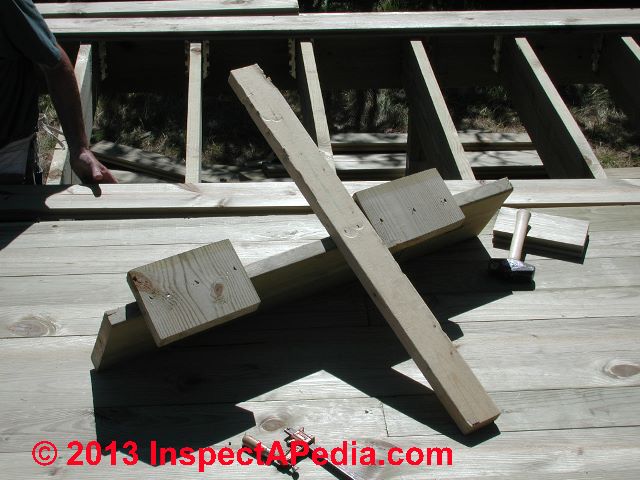
To install heavy 5/4 or (as shown at left) 2x6 tongue-and-groove decking we made the simple board wedging tool shown at left.
For the most curved deck boards we tacked our wedge across two joists and used the 2x4 as a pry bar against a T&G scrap that was in turn used to prevent damage to the deck boards.
By tacking the wedging apparatus a few feet away from the working edge of deck board installation, and by using additional scraps between the 2x4 pry bar and the secured edge of our wedging tools, we could install several deck boards straight and tight before having to pull up and relocate the wedge device.
To maintain a consistent gap between the decking boards, that means some will require a bit of persuading to get them into alignment. Moderately bowed boards can usually be pulled into line with one hand while driving a screw or nail with the other. More difficult boards may require other techniques.
Whichever method you use, remember to place a spacer between the boards before pulling the problem board into place.
A flat pry bar or utility chisel can be used to straighten most thinner deck boards than those we just described above. Knock the sharp end into the joists at an angle, and then pull the board toward you. Hold the pressure on the board until the fasteners are installed. If you are working alone, start the fasteners before pulling the board in.
When prying by hand fails to move the board far enough, a pipe damp is a good alternative. Hook one end against a pry bar stuck between two boards and the other end over the edge of the problem board.
Tighten the clamp until the board is properly aligned. Fasten the board, and then remove the clamp.
If you are building a large deck and have a plentiful supply of bowed boards, it might be worth investing in a specialized tool. Buy one that hooks over the joists, and then pulls the board into line quickly and with little effort.
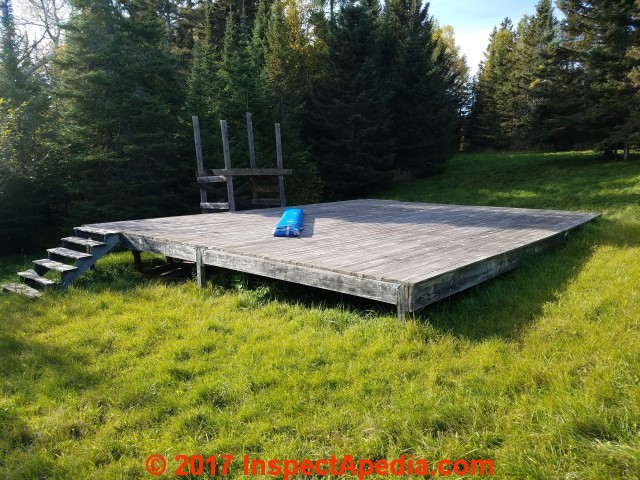
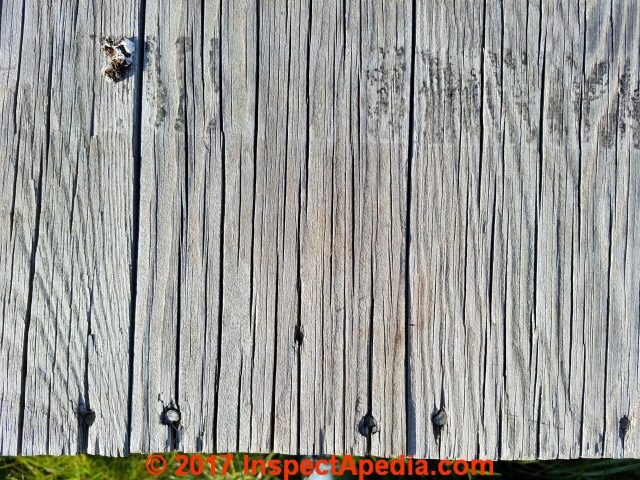
In the photo above (October 2017) you can see that this deck had survived well but as our photos show below, exposure to sixteen years of Northern Minnesota weather has caused checking and roughening of the surface that created a splinter hazard for performers on this stage
A tarp is often used to provide a splinter-free performing surface during the summer season.
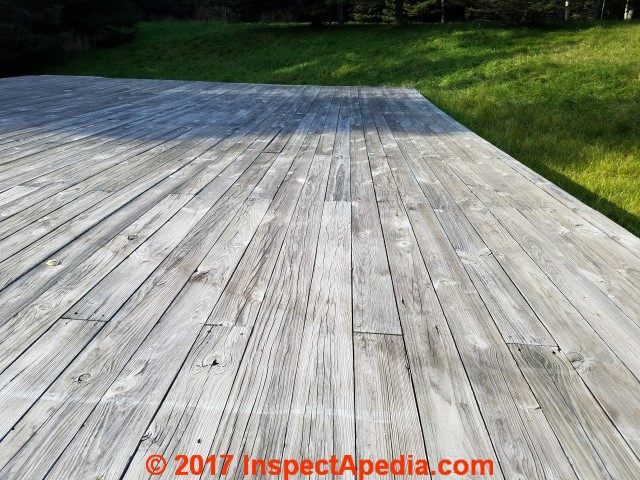
The original construction, installation and long term performance of this outdoor performing arts stage floor are described in a series of articles beginning at BATTER BOARDS LAYOUT METHOD.
Tongue and Groove Decking Installation
Tongue-and-groove composite decking is installed much like hardwood flooring used indoors.
Fasteners are driven through the grooves, which are then covered with the tongues of subsequent boards.
This type of decking is installed beginning at the outside edge of the deck, working toward the house. You’ll need to add fascia boards on the three exposed edges to hide the decking edges.
1. Install the Starter Strip
The starter strip is attached at the far end of the deck, with screws driven into the rim joist. The strip must be straight and parallel with the side of the house.
2. Attach the Decking
Slide the tongue of each new board into the groove of the installed board (or, to begin with, the starter strip). The decking is designed to create a ¼ inch gap between boards. Drive screws through the tongue of the board and into the joist.
3. Install the Last Row
If a full board fits comfortably in the row next to the house, drive screws vertically through the groove section. Otherwise, rip the board to fit and attach it to a 1-inch-square block of wood. As for any decking, allow a 1/4-inch gap between the decking and the house. Attach fascia boards to cover the edges of the decking.
Why & How to Notch Deck Boards Around Obstructions
 Most decks have obstructions that require decking to be notched. These include posts for railings or overheads or legs for built-in seating. Many of these supports need to be installed before you finish the decking.
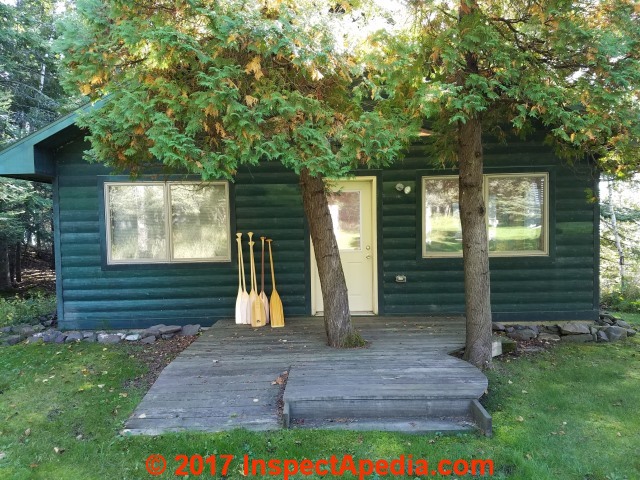
It was important to preserve the trees shown in our Green Cabin project photo (left).
This meant that the ground-level deck planned for this area would need to be cut around these obstructions, leaving clearance for green growth, the roots or bole of the tree.
These methods can be used on solid decking, whether wood or composite.
For other decking materials, check with the manufacturer before cutting notches.
1. Mark for the Decking Notch Cut
To mark an accurate cut line in a board that needs to fit around a post, set the decking in place against the post.
With an angle square or combination square, mark the post location on the decking.
 Our photo at left shows the ground-level deck in place.
We cut around the center tree to the left of the cabin entry door. The deck layout simply chose to avoid the second right-hand tree completely.
Notice that our little deck gives two methods of entry: a single low step (at front right) or an accessible ramp (at front left).
2. Make the Deck Board Notch Cut
Cut the notch with a jigsaw. Cut a little to the outside of the marks so that the notch is not too tight.
3. Add Support at Cut Decking Ends
You always need to support cut ends of decking.
When notching to fit around a post or another obstacle, attach cleats to serve as supports, and then drive fasteners through the decking and into the cleats.
Watch out: the life of any wood deck, whether on or close to the ground as shown will be reduced by the lack of air circulation below the deck, and will be further reduced for any deck boards that are in direct contact with the ground.
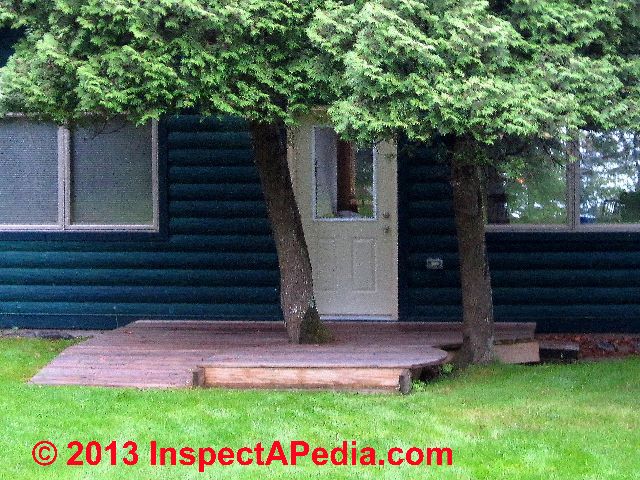
Below is the same entry deck in 2017 when we observed the beginning of deterioration of the deck boards that were in ground contact: this was eleven years after original construction of this entry deck.
Tips for Trimming Deck Floor Boards
It is much more efficient to cut the decking to length after it has been installed.
Measure and mark the end boards for any overhang you have planned (typically 1 inch), then snap a chalk line to guide your cut.
If you are concerned about being able to make a straight cut, tack a 1 X 4 to the deck surface to guide your saw. Follow the same method for any decking material.
1.Trim the Ends
Carefully follow the chalk line to cut the decking to its final length.
You can finish cutting near the house with a handsaw or jigsaw.
2. Smooth the Deck Board Cuts
Clean up the edges with a power sander, or use medium-grit sandpaper wrapped around a block of wood.
How to Handle Left-Over Deck Flooring or Framing Lumber
If you wind up with a pile of short pieces of cut-off decking, you need to dispose of these leftovers properly.
Pressure-treated wood and composite or vinyl decking should never be burned. In most areas, you can dispose of unneeded scraps with normal household waste.
Larger pieces of decking, however, can be used to build small planters or tables for use on the deck or around the yard.
...
Continue reading at DECK FLOOR INSTALLATION or select a topic from the closely-related articles below, or see the complete ARTICLE INDEX.
Or see these
Recommended Articles
- GUARDRAIL CONSTRUCTION, DECKS & RAMPS
- DECK BOARD GAPS & SPACING
- DECKING COMPOSITE PRODUCTS
- FOUNDATION DAMAGE by ICE LENSING - long term performance of the outdoor deck / stage shown in this article
Suggested citation for this web page
DECK FLOOR INSTALLATION TIPS at InspectApedia.com - online encyclopedia of building & environmental inspection, testing, diagnosis, repair, & problem prevention advice.
Or see this
INDEX to RELATED ARTICLES: ARTICLE INDEX to BUILDING DECKS & PORCHES
Or use the SEARCH BOX found below to Ask a Question or Search InspectApedia
Or see
INDEX to RELATED ARTICLES: ARTICLE INDEX to BUILDING STRUCTURES
Or use the SEARCH BOX found below to Ask a Question or Search InspectApedia
Ask a Question or Search InspectApedia
Try the search box just below, or if you prefer, post a question or comment in the Comments box below and we will respond promptly.
Search the InspectApedia website
Note: appearance of your Comment below may be delayed: if your comment contains an image, photograph, web link, or text that looks to the software as if it might be a web link, your posting will appear after it has been approved by a moderator. Apologies for the delay.
Only one image can be added per comment but you can post as many comments, and therefore images, as you like.
You will not receive a notification when a response to your question has been posted.
Please bookmark this page to make it easy for you to check back for our response.
Our Comment Box is provided by Countable Web Productions countable.ca
Citations & References
In addition to any citations in the article above, a full list is available on request.
- [1] Steve Bliss's Building Advisor at buildingadvisor.com helps homeowners & contractors plan & complete successful building & remodeling projects: buying land, site work, building design, cost estimating, materials & components, & project management through complete construction. Email: info@buildingadvisor.com
Steven Bliss served as editorial director and co-publisher of The Journal of Light Construction for 16 years and previously as building technology editor for Progressive Builder and Solar Age magazines. He worked in the building trades as a carpenter and design/build contractor for more than ten years and holds a masters degree from the Harvard Graduate School of Education. Excerpts from his recent book, Best Practices Guide to Residential Construction, Wiley (November 18, 2005) ISBN-10: 0471648361, ISBN-13: 978-0471648369, appear throughout this website, with permission and courtesy of Wiley & Sons. Best Practices Guide is available from the publisher, J. Wiley & Sons, and also at Amazon.com - [2] Decks and Porches, the JLC Guide to, Best Practices for Outdoor Spaces, Steve Bliss (Editor), The Journal of Light Construction, Williston VT, 2010 ISBN 10: 1-928580-42-4, ISBN 13: 978-1-928580-42-3, available from Amazon.com
- [3] Prescriptive Residential Wood Deck Construction Guide, based on the 2009 International Residential Code, American Forest & Paper Association, Inc., provided by reader Mark Morsching from Everflashing.
- [4] Mark Morsching, Everflashing, Tel: 800-550-1667, Email: everflashing@gmail.com. The Everflashing product comes in G-185 and Stainless Steel and is intended for use with treated lumber with copper in it. Everflashing produces a variety of specialty flashing products including flashings for use with decks at deck ledgers and deck perimeters.
- [2] Manual for the Inspection of Residential Wood Decks and Balconies, by Cheryl Anderson, Frank Woeste (Forest Products Society), & Joseph Loferski, October 2003, ISBN-13: 978-1892529343,
- [5] Claudia Hudson, Asheville NC, Tel: 828-252-0644 Email: claudiahudson@charter.net . Ms. Hudson is an SEO copyrighter / content writer. She has provided background research and text for InspectApedia's articles on deck and porch construction methods & procedures. April 2013.
- In addition to citations & references found in this article, see the research citations given at the end of the related articles found at our suggested
CONTINUE READING or RECOMMENDED ARTICLES.
- Carson, Dunlop & Associates Ltd., 120 Carlton Street Suite 407, Toronto ON M5A 4K2. Tel: (416) 964-9415 1-800-268-7070 Email: info@carsondunlop.com. Alan Carson is a past president of ASHI, the American Society of Home Inspectors.
Thanks to Alan Carson and Bob Dunlop, for permission for InspectAPedia to use text excerpts from The HOME REFERENCE BOOK - the Encyclopedia of Homes and to use illustrations from The ILLUSTRATED HOME .
Carson Dunlop Associates provides extensive home inspection education and report writing material. In gratitude we provide links to tsome Carson Dunlop Associates products and services.
 | HOME | ABOUT | ASK a QUESTION | CONTACT | CONTENT USE POLICY | DESCRIPTION | POLICIES | PRIVACY | |
| © 2024 - 1985 Publisher InspectApedia.com - Daniel Friedman | |||||||||