
InspectAPedia® FREE Encyclopedia of Building & Environmental Construction, Diagnosis, Maintenance & Repair |
Question? Just ask us! InspectAPedia
|
 Deck Floor Pattern Choices, Layouts
Deck Design-Build Online Guide
- POST a QUESTION or COMMENT about deck construction
Deck board pattern recommendations:
This article describes layout options for simple decks as well as more complex deck floor pattern installations. The article explains the key step in placing the first deck board - the line from which the rest of the decking follows.
We explain how to lay out the remaining deck boards, how to stagger butt joints between boards, and we address the problem of deciding which side of the deck board should face up? This article series describes design-build details for decks, deck stairs and railings.
InspectAPedia tolerates no conflicts of interest. We have no relationship with advertisers, products, or services discussed at this website.
Decking Patterns & Layouts
You will look at the deck surface every time you step out onto your deck, so you want to make it as attractive as possible.
That entails making a smart choice in the decking you buy and taking the time to ensure a neat installation.
The deck surface must also withstand a lot of abuse—from feet, furniture, and the elements—so it needs to be tightly and securely fastened to the framing, and maintained and repaired as needed.
You will need to arrange and install decking that will live up to its dual responsibilities of visual appeal and durability. In addition to looking at the traditional option of wood decking installed with screws or nails, it is also a good idea to take a close look at the newer and promising choices of composite decking and hidden fasteners.
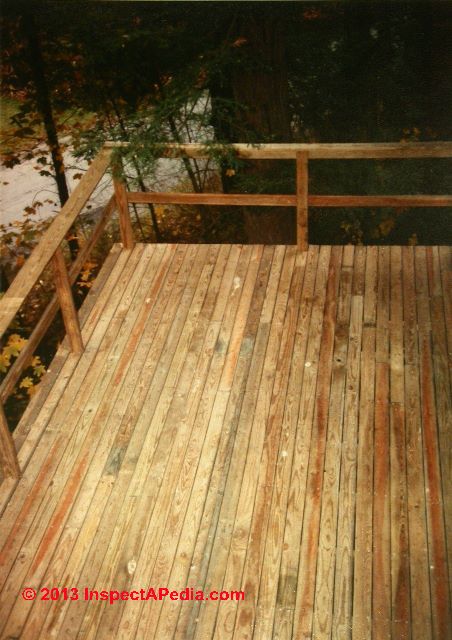
At left we show the most-simple deck floor installation on a deck being constructed in New York (by the editor in 1986) .
Choices of a Decking Layout Patterns
You can install decking in a wide variety of patterns. Most decking variations require adjustments in the framing, So you need to decide early in the design stage exactly how you want your deck surface to look.
Simple Deck Floor Layout Patterns
Installing boards that are all parallel to each other is the easiest approach. Most decks are constructed with decking that runs parallel to the house.
 There are good reasons for this predominance: this style is the easiest to design, the quickest to install, and, to some minds, the best looking.
A slight variation on this theme is to alternate different widths of decking (such as 2 X 6s and 2 x 4s). Running the decking perpendicular to the house looks like a minor modification, but it actually requires the entire frame except the ledger to be rotated.
This can be an advantage when you want to use short decking boards and avoid butt joints, or when you expect to shovel a lot of snow.
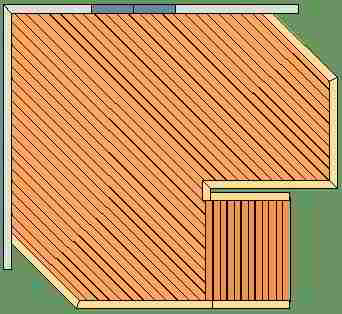
At DECK PLAN & SKETCH we discuss using a computer program or online web service to make deck drawings and plans for design-build projects, including exploring deck board pattern options such as that shown at left.
Diagonal decking can be installed over conventional framing, but it requires that you measure the joist spacing (that is, the decking span) along the diagonal run of the decking.
This usually means that joists must be spaced a little closer together, or that you need to use thicker decking. Since each board length differs, and both ends must be cut at an angle, diagonal decking takes more time to install.
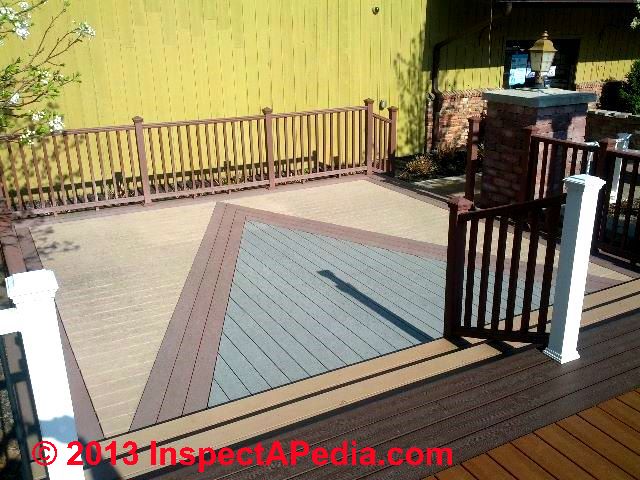
Complex Patterns
Tastes vary, of course. If yours runs contrary to the straight and narrow, and you do not mind the extra effort, by all means choose a more compelling pattern.
Complex decking patterns require careful planning, and the details will vary from one deck to another. Regardless of the design, however, two principles must always be observed: the ends of every piece of decking must be supported by framing, and no piece of decking should exceed its allowable span.
You may want to seek professional design assistance if you want to create one of these decking patterns.
Laying Out Decking

The more complicated your decking pattern, the more time you need to spend on the layout. But even a simple deck will benefit from a careful layout, which usually boils down to getting the first board installed as perfectly as possible.
The page top photo shows the editor (DF) compulsively sorting deck building tools at the completion of the Two Harbors SummerBlue Arts Camp stage deck.
The original construction, installation and long term performance of this outdoor performing arts stage floor are described in a series of articles beginning at BATTER BOARDS LAYOUT METHOD.
At DECK FLOOR INSTALLATION TIPS we describe forcing these nearly 2" thick tongue and groove deck boards into place using a special jig.
Plan The First Board
With most decking patterns, the first installed board becomes a reference for the rest of the boards. If it is not perfectly aligned, the rest of the pattern will suffer accordingly
. In the deck above we worked from the stage front (the left side of the photo) towards the rear.
As we were using tongue and groove flooring we ripped the tongue off of the leading or first board edge.
 Making the first deck board straight and securing it well made installing the rest of the deck boards easier, though as we describe in the deck floor installation articles cited just above, aligning, straightening, and fastening 2x6 T&G decking was not an easy job.
On each side of the deck, measure out from the house the width of a decking board plus an additional ¼ inch.
Mark the location on each end joist.
Snap a chalk line between the two marks. Use the straightest board you can find for this first row, and install it so the outer edge is aligned with the chalk line.
If you are installing diagonal decking, check the distance from the house to the end of the deck.
Measure an equal distance along the rim joist and make a mark. Snap a chalk line between that mark and the outside corner of the end joist at the house, and install the first row of decking aligned with the chalk line.
If you are installing diagonal decking, check the distance from the house to the end of the deck.
Measure an equal distance along the rim joist and make a mark. Snap a chalk line between that mark and the outside corner of the end joist at the house, and install the first row of decking aligned with the chalk line
Plan The Edging For Your Deck
This is the time to think about how you want the edges of the deck to look.
The most common approach is to leave the board ends exposed, overhanging the perimeter joists by an inch or so. This is also the easiest technique, allowing you to install slightly oversized boards, then go back and cut them to length at one time.
If you do not like the look of all that end grain on the edges, however, you should consider installing a fascia board. This requires that you trim the decking flush with the joist faces.
The fascia will look best if it matches the decking as closely as possible. Use 2 x boards for the fascia, choosing a width that can span from the top of the decking to a bit below the joist. Miter the corners for the neatest appearance.
If you are bothered by the exposed deck edges, but want to dress up highly visible joists around the perimeter, attach a fascia board beneath the decking.
You can use 1 x board for this purpose, since the top of the board will not be stepped on. Install the decking so that it will overhang the fascia by about an inch on all sides.
Best Deck Board Side Up? What about deck board cupping?
 If you are installing wood decking, you will need to decide which side of the board should face up.
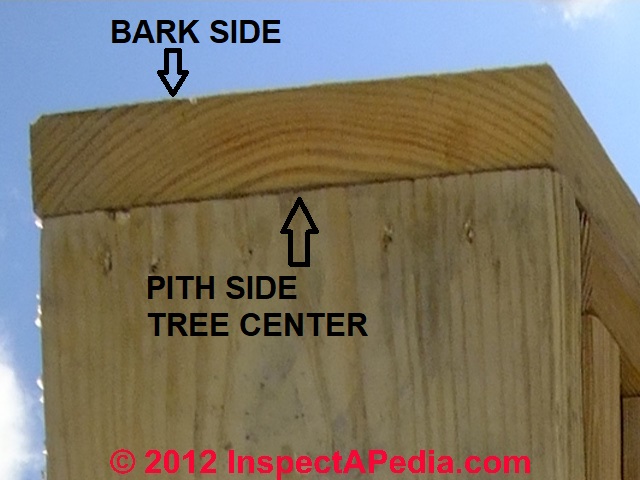
When you examine the end of a piece of lumber, you can see that the grain has a specific orientation, depending on how the log from which it came was cut. Most often you will see the grain forming a ringed pattern.
As the rings move out from the center, they approach what was the outside, or bark side, of the tree.
Traditional wisdom dictated that the wood should be oriented consistently according to the grain, with most advising “bark side up.” For details
see BARK SIDE UP on DECKS & STEPS.
Wood usually forms a slight cup or hollow side-to-side over time. By installing wood so the cup forms underneath, water runs off. If the cup forms in the other direction, water collects.
Research has shown that there are small advantages to following the “bark side up” rule for dried lumber. But these advantages are usually not significant enough to overcome the advantages of installing the best-looking side up.
A defense against excessive cupping is to attach the decking with screws and apply a water- repellent finish regularly.
See DECK FINISHES COATINGS PRESERVATIVES - best practices guide.
Deck floor board installation tip: while generally it is preferable to install deck flooring with the bark side up to minimize cupping, water collection, slippery algae formation and rot, don't follow this rule blindly. Look at each board. If the "bark side" of the deck board is cupped "wrong way" or if it is badly damaged, gouged, split, or shelling, flip it over.
...
Continue reading at DECK FLOOR INSTALLATION - the next step in building a deck, or select a topic from the closely-related articles below, or see the complete ARTICLE INDEX.
Or see these
Recommended Articles
- COMPOSITE DECK BOARDS
- DECK FLOOR INSTALLATION
- DECK FLOOR INSTALLATION TIPS
- DECK FLOOR LAYOUT
- DECK FLOOR & STEP CUPPING
- GUARDRAIL CONSTRUCTION, DECKS & RAMPS
Suggested citation for this web page
DECK FLOOR LAYOUT at InspectApedia.com - online encyclopedia of building & environmental inspection, testing, diagnosis, repair, & problem prevention advice.
Or see this
INDEX to RELATED ARTICLES: ARTICLE INDEX to BUILDING DECKS & PORCHES
Or use the SEARCH BOX found below to Ask a Question or Search InspectApedia
Or see
INDEX to RELATED ARTICLES: ARTICLE INDEX to BUILDING STRUCTURES
Or use the SEARCH BOX found below to Ask a Question or Search InspectApedia
Ask a Question or Search InspectApedia
Try the search box just below, or if you prefer, post a question or comment in the Comments box below and we will respond promptly.
Search the InspectApedia website
Note: appearance of your Comment below may be delayed: if your comment contains an image, photograph, web link, or text that looks to the software as if it might be a web link, your posting will appear after it has been approved by a moderator. Apologies for the delay.
Only one image can be added per comment but you can post as many comments, and therefore images, as you like.
You will not receive a notification when a response to your question has been posted.
Please bookmark this page to make it easy for you to check back for our response.
Our Comment Box is provided by Countable Web Productions countable.ca
Citations & References
In addition to any citations in the article above, a full list is available on request.
- [1] Steve Bliss's Building Advisor at buildingadvisor.com helps homeowners & contractors plan & complete successful building & remodeling projects: buying land, site work, building design, cost estimating, materials & components, & project management through complete construction. Email: info@buildingadvisor.com
Steven Bliss served as editorial director and co-publisher of The Journal of Light Construction for 16 years and previously as building technology editor for Progressive Builder and Solar Age magazines. He worked in the building trades as a carpenter and design/build contractor for more than ten years and holds a masters degree from the Harvard Graduate School of Education. Excerpts from his recent book, Best Practices Guide to Residential Construction, Wiley (November 18, 2005) ISBN-10: 0471648361, ISBN-13: 978-0471648369, appear throughout this website, with permission and courtesy of Wiley & Sons. Best Practices Guide is available from the publisher, J. Wiley & Sons, and also at Amazon.com - [2] Decks and Porches, the JLC Guide to, Best Practices for Outdoor Spaces, Steve Bliss (Editor), The Journal of Light Construction, Williston VT, 2010 ISBN 10: 1-928580-42-4, ISBN 13: 978-1-928580-42-3, available from Amazon.com
- [3] Prescriptive Residential Wood Deck Construction Guide, based on the 2009 International Residential Code, American Forest & Paper Association, Inc., provided by reader Mark Morsching from Everflashing.
- [4] Mark Morsching, Everflashing, Tel: 800-550-1667, Email: everflashing@gmail.com. The Everflashing product comes in G-185 and Stainless Steel and is intended for use with treated lumber with copper in it. Everflashing produces a variety of specialty flashing products including flashings for use with decks at deck ledgers and deck perimeters.
- [2] Manual for the Inspection of Residential Wood Decks and Balconies, by Cheryl Anderson, Frank Woeste (Forest Products Society), & Joseph Loferski, October 2003, ISBN-13: 978-1892529343,
- [5] Claudia Hudson, Asheville NC, Tel: 828-252-0644 Email: claudiahudson@charter.net . Ms. Hudson is an SEO copyrighter / content writer. She has provided background research and text for InspectApedia's articles on deck and porch construction methods & procedures. April 2013.
- Our recommended books about building & mechanical systems design, inspection, problem diagnosis, and repair, and about indoor environment and IAQ testing, diagnosis, and cleanup are at the InspectAPedia Bookstore. Also see our Book Reviews - InspectAPedia.
- In addition to citations & references found in this article, see the research citations given at the end of the related articles found at our suggested
CONTINUE READING or RECOMMENDED ARTICLES.
- Carson, Dunlop & Associates Ltd., 120 Carlton Street Suite 407, Toronto ON M5A 4K2. Tel: (416) 964-9415 1-800-268-7070 Email: info@carsondunlop.com. Alan Carson is a past president of ASHI, the American Society of Home Inspectors.
Thanks to Alan Carson and Bob Dunlop, for permission for InspectAPedia to use text excerpts from The HOME REFERENCE BOOK - the Encyclopedia of Homes and to use illustrations from The ILLUSTRATED HOME .
Carson Dunlop Associates provides extensive home inspection education and report writing material. In gratitude we provide links to tsome Carson Dunlop Associates products and services.
 | HOME | ABOUT | ASK a QUESTION | CONTACT | CONTENT USE POLICY | DESCRIPTION | POLICIES | PRIVACY | |
| © 2024 - 1985 Publisher InspectApedia.com - Daniel Friedman | |||||||||