
InspectAPedia® FREE Encyclopedia of Building & Environmental Construction, Diagnosis, Maintenance & Repair |
Question? Just ask us! InspectAPedia
|
 Deck Ledger Board Installation
Deck Design-Build Online Guide
- POST a QUESTION or COMMENT about deck construction
The deck ledger, the horizontal framing member that connects the deck to the building forms the starting or reference point for the rest of deck construction. The ledger defines the deck location, width at the building, and height from the ground. The ledger forms the key reference point from which all other deck measurements and plans will be made.
Here we describe how to locate and install the deck ledger board. This article series describes critical safe-construction details for decks and porches, including avoiding deck or porch collapse and unsafe deck stairs and railings.
InspectAPedia tolerates no conflicts of interest. We have no relationship with advertisers, products, or services discussed at this website.
Deck Ledger Boards: Connections Between Deck & House
Attaching the ledger board for a deck
The ledger is a board that is bolted to the house to support one end of the deck joists. It is a bit of a hybrid—part foundation, part framing—and installing it is usually the first construction task in deck building.
With the ledger firmly and properly in place, it will be easier to lay out the rest of the foundation. Procedures for installing a ledger vary, depending upon the type of siding on your house.
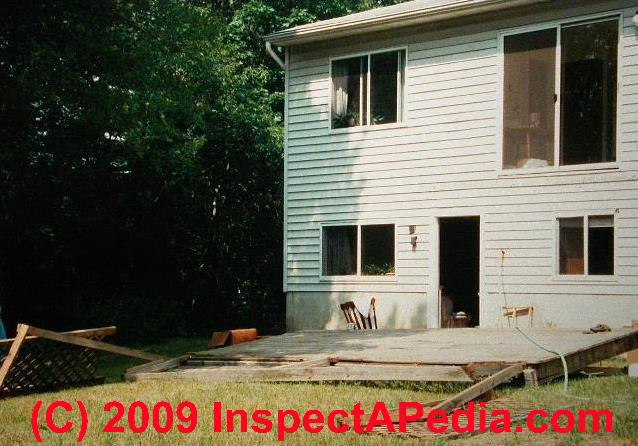
Watch out: to avoid a dangerous deck collapse the deck ledger board must be correctly connected to the building structure using proper fasteners that tie to the building structure, and the ledger must be properly flashed to prevent rot and insect damage.
At DECK COLLAPSE Case Study we show what happens when an idiot just tacked the deck ledger to the building through vinyl siding using just some nails.
This article explains deck ledger board installation, connections, & framing.
How to choose the position for the deck ledger board
To keep snow and water away, the finished surface of the deck should be lower than the interior floor of any room leading onto it. To avoid creating a tripping hazard, the deck can be located an inch or less below the interior floor deck surface 4 to 8 inches below the interior floor. This distance will produce a safe, clearly visible step from the deck up to the house. Your local building code may offer more specific guidelines on this issue.
When determining the height at which to install the ledger, you need to take into account both the drop from the interior floor and the thickness of the decking material you plan to install.
How to choose the size of the deck ledger board
As a general rule, you should use the same size of board for the ledger as you plan to use for the joists. You can use a larger board, however, if it allows for a better connection to the house framing. Calculate the length as 3 inches less than the width of the deck framing. This leaves room for the end joists to overlap, and thus hide, the ledger ends. Also, reduce the length of the ledger as needed to allow the decking to overhang the framing.
Some types of siding should be cut away to make room for the ledger. Relatively flat siding, how-ever, can remain intact. Regardless of the type of siding, the strongest ledger connection relies on bolts that run through the ledger and the house sheathing and rim joist, with nuts and washers attached in the basement or crawl space. When access to the other side of the fasteners is not feasible, you can use lag screws instead.
Sometimes it is necessary to use both types of fasteners.
Ledgers should never be merely nailed to the house, and they must always connect to the house framing or foundation— never just the sheathing, which cannot support a deck.
The size and spacing of the bolts should be spelled out in your building code. If they are not, use I/2-inch bolts every 14 inches on decks with joist spans of up to 10 feet; every 10 inches for joist spans of up to 14 feet; and every 8 inches for longer spans. Avoid installing bolts that will interfere with joists and joist hangers. Drill pilot holes as to install carriage bolts or lag screws.
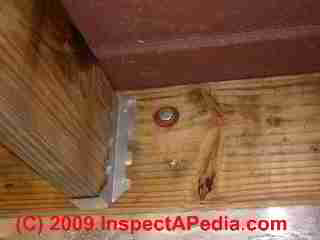
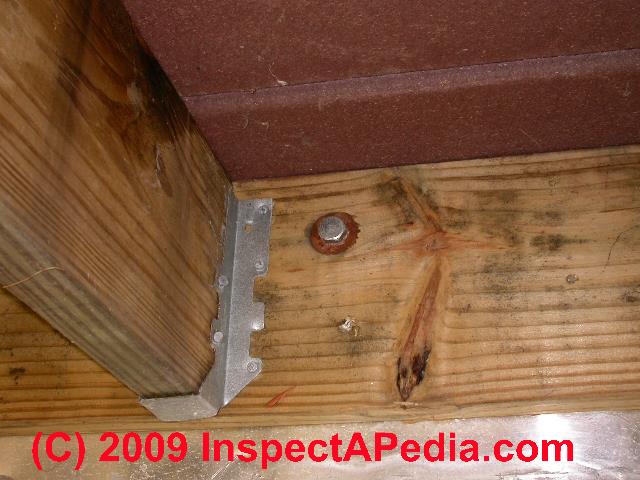
Provide Drainage and Avoid Moisture / Rot / Insect Damage at the Deck Ledger
 It is a good idea to leave a space behind the ledger to allow for drainage. This is easily accomplished by placing three or four washers (galvanized or stainless steel) on each bolt.
Alternatively, wood spacers can be cut out of pressure-treated plywood and placed behind the ledger.
As added protection against moisture infiltration, squirt some caulk into the holes before inserting bolts or lag screws.
Watch out: as we discuss below, for virtually every deck installation you will also need to add flashing properly installed to avoid rot, insect damage, leaks into the building, and risk of catastrophic deck collapse when the ledger board fails.
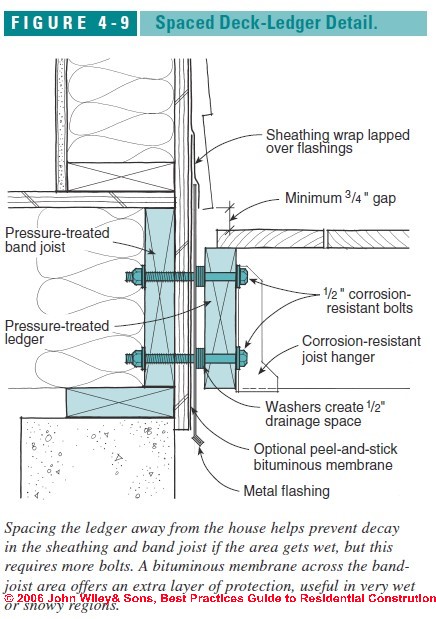
At DECK FLASHING (in our Best Construction Practices article series) we describe two options for deck ledger connection:
1. The deck ledger is bolted directly against the building and flashed to avoid leaks and rot
2. The deck ledger board is connected to the building with a 1/2-inch gap to improve drainage at the building.
Illustration at above left is used with permission and appears in Best Practices Guide to Residential Construction (Steve Bliss, J Wiley & Sons) , Chapter Four, Best Construction Guide for Building Decks and Porches.
Connecting a Deck Ledger when the Building Used Nonstandard Building Joists
If the floors in your house are framed with something other than solid wood, such as wood I-joists or another kind of manufactured joist system, you will probably need to take extra steps to secure the ledger. Discuss your options with the building department or a construction professional.
Removing Siding to Connect the Deck Ledger
If your house has clapboard, beveled wood, metal, or vinyl siding, you will need to remove some siding to accommodate the ledger. Also cut away siding1/2 inches to each side of the ledger to allow for the end joists of the deck.
Plan to remove enough siding so that flashing can be tucked behind the siding above the ledger and overhang the siding below the ledger, Although metal flashing is often installed to cover the top edge of the ledger, a better technique is to extend it below the ledger.
If you will be using self- adhesive membrane instead, prepare for it by removing the entire row of siding above the ledger. After you apply the membrane, reattach the siding.
If your house was built before 1978, there is a good chance that paint on the siding may contain lead. Inhaling lead dust can be harmful, so if you are cutting painted siding of that vintage, wear a HEPA- rated respirator and clean up any paint chips or other debris you create immediately.
Cut the Siding
Carefully mark lines for the cuts on the siding. Make sure to check for level and to allow room for the end joists. Adjust the blade of your circular saw so that it cuts just to the depth of the siding and not into the sheathing underneath. Do not let the blade cut beyond the layout lines. If you are cutting vinyl siding, you can also use a sharp utility knife.
Finish with a Chisel
Use a chisel to finish each cut and make clean corners. You may find it easier to make the vertical cuts with the chisel alone.
Deck Ledger Flashing is Key to Deck Structural Safety & Avoiding Building Leaks
 Slide metal flashing beneath the siding. You may need to temporarily remove some siding nails first. Cut the flashing to fit around the door threshold, as shown. Apply caulk to the joint between the threshold and flashing. Details about deck ledger flashing are at these two key additional references:
- DECK FLASHING - Deck Flashing Details to avoid building leaks & rot
- DECK FLASHING LEAKS, ROT Case Study - how bad deck flashing leads to catastrophic deck collapses
Also see FLASHING SIDING DETAILS
and FLASHING MEMBRANES PEEL & STICK.
How to Attach a Deck Ledger Board to a Masonry Wall
Ledgers can also be attached to solid concrete or solid masonry walls. For walls of concrete block, fill the hollow cores with grout; if that is not possible, consult a professional. For solid concrete and grout- filled concrete block, use 1/2-inch galvanized expansion or wedge anchors. For other types of masonry walls, epoxy anchors are best.
Prepare the Wall and Ledger
1.Outline the ledger location on the wall. Drill holes in the ledger for the bolts, taking into account the planned joist locations. Set the ledger against the wall, using 2 x 4s to hold it in place. Mark bolt hole locations on the wall with a nail.
2.Drill the Bolt Holes Using a hammer drill and masonry bit, drill holes to the depth necessary for the bolts.
3.Attach the Ledger. Remove debris from the drilled holes with a shop vacuum. Prop the ledger back in place and insert an expansion bolt equipped with a washer in each hole. Tighten the bolts with a socket wrench. Apply a bead of silicone caulk to the joint between the wall and the ledger.
Using Epoxy Anchors for Deck Ledger Connections
For a wall that requires epoxy anchors, place a glass vial of epoxy into the hole. Let the epoxy harden, then slip the ledger over the rods, add washers and attach the ledger with nuts. For a wall that requires epoxy anchors, place a glass vial of epoxy into each hole. Quickly insert a threaded rod.
Or for an example of what happens if you foul up the ledger board see DECK COLLAPSE Case Study
Reader Comments, Questions & Answers About The Article Above
Below you will find questions and answers previously posted on this page at its page bottom reader comment box.
Reader Q&A - also see RECOMMENDED ARTICLES & FAQs
On 2017-08-30 by Ed
The new decking boards we have don't fit evenly across the old deck structure so should we start with a full board on the door edge or the outside edge?
On 2017-02-14 - by (mod) -
Re-posting
brendon7 said:
@JOseph, look into this link we have used this product on hollow blocks, it works very well. /www.strongtie.com/screentubes_adhesiveanchoringaccessories/optimesh_screentube/p/opti-mesh-adhesive-anchoring-screen-tubes
Moderator's note: this refers to Simpson Strong-Tie's Opti-Mesh Adhesive-Anchoring screen tubes. The company's product description includes
The Simpson Strong-Tie Opti-Mesh screen features formula-specific mesh designed to control the flow of adhesive out of the screen. The result is uniform coverage of adhesive on the rod. The standard screen utilizes mesh which allows adhesive to flow freely out of the screen when the rod is inserted.
Too much adhesive is pushed out of the screen, leaving a large portion of the rod unbonded. This unbonded rod will pull out of the screen at a much lower load than a rod installed with an Opti-Mesh screen.
JOseph: typically you would use a concrete patch material to seal the old holes left in a concrete block wall when ledger board bolts have been removed. The new ledger board is usually bolted to the block wall using a concrete-anchoring system to accept the bolts.
You still need to take care that the deck and ledger are properly flashed to avoid leaks into the building through the block wall at any crack, penetration, or porous area and to protect the ledger connections.
On 2017-02-08 by JOseph
Further clarification: There is no rim joist or band joist on the inside of the concrete block walls. Thank you.
On 2017-02-08 by JOseph
The deck on the back of our house is being replaced. There was no ledger board before as the joists were resting between the (hollow) concrete blocks of the wall. Those boards have been removed, leaving holes in the wall. What should I require of the new deck installation/installer who is proposing a ledger board over those holes. What anchors would be acceptable in hollow concrete blocks, if any? I am concerned. Thanks!
On 2015-10-28 by John Pratt
Im building a deck on top of flat roof. We removed existing deck a rebuilding one. The roof is 1 storys off a 2 story house and deck will need to fasten to wall studs because its to high for ledger to attatch to floor joist. I cannot use ledger load devices. What am i required to do?
On 2014-02-24 - by (mod) -
Edward:
The ledger board is a critical connection when it is bearing load; but when attaching a deck to an existing cantilever it's more likely that additional support will be needed below the deck; in this case the cantilevered building is not carrying most or perhaps not carrying any of the deck weight (depending on the cantilever structure of the original building). Instead the ledger board and proper attachment of it to the building and of the deck to the ledger is what keeps the whole deck from leaning away from the building and then collapsing.
You could build a perfectly secure deck with no ledger board whatsoever, but it'd need support for both ends of the deck and cross-bracing to prevent leaning and collapse.
By no means do I claim that you can simply bolt the deck onto the cantilever, particularly in the case you describe.
On 2014-02-24 by Edward
Hi Dan, thank you for your (quick!) response. It's clear from this article that the connection to the home is _incredibly_ important in determining the strength of a deck. I understand your idea of placing the posts in from the outer edge of the deck. It's not currently planned that way (still negotiating), so I will bring it up.
Everything will be permitted (I already got variance approval), and am keen to have the inspector take a close look at each step. Your response gives me confidence that a deck can be safely attached to a cantilever by a thoughtful contractor. Thanks again!
On 2014-02-23 - by (mod) -
Edward,
I don't have the nerve to pretend to do deck engineering by text mail, but I can offer some general advice:
1. the deck will need a building permit and CO - those have to satisfy the building department that the deck construction is safe and properly secured - I emphasie that connections are a most common source of deck disasters.
2. I'm not sure why the design places the deck support at its far end. A 2 foot cantilever on a house is quite common, and I wouldn't be afraid to connect the ledger board to the house rim joist. BUT I would think about avoiding adding downwards force to the existing cantilever; Depending on where the deck is supported, for example if the deck outer edge were itself cantilevered, it might result in a neutral force at the house ledger, or even an upwards force. It's a pretty straight forward calculation.
So maybe you will want to bring in the deck support girder; or if it has to remain at the deck outer edge, most distant from the house if I were building it I'd add another supporting deck girder much closer to the house.
Let me know who's doing your deck drawings and what the building department accepts.
On 2014-02-23 by Edward
Hello. Your web site is fantastic. I plan to have a licensed contractor build a deck roughly 3 feet off the ground attached to a cantilevered section of my house. The cantilever hangs out about 2 feet from the foundation. They plan to use a ledger to attach the deck to the house at the cantilever, and place 3 posts to support the deck at the far edge from the house.
The deck will be 8 feet deep (distance from cantilever to edge of deck). Do any additional steps/precautions need to be taken, since one side of the deck will be attached to the cantilever, which does not have foundation directly under it? Thank you.
...
Continue reading at DECK LAYOUT or select a topic from the closely-related articles below, or see the complete ARTICLE INDEX.
Or see these
Recommended Articles
- DECK COLLAPSE Case Study
- DECK LAYOUT
- DECK LEDGER BOARDS - best practices.
- DECK FRAMING TABLES, SPANS
Suggested citation for this web page
DECK LEDGER BOARD INSTALL at InspectApedia.com - online encyclopedia of building & environmental inspection, testing, diagnosis, repair, & problem prevention advice.
Or see this
INDEX to RELATED ARTICLES: ARTICLE INDEX to BUILDING DECKS & PORCHES
Or use the SEARCH BOX found below to Ask a Question or Search InspectApedia
Or see
INDEX to RELATED ARTICLES: ARTICLE INDEX to BUILDING STRUCTURES
Or use the SEARCH BOX found below to Ask a Question or Search InspectApedia
Ask a Question or Search InspectApedia
Try the search box just below, or if you prefer, post a question or comment in the Comments box below and we will respond promptly.
Search the InspectApedia website
Note: appearance of your Comment below may be delayed: if your comment contains an image, photograph, web link, or text that looks to the software as if it might be a web link, your posting will appear after it has been approved by a moderator. Apologies for the delay.
Only one image can be added per comment but you can post as many comments, and therefore images, as you like.
You will not receive a notification when a response to your question has been posted.
Please bookmark this page to make it easy for you to check back for our response.
Our Comment Box is provided by Countable Web Productions countable.ca
Citations & References
In addition to any citations in the article above, a full list is available on request.
- [1] Steve Bliss's Building Advisor at buildingadvisor.com helps homeowners & contractors plan & complete successful building & remodeling projects: buying land, site work, building design, cost estimating, materials & components, & project management through complete construction. Email: info@buildingadvisor.com
Steven Bliss served as editorial director and co-publisher of The Journal of Light Construction for 16 years and previously as building technology editor for Progressive Builder and Solar Age magazines. He worked in the building trades as a carpenter and design/build contractor for more than ten years and holds a masters degree from the Harvard Graduate School of Education. Excerpts from his recent book, Best Practices Guide to Residential Construction, Wiley (November 18, 2005) ISBN-10: 0471648361, ISBN-13: 978-0471648369, appear throughout this website, with permission and courtesy of Wiley & Sons. Best Practices Guide is available from the publisher, J. Wiley & Sons, and also at Amazon.com - [2] Decks and Porches, the JLC Guide to, Best Practices for Outdoor Spaces, Steve Bliss (Editor), The Journal of Light Construction, Williston VT, 2010 ISBN 10: 1-928580-42-4, ISBN 13: 978-1-928580-42-3, available from Amazon.com
- [3] Prescriptive Residential Wood Deck Construction Guide, based on the 2009 International Residential Code, American Forest & Paper Association, Inc., provided by reader Mark Morsching from Everflashing.
- [4] Mark Morsching, Everflashing, Tel: 800-550-1667, Email: everflashing@gmail.com. The Everflashing product comes in G-185 and Stainless Steel and is intended for use with treated lumber with copper in it. Everflashing produces a variety of specialty flashing products including flashings for use with decks at deck ledgers and deck perimeters.
- [2] Manual for the Inspection of Residential Wood Decks and Balconies, by Cheryl Anderson, Frank Woeste (Forest Products Society), & Joseph Loferski, October 2003, ISBN-13: 978-1892529343,
- [5] Claudia Hudson, Asheville NC, Tel: 828-252-0644 Email: claudiahudson@charter.net . Ms. Hudson is an SEO copyrighter / content writer. She has provided background research and text for InspectApedia's articles on deck and porch construction methods & procedures. April 2013.
- Our recommended books about building & mechanical systems design, inspection, problem diagnosis, and repair, and about indoor environment and IAQ testing, diagnosis, and cleanup are at the InspectAPedia Bookstore. Also see our Book Reviews - InspectAPedia.
- In addition to citations & references found in this article, see the research citations given at the end of the related articles found at our suggested
CONTINUE READING or RECOMMENDED ARTICLES.
- Carson, Dunlop & Associates Ltd., 120 Carlton Street Suite 407, Toronto ON M5A 4K2. Tel: (416) 964-9415 1-800-268-7070 Email: info@carsondunlop.com. Alan Carson is a past president of ASHI, the American Society of Home Inspectors.
Thanks to Alan Carson and Bob Dunlop, for permission for InspectAPedia to use text excerpts from The HOME REFERENCE BOOK - the Encyclopedia of Homes and to use illustrations from The ILLUSTRATED HOME .
Carson Dunlop Associates provides extensive home inspection education and report writing material. In gratitude we provide links to tsome Carson Dunlop Associates products and services.
 | HOME | ABOUT | ASK a QUESTION | CONTACT | CONTENT USE POLICY | DESCRIPTION | POLICIES | PRIVACY | |
| © 2024 - 1985 Publisher InspectApedia.com - Daniel Friedman | |||||||||