
InspectAPedia® FREE Encyclopedia of Building & Environmental Construction, Diagnosis, Maintenance & Repair |
Question? Just ask us! InspectAPedia
|
 Build Concrete Deck Piers & Footings
Pier Construction & installation w/ concrete forming tubes
Deck Design-Build Online Guide

- POST a QUESTION or COMMENT about deck construction
Deck footing & pier construction guide:
This article explains how to prepare deck footings or piers using cardboard tubes, reinforcing steel, post connectors, and concrete. We describe using a SonoTube concrete form to pour the concrete piers or footings that will carry deck posts.
This article series describes critical safe-construction details for decks and porches, including the preparation of footings, piers, and pier-to-post connections for decks, porches, & exterior stairs.
InspectAPedia tolerates no conflicts of interest. We have no relationship with advertisers, products, or services discussed at this website.
How to Build Deck Post Footings & Structural Piers
Footings and piers are designed to support the weight of a deck through all types of weather and stress.
The following steps demonstrate the use of waxed cardboard tubes, popularly called SonoTubes, for making concrete piers. These tubes may be required by your building code, especially if the local soils are sandy or loose.
But they are convenient and practical in all circumstances.
They create smooth-sided piers that resist uplift caused by frost; make it easier to estimate how much concrete you will need; and hold moisture in the curing concrete longer, resulting in stronger piers.
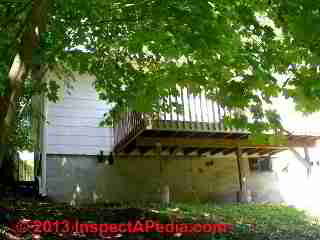
Photo: deck piers and posts installed by the author [DF] at a Poughkeepsie NY home.
[Click to enlarge any image]
Deck Pier Hole & Form Prep Tips
This is a good time to double- check your building code and permit.
- Watch out: under some codes, you may be required to have the footings inspected before making the piers. It's smart to take photos of how you constructed the piers to avoid any question later-on about depth, bottom treatment, re-bar, etc.
- Gravel: Also under some codes you may need to add several inches of gravel to the bottom of each footing before adding concrete. The gravel provides a solid base that should be on top of virgin, un-disturbed soil (or compacted soil if necessary) and it improves drainage below the pier.
- Hardware & Re-Bar: Be sure to have sufficient rebar cut to length, as well as anchor bolts or post bases on hand, as they must be added to the concrete while it is still wet.
Sources of Concrete Forming Tubes
Choices for Concrete Forming Tubes & Their Properties, Prices, Availability |
||
| Concrete Form Tube Product | Properties | Source, Price, Comments |
| Ceme-Tube | Partially recycled HDPE plastic | Extra protection from frost-heaving due to lensing on the sides of concrete piers in very cold climates. 2. Not designed to be stripped from the poured concrete. Distributed by Menards. . |
| Quikrete® 8" Concrete Form Tube, 692201 | Rigid fiber form used in construction to pour and form deck supports, mailbox bases, lamp posts, and more. Residential use. 4' long. No. 692201: Material: Rigid Fiber, Width: 8", Size: 8'', Length: 4' No. 692203: Material: Rigid Fiber, Width: 12", Size: 12'', Length: 4' - and other sizes. |
Quikrete form tubes are distributed at building suppliers including Home Depot & Loews as well as at your local building supplier. |
| QuikTube Building Forms | 6", 8" & 12" diameter Quik-Tubes No. 6922 are ridged fiber building form tubes that eliminate the need to build wood forms required in some applications. Mmultiple layers fiber laminated with an adhesive, with a special coating which resists moisture and facilitates even curing. |
Distributed by Menards building suppliers |
| SakRete® Concrete Form Tubes | Model # 65470006: 10 in. x 48 in. SakRete concrete forming tubes are sold in 4 ft. lengths and are available at 6", 8", 10", 12" and 16" diameters |
Home Depot stores. |
| SonoTubes® Sonotube Builders Tube® |
Concrete pier and column forms provided in 4", 6", 8", 10", and 12" diameters | Website: www.sonotube.com Not designed to be stripped from the poured concrete. 1. |
Notes to the table above
1. "Sonotube Builders Tube concrete forms are not designed to be stripped from the cured concrete. If stripping above ground is desired, use a releasing agent before pouring the concrete and remove as soon as the concrete is set. Sonotube Builders Tube concrete forms should not be used with mechanical vibrators" - Sonotube.com [6]
2. Creme-Tube is sold through Menards lumber suppliers (e.g. in Minnesota). Sold in 4 ft. lengths (can be stacked to 20 ft. for greater depths), sold in standard diameters, all tubes are uniform in diameter. [7]
3. Watch out: because some concrete forming tubes are sold nested one inside of another to save on shipping and storage space, those brands will produce piers of slightly different diameters. Be sure that all of your footing and pier measurements and the placement of your forming tubes are based on the center of the measurement point, not one side. Otherwise a creeping error can result in piers out of place at the end of a line.
4. Concrete Form Tube Storage: Quikrete warns that QUIK-tubes [and similar products\ should be protected from moisture prior to placement. Cover QUIK-tubes prior to use and store at least 4” above ground level, allowing air to circulate through the tubes.[7]
1. Do You Need to Pour Separate Deck Pier Footings?
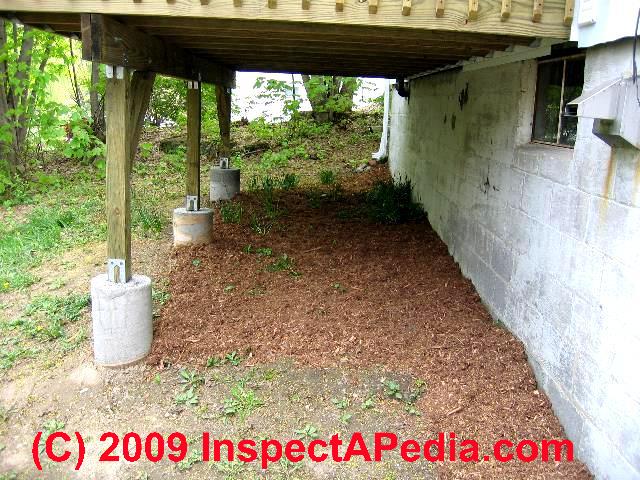
In the three-piered deck photo above you will notice that the piers are close to the breaking edge of a hill.
Hillside piers need to have adequate depth and if necessary need to be pinned to bedrock to assure that the whole structure doesn't creep or fall down the hill. In this deck installation you can't see the sloping rock that we encountered when digging for these piers.
Encountering shallow bedrock may mean that your piers won't meet the depth requirement specified by your building department and local codes. The easy solution that your building inspector is likely to approve is the proper pinning of the pier to the rock.
That means clearing away enough soil to work in the hole bottom, clear soil off of the rock, then using a masonry bit sized to bore a hole that will accept the re-bar, drill holes for each piece of re-bar to be inserted into the pier form tube. It's smart to also clean off the rock dust before setting the tub and pouring the pier.
Watch out: if your excavation of the footing and pier hole hits solid rock that is not close to dead flat, you will want to anchor the footing and pier to the rock using re-bar.
Using a power drill and masonry bit, drill the top of the solid rock to accept 4-6" of re-bar to assure that there will be no pier slippage along the sloping rock surface.
Soft or un-stable soils may require a larger spread footing under your poured concrete deck piers.
See details and example products used under deck piers and also some pre-cast concrete "piers" that may be permitted set directly on some soils, below at
Also
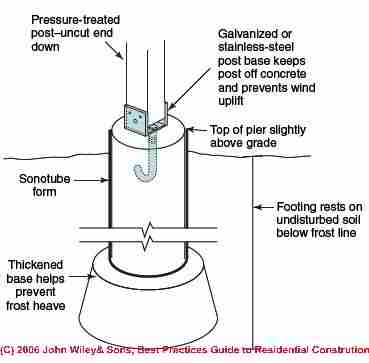
Illustration above used with permission from Best Practices Guide to Residential Construction (Steve Bliss, J Wiley & Sons) , by Steven Bliss,
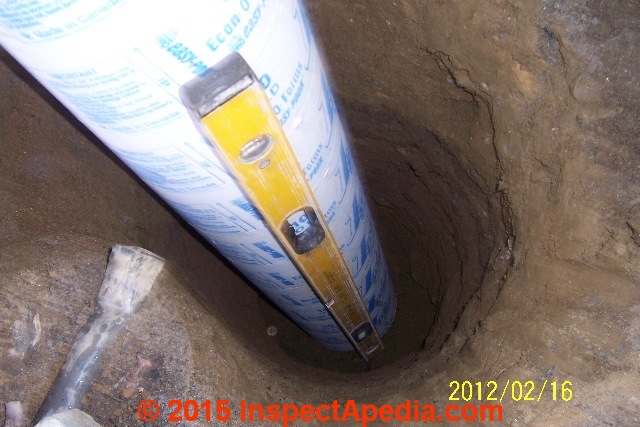
2. Dig the Hole for the Pier, plumb and to proper depth

Photo above showing an excavation for a deck pier, provided courtesy Eric Galow, Galow Construction, a Poughkeepsie, New York contractor.
Preparing the hole & hole bottom for the form tube for a concrete pier
Sometimes, in fact usually in most soils, the footings and piers can be poured simultaneously, in which case you can skip this step. Or by good construction practice we want the bottom of the hole excavated for the form tube to be handled as follows:
- Soil: Be firm, undisturbed virgin soil. If the soil was disturbed it should be compacted before proceeding.
- Gravel: Place 2" of crushed gravel (no. 4) in the bottom of the hole.
- Block at hole bottom? Some inspectors permit a simple solid 4-inch or 6-inch concrete block placed at the bottom of the hole to serve as a footing that will carry the deck pier.
If your footings need to be larger than the bottom of the concrete pier and if the footings will need to be inspected by your building official you should begin here.
The hole for the footings should be below the frost line, as large as required by code (typically 16 inches in diameter and 8 inches deep for 8-inch-wide piers), and flared. Shovel or pour concrete into the hole until it reaches the top of the flared section. Take care not to disturb dirt on the sides of the hole.
3. Cut the Concrete Pier Form Tubes to Proper Length
Cardboard form tubes are sold in lengths up to 12 feet. In most cases, you will need to cut them to the length you require. (The length will vary depending on whether you are seating the tube into a wet footing or pouring the footing and pier at the same time.
Tubes can be cut with a handsaw, but the job will go quicker if you use a reciprocating saw.
Make square cuts and cut the tubes long enough so they all extend the same distance—at least 2 inches—above the ground. Measure and cut tubes for each hole individually, as hole depths are likely to inches in diameter and 8 inches deep for 8-inch-wide piers), and flared.
Shovel or pour concrete into the hole until it reaches the top of the flared section. Take care not to disturb dirt on the sides of the hole.
Cut the Tubes
Cardboard form tubes are sold in lengths up to 12 feet. In most cases, you will need to cut them to the length you require. The length will vary depending on whether you are seating the tube into a wet footing or pouring the footing and pier at the same time. Tubes can be cut with a handsaw, but the job will go quicker if you use a reciprocating saw.
Make square cuts and cut the tubes long enough so they all extend the same distance—at least 2 inches—above the ground. Measure and cut tubes for each hole individually, as hole depths are likely to vary by a few inches.
4. Set the Pier Form Tubes in Place

Above Eric Galow is checking the depth of the form tube and the total pier height from base to top.
Set the tubes in their respective holes. If you have already poured footings and the concrete is still wet, push the tubes an inch or two into the footings. Use a level to ensure that the tubes are plumb in the holes and level at the top. Begin backfilling by shoveling dirt into the hole around the outside of the tube.
When 6 to 8 inches of dirt have been placed in the hole, tamp the dirt with a piece of wood.
The dirt needs to be firm, but do not pound so hard that you damage the tube. Continue with this routine until the hole is filled, checking the tube’s position periodically with a level.
If you are pouring footings and piers simultaneously, you need to lift the tubes so that the bottom of each is even with the top of the flared footing section; the tubes can be suspended with braces, as shown in the lower picture.
Once a sonno-tube is level and plumb, drive two screws through each brace into the side of the tube. Do not backfill around suspended tubes.
If the batterboards are still in place and you would like to be sure that the tubes are centered and aligned properly, put the string lines back in place. Drop a plumb bob from the line at each of the planned hole locations, and adjust each tube so that the plumb bob is centered.
5. Install the Re-Bar & Post Anchors in the Concrete Form Tubes
Some builders may set the re-bar first for ease of access, then place the form tube around it. I do this in particular if I'm drilling re-bar holes into solid rock around which a poured-concretre pier will be built.
Watch out: before you pour concrete into the sonno-tubes your local building inspector will probably require reinforcing re-bar in your deck piers and you may also want or even be required to set post anchor bolts into the pier tops as you pour the concrete.
Your local building code official may want to inspect your piers before the concrete is poured. The official will want to confirm that piers were set to the required depth and that the re-bar was installed.
Some officials may accept photographs documenting the pier depth and reinforcement.
Setting Wooden Deck Posts In Concrete ?
Decks are most often built with posts set on top of solid concrete piers, a technique that allows you to use shorter posts, keeps the wood out of the ground, provides for easy repair in the event a post is damaged, and offers a greater margin of error.
There are occasions, however, when it makes sense to set the post itself in the ground in concrete. Done correctly, this approach produces a more rigid frame, which may be necessary for a freestanding or an elevated deck, and required where earthquakes are common.
The post can be set in a hole that is partially filled with concrete, then topped off with soil or gravel or, for even greater stability, the hole can be filled to the top with concrete. For best results, use a treated post and set the uncut end in the ground. The earth itself can serve as the form for concrete, or you can set the post in a large cardboard tube. The posts must be carefully plumbed, aligned, and braced before you pour any concrete.
Deck or Porch Piers & Post Installation Details & SNAFUs to Avoid
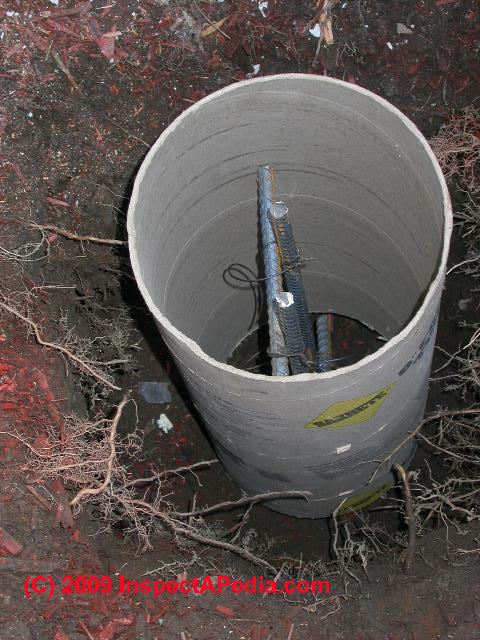
The concrete forming tube with rebar inserted shows reinforcement details at a poured concrete pier at our forensic lab in New York
. The contractor excavated to bedrock (he could not get below the frost line) where he then drilled into the rock to insert wired re-bar to pin the pier to the rock surface.
We took the photograph shown above to provide to the building code inspector who could not be present at the time the piers were poured.
The photos early on this page show above-grade masonry piers. Structural connectors were used to connect post to pier, post to girder, and joists to a ledger board that was bolted to the building's rim joist.

Our deck photo shows a structure that we were reluctant to inspect from below. The deck was relying principally on gravity to keep those girders atop the tall steel posts. On closer look, the post bottoms were also not secure.
Just below this article includes an excerpt adapted from Best Practices Guide to Residential Construction (Steve Bliss, J Wiley & Sons) , by Steven Bliss, courtesy of Wiley & Sons. Also see our review of that book.
According to Best Practices Guide to Residential Construction:
In frost-susceptible soils, all deck or porch posts should sit on concrete piers that extend below the frost depth. The tops of the concrete piers should extend slightly above grade to keep the post ends out of standing water.
It is also a good idea to use steel post bases to keep the wood out of direct contact with concrete.
Where uplift from wind is an issue, use structural post bases that are rated for the necessary uplift loads and connected to the concrete with anchor bolts.
Many of these are adjustable laterally so the footing and anchor bolt do not need to be precisely placed. Use pressure-treated posts rated for ground contact with a minimum preservative level of .40 pounds/cubic feet. Treat any cut post ends and do not place cut ends in contact with soil or concrete.
While 4x4 posts can be used up to about 10 feet in height, depending on loads, tall pressure-treated 4x4s are prone to warping and twisting when they dry. Some local codes limit the use of 4x4s to 8 feet.
Diagonal sway bracing can help stiffen tall posts and provide resistance against racking. The easiest approach is to run short 2x4 or 4x4 sway braces from posts to beams.
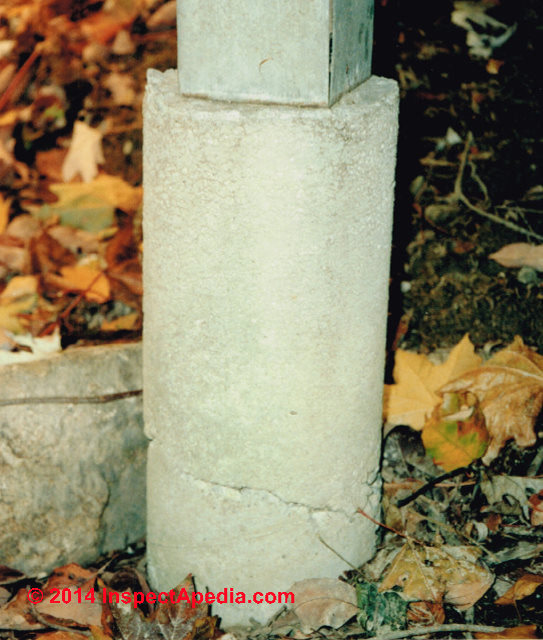
At PIER FOUNDATION PROBLEMS we comment that the concrete pier shown above is cracked and damaged, perhaps from frost. See that article for more examples of improper, unsafe, or otherwise interesting structural piers.
If the pier shown just above was made using steel re-bar reinforcement I don't think we face an imminent collapse of the structure above but if not, that's possible.
Don't confuse a cold pour joint often visible in concrete with actual cracking or frost heave damage.
See CONCRETE COLD POUR JOINTS
Examples of Unsafe, Collapsing Deck Piers & Deck Posts
We have moved this section to a new article:
Reader Comments, Questions & Answers About The Article Above
Below you will find questions and answers previously posted on this page at its page bottom reader comment box.
Reader Q&A - also see RECOMMENDED ARTICLES & FAQs
On 2020-05-05 - by (mod) - concete block may be permitted to support deck posts or joists
 Auto
Auto
Even on a low deck it's good practice (and required by building codes in most jurisdictions) that supporting posts are always tied to their piers (as well, of course, to the structure above).
Deck blocks - a "pier" that simply sits on the ground surface - may be accepted by your local building inspector. Those blocks resist sideways movement (somewhat) but not uplift, so they may not be suitable in coastal or high-wind areas.
Those blocks are also often shown supporting a frame right on the ground (or just off a slab) rather than a high deck.
For your posts on dirt, you want to check with your local officials on acceptance. (Shorter life, less stable, less safe). Be sure you've got permit and approval and with that these questions will become moot as your inspector will look at how your deck is supported and will tell you if your plan isn't acceptable.
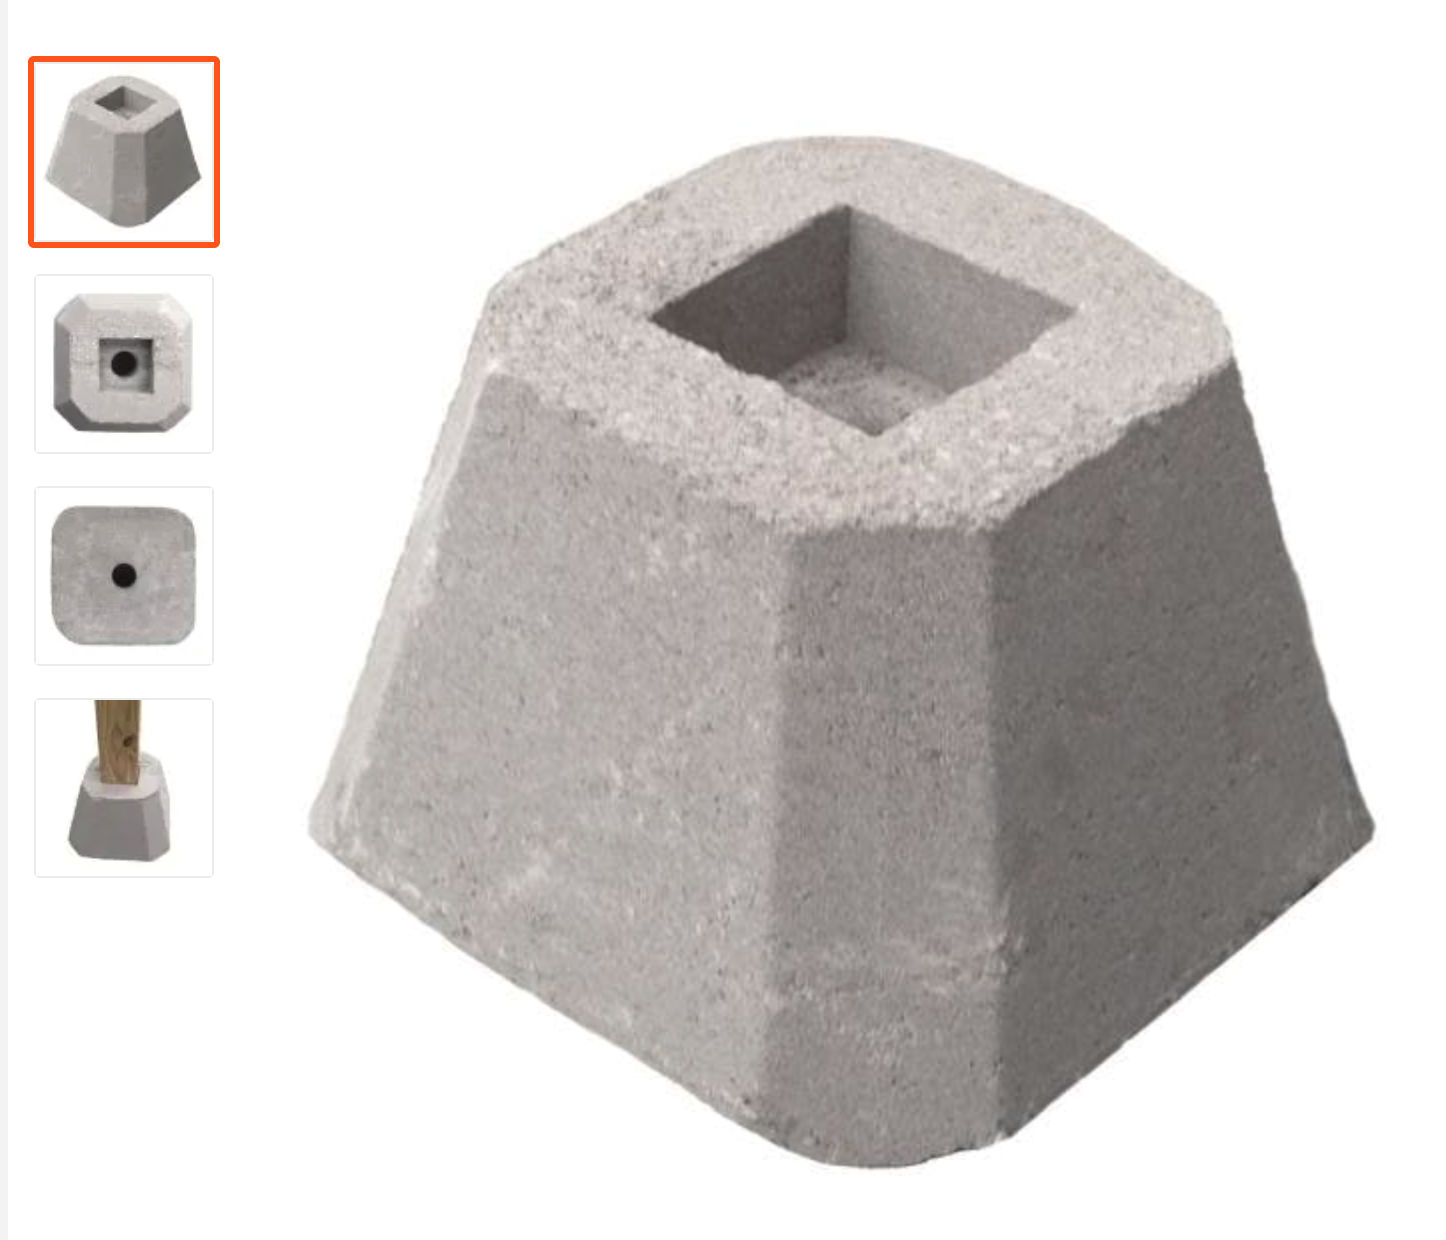
The concrete deck block shown here, both above and below are as sold in Home Depot stores and other building suppliers like Lowes, Menards, and often smaller local masonry or building suppliers where you live.
Similar productts are made by Angelus Block and qite a few other masonry suppliers.
The concrete block deck post support "pier" shown below makes me a bit more nervous about rotting the bottom of my deck post, thought here is a drain hole cut into the bottom of the rectangular in-set. If water is trapped around the post set into this block and if you're in a freezing climate there may be an increased risk of frost cracking or damage to the pier.
See details at DECK PIER CONSTRUCTION
On 2020-05-04 by 631auto1
Building a 14 by 20 freestanding deck on an existing concrete slab - should I anchor posts to concrete, also 2 posts at opposite ends will be on dirt , can I use dek-blocks or pour footings and last -4x4 or 6x6
This Q&A were posted originally at DECK BEAM CONSTRUCTION
On 2017-07-28 by (mod) - Footing or base Requirements for Sonotube piers?
 Not all constuctions need a larger footing below the sonotube, particularly if you choose your sonotube diameter itself at sufficent diameter to serve as the pier for your above-ground post, but you do need to consider
- soft or un-stable soils
- hilliside posts
- sloping bedrock (for this case we drill and pin the sonnotube pier to the rock using re-bar, described on the page above).
Where a larger sonotube or other cardboard pier form base is desirable, that is, where the soil bearing capacity is not sufficient for your posts and the weight that they will, in turn carry, then at the very bottom of the hole into which you're putting a sonotube there are several options: - a solid 4" block on solid soil
- a pre-cast post pier block [examples shown above]
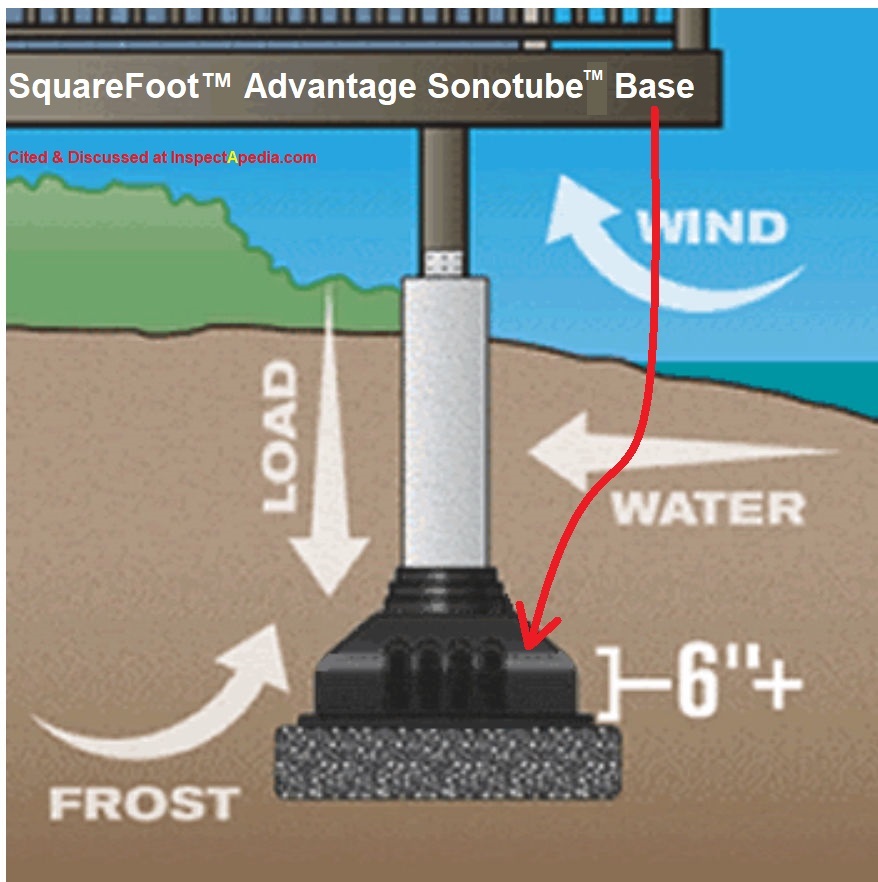
- a proprietary or patented sonnotube base like the SquareFoot™ Advantage tube base shown here.
Note that you will need to dig a larger (wider) excavation where this or any other base is employed whose footprint is larger than the excavation needed for the Sonnotube alone. - a layer of about 2" of item 4 sized gravel
- concrete poured into the bottom of the full width excavation to form a base - in the tube and around it
You'll want to see DECK PIER CONCRETE MIX
Let me know if you need more help.
- Contact: SquareFoot Advantage Sonnotube Footing Base,Sound Footings LLC
277 Blair Park Road, Suite 120
Williston, VT 05495 USA, Tel: 802-764-2323
Toll Free USA:
1-877-924-2323 Website: http://soundfootings.com/
The company provides soil bearing capacity tables mapped against their footing products and also an online concrete calculator. - SquareFoot Concrete Footing Forms SF-22 DATA SHEET [PDF] Op. Cit. This example is one of the company's products and supporting data.
- Canadian Table of Allowable Soil Bearing Capacities & SquareFoot Pier Capacities [PDF] (English) retrieved 2021/06/03 original source: http://www.sqfoot.com/doc/CDA_Allowable-Bearing-Capacities_OBC-2012-ONT.pdf
The soil bearing capacity of your soil is a question for your architect or engineer, though your local buildign department may have an opinion that will be sufficient. The table of soil bearing capacities given below is excerpted and adaptef from soundfootings.com cited just above. The company's original information contains additional types of soil and rock and also copies of Canadian bearing capacity tables.
Typical Soil Bearing Capacities
Example Soil Bearing Capacity Table |
Soil Bearing Capacity psf |
|
| Soil Type | US |
Canada |
| Soft Clay | 1000 psf 47.88 kPa |
833.4 psf 40 kPa |
| Loose Sand /Gravel | 1041.7 psf 50 kPa |
|
| Firm Clay | 1562.5 psf 75 kPa |
|
| Clay, sandy clay, silty, clay, "clayey silt" | 2,000 psf 95.76 |
|
| Dense / Compact Silt | 2083.4 psf 100 kPa |
|
| Sand, silty sand, clayey sand, silty gravel, clayey gravel | 3,000 psf 143.64 |
|
| Dense / Compact Gravel or Stiff Clay |
3125 psf 150 kPa |
|
| Till | 4166.7 psf 200 kPa |
|
| Sandy gravel / gravel | 5,000 psf 239.40 |
|
| Sedimentary rock | 6,000 psf 287.28 |
|
| Clay Shale | 6250 psf 300 kPa |
|
| Sound Rock | 10416.7 psf 500 kPa |
|
| Crystalline rock | 12,000 psf 574.56 |
|
Notes to the table above:
- Adapted & excerpted from Sound Footings LLC 277 Blair Park Road, Suite 120 Williston, VT 05495 USA, Tel: 802-764-2323 Toll Free USA: 1-877-924-2323 Website: http://soundfootings.com/
- Note that the U.S. and Canada use slightly different soil classifications and nomenclature; we arranged the combine data in order by allowable bearing pressure on each soil type
- The soil bearing capacity psf is, in turn, matched against the allowable load on various footing products, based on the footing's size or footprint in square inches. For example in soft clay, the least-stable soil, the SquareFoot SF22 (product specification given above on this page) can bear or carry a load (per footing and post) of 3,360 lbs.
Watch out: these are example data points. The bearing capacity of your particular soil and the load carrying capacity of your posts, piers, and their footings (if required) will depend on the specific products you are installing and their dimensions.
On 2017-07-28 by Ian William Polnick - How do you make the very bottom part, that the sonotube sets on?
I am located in Elliot Lake Ontario. I am constructing an overhang roof over a patio, in clay soil which is susceptible to frost.
On one side the overhanging roof is attached to the house by means of a ledger board.
The opposite side is to be on concrete piers made with the aid of sonotubes, I understand that you have to go bellow the frost level.
My question is how do you make the very bottom part, that the sonotube sets on?
Can you please explain this to me? My e:mail address is ianpolnick@eastlink.ca. Thank-you for your help.
Ian William Polnick
...
Continue reading at DECK PIER CONCRETE MIX (how to figure how much concrete you need as well as procedures for mixing concrete and pouring it into the forms) or select a topic from the closely-related articles below, or see the complete ARTICLE INDEX.
Or see DECK PIER CONSTRUCTION FAQs - questions & answers posted originally at this article
Or see these
Recommended Articles
- COLUMNS & POSTS, DEFECTS
- DECK & PORCH CONSTRUCTION - home
- DECK BEAM CONSTRUCTION
- DECK JOIST LAYOUT
- DECK PIER CONSTRUCTION
- DECK POST CONSTRUCTION
- DECK POST & PIER MISTAKES
- PIER FOUNDATION PROBLEMS - common structural pier types, inspection, defects
- SOIL PROPERTIES & BUILDING FAILURES
Suggested citation for this web page
DECK PIER CONSTRUCTION at InspectApedia.com - online encyclopedia of building & environmental inspection, testing, diagnosis, repair, & problem prevention advice.
Or see this
INDEX to RELATED ARTICLES: ARTICLE INDEX to BUILDING DECKS & PORCHES
Or use the SEARCH BOX found below to Ask a Question or Search InspectApedia
Or see
INDEX to RELATED ARTICLES: ARTICLE INDEX to BUILDING STRUCTURES
Or use the SEARCH BOX found below to Ask a Question or Search InspectApedia
Ask a Question or Search InspectApedia
Try the search box just below, or if you prefer, post a question or comment in the Comments box below and we will respond promptly.
Search the InspectApedia website
Note: appearance of your Comment below may be delayed: if your comment contains an image, photograph, web link, or text that looks to the software as if it might be a web link, your posting will appear after it has been approved by a moderator. Apologies for the delay.
Only one image can be added per comment but you can post as many comments, and therefore images, as you like.
You will not receive a notification when a response to your question has been posted.
Please bookmark this page to make it easy for you to check back for our response.
Our Comment Box is provided by Countable Web Productions countable.ca
Citations & References
In addition to any citations in the article above, a full list is available on request.
- [1] Steve Bliss's Building Advisor at buildingadvisor.com helps homeowners & contractors plan & complete successful building & remodeling projects: buying land, site work, building design, cost estimating, materials & components, & project management through complete construction. Email: info@buildingadvisor.com
Steven Bliss served as editorial director and co-publisher of The Journal of Light Construction for 16 years and previously as building technology editor for Progressive Builder and Solar Age magazines. He worked in the building trades as a carpenter and design/build contractor for more than ten years and holds a masters degree from the Harvard Graduate School of Education. Excerpts from his recent book, Best Practices Guide to Residential Construction, Wiley (November 18, 2005) ISBN-10: 0471648361, ISBN-13: 978-0471648369, appear throughout this website, with permission and courtesy of Wiley & Sons. Best Practices Guide is available from the publisher, J. Wiley & Sons, and also at Amazon.com - [2] Decks and Porches, the JLC Guide to, Best Practices for Outdoor Spaces, Steve Bliss (Editor), The Journal of Light Construction, Williston VT, 2010 ISBN 10: 1-928580-42-4, ISBN 13: 978-1-928580-42-3, available from Amazon.com
- [3] Prescriptive Residential Wood Deck Construction Guide, based on the 2009 International Residential Code, American Forest & Paper Association, Inc., provided by reader Mark Morsching from Everflashing.
- [4] Mark Morsching, Everflashing, Tel: 800-550-1667, Email: everflashing@gmail.com. The Everflashing product comes in G-185 and Stainless Steel and is intended for use with treated lumber with copper in it. Everflashing produces a variety of specialty flashing products including flashings for use with decks at deck ledgers and deck perimeters.
- [2] Manual for the Inspection of Residential Wood Decks and Balconies, by Cheryl Anderson, Frank Woeste (Forest Products Society), & Joseph Loferski, October 2003, ISBN-13: 978-1892529343,
- [5] Claudia Hudson, Asheville NC, Tel: 828-252-0644 Email: claudiahudson@charter.net . Ms. Hudson is an SEO copyrighter / content writer. She has provided background research and text for InspectApedia's articles on deck and porch construction methods & procedures. April 2013.
- [6] Sonotube, "Sonotube Builders Tube® Concete Forms", Sonoco, www.sonotube.com, Tel: 866-766-8823, retreived 4/30/2013, original source www.sonotube.com copy on file as Sonotube® Builders Tube® concrete forms.pdf
- [7] QuikCrete, "Quik-Tubes No. 6922 Installation Instructions", The Quikrete® Companies, Inc., One Securities Cewntre, 3490 Piedmont Rd., Suite 1300, Atlanta GA 30305, Tel: 404-634-9100. Retrieved 4/30/2012
- In addition to citations & references found in this article, see the research citations given at the end of the related articles found at our suggested
CONTINUE READING or RECOMMENDED ARTICLES.
- Carson, Dunlop & Associates Ltd., 120 Carlton Street Suite 407, Toronto ON M5A 4K2. Tel: (416) 964-9415 1-800-268-7070 Email: info@carsondunlop.com. Alan Carson is a past president of ASHI, the American Society of Home Inspectors.
Thanks to Alan Carson and Bob Dunlop, for permission for InspectAPedia to use text excerpts from The HOME REFERENCE BOOK - the Encyclopedia of Homes and to use illustrations from The ILLUSTRATED HOME .
Carson Dunlop Associates provides extensive home inspection education and report writing material. In gratitude we provide links to tsome Carson Dunlop Associates products and services.
 | HOME | ABOUT | ASK a QUESTION | CONTACT | CONTENT USE POLICY | DESCRIPTION | POLICIES | PRIVACY | |
| © 2024 - 1985 Publisher InspectApedia.com - Daniel Friedman | |||||||||