
InspectAPedia® FREE Encyclopedia of Building & Environmental Construction, Diagnosis, Maintenance & Repair |
Question? Just ask us! InspectAPedia
|
 Hot Water Radiator Air Bleed Vent Installation
Hot Water Heat Air Bleeders, Air Eliminators & Air Vents
- POST a QUESTION or COMMENT about troubleshooting problems bleeding the air out of hot water heating system radiators, baseboards, convectors etc.
Air bleeder valves & automatic air purging valve installation procedures: here we explain how & where to install manual or automatic float-type air purgers or air bleed valves on hot water heating system piping, boilers, baseboards, radiators or convectors.
This article series provides a detailed guide to using air bleed valves to get rid of unwanted air in hot water heating systems: fix cold or noisy hot water heating radiators or baseboards.
InspectAPedia tolerates no conflicts of interest. We have no relationship with advertisers, products, or services discussed at this website.
How & Where to Install Automatic or Manual Air Bleeder Valves on Hot Water Heating Systems
 This page describes how and where to install manual air bleeders or air purge valves on hot water heating system pipes, convectors, radiators, or baseboards.
We also describe how to replace an existing manual or screw-type air bleeder that no longer works and we answer questions about the position and location of all types of air bleeding or air purging devices used on hot water heating systems.
Where Should Automatic or Float Type Air Bleeder Valves or Vents be Installed?
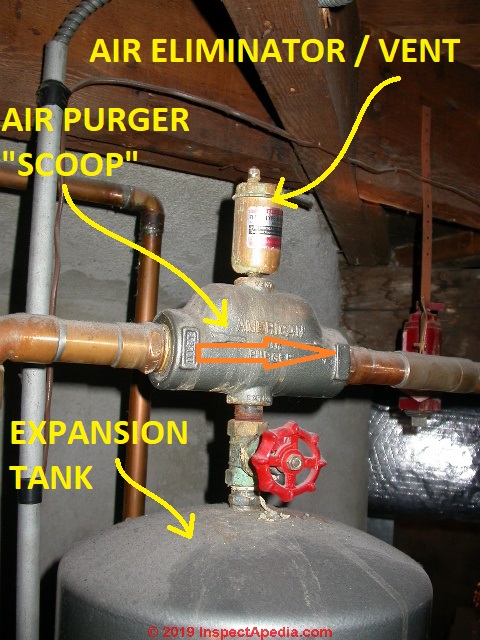
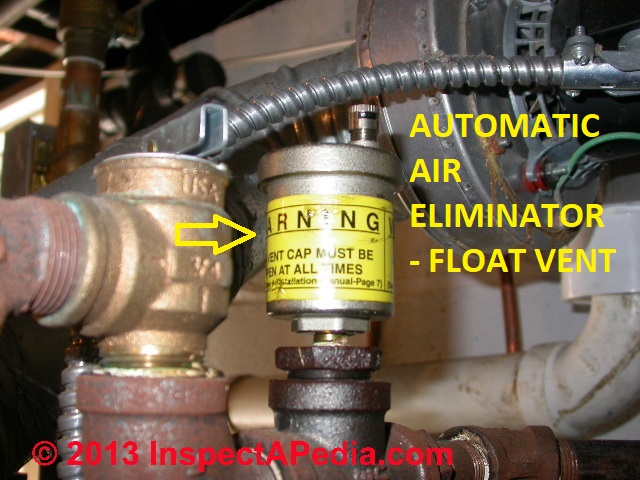
- An automatic float type air vent should be located at a high point above the boiler, usually atop the air separator or air-scoop.
Our photo just above illustrates the proper location for a float-type air eliminator or air vent installed in a tapping in the top of the air purger or "air scoop" found above a typical hydronic (hot water) heating boiler.
The air scoop is installed at a high point above the boiler and it literally separates or scoops bubbles of air out of the hot water as it leaves the boiler. The air eliminator uses an internal float that will automatically release that air as it accumulates inside the vent.
On some boilers a special top tapping right on the boiler itself will be dedicated to a float vent that purges air out of the boiler.
- Automatic float type vents are also often located at a high point at a check valve or elbow on each of individual zone loops, possibly at the return side of the loop.
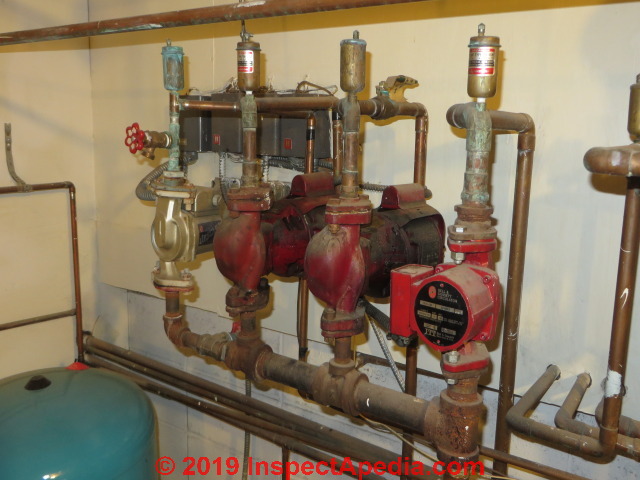
Our photo above illustrates installation of float type automatic air eliminators above each zone circulator at a hot water heating system installed in Two Harbors Minnesota. These circulators are located on the return side of the zones and are just above the heating boiler itself (not shown) .
[Click to enlarge any image]
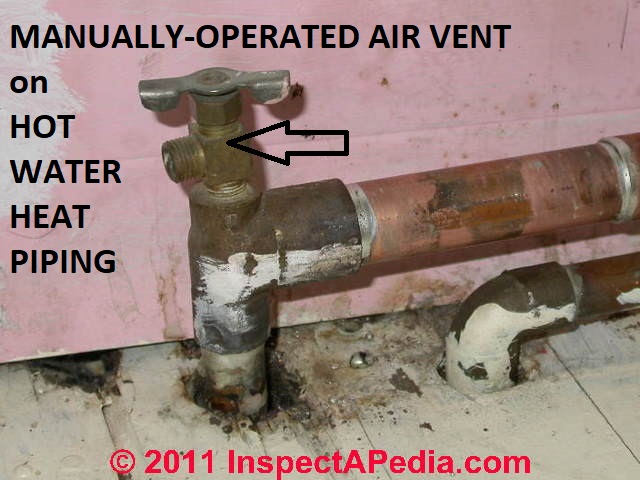
Where are Manually-operated Air Vents Installed on Hot Water Heat Piping?
Manually-operated air venting devices like the ones shown here are found on hot water heating systems at
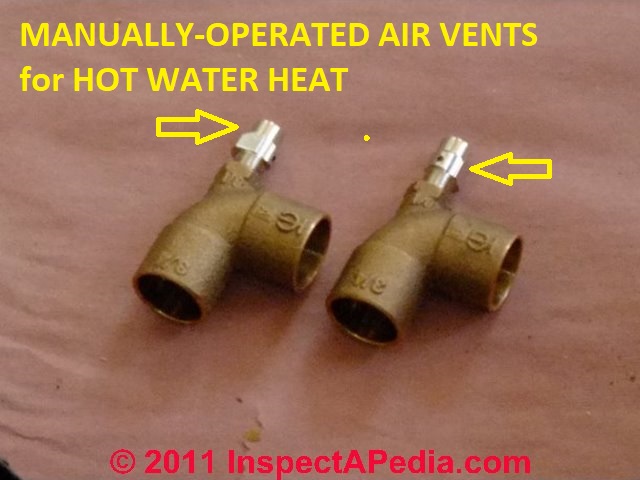
- Hot water heating radiators at a high point tapping on the radiator; some radiator valves that feed at the top of radiators include an air-vent.
- Hot water heating baseboards at the outlet end of of loops that rise up, run along a floor, then pass back down through the floor
- High points on hot water heating system distribution piping such as on the uppermost floor
- Hot water heating convectors at the outlet end of the convector
On most hot water heating systems there will also be one or more automatic air eliminators or float vent type air purgers that look like the device we show below.
Those are described separately at
AIR ELIMINATOR / FLOAT VENT REPLACEMENT
Note: to diagnose a cold radiator or convector unit or baseboard that may be air bound and where automatic air eliminators or float vents are installed OR if you need to replace an existing automatic air eliminator or float vent that is not working, then
see AIR ELIMINATOR / FLOAT VENT REPLACEMENT
If your heat is by steam, not hot water, you want to
see STEAM VENTS
How do I add a baseboard Tee bleed valve on hot water heating baseboard piping?
Reader question: Hi Dan, How do I install a manual bleeder valve on my baseboard heating pipe?
Can I tap into the 90 degree elbow with a 1/8 drill bit and sweat a bleeder valve?
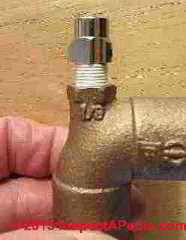
Photo at left, a pair of baseboard tees with manual air vent valves.
Are there any other alternatives to incorporate a manual bleeder to the baseboards in the house? - Simon.
Reply: Here is how to buy and install a Heating Baseboard Tee - a special 90 degree elbow that has a reinforced 1/8" NPT tapping and solder it in place at system high points
 I was disgusted when a Poughkeepsie plumber we recently hired to install heating baseboard tossed aside the air bleeder fittings I had left to indicate where I wanted them installed.
At above left are the two baseboard tees I had purchased, along with their air bleeder fittings, ready for installation. The plumber (whom I am leaving nameless) left them on the floor - his real reason: he took a shortcut that saved maybe five minutes on the job by using the PEX to copper 90's [photo] (with no tapping for an air bleeder valve) that he had on his truck.
When I complained, his retort was that air bleeders are not needed and that they were in his opinion a liability (because he fears they'll leak) rather than an asset. I really wanted to slap him.
While it's true that in a perfect world, with a combination of luck,
AIR SCOOPS SEPARATORS PURGERS that magically capture 100% of problem air in the heating system, and perfect plumbing routing you can purge air from at least some hot water heating systems at initial installation.
But it's just plain stupid to think that over the life of a hydronic heating system there will never be an air problem in the piping. It's not a perfect world, and "stuff happens", ya know?
So I do not agree with that plumber, nor do heating experts nor the manufacturers who produce a wide variety of valves to manually or automatically purge air from hot water heating systems.
As we were installing a new heating loop on an upper floor addition on a one story house, it's likely that air entrained in the heating water or that appears in heating system ever in the future will rush upstairs.
Now I'm going to have to drain down the system and remove his work and install the proper fittings myself.
Photo at left: close-up of a baseboard tee with a manual air purge - note that this valve has not been "installed" yet: there is no thread sealant or teflon tape.
Stop by your local plumbing supplier or
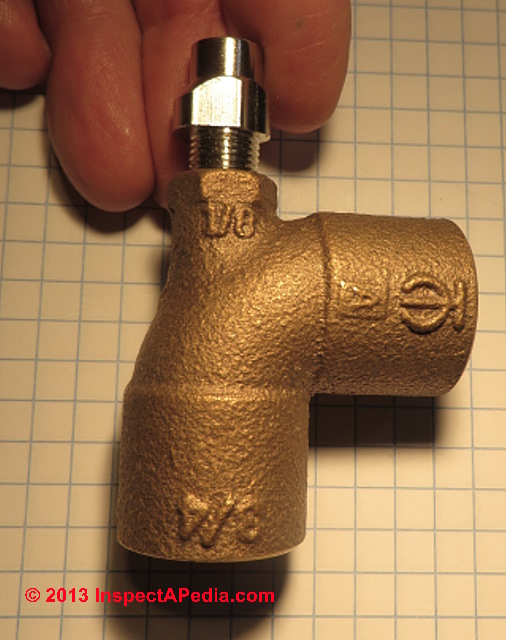
see AIR BLEED VALVE TYPES / SOURCES. The plumbing & heating supplier can sell you a special elbow, a baseboard tee, usually bronze (see our baseboard tee image at left), that solders in place to replace the existing 90 degree elbow at either end of your baseboard run.
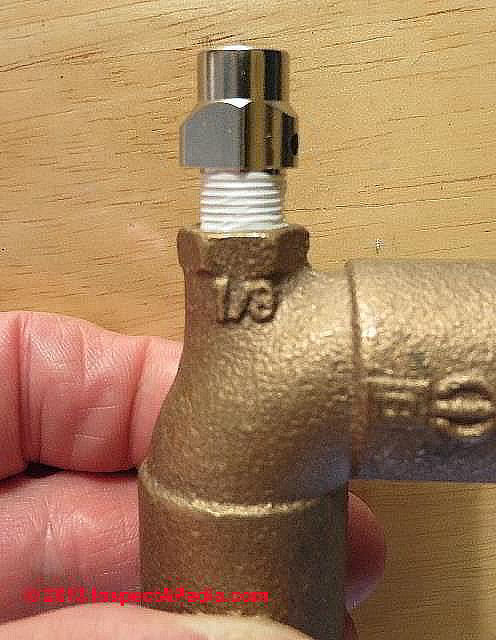
The baseboard tee looks like a 90 degree elbow but technically it's "Tee" because it has three openings - the two 3/4" copper pipe fittings and a third 1/8" tapping that is installed pointing "up" to accept the bleeder valve. These are inexpensive fittings, typically around $4.00 U.S.
The baseboard tee or elbow (photo at left) includes a raised casting with additional bronze 1/8" NPT tapping already threaded to accept the bleeder fitting itself. Shown is a sweat-type baseboard tee intended for installation on 3/4" copper hot water heating piping feeding heating baseboards.
As you will read below, we use teflon tape to seal the threads of the air bleeder when installing it into the baseboard tee fitting.
At the top
of AIR BLEEDER VALVE DIAGNOSTIC FAQs we illustrate a similar air bleeder connecting tee made of cast iron [photo] in use on the heating convector installed in a home built in the 1920's.
And below our next photo shows an older tee-handled air bleeder installed into a baseboard tee on a funky copper baseboard heating run in an older home. Looks a lot like an old automobile radiator drain valve, right? This is probably not a coincidence.
 Under a heating baseboard cover, at the start or end of the baseboard run, because of space limitations (under the baseboard cover) and for reliability I prefer to use simple manual bleeder valves at baseboards - they're solid and bullet-proof.
Below in this article I show how to install an elegant stainless steel air bleed valve used in these locations.
Baseboard tees are also available for other types of heating piping systems such as PEX tubing, and in mixed sizes such as 1/2" x 1/8" x 1/2" and 1/2" x 1/8" x 3/4" diameters to fit the PEX, bleeder valve, and 3/4" diameter copper baseboard piping
If you are working with standard copper heat piping you probably need one or more 3/4 " x 1/8" x 3/4" baseboard tees.
When I was actually working for a living and had to try to fix air-bound heating baseboards in some older homes it was standard practice to install at least one of these bleeder fittings at the highest point on any baseboard run that was giving problems.
See AIRBOUND HEAT SYSTEM REPAIR by WATER FEED VALVE
My photo (left) shows another heating baseboard tee with an older type of air bleeder valve installed at a home where there had indeed been a baseboard piping leak. But the leak didn't occur at the air bleed valve, which had been safely shut.
The leak happened when the home lost heat and the piping froze and burst. You can see a section of new copper piping that had been soldered in place during repair work on the home.
You'll want to do he job if adding one or more heating baseboard tees and its air bleeder fitting before the heating season begins so that you won't mind shutting down and cooling off the boiler. You'll need to drain the heating line so that you can de-solder the old elbow and then solder the new baseboard tee in place.
I advise AGAINST drilling and tapping in an air bleeder into an existing elbow even though it's technically possible to do so. The worry is that the 90 is just too thin at the point where you'd drill; even soldering an air bleeder in place I would be forced to agree with my irritating plumber, that in that case the fitting would not be reliable. It's not worth a leak and water damage and mold contamination from a leak that will naturally happen while no one is at home.
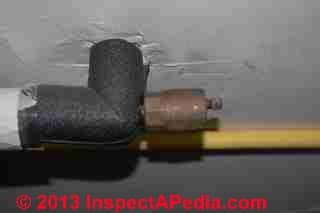
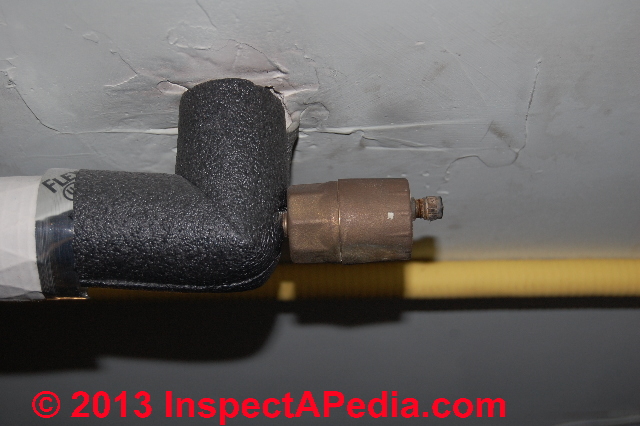
Incidentally small amounts of air WILL circulate around through the system as bubbles and can get caught and vented by an air bleeder right at the boiler or its riser pipe. That's why you'll usually find an air bleed in that location. (See our page top photo).
Finally, if you take the annoying plumber's view, you can eschew any air bleeders and instead, wait until the system is air bound and you've lost heat.
Then one can, using boiler drain and feed fittings, force higher pressure through the system to try to blow air out of those uppermost heating baseboards. Of course that' a heck of a lot more trouble than just loosening a bleeder valve screw and letting the air hiss out at the high point(s) in the system.
At AIRBOUND HEAT SYSTEM REPAIR by WATER FEED VALVE we discuss alternative methods for removing air from an air-bound system.
How to Replace the Manual (Screw Type) Air Bleeder Valve on Hydronic Heating Systems
If the bleeder valve is completely blocked with debris it might be possible to open it up by completely removing the center screw, but as I warn in a companion article
at AIR BLEED VALVE LEAK REPAIR, on a hot heating system, trying to get the screw back in while being squirted by hot water can be unpleasant.
I've done this once or twice, but generally you will probably have to replace the entire valve.
Watch out: if replacing an entire air bleed valve or even if just removing its inner screw, the task is safer and less messy if performed when the heating system water is cool or cold.
To keep heat on after removing a leaky bleed valve to prepare for replacement, that is, in a pinch, you can remove the old air bleed valve and temporarily close the opening where it was mounted using a threaded pipe plug of the proper size (usually 1/8" NPT) while you hitchhike off in subzero weather to buy the replacement part.
I would prefer to just show up with the replacement part in hand to do the whole job at once. Just sayin'
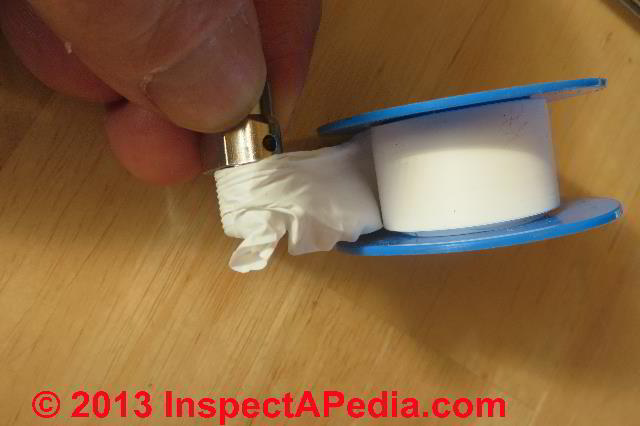
To install a new air bleed valve into an existing threaded opening on a radiator or baseboard tee we do not have to disassemble it, but we should use a thread sealant. I prefer teflon tape or teflon paste.
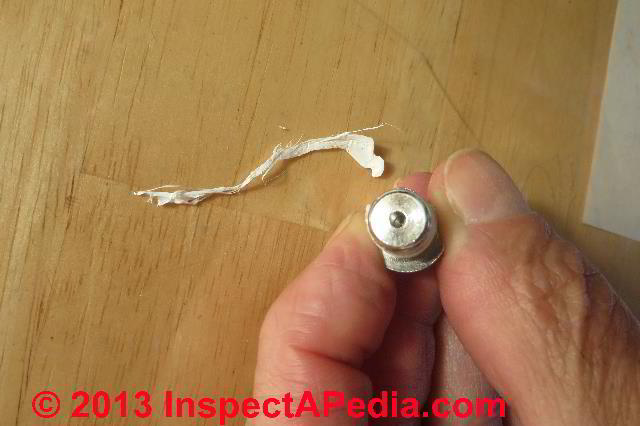
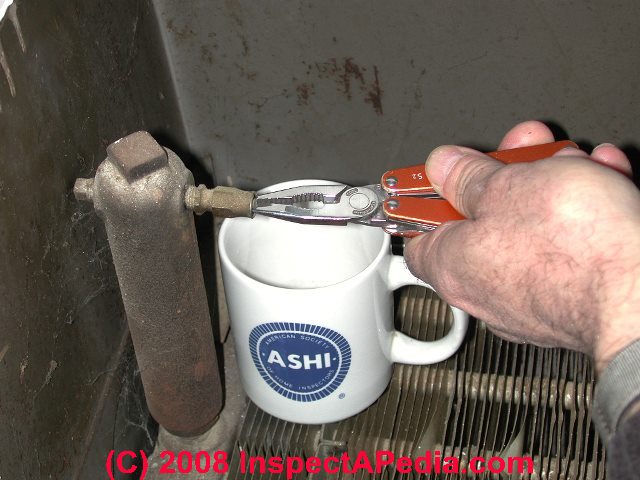
Wrap the teflon tape onto the threaded portion of the bleeder valve as I show at above left. I am turning the valve in the clockwise or "screw-in" direction. This will wrap the teflon tape in the right direction onto the treaded valve base.

At above and in detail below you can see the finished result - sort-of. If an idiot installs the bleeder valve with its inlet opening blocked by teflon tape (below left) the valve will not work.

Below you can see that I have cleaned off the excess teflon tape that would have blocked the air bleed valve inlet opening.
Just below you can see the new air bleeder valve with it's teflon tape seal screwed into the 1/8" NPT of a baseboard tee fitting.
 For the photos shown here I used new parts at a workbench.
But in the field may be installing this air bleeder into a pre-existing tapped opening, probably working in the dark, upside down, in a cold, tight crawl space, alone, maybe with the company of spiders and snakes - which is no place for an air bleeder that should be easy to access if it is to ever be used.
Watch out: For automatic or float type air bleed valves, the replacement procedure is essentially the same as shown here. Take off the old valve, seal the threads on the new bleeder valve, and screw it in place.
But take care not to use the float body itself to screw the float bleeder valve into position - you may break it.
Use a wrench in place on the cast portion of the valve base intended for that purpose.
Watch out: for automatic and some manual air vents to work properly the vent or valve has to be installed in a location that will receive air in the water piping system, radiator, or other device, has to be installed in the proper position (some vents like the Sparco air purger and the Taco 409 Air Vent work properly only in the upright position), and the pressure in the heating (or cooling water) system must be higher than atmospheric pressure.
Otherwise when the vent or valve is opened air may enter the piping system rather than being purged from it.
Watch out: when installing canister type air eliminators or air purge valves such as all of the float type valves, do not try to screw the valve body tightly into the receiving plumbing tapping by using a tool to torque or twist the valve body - you will most likely damage or ruin the valve.
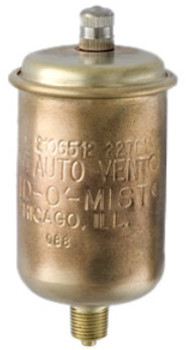
Valves such as the Maid-o-Mist copper body units shown at left (Maid-o-Mist No. 71 Auto-Vent) are turned by hand only - notice the clue: there is no faceted fitting designed to accept a wrench on some models; other air vent valves do include a fitting that can accept a wrench, such as the Maid-O-Mist No. 74.
Tips for Replacing a Damaged or Leaky Air Bleeder or Vent on Hot Water Heating Systems
This topic is now found at AIR ELIMINATOR / FLOAT VENT REPLACEMENT
Installation Questions & Answers about Hot Water Heating System Air Purgers & Air Bleeder Valves
 Question: what is the proper installation position for float-type automatic air bleeder valves: do we mount the air vent or air eliminator valve vertically, horizontally, or what?
I’ve read your site for years and enjoyed it immensely. You probably get a zillion questions but I have one I can’t find anywhere anywhere, including your site.
I have 1965 hot water heating and at the point farthest from my furnace is a Taco 400-2 air vent.
The weird thing is its installed horizontally. It's screwed into the end of the pipe.
Will the valve still function sideways or is it only designed to be vertical?
Might be moot as its not the highest point anyway, but I’m interested if it does anything at all.
Thanks. - B.L. 11/30/2013
Reply: float type valves depend on vertical positioning for proper float operation - install the float type air vent according to the manufacturer's instructions, which in all our literature means "upright" with the cap loose
About that vent, I'm pretty sure that's a conventional float-type air vent; if so it can't work properly for long in that position - since the floats depend on gravity and on air moving to the float top to work properly.
There are, of course, other types of air bleeder vents that can be installed horizontally, including some shown earlier in this article.
I'd bet that the valve stem cap on the float type air vent in your photo (above left) is screwed shut - or if it's not, and if it was not leaking, the orifice may have been clogged by mineral deposits and heating water debris.
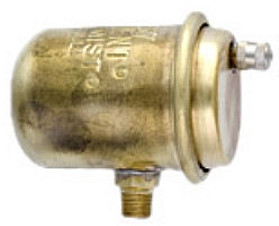
Our photo at left shows a typical float type automatic air bleeder valve on a hydronic heating system.
It is installed upright, and [click to enlarge] you can see the warning tag about leaving the cap loose if the float vent is to actually release air from the heating system.
Really?
Well not always.
There are some hydronic heating system auto vents such as the Maid-O-Misty No. 66, 67, 68 Auto-Vents (below left) that are float operated vents that do not require an air chamber, and some models such as No. 27 and No. 37 Auto-Vents that are mounted horizontally (below right), as we illustrate just below.
You can get a clue about whether or not the air vent is intended to be mounted horizontally or vertically just by looking at it, though reading the installation instructions is really more sensible. [Click to enlarge any image]
Taking a look at the product specification sheets for Taco's float type automatic air vents such as the Taco 409 shown at above left, as well as having disassembled a few of them myself makes clear that for proper operation the device depends on free movement of a float-operated vent valve inside the device.
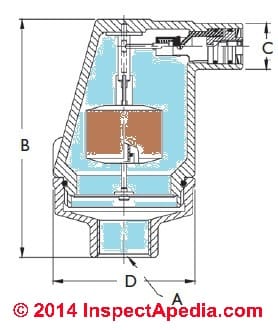 The float moves "up and down" as air enters or is vented from the device. The device wants to be installed vertically. At left is a schematic for the Taco 409 Air Vent, adapted from the company's product literature.
Watch out: when installing an air vent, Taco warns as follows:
Please note that when installing a new system or retro-
fitting an old, you must flush out the disturbed dirt as
well as any oily film or solder paste entrained in the system water.
If this is not done, it is entirely possible that
the internal float mechanism will become clogged open,
causing the air vent to leak.
For installations where possible property damage may occur due to fluid leaking from the vent, a 3 ⁄ 4 " ID hose may be clamped to the air vent outlet. The hose may then be fed to a drain or col- lection area designed for the fluid in use.
DO NOT USE A SOLDER CONNECTION AT THE OUTLET! - Taco High Pressure Vent Instruction Sheet (2007)
You can contact Taco directly for assistance (I found that the company's product specification sheets easy to download but those documents don't include installation details) at
- Taco Inc., 1160 Cranston Street. Cranston, RI 02920 / (401) 942-8000 / Fax (401) 942-2360 Taco (Canada) Ltd., 8450 Lawson Road, Unit #3, Milton, Ontario L9T 0J8 / (905) 564-9422 / Fax (905) 564-9436 www.taco-hvac.com. As Taco likes to say, Do it Right, Once.
 How did it happen that a vertical float valve found itself swimming horizontally on a heating system pipe? If I'm correct I suspect that previously there was a manual air bleed valve in the location in your photo - not a particularly good spot anyway. Perhaps someone thought "I can improve this mess, I'll just install an automatic float valve in this spot and I won't have to keep fooling with this valve."
One can imagine that the whole idea was not very successful.
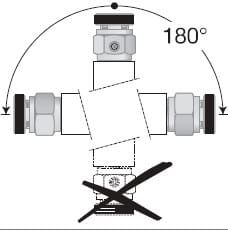
At left we illustrate another air bleeder that could have been installed horizontally in the location of the float vent in your photo. This is a Taco 417 Vent or "coin vent" suitable to replace the valve in your photo.
The Taco 417 can be installed in the three positions shown, and is operated by hand - no tools are necessary. In the proper position it can vent air automatically from the heating system.
About our articles, while I'm glad they have been helpful to you and much appreciate the comment, let me emphasize that questions are very welcome.
We would much appreciate hearing any comments, critique, suggestions, or further questions that you may have about any of our diagnosis/repair articles.
Question: how do I get old air bleeders off when they're stuck?
 (Jan 2, 2020) Pete Smith said:
I have a baseboard heating system with bleed elbows but no bleeders installed and bought bleeders but cant get 1/8 inch plugs out to change to automatic bleeders and sprayed on blaster for week any suggestions
Reply:
Pete
Try letting the heating system cool down, drip some Liquid wrench around the 1/8" pipe plug and give it time (5 minutes or longer to penetrate),
then use a wrench that fits snugly onto the pipe plug rectangular top,
and if you can, hold the elbow with another wrench as you loosen the plug - thus preventing torquing and twisting the baseboard pipes - thus hopefully avoiding damaging the baseboard and starting a leak.
...
Continue reading at AIR BLEED VALVE LEAK REPAIR or select a topic from the closely-related articles below, or see the complete ARTICLE INDEX.
Or see AIR BLEED VALVE INSTALLATION FAQs - questions & answers about air bleeder valves on hot water heating systems, posted originally at this page.
Or see these
Related Articles
- AIR BLEEDER VALVES - home
- AIR BLEEDER VALVE FUNCTIONS
- AIR BLEED VALVE INSTALLATION
- AIR ELIMINATOR / FLOAT VENT REPLACEMENT
- AIR BLEED VALVE LEAK REPAIR
- AIR BLEED VALVE SOURCES
- AIR-BOUND HEATING SYSTEMS - home
- AIR ELIMINATORS for POTABLE WATER SUPPLIES to remove air from water supply systems, piping, fixtures.
- AIR SCOOPS PURGERS SEPARATORS
- RADIATOR PLUG REMOVAL
- RADIATOR VALVES & HEAT CONTROLS
Suggested citation for this web page
AIR BLEED VALVE INSTALLATION at InspectApedia.com - online encyclopedia of building & environmental inspection, testing, diagnosis, repair, & problem prevention advice.
Or see this
INDEX to RELATED ARTICLES: ARTICLE INDEX to HEATING RADIATORS
Or use the SEARCH BOX found below to Ask a Question or Search InspectApedia
Or see
INDEX to RELATED ARTICLES: ARTICLE INDEX to HEATING BOILERS
Or use the SEARCH BOX found below to Ask a Question or Search InspectApedia
Ask a Question or Search InspectApedia
Try the search box just below, or if you prefer, post a question or comment in the Comments box below and we will respond promptly.
Search the InspectApedia website
Note: appearance of your Comment below may be delayed: if your comment contains an image, photograph, web link, or text that looks to the software as if it might be a web link, your posting will appear after it has been approved by a moderator. Apologies for the delay.
Only one image can be added per comment but you can post as many comments, and therefore images, as you like.
You will not receive a notification when a response to your question has been posted.
Please bookmark this page to make it easy for you to check back for our response.
Our Comment Box is provided by Countable Web Productions countable.ca
Citations & References
In addition to any citations in the article above, a full list is available on request.
- "Residential Hydronic (circulating hot water) Heating Systems", Instructional Technologies Institute, Inc., 145 "D" Grassy Plain St., Bethel, CT 06801 800/227-1663 [home inspection training material] 1987
- Installation Guide for Residential Hydronic Heating Systems
- Installation Guide #200, The Hydronics Institute, 35 Russo Place, Berkeley Heights, NJ 07922
- Our recommended books about building & mechanical systems design, inspection, problem diagnosis, and repair, and about indoor environment and IAQ testing, diagnosis, and cleanup are at the InspectAPedia Bookstore. Also see our Book Reviews - InspectAPedia.
- In addition to citations & references found in this article, see the research citations given at the end of the related articles found at our suggested
CONTINUE READING or RECOMMENDED ARTICLES.
- Carson, Dunlop & Associates Ltd., 120 Carlton Street Suite 407, Toronto ON M5A 4K2. Tel: (416) 964-9415 1-800-268-7070 Email: info@carsondunlop.com. Alan Carson is a past president of ASHI, the American Society of Home Inspectors.
Thanks to Alan Carson and Bob Dunlop, for permission for InspectAPedia to use text excerpts from The HOME REFERENCE BOOK - the Encyclopedia of Homes and to use illustrations from The ILLUSTRATED HOME .
Carson Dunlop Associates provides extensive home inspection education and report writing material. In gratitude we provide links to tsome Carson Dunlop Associates products and services.
 | HOME | ABOUT | ASK a QUESTION | CONTACT | CONTENT USE POLICY | DESCRIPTION | POLICIES | PRIVACY | |
| © 2024 - 1985 Publisher InspectApedia.com - Daniel Friedman | |||||||||